

Vouchers
Vouchers are text codes customers use to redeem discounts or special offers in your online store. You can share these codes through your campaigns — either using the same code for every customer or sending unique codes to each one.
The Vouchers feature lets you load a pool of voucher codes, insert them into campaigns, and track their usage.
NoteThe Vouchers feature doesn't replace your voucher system. Your existing system still applies the appropriate discounts when a customer redeems a code.
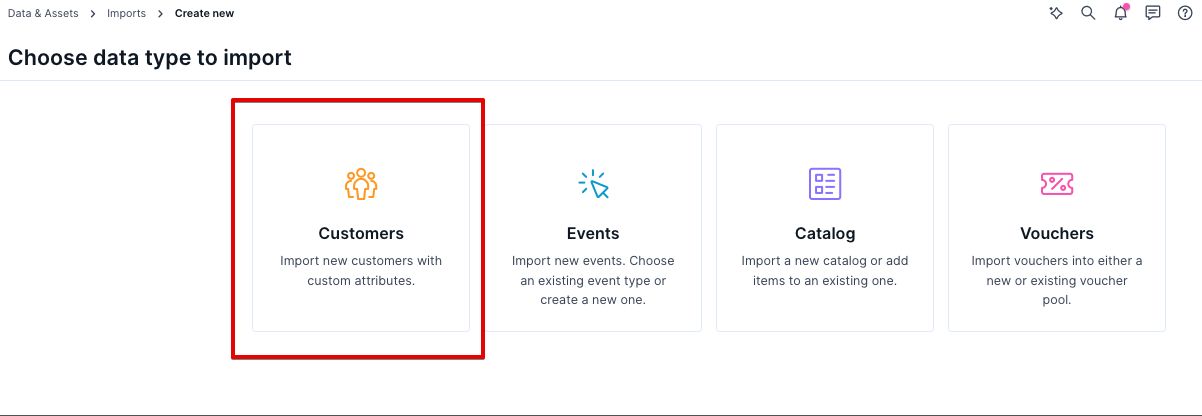
Import vouchers
You can import vouchers from multiple data sources. Before importing, prepare a pre-generated list of unique voucher codes in a single column with a header row. If a code already exists in the pool, it's ignored during import. You can't import the same code into multiple voucher pools.
Name your vouchers
Group your vouchers into named pools for easy identification— for example, 10%Discount, 100EURoff, or a campaign name. Don't include spaces in the pool name, as this causes errors.
Run a single import
-
Go to Data & Assets > Imports.
-
Click + New Import .
-
Click Vouchers.
-
Choose an existing voucher pool to add new voucher codes or create a new one.
-
Select the data source you want to use.
-
Click Preview to verify the Delimiter and Encoding settings.
-
Click Next.
-
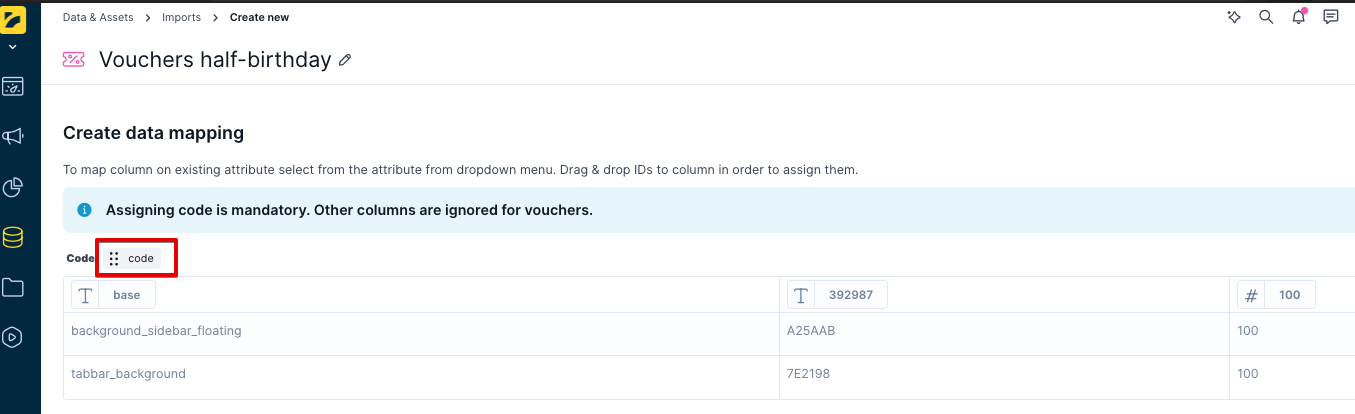
Drag the code box to assign the code ID.
- You can only import one column containing the voucher codes
Schedule a repeated import
If you import from a URL, database, or a Bloomreach analysis, you can schedule a repeated import.
- Click Run Import.
- Return to Data & Assets > Imports to review the import. Make sure all rows (vouchers) were imported correctly.
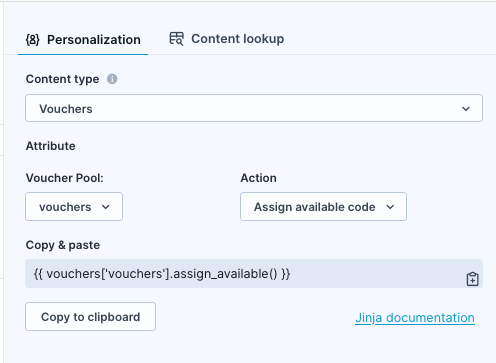
You can view all your imported voucher pools in Data & Assets > Vouchers.
Set up voucher tracking
Before using vouchers for the first time, make sure you're tracking voucher usage during purchases — including the voucher code itself.
Track vouchers
Go to Project Settings > Mapping > Vouchers and specify where the voucher code is tracked after use. This lets Bloomreach recognize when a specific voucher is redeemed.
For example, if you track voucher codes as an attribute of a purchase event named voucher_code, your mapping should reflect that.

The mapped attribute for tracking redeemed vouchers must be a string.
Personalize vouchers
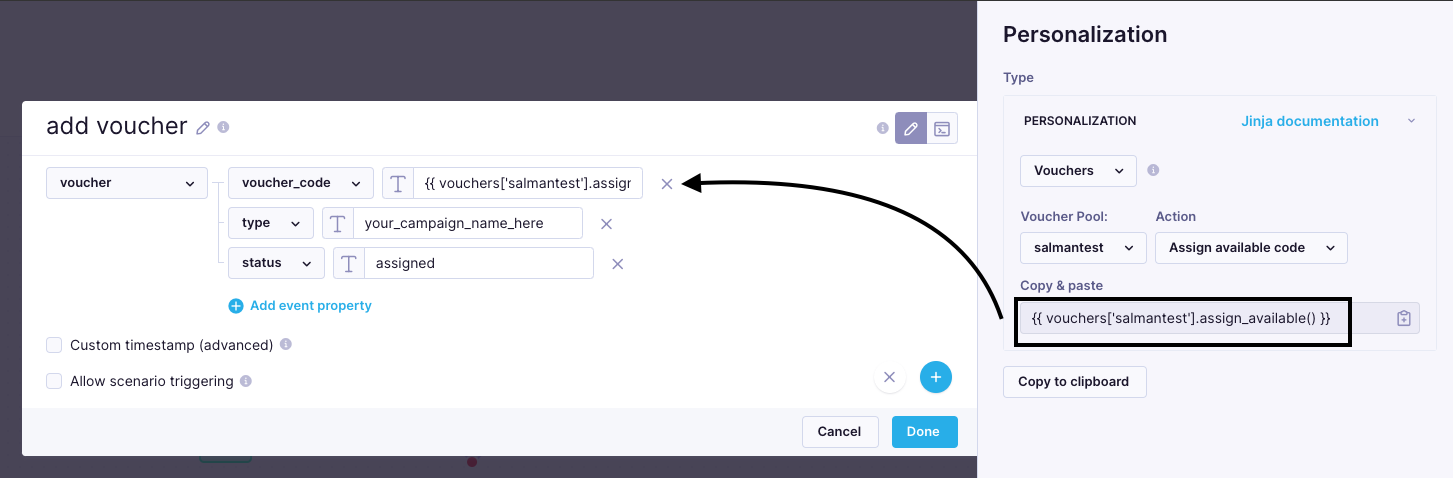
When setting up your campaign, access vouchers using Jinja. The Personalization wizard can help you generate the correct syntax.
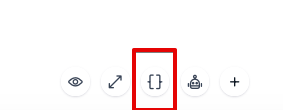
The following Jinja functions are available:
- Assign available code: Selects an available code from the pool, changes its status from available to assigned, and displays it in the campaign.
- Count available codes: Returns the number of currently available codes in a voucher pool. Useful for sending automated alerts when stock runs low.
- Count total codes: Returns the total number of all codes in a voucher pool.
Codes are assigned when the campaign runs. For example, when a weblayer is shown to a customer or an email is sent (including test campaigns). There's no limit to the number of vouchers a customer can be assigned.
Assign available voucher codes
Each time you use vouchers['voucher_xy'].assign_available(), it assigns a voucher code from the pool. By default, it reuses the same code within the same email, SMS, or MMS to the same customer if you call it multiple times.
To display different vouchers to the same customer within a single campaign, set the cached parameter to false.
vouchers['voucher_xy'].assign_available(cached = false)This generates a new voucher for each occurrence within the campaign.
Bloomreach randomly selects voucher codes from the pool. You can't control which codes the algorithm selects.
NoteSetting
cached = falsedoesn't apply in the email preview function. The same voucher appears in the preview regardless. If you usecached = falsein the live campaign, the customer receives a different voucher than the one shown in the preview.
To check if and when a voucher was assigned or redeemed, go to Data & Assets > Vouchers and select the voucher pool.
Reuse vouchers
The Jinja code {{vouchers['voucherpool_name'].assign_available()}} randomly selects a code from the pool. By default, Bloomreach doesn't track which code was assigned to which customer, which limits your ability to reuse the same code for the same customer in future campaigns.
You can reuse the same voucher code in 2 ways:
- Custom customer attribute: Add the code as a customer attribute and retrieve it using
{{ customer.attribute_name }}. These codes don't need to be unique. - Custom event attribute: Assign the voucher as a custom event attribute and retrieve it through an aggregate. Use this approach if you want to track which voucher a customer received and when.
Reuse vouchers using a custom customer attribute
This is the simpler of the 2 approaches.
- Go to Data manager and create a new customer attribute. Give it a name you can identify as a voucher — for example,
voucher,temp_voucher, orvoucher_assigned.

You can populate this attribute in 2 ways:
-
Using the Set attribute node in scenarios: Add a Set attribute node to your scenario and configure it to assign the voucher code to the customer attribute.

-
Using a customer attributes import: Import voucher codes as customer attributes using the Customers rather than the Vouchers import.
Once the attribute is populated, it looks like this:
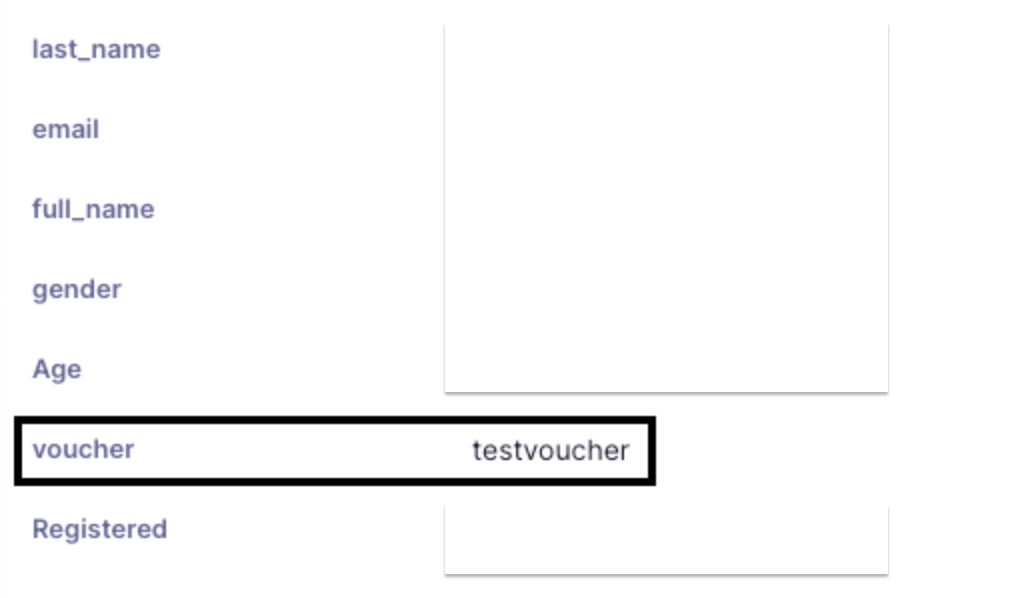
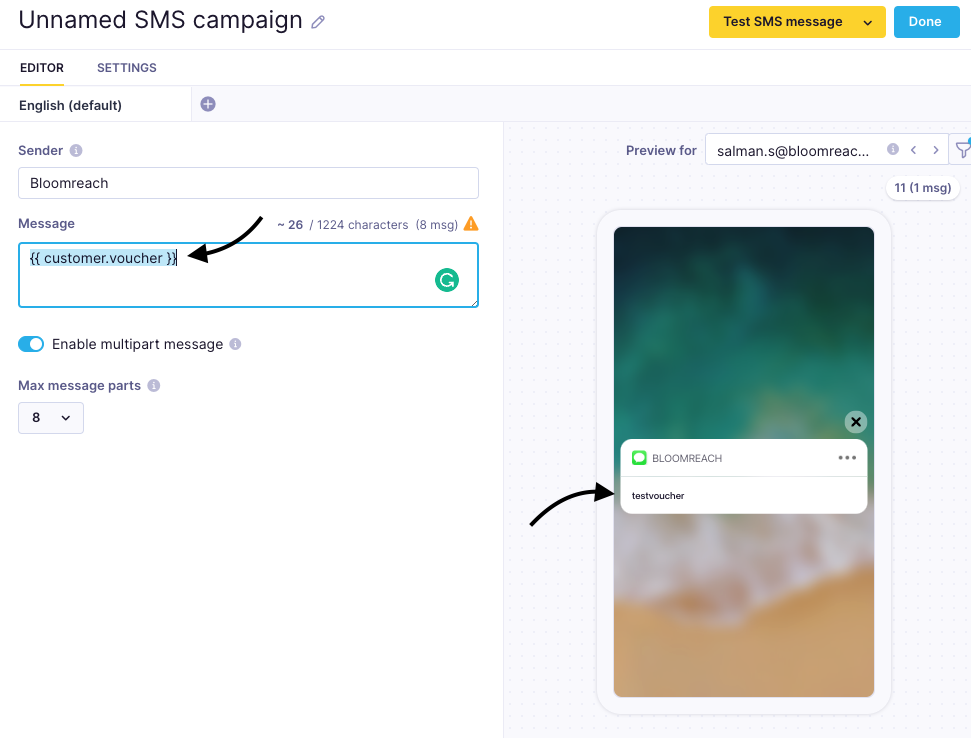
Use {{ customer.voucher }} to display the voucher code wherever you need it in your campaign.
NoteThis approach works best for smaller customer bases. You'll need to update the attribute each time you assign new vouchers.
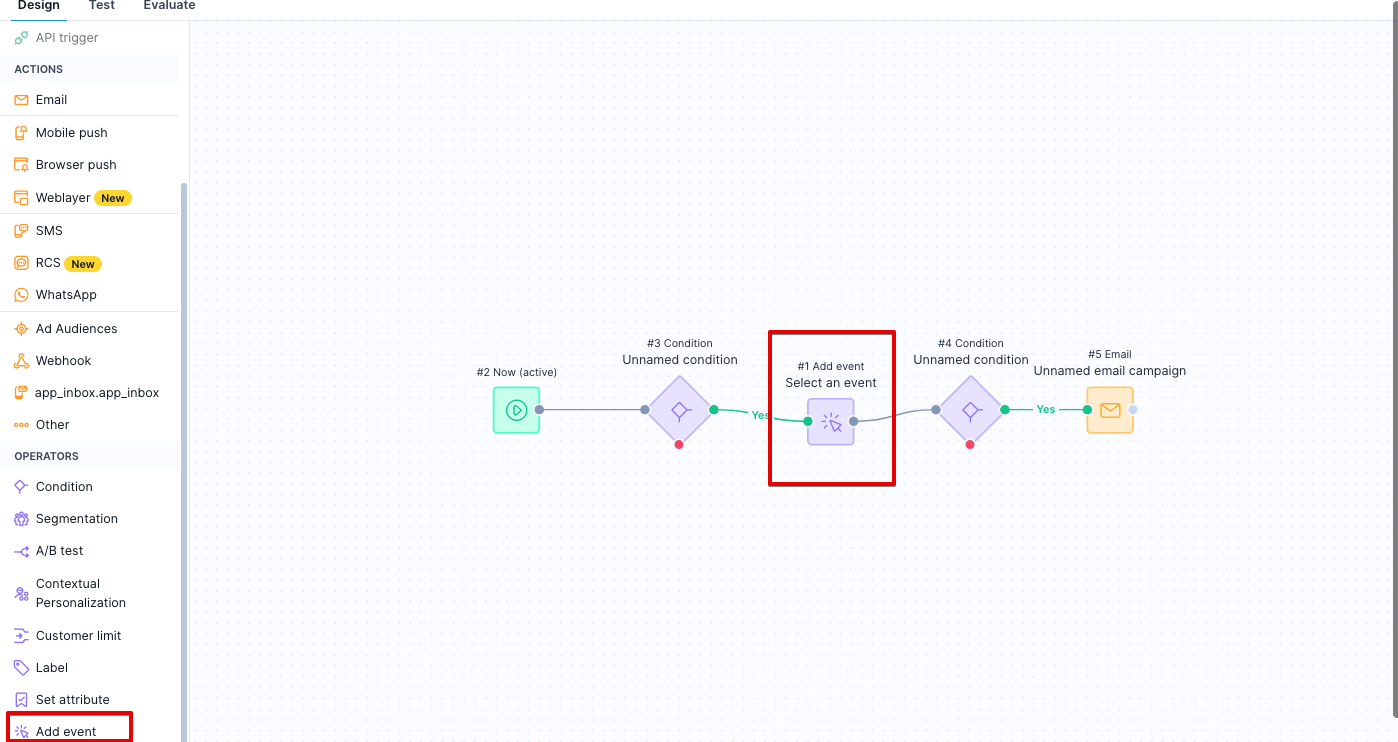
Reuse vouchers using a custom event attribute
-
Create a new event and name it. For example,
voucherorvoucher_assigned. -
Add attributes to the event, such as type,
voucher_code, andstatus. These attributes help you identify specific vouchers in analyses and dashboards. -
In your scenario, add an Add event node and place it before the email node.
-
Create an aggregate that looks for the
voucher_codeattribute at the customer's most recent voucher event. Filter bytypeandstatusto ensure the aggregate pulls only the latest code for the relevant campaign.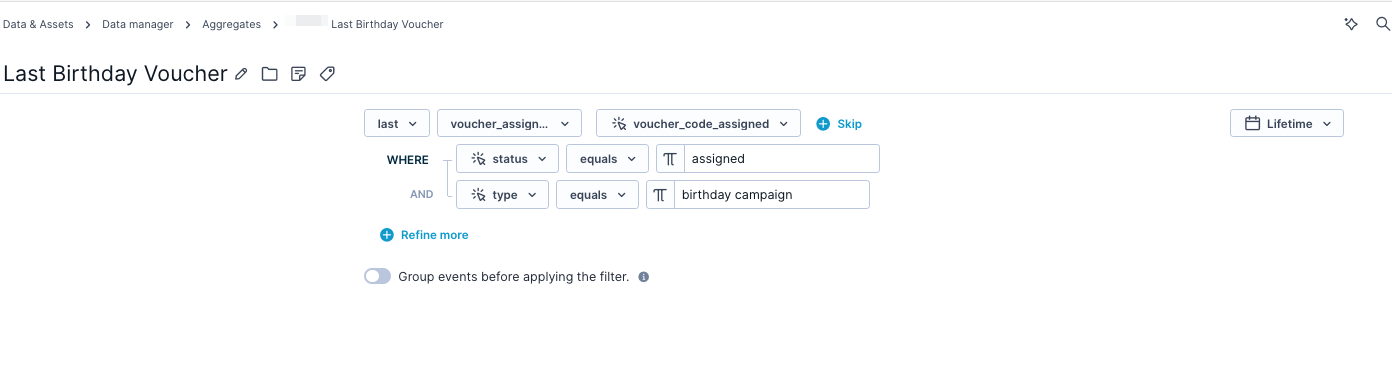
-
Use the Jinja expression for this aggregate to call the
voucher_codeattribute whenever you need to display the voucher code in a campaign.
Jinja expression for the voucher aggregate used to display the voucher_code in a campaign.
Running out of vouchers
Email campaigns
If no voucher codes are available to assign, the campaign fails to send. This generates campaign events with status = enqueue_failed.
Weblayer campaigns
If no voucher codes are available to assign, the weblayer isn't displayed and no events are generated.
Limitations
You can view only the first 1,000 vouchers in the platform.
Updated 19 days ago