

Twilio Segment
Integration
Twilio Segment is a customer data platform (CDP) that collects customer data across websites, apps, and other sources, then routes it to destinations like Bloomreach for analytics and campaign execution. This guide covers how to set up the integration and use it to target potential buyers with cross-channel mobile campaigns.
How the integration works
The Bloomreach destination in Twilio Segment maps standard Segment calls to Bloomreach data structures automatically:
| Segment call | Bloomreach action |
|---|---|
| alias | Identify or merge customers |
| group | Update customer properties |
| identify | Identify or update customer properties |
| page | Add a page_visit event |
| screen | Add a screen_visit event |
| track | Add a custom event |
Increase conversions
This use case shows how to combine Twilio Segment and Bloomreach to target inactive users with a push notification and a persistent in-app message, driving them back to your app and increasing conversions.
Prerequisites
-
Access to a Twilio Segment account, including Unify (a premium add-on).
-
Access to Bloomreach and the App Inbox feature.
-
A developer who can access and configure your mobile app's codebase.
Set up the integration
To start sending data from Twilio Segment to Bloomreach, see the destination guide in the Twilio Segment Connections Catalog. It covers the full setup and explains how Segment data is processed.
Implement data tracking
- Sign up or log in to the Segment app.
- Create a source for your mobile app. A source is where events—such as Application Opened or Feature Used—are collected and sent to Segment. For mobile push notifications, start with an iOS or Android source.
- Implement events by bundling Segment's Android or iOS SDK with your app. Events are actions performed by users, such as screen views or button clicks. For setup guidance, see Source documentation.
Track the following events to understand how users interact with your app:
| Event name | Description |
|---|---|
| Cart Viewed | Customer viewed their shopping cart. |
| Checkout Started | Customer initiated the order process (a transaction is created). |
| Checkout Step Completed | Customer completed a checkout step. |
| Checkout Step Viewed | Customer viewed a checkout step. |
| Order Cancelled | Customer cancelled the order. |
| Order Completed | Customer completed the order. |
| Order Refunded | Customer refunded the order. |
| Order Updated | Customer updated the order. |
| Payment Info Entered | Customer added payment information. |
| Product Added | Customer added a product to their shopping cart. |
| Product Clicked | Customer clicked on a product. |
| Product Removed | Customer removed a product from their shopping cart. |
| Product Viewed | Customer viewed a product details page. |
Send an identify call each time a user registers, logs in, or updates their information.
Connect Bloomreach as a Segment destination
- In Segment, go to Connections > Destinations.
- Click Add Destination and search for "Bloomreach" in the Destinations Catalog.
- Enter your API key details to enable the destination.
For more information, see the Bloomreach Destination instructions.
Once enabled, Bloomreach receives data from Segment and uses it to build customer profiles and power campaigns.
Create a computed trait and sync it to Bloomreach
A computed trait calculates a value for each user—for example, their most frequently viewed product category. Bloomreach stores this as a static attribute on each customer profile, which you can use to personalize campaigns.
- In Segment, go to Computed Traits and click New Computed Trait.
- Build your audience query and preview the results. Click any user to view their full profile.
- Sync the computed trait to your Bloomreach destination.
- Set the connection to
send identifyto send the trait to Bloomreach as a standard attribute. - Give the trait a name and description so you can identify it in Bloomreach.
Each customer profile in Bloomreach displays this attribute with a value unique to that user.
Build the cross-channel campaign
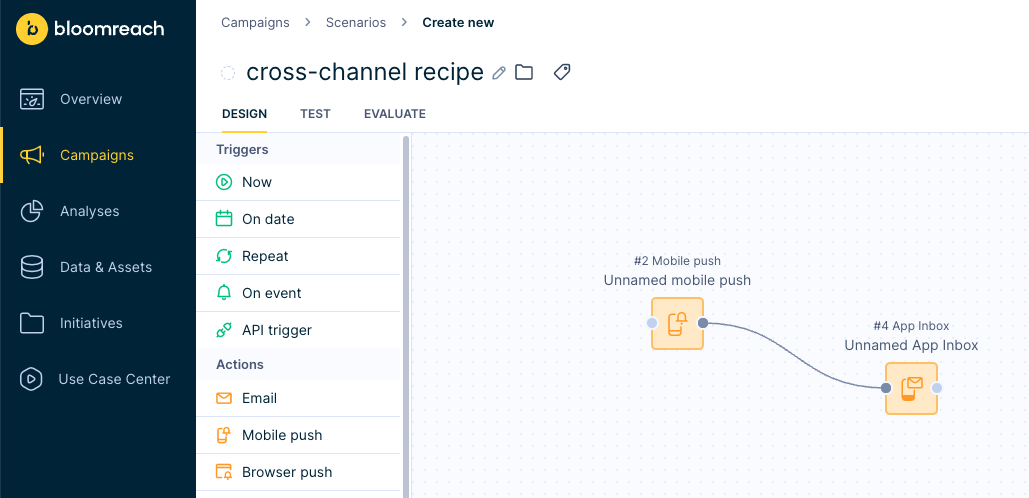
This campaign uses 2 channels working together: a push notification delivers timely content that prompts users to open the app, and a mobile app message stays visible inside the app as a persistent reminder for users who don't act immediately.
-
In Bloomreach, go to Scenarios and create a new scenario.
-
Add a push notification as your first messaging channel. Select your notification platform (iOS, Android, or Browser Push). Repeat this step for each platform you want to target. For setup guidance, see the Push Notifications documentation.
-
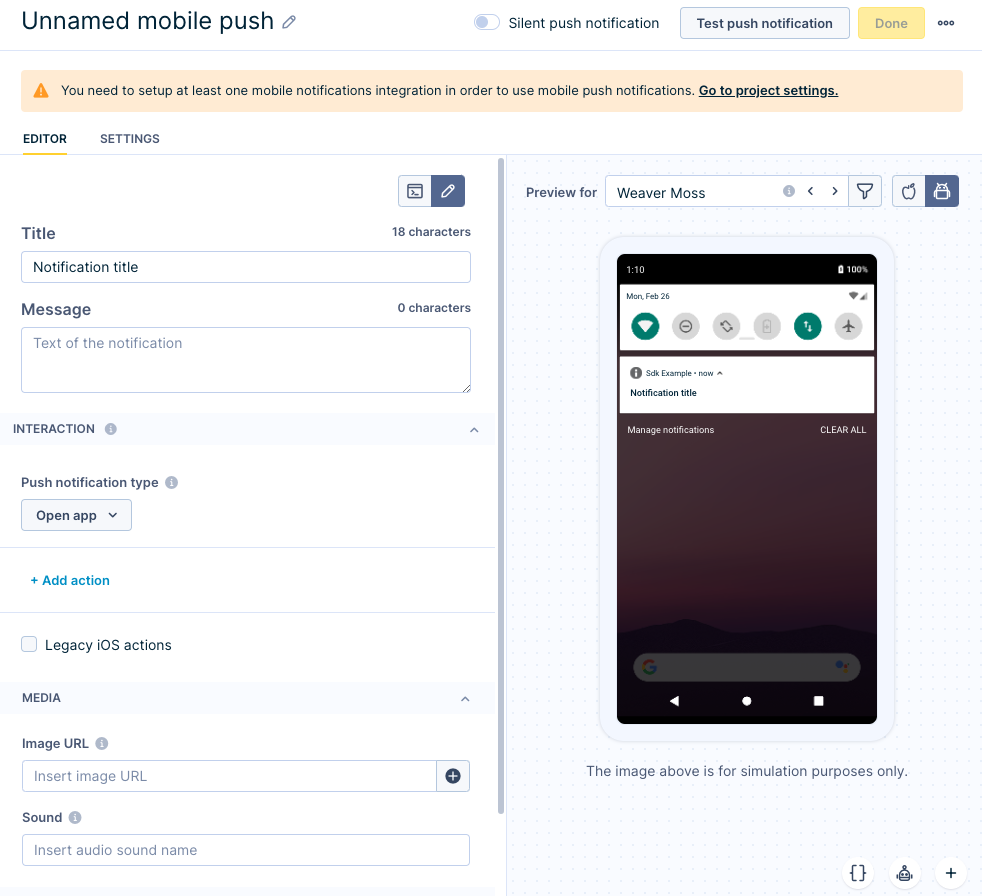
Compose your notification: add a title, message, and push icon image.
-
Add a Mobile App Message as your second channel. For guidance, see the Mobile App Messaging and App Inbox documentation.
-
In the Interaction section of the mobile app message, define what happens when a user taps the message:
- Open application: Opens the app.
- Open browser: Opens a URL in the browser.
- Open deeplink: Navigates to a specific location in the app.
Test your messages
Go to the Test tab to preview how your messages look and confirm that personalization tags render correctly before launching.
Launch the campaign
- Review the complete workflow in the Test tab.
- Click Start. A confirmation window shows how many customers the scenario will reach.
If you're not yet familiar with scenarios and node structure, see the Scenarios documentation before launching.
Measure conversion
Create a conversion dashboard to track conversion rates and evaluate campaign results. For setup instructions, see conversion dashboard.
To get a fuller picture of campaign effectiveness, add additional conversion sources to your dashboard—for example, compare campaign vs. non-campaign conversions, or subscribed vs. non-subscribed users.
Updated 13 days ago