Server-side anonymous identity management
1st party cookie tracking solutions are guides and features providing three different solutions aimed at sustaining consistent tracking of anonymous users using 1st party server-side cookies.
As browsers are becoming more privacy-conscious, various measures have been introduced by browsers such as Safari’s Intelligent Tracking Prevention (ITP) or Mozilla’s Enhanced Tracking Protection (ETP) and there are announced changes to Chrome as well. These change the way cookies are handled and are blocking or restricting cookies in both 3rd party and 1st party contexts in order to increase privacy for the end-user.
These tracking preventions have an impact on our tracking, analytics, campaigns, and mostly single customer view. Therefore, our use of “cookies” has to adapt as well.
This solution was developed to mitigate the impact of various tracking limitations imposed by browsers, such as (ITP/ETP…) which are aimed against 3rd party cookies. Specifically aiming to eliminate cross-site tracking by advertising networks (Facebook, Google, Criteo).
The objective of this solution is to sustain single customer view, data quality, and provide reliable and consistent web tracking of anonymous users tracked on your websites (1st party data).
It’s important to note that this is not a workaround that is likely to be removed by the browsers in the future. We developed all of these solutions to be future-proof given the stated objectives of browsers for limiting 3rd party cookies. Our solutions don’t invade end customer privacy, we give our clients the tools to both maintain data quality and respect their privacy.
Bloomreach Engagement cookies
In the default setup, Bloomreach Engagement cookies are first-party client-side cookies saved under your website domain. That means certain browser limitations apply (e.g. Safari’s 7-day expiration).
Example of Safari’s ITP effect on our cookies
Safari automatically sets the expiration date to 7 days (or 24 hours in specific cases when a domain is considered as a cross-site tracker) for cookies created via javascript (our standard cookie) or even server-side cookies set using Custom tracking domain (set up using CNAME records).
This means that if an anonymous visitor comes to the website on Safari, they are identified with a new cookie. The visitor will do some in-session actions, eventually, even log in or make a purchase, when they get identified as a known customer (not anonymous). Once the customer finishes their session, the cookie that identifies them as the known customer will be removed after 7 days (or 24 hours).
Therefore, if the same customer comes back to the website after more than 7 days (or 24 hours) they will get a new cookie and are again treated as an anonymous visitor. Unless they log in again or make a purchase, their individual visits will not be connected to a single customer view, but will instead create several disconnected anonymous profiles. This can have a negative impact on single customer view and data quality, A/B testing, consistent personalization, etc. The actual effect in terms of business can depend on your individual use cases.
There are 3 possible solutions you can implement to ensure consistent and long-lasting identification of anonymous customers:
- Custom tracking Domain (CTD) using NS zone DNS records.
- Web tracking via Google Tag Manager server-side container.
- Server-side handling of identification of anonymous users by your infrastructure.
1. Custom tracking domain using NS zone records
Hint
This solution is the best choice in most scenarios, it is also the fastest and easiest to implement. In case the customer has an existing implementation of Server-side Google Tag Manager, we recommend the second option (see below). In case there are strong regulatory and security requirements, we recommend the third option (see below).
Custom tracking domain (CTD) feature provides a way to set a subdomain of your website e.g.
analytics-api.yourdomain.com ( *.yourdomain.com ) as the tracking endpoint for Bloomreach Engagement for front-end tracking. This enables us to set first-party server-side cookies by Bloomreach Engagement API under your domain.
The subdomain is set up using Domain Name System (DNS) records in a way that it simply forwards requests to Bloomreach Engagement's standard tracking API. Depending on the type of DNS records that are used CTD can also provide a consistent long-lasting anonymous identity.
DNS record types differences:
- NS zone records -> Safari’s 7-day expirations do not apply
- CNAME -> Safari’s 7-day expiration still applies
You can read more about how the server-side cookies work and how to set up CTD with NS zone records.
2. Google Tag Manager server-side solution
Hint
This solution is the best option for customers who have already implemented Google Tag Manager server-side tracking so that they can manage data flows from the website to multiple vendors in one place.
Server-side tagging allows Google Tag Manager users to add server-side measurement tags in addition to the standard client-side (implemented on the website via javascript, or in-app). Server-side tagging in combination with client-side tagging offers a few advantages over just client-side tags:
- Improved performance: Fewer measurement tags on a website or an app means less code to run on your side (in the customer’s browser).
- Improved security: Visitor data is better protected by collecting and distributing data in a customer-managed server-side environment. Data is sent to a Google Cloud instance where it is then processed and routed by other tags.
This solution is recommended to customers who have experience with Google Tag Manager and are confident in their ability to manage a server-side Google Tag Manager container. Implementing this solution will lead to introducing a new piece of technology into your stack that you are responsible for maintaining in order to get the best experience out of using Bloomreach Engagement.
A typical tagging configuration without server-side tagging relies on a container on the page to send measurement data to various collection servers. Figure 1 illustrates an example of how a Tag Manager web container running in a web browser sends data to multiple servers.
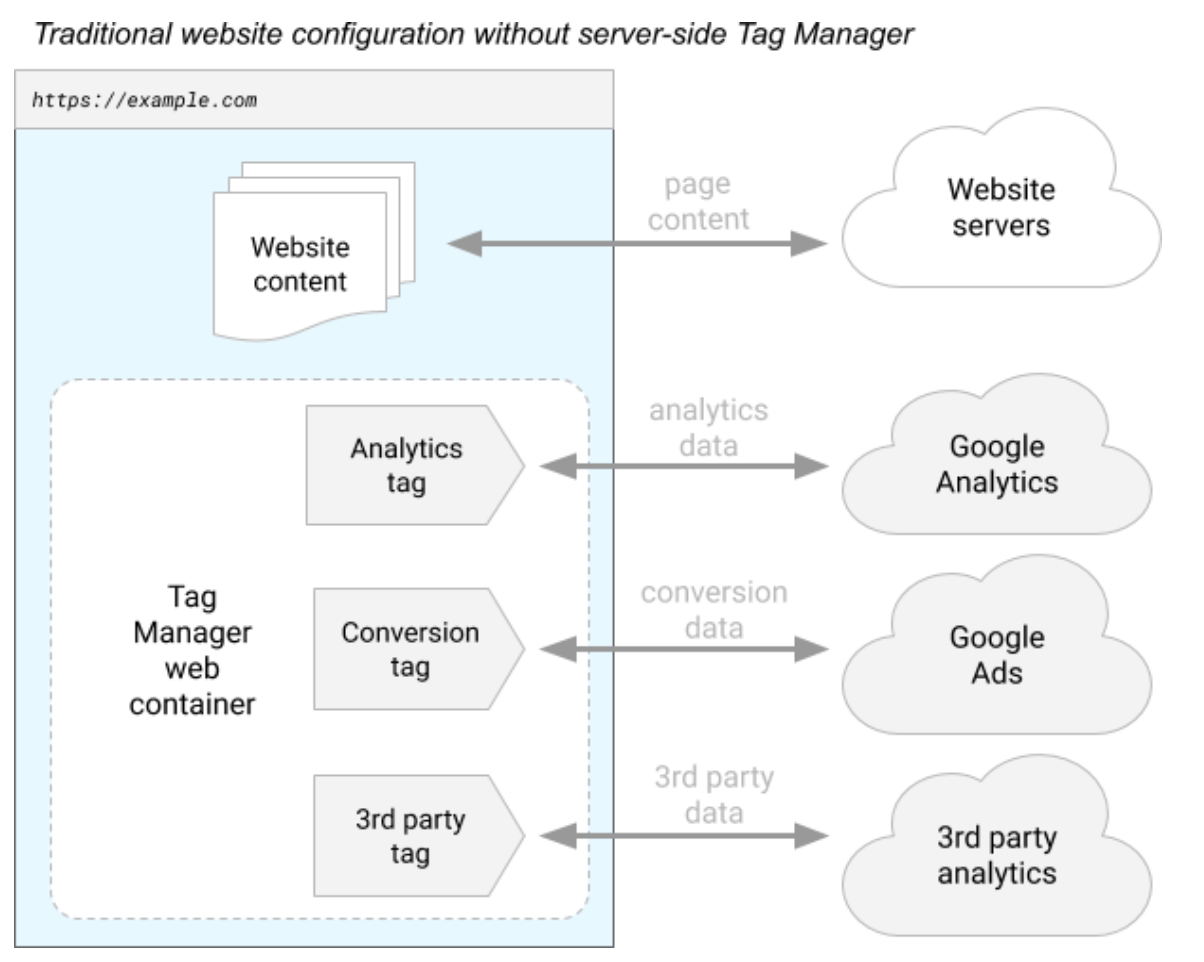
Figure 1: A diagram of a site instrumented to use a Google Tag Manager web container (source).
By contrast, a server container doesn't run in the user's browser or on their phone. Instead, it runs on a server that you control.
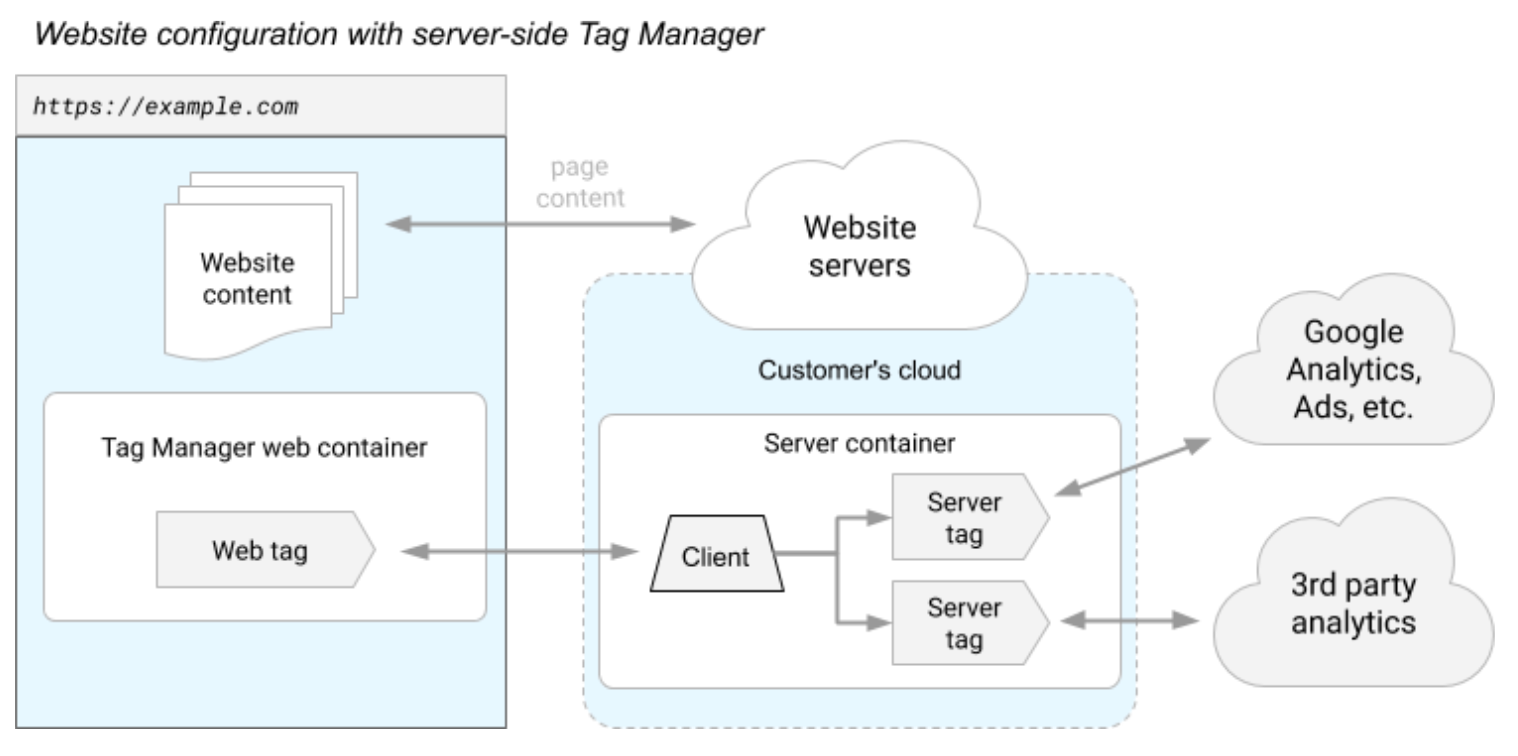
Figure 2: An example of a tagging configuration that uses a server container (source).
Basic implementation
Bloomreach Engagement Templates for Google Tag Manager
The Google Tag Manager template linked in this article is built and maintained by the Google Tag Manager community. We are providing link to the community template which is intended for technically advanced users who understand the underlying code of the templates and are able to modify the template according to their needs.
Bloomreach does not currently provide support for any kind of usage of this template.
1. Configure server-side Google Tag Manager
We assume that you have already integrated the Bloomreach Engagement Javascript SDK on your website. If it is not the case, integrate Bloomreach Engagement according to the documentation. You have the possibility to integrate Bloomreach Engagement also via Google Tag Manager.
To get started with server-side tagging:
Now your server container should be successfully configured on the selected subdomain (e.g. sgtm.your domain.com).
2. Import a new client template “Bloomreach Engagement Analytics Client”
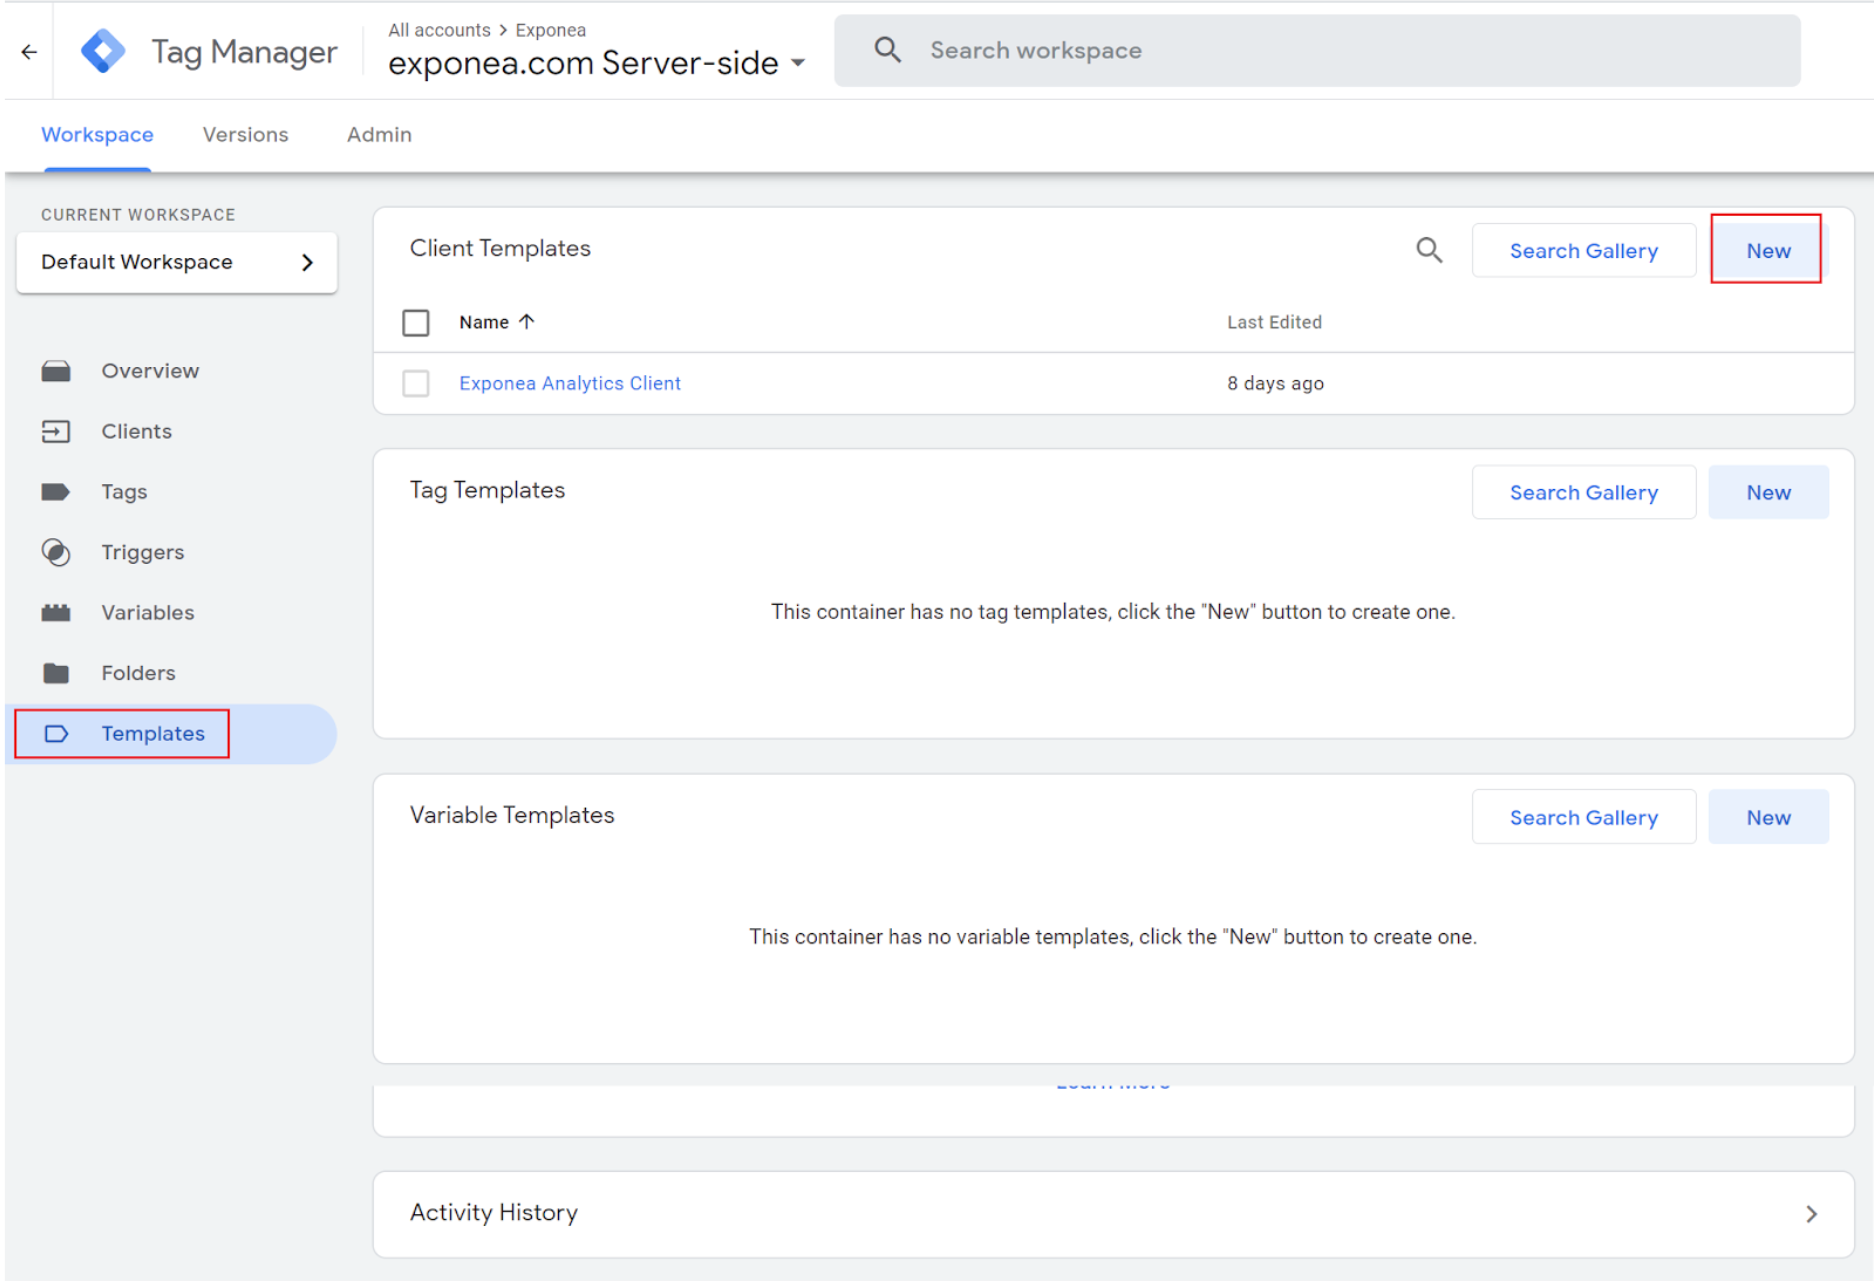
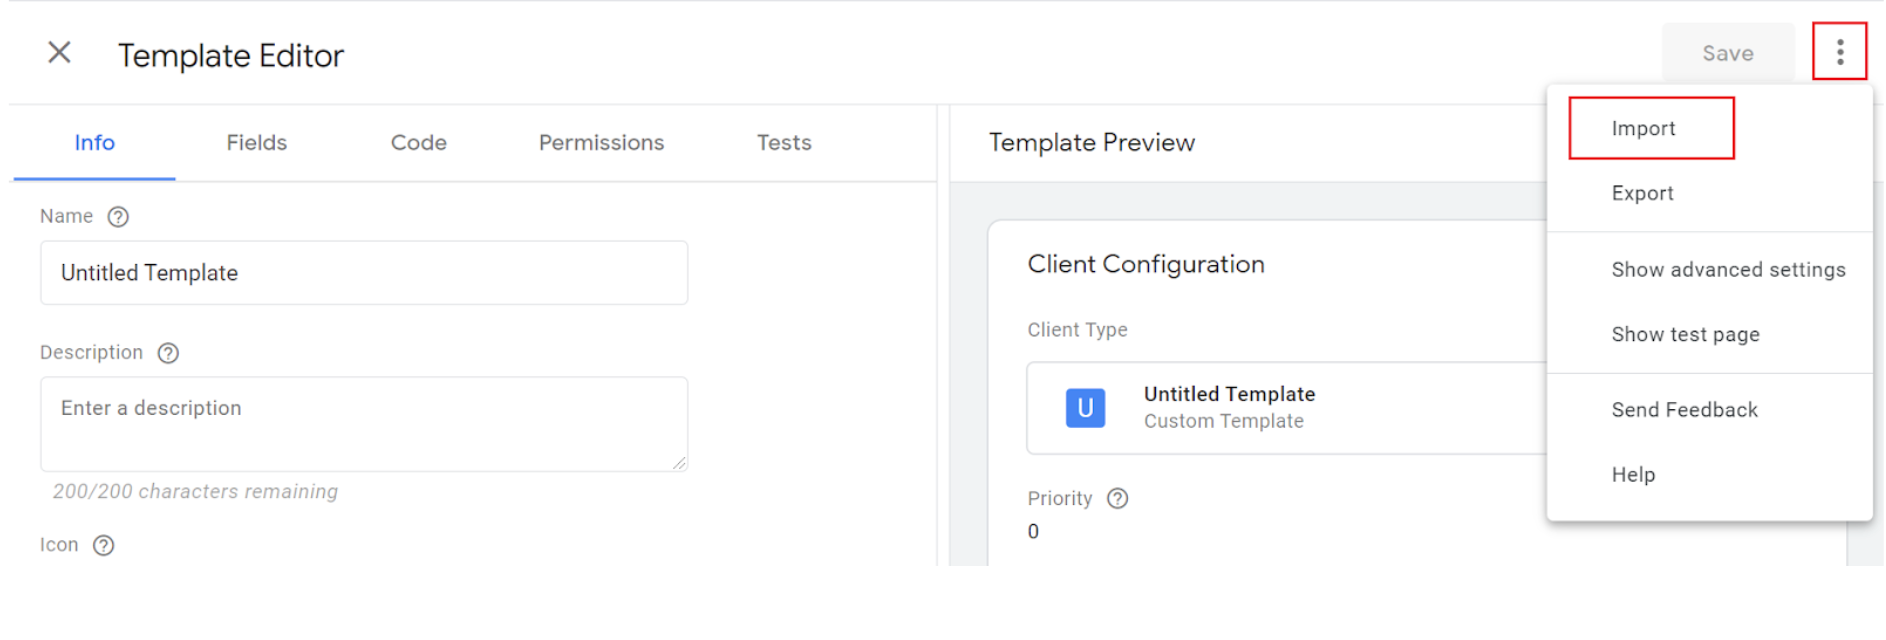
When you are inside your server container, click on the "Templates" → “New” → [three dots in the right upper corner] → “Import” and select the .tpl template of Bloomreach Engagement Analytics Client. If you don’t have a Bloomreach Engagement Analytics Client yet, you can download it here.
3. Create a new client
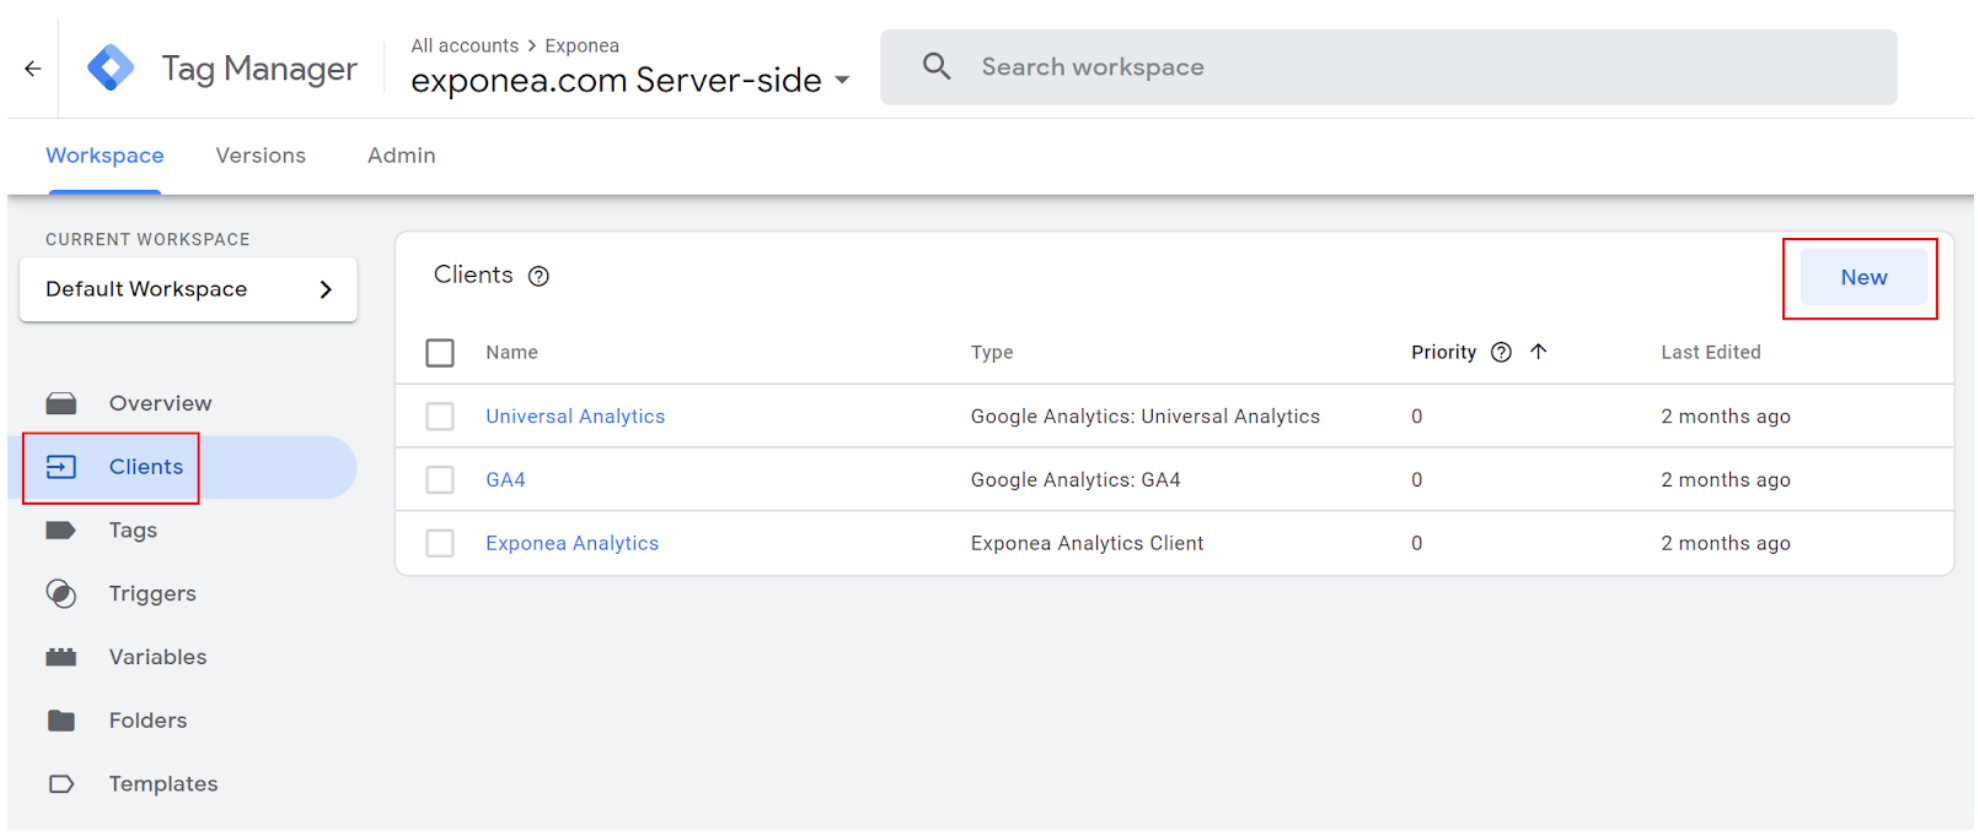
Click on the "Clients" → “New” and select Bloomreach Engagement Analytics Client from the offered clients.

4. Save a new client
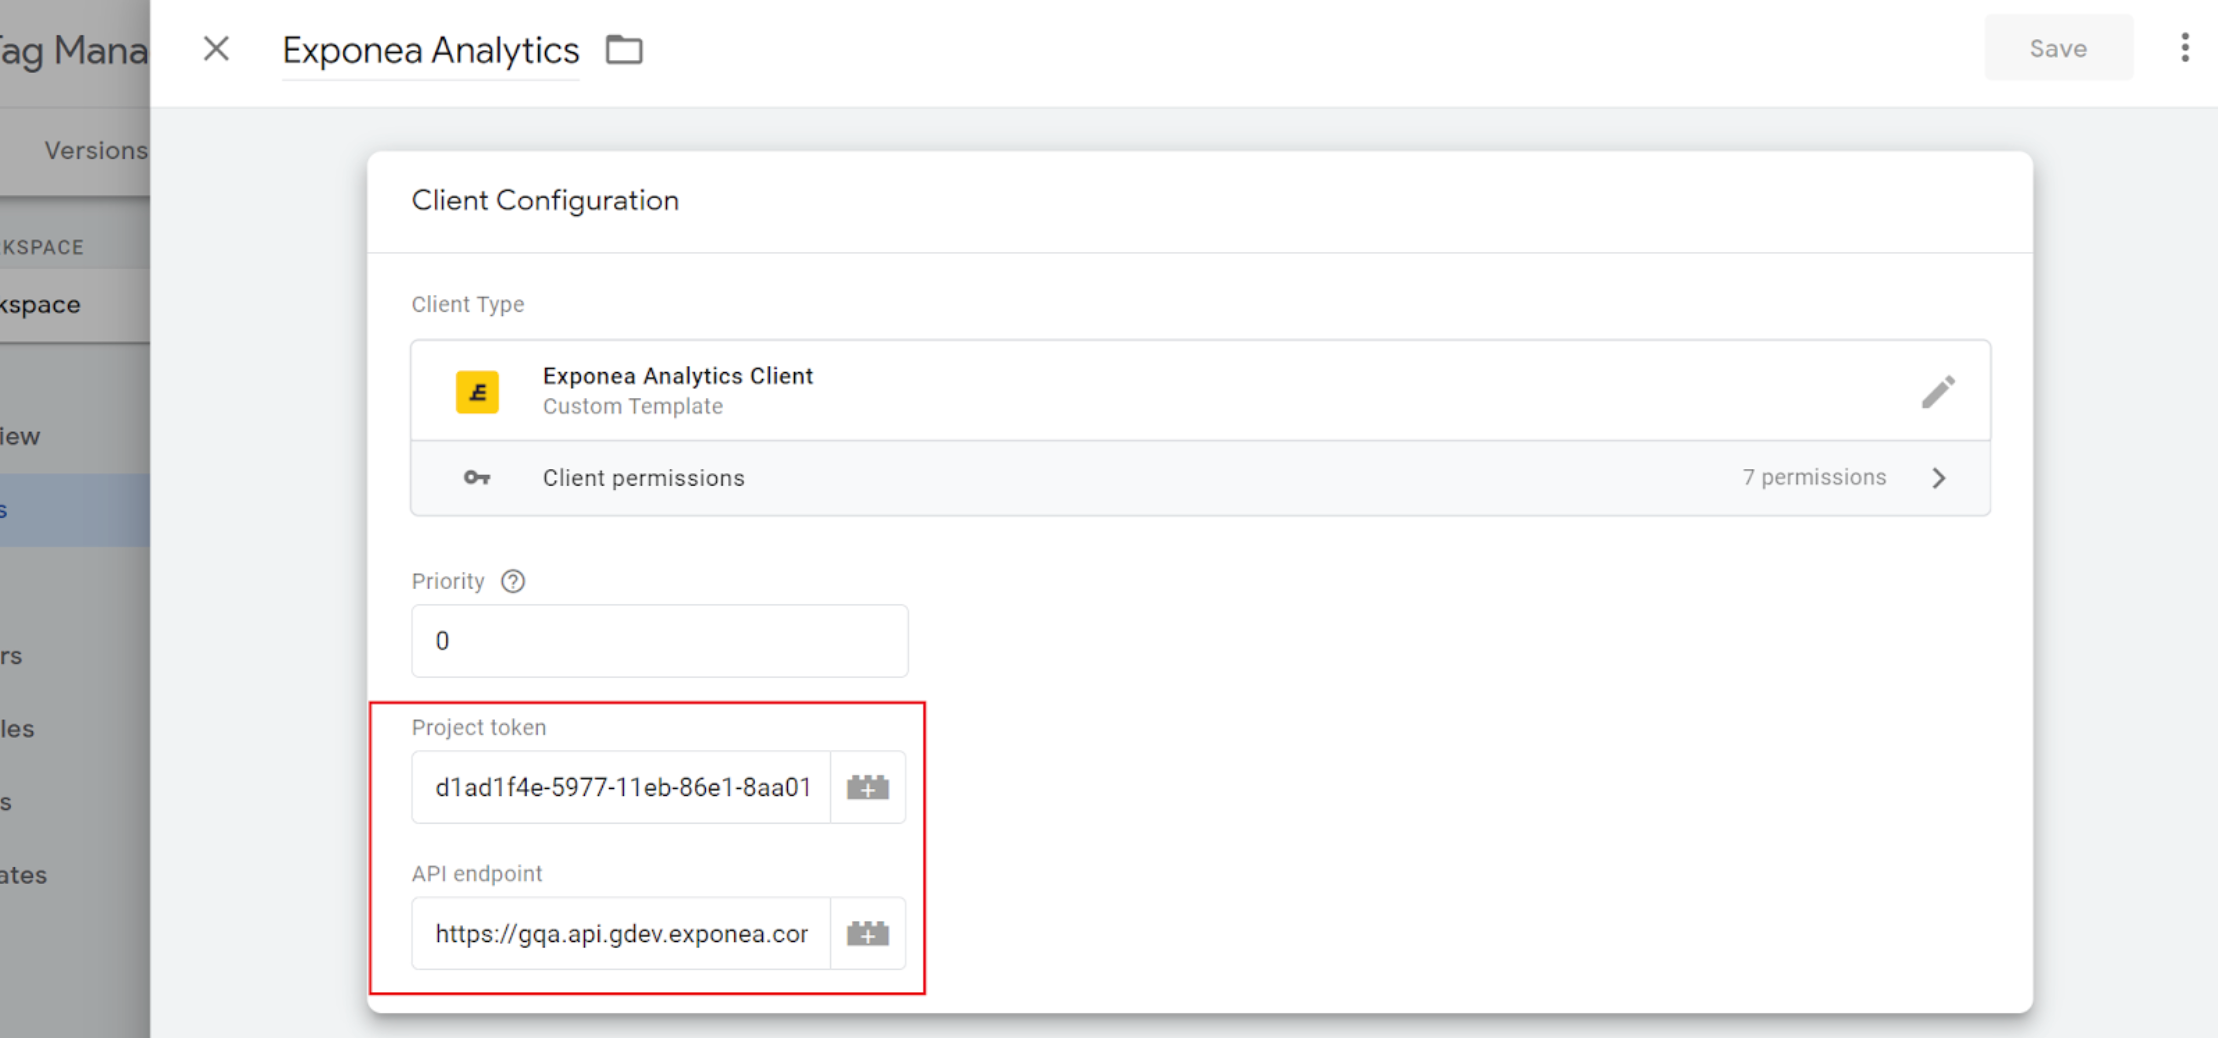
Before you save the client you have to fill the project token and the API endpoint. You can find both information with web integration snipped or in the Bloomreach Engagement platform.
5. Publish changes
After you have created a new client you can see that the "Unpublished Changes" counter is incremented by one. To publish new clients, click the "Publish" button in the top-right corner and then confirm by clicking "Publish now".
6. Change target URL to server-side container domain
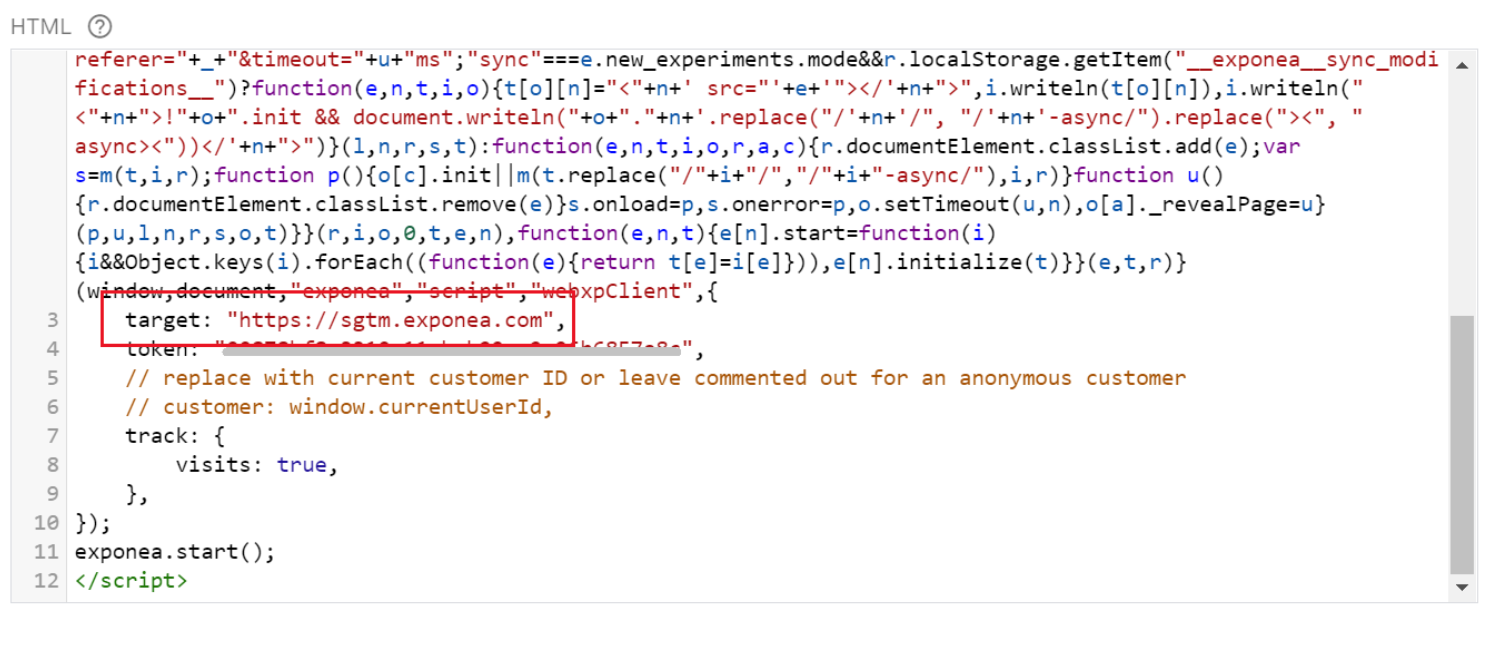
Lastly, you have to change the target URL within your existing Bloomreach Engagement initialization script to the configured server-side container domain (in our case we changed https://api.exponea.com to https://sgtm.exponea.com).
That’s it. You have now added Bloomreach Engagement Analytics Client to your website.
Privacy and compliance checklist
- Please review your Terms and Conditions, Privacy Policies and Cookie Policies and update if your legal and compliance teams instruct you to do so.
- Server-side GTM tracking offers a new technical solution for more precise and accurate data collection, however it does not affect your responsibilities and legal obligations in any way (e.g. you still need to collect consents for certain purposes even after implementation of the new tracking solution).
- You as a client using Bloomreach Engagement platform are a data controller, setting the purpose for collecting data, collecting consents and consuming results, Bloomreach is a data processor.
- If you are running the GTM server-side container on a Google infrastructure, make sure your direct relationship with Google as a vendor is disclosed properly.
- If the data collection or data tracking is not working because of an incident or downtime on your Google Cloud / Google Tag Manager infrastructure. Bloomreach does not take any responsibility for such downtimes.
- Some legal and compliance teams also have specific requirements when it comes to understanding, describing and complying with your practice of data collection, data flows, especially in some cases, where the GTM server container may be located in a different world region. Please check if locations of your Google Cloud servers are in-line with your existing policies.
Please discuss the following topics with your legal and compliance teams before implementing this solution.
3. Server-side handling of identification of anonymous users by your infrastructure
Hint
This solution is the best choice for customers who have strong regulatory requirements in the areas of security, privacy and compliance, especially financial institutions and banks.
Bloomreach Engagement enables you to handle the anonymous identity with your own solution. You could store the identity of anonymous users in your own cookies or systems and pass those values to the Bloomreach Engagement platform using these channels:
- Using Bloomreach Engagement REST APIs - see the documentation for details.
- Using JS-SDK, leveraging its customer config option.
The customer configuration option enables passing the identity of the customer, both logged-in and anonymous to Bloomreach Engagement. The identity could be stored in a 1st party server-side cookie that you own, control, and pass to this option synchronously using JS or server-side rendering.
If the identity is fetched asynchronously, it will impact the user experience of JS-SDK features (delaying tags, weblayers, experiments, and so on). Please, be aware that using this option, the non-flickering experiments may not work correctly since they rely on the cookie functionality that cannot be overridden (as of 17.6.2021) by passing a customer identity manually.
This solution is usually a good alternative if you have strong requirements in terms of security and privacy. Consequently, it has usually high requirements on the technical skills of you, our clients. We include it here, because we know some of our clients have already developed solutions like this, although it was often for other reasons. If that is your case, know that you can utilize your solution to improve anonymous ID strength. If you’re considering a project like this, know that this can be an additional benefit to consider.
1. Set up a server cookie
You need to create a new cookie to identify anonymous users. The specific implementation is dependent on the technology used for your website. The cookie needs to be a server-side cookie to prevent current limitations in browsers regarding cookie expiration. The name of the cookie is up to you, but we advise using a name like "your_organization_exponea_id". The important point is to be able to read the cookie when the JS SDK is initialized, so it can be passed to its configuration. This means:
- If the webpage is not server-side rendered, the cookie must not be a http-only cookie so the javascript on the page could read it.
- If the webpage is server-side rendered, the cookie may be directly printed to the webpage, but this is dependent on the platform used.
2. Set up a new soft id
New soft IDs can be defined when creating a new project. If you want to add new soft IDs to an already existing project, please contact your CSM.
3. Pass the cookie to JS SDK
For the “HttpOnly” type of cookie, you will use tools provided by your custom frameworks to pass the cookie to the JS SDK settings.
For the non “HttpOnly” type of cookie, it is possible to use this function to get the cookie value and pass it to our SDK (function must be added to the page):
function getCookie(cname) {
  let name = cname + "=";
  let decodedCookie = decodeURIComponent(document.cookie);
  let ca = decodedCookie.split(';');
  for(let i = 0; i <ca.length; i++) {
    let c = ca[i];
    while (c.charAt(0) == ' ') {
      c = c.substring(1);
    }
    if (c.indexOf(name) == 0) {
      return c.substring(name.length, c.length);
    }
  }
  return "";
}
The JS SDK configuration will then look something like this (assuming your custom soft ID and cookie is named “anonymous_id” ):
exponea.start({
  target: 'https://api.exponea.com',
  token: '313a6a16-b422-11e8-1230-0a580a211c63',
  customer: {
    anonymous_id: getCookie('anonymous_id'),
  },
  track: {
    visits: true
  },
  ...
});
Anonymization
Adding a new soft id does not disable the default JS SDK cookie. Cookie and new soft id would work in synergy and will work according to Bloomreach Engagement merging rules. Consider this Use Case:
- An anonymous user visits the page for the first time. They are assigned a custom “anonymous_id” by you as well as a standard “cookie” by JS SDK.
- You want to treat that anonymous user as a different anonymous user (i.e. “guest” profile functionality on their web), so they change the “anonymous_id” cookie value.
- But the user still has JS SDK cookie assigned and the new “anonymous_id” value is merged with the previous profile and the user is treated as the same customer as from #1.
Custom identification and non-flickering experiments
When using a combination of non-flickering experiments and custom identification of anonymous users on browsers that have cookie limitations, it's possible that on the first-page load of the session, the non-flickering experiments applied will not be personalized. This will happen in the case when the Bloomreach Engagement cookie is already expired and the identification of the user by the custom cookie happens after the non-flickering experiments are applied. On every next page visit of the session, the customer will be already identified.
Geo IP data
The Google Server Side container runs on Google's premise which can cause an event to be tracked with incorrect location information ('session start', 'end', 'page_visit').
Updated about 2 years ago
