Revenue attribution
This article explains how revenue attribution works within Performance dashboards, how to adjust attribution settings, and how to use data filters and cleaning to ensure accurate and meaningful campaign performance analysis.
Revenue attribution is a process that assigns revenue to specific marketing touchpoints, like email and SMS, based on customer interactions. This process helps you identify which channels and campaigns drive revenue and understand how customers move between channels, such as from email to SMS.
Revenue attribution is a key feature of Performance dashboards with predefined settings.
Revenue attribution model
Revenue attribution model is based on the last touch principle. This model attributes the revenue from a purchase to the last interaction or "touchpoint" the customer had before converting. Here’s how it works:
Each touchpoint is a combination of three key elements:
Channel
The medium through which the interaction occurs, such as email, SMS, push notifications, and weblayer.
Status or action
The specific activity tied to the interaction, such as "delivered", "opened", "clicked", or "viewed".
Attribution window
The period when a touchpoint (like an email click or a banner view) can be credited for conversion or purchase after the customer interacts with it.
Define attribution windows according to the recency of interaction in:
- hours
- days
- weeks
- months
Setting the right attribution window ensures your data accurately reflects timely customer actions. This helps you measure the performance of your campaigns and channels effectively.
In Bloomreach Engagement, this window varies by channel and event. By default, Performance dashboards use pre-set attribution windows, but you can adjust them to better measure the impact of different touchpoints on your revenue.
Revenue attribution settings
The settings apply revenue attribution to all available channels by default. However, you can modify the default functionality to suit your needs.
Watch our video chapter on Revenue attribution for a visual walkthrough.
There are two options to access the attribution settings:
- Go to Project settings > Performance dashboards > Revenue attribution.
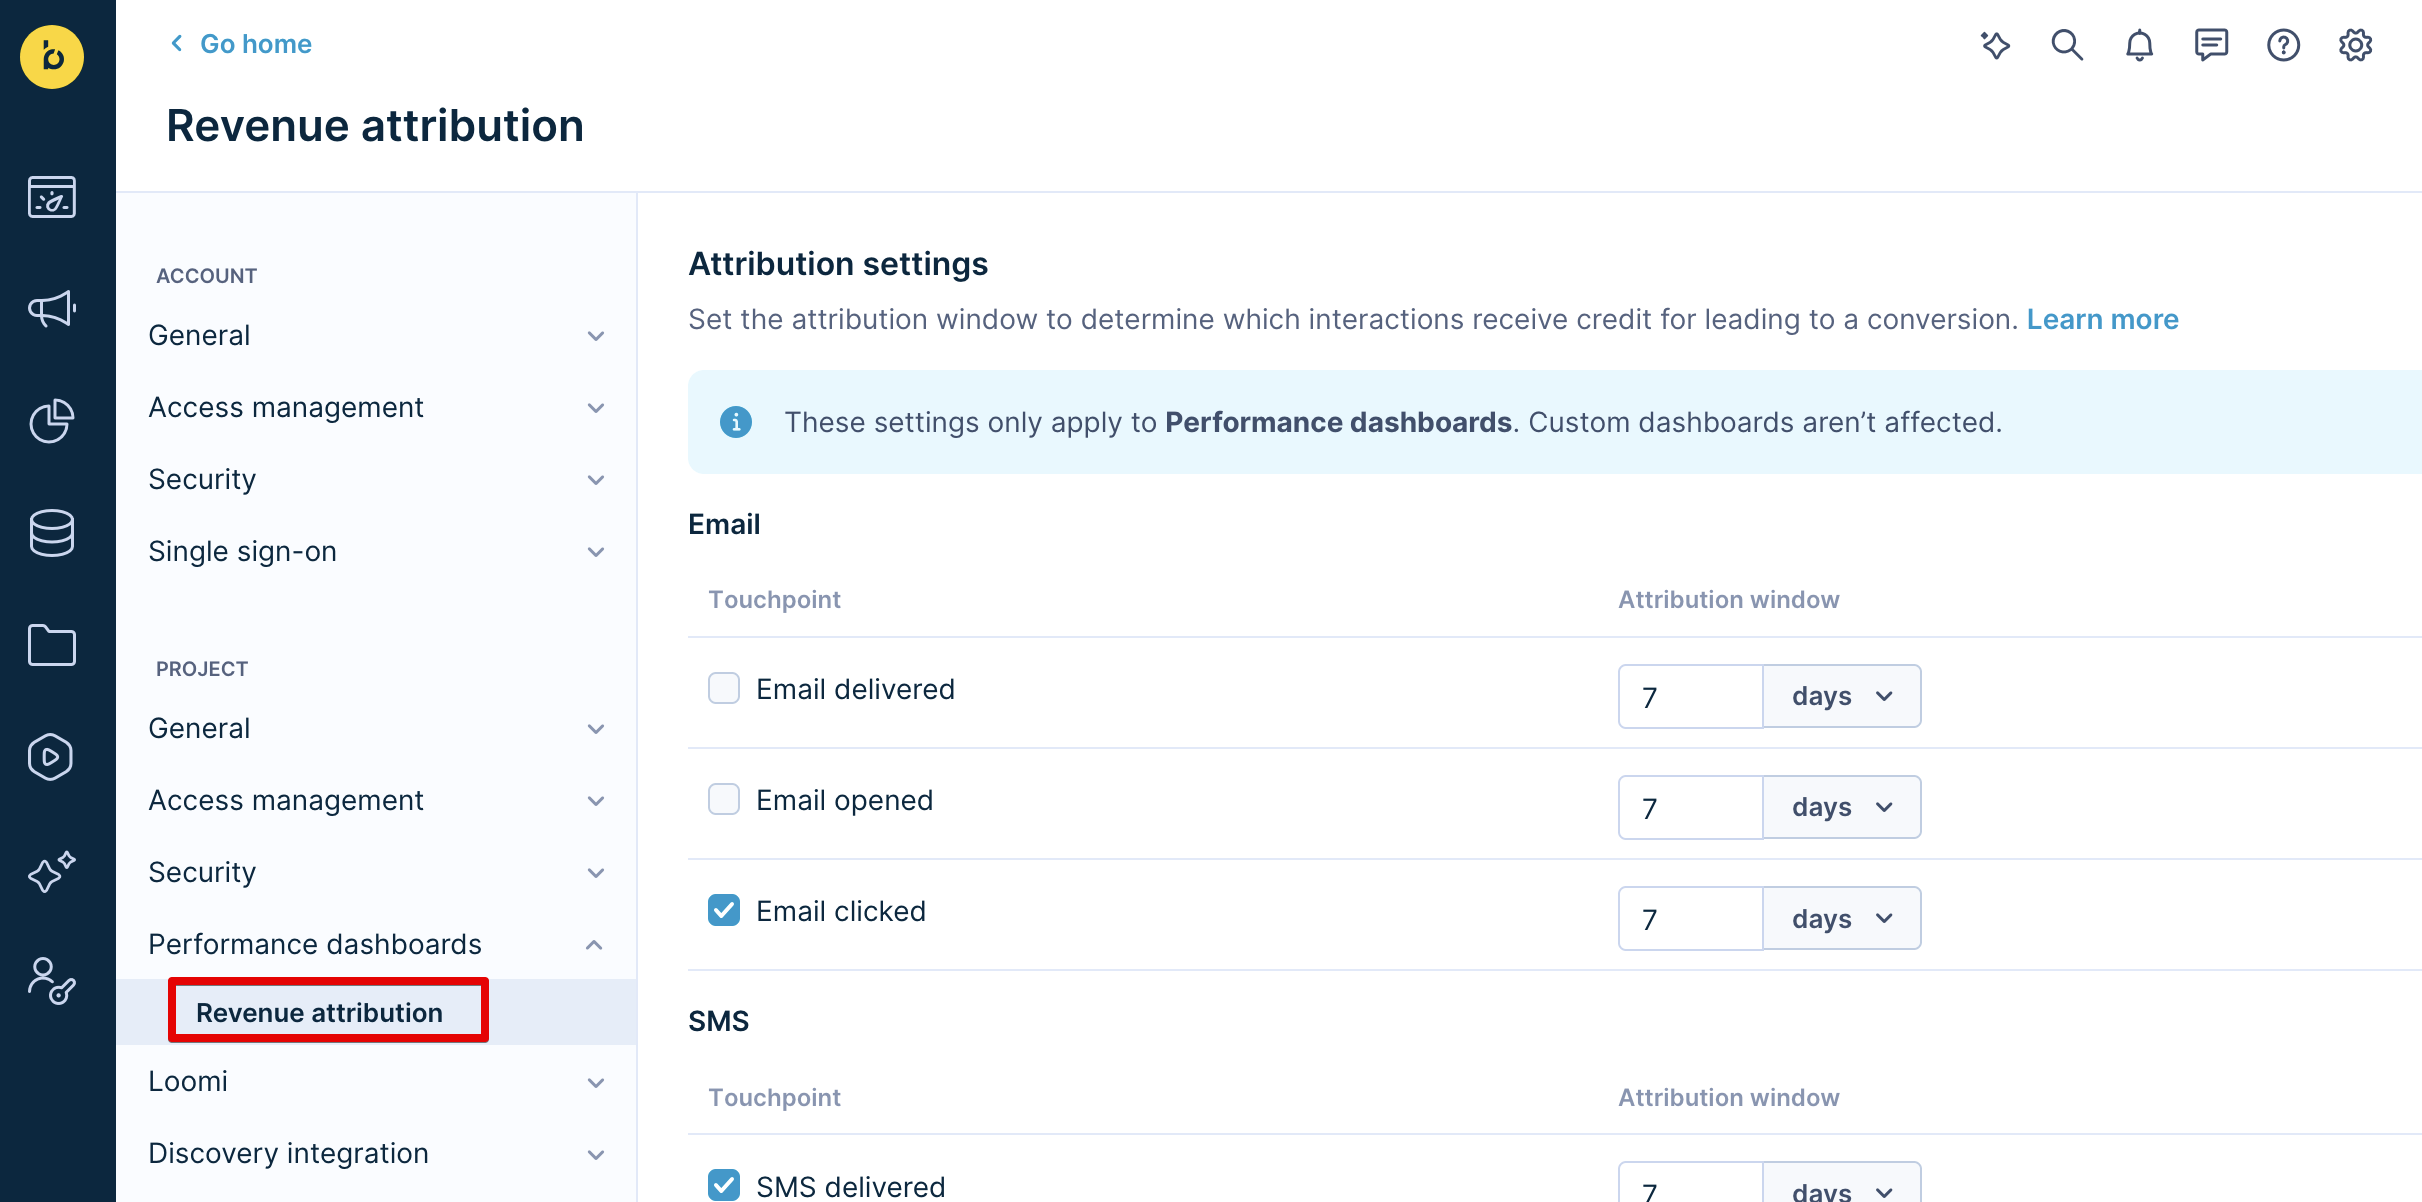
- To access the settings page directly from your respective Performance dashboard, click the three dots on the right side and select Revenue attribution.

In the revenue attribution settings section, you can add or remove any touchpoint (channel) from the list. This allows you to choose which touchpoint to attribute your revenue to. You can also modify the attribution window. Remember, changing these settings only impacts the Performance dashboards.
Note
Only Project admin and higher roles can change the attribution settings.
Revenue attribution examples
Here are the use case examples showing modification of attribution settings and its possible outcome:
1. Purchase attributed to weblayer
Imagine you selected in your attribution settings the following touchpoints:
- "Email clicked"
- "SMS clicked"
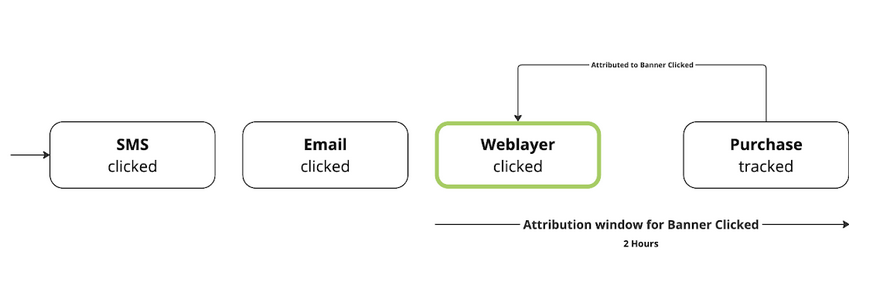
- "Weblayer clicked" with setting attribution window to 2 hours.
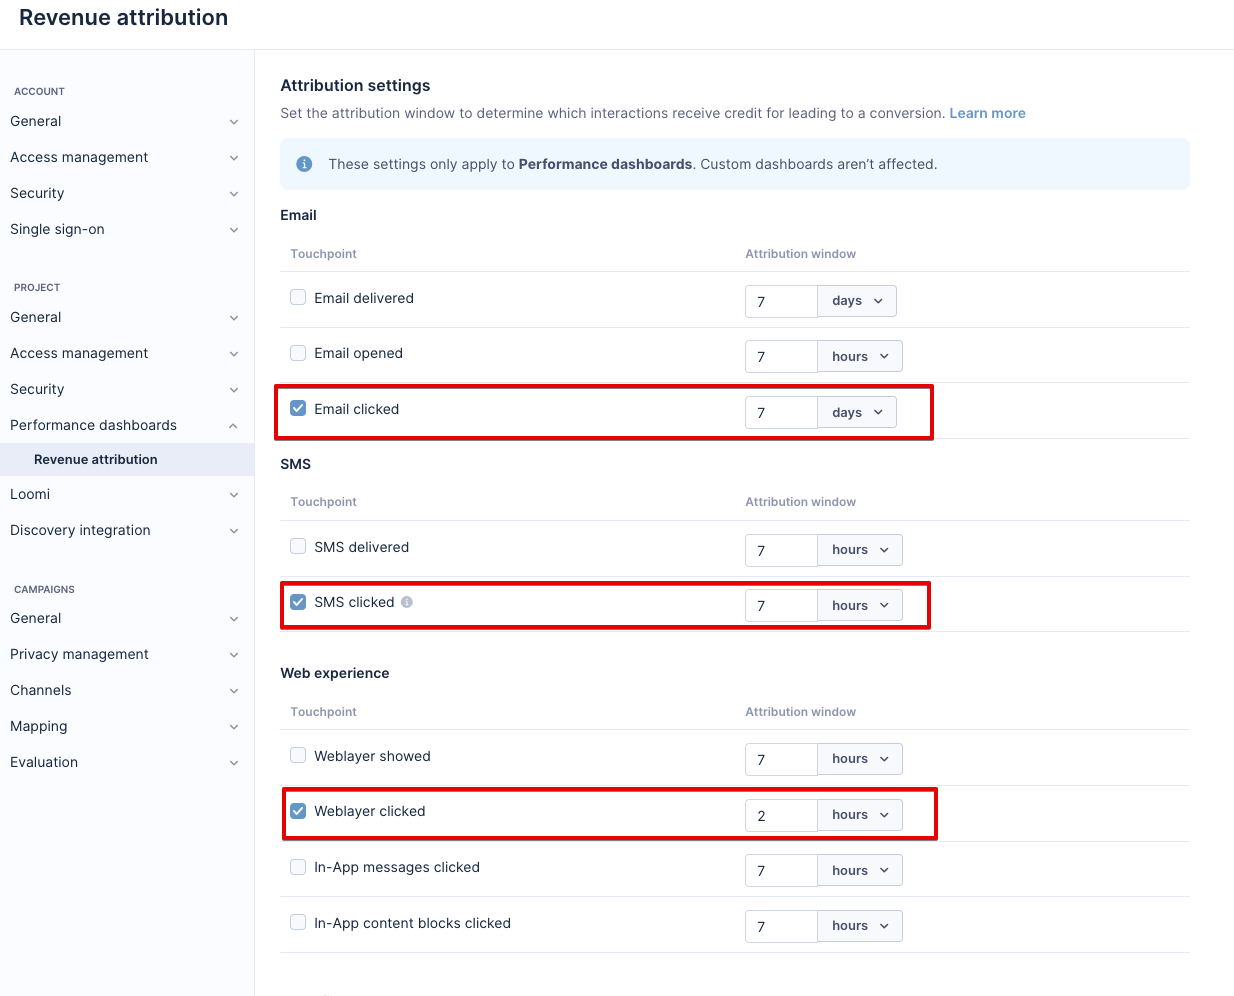
If a customer clicks on an email, then an SMS, and finally a weblayer and makes the purchase within the attribution window set for the weblayer, the revenue is attributed to the weblayer.
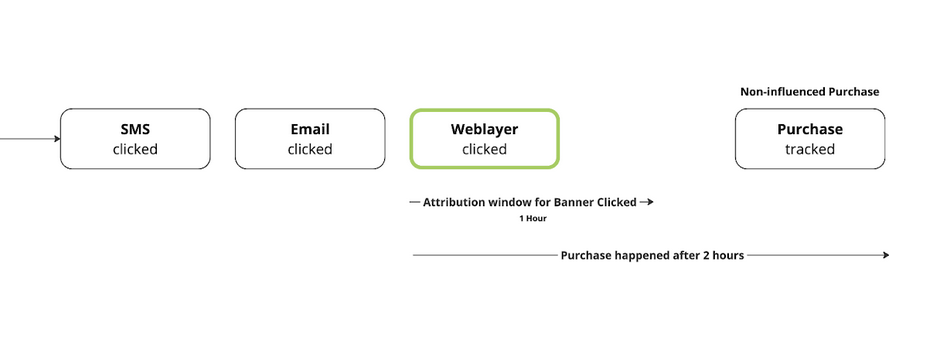
2. Non-influenced purchase:
In this example, the attribution settings are as follows:
- "Email clicked"
- "SMS clicked"
- "Weblayer clicked" with setting attribution window to 1 hour.
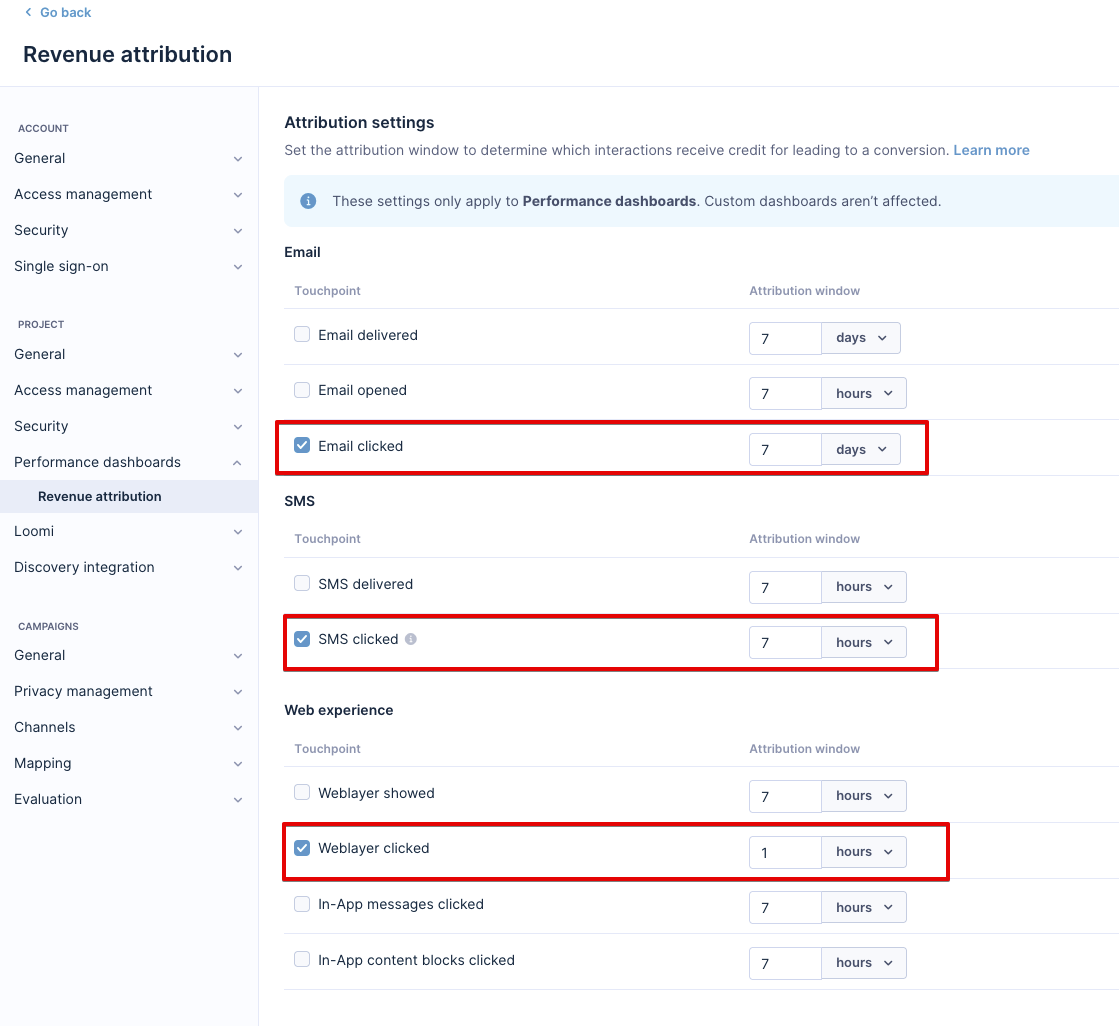
The purchase is non-influenced if the last touchpoint is outside the set attribution window.
For example, if a purchase happens 2 hours after a weblayer interaction, but the window is set to 1 hour, the purchase is non-influenced.
3. Purchase attributed to email
You selected the following touchpoints in your settings:
- "Email clicked"
- "SMS clicked"
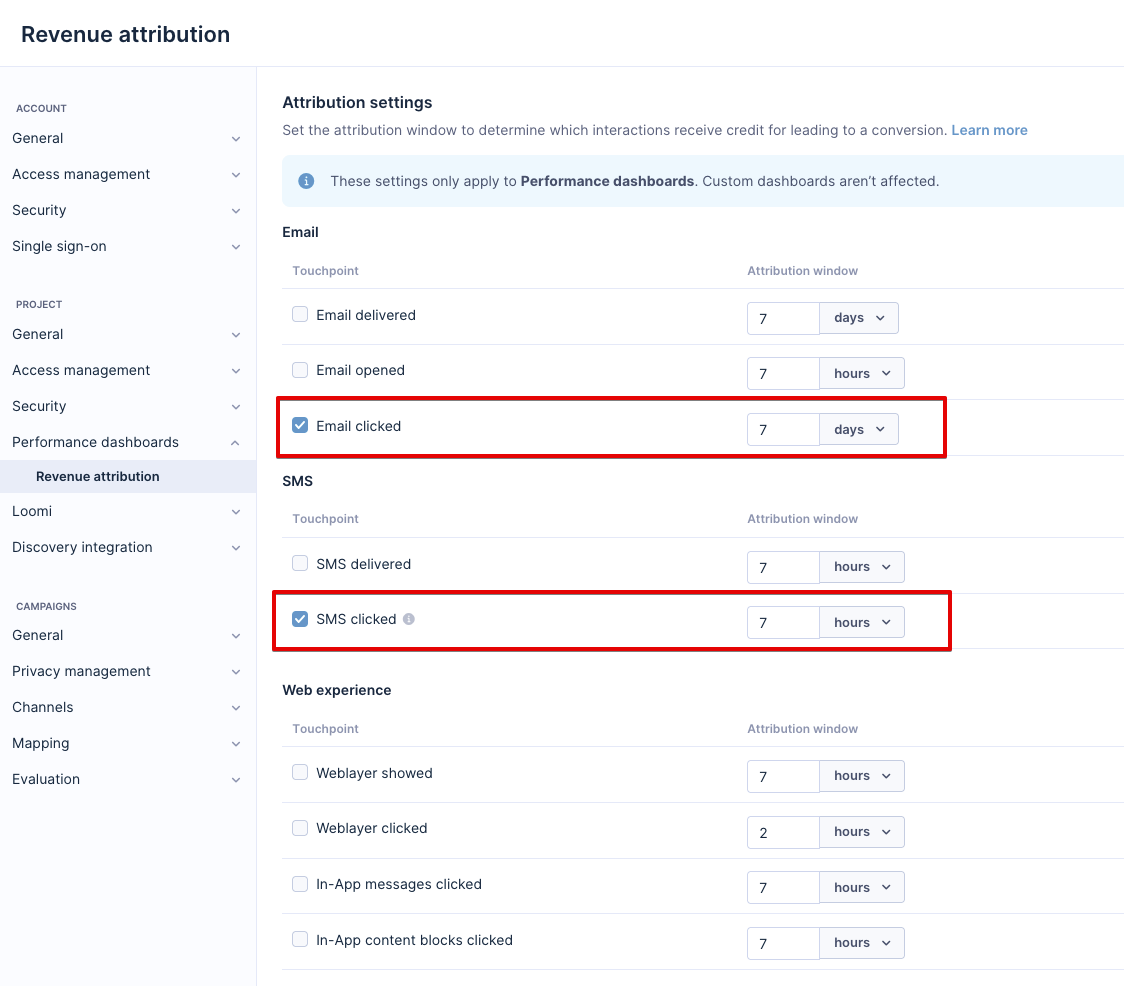
Imagine your customer interacting with your banner as the last touchpoint. Since the "weblayer" is not picked as a touchpoint in the settings, the purchase is attributed to the previous valid touchpoint within the attribution window, in our case, "email clicked".

Data filter
Use the data filter to include or exclude specific campaigns or events for each touchpoint. Each touchpoint is based on a campaign or banner event. You can filter data based on campaign ID, name, or purpose.
Here are some examples:
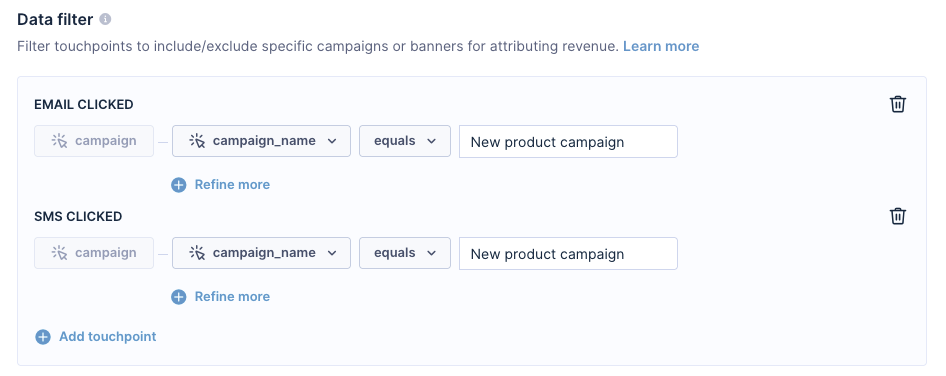
1. Include specific campaigns
Imagine you want to include only specific campaigns to focus on analyzing the performance of those campaigns. For instance, if you recently launched a new product and ran a dedicated campaign, you would want to see how this specific campaign contributed to revenue without the noise from other campaigns.
2. Exclude brand campaigns
In this example, imagine you often run brand awareness campaigns that don't directly drive revenue. By excluding these campaigns, you can get a clearer picture of which campaigns are actually contributing to sales.

3. Exclude transactional communication
Imagine, you want to attribute revenue to a push notification channel and use push notifications also for transactional messages. Almost every clicked transactional message, which isn't intended to drive revenue, could attribute a purchase tracked right after it.
To handle this, name every transactional campaign with the prefix [transactional]. This naming helps clearly differentiate between transactional and revenue-driving communication. Thanks to data filtering, you can exclude this kind of communication by filtering out campaign events that contain specific words in their name.

Note
You can add only event attributes to your filters. Expressions and event segmentations are not supported.
Data cleaning
To ensure accurate performance metrics, you must exclude unreliable clicks and opens in the email channel. Campaign events may indicate that someone opened an email or clicked a link. However, this activity might be caused by a third-party bot instead of a customer. The same applies to link clicks.
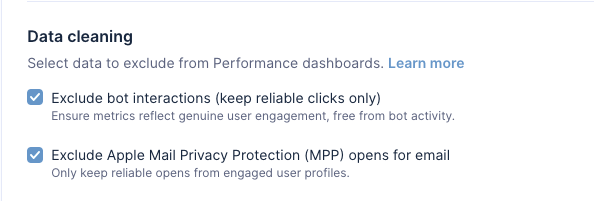
In this section, you can select or unselect the following fields:
Exclude automated interactions (keep only authentic clicks)
This option removes bot interactions — automated programs or scripts — from your performance metrics. Bots can artificially inflate clicks and engagement data, making it hard to gauge real user activity.
Excluding bot interactions means that only real people's clicks appear in the data. This gives you a clearer understanding of how users engage. Enable automatic bot detection in emails to ensure best functioning.
Exclude Apple Mail Privacy Protection (MPP) opens for accurate email metrics
This option helps you filter out email opens triggered by Apple’s Mail Privacy Protection (MPP). MPP can automatically load email content (like images or tracking pixels) without the recipient opening the email, creating "false" opens.
Check this box to exclude revenue attribution to automated opens. Only count real opens from engaged users.
Updated 11 days ago
