

File management
Overview
Our file management is uniting all uploaded files into one central and shared access point within the Asset Manager. You are able to upload, find, and reuse an image, a video, or other files in every place where such files can be used, including emails, weblayers, or push notifications. You can also organize your files into folder structures.
File manager is then accessible from all campaigns and places where you work with files. Using the asset picker or image input, you can search for your files, use them in your campaigns and easily share and reuse files across multiple campaigns and channels.
Inserting files is commonly done via the “Copy URL” option, which will copy their public URL into the campaign. For campaigns where HTML is used, there is also an option to Copy HTML for creating the HTML tag with basic attributes set up.
Supported file types
The file manager supports upload of the following file types and sizes:
- Images (max size: 2MB)
- jpg/jpeg, png, gif, svg, webp
- Videos (max size: 20MB)
- mp4, webm, mkv
- Other (max size 5MB)
- pdf, rtf
- MS Office: doc, ppt, pps, xls, docx, pptx, ppsx, xlsx
- OpenOffice: odt, ods, odp
- Fonts: ttf/otf, woff, woff2
- css
Bulk actions
Files can be uploaded within the Asset manager. You can perform several per file or bulk actions, including:
- Copy URL
- Rename
- Move to folder
- Archive
- Delete
- Add to Initiative
- Clone
It is possible to update an already uploaded file with a new one, or perform specific actions, such as replacing a relative image path.
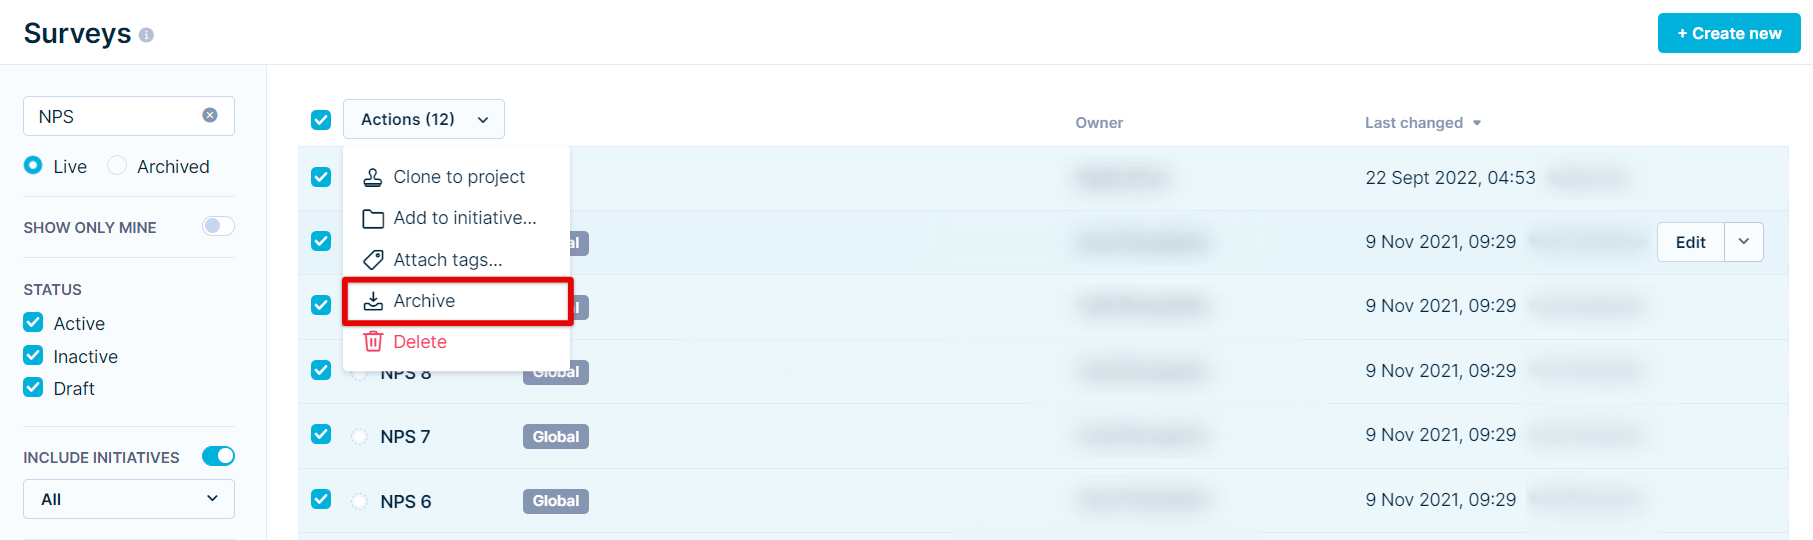
Bulk archive
You can bulk-archive assets (scenarios, weblayers, campaigns, blocks etc.) from the 'actions' tab in the top left of the respective asset column. Performing bulk actions, such as archiving, is not possible using the 'edit' dropdown in the asset row itself
Upload files
Files can be uploaded and managed within the asset manager, at: Asset Manager -> Files. You can upload files by clicking on the "Upload file" button at the top of the screen or drag and drop the files into the list. Files will be uploaded into the currently selected folder and the progress of upload will be displayed in a pop-up window at the bottom.

Uploaded files are saved to a Google storage providing public URLs that can be used for campaign creation or other functionalities, such as custom fonts.
Once uploaded, files can be previewed (except “Other” type files) and edited: users can change the file display name, add tags or descriptions.
Files are saved under a system-generated ID, but will keep an editable human-readable file name. This name is displayed in the UI and will be used for search. Originally, it is taken from the uploaded file name. The system-generated ID is used in the file URL accessible publicly.
Update files
After double-clicking the file, which opens the file editor, you can use the option “Select new file” and save the campaign. This way, already uploaded files can be replaced with a new file, while the URL stays the same. Therefore, campaigns already using the file will start displaying the new file.

Keep in mind that files can be updated only with a file of the same type, image for an image, video for a video and other files for one of the other file types, for example, .css for .css, or .doc for .pdf. It may take up to an hour until the file is updated on the public URL and the change is visible in your campaigns.
By navigating to the 3 dots menu in the top right corner > Show usages, you will be able to explore in which campaigns the file is being used, so that you can easily check for any dependencies.
Replace image relative paths
When working with the HTML email editor, you can upload an HTML template that was created outside Bloomreach containing relative paths to files, e.g. <img src="./name_of_your_image.jpg">. Once the needed files are uploaded to the desired location, in the file manager, the “Replace relative paths” action within the (...) menu can be used to automatically replace the relative paths with the public URLs of the images based on a match in the file name.

Selecting the “Replace relative path” option will open a modal allowing the user to select the folder containing the files to be replaced. The modal will also show how many relative paths were detected, how many would be replaced using the selected folder, and if needed all of the detected relative paths can be listed.
Once confirmed, all of the relative paths matching a file name in the selected folder will be replaced by the public URL. Any folder paths within the relative path are ignored and files are always replaced by matching files found in the selected folder.
False positive relative paths
It is possible that relative paths lookup will also detect “false positive” occurrences of attributes that look like relative paths but are not. Upon the campaign “Start” users are presented with a warning in case some relative paths are detected to make sure the campaign is sent out correctly. It's upon the user to check that everything that should be is replaced.
Organize files
Folder structures can be created to keep your files organized. You can create new folders by clicking on the "New folder" button at the top of the screen, which will create a new folder within the current location. You can navigate in the folder structure by double-clicking the folder name or using the location breadcrumb displayed above the list/grid view.
Folders and files can be moved into other folders using the menu action “Move to folder”, which will open the folder explorer to select the target folder. Folders can also be Deleted or Archived (including all of their content), or Renamed.
Files and folders can be searched for by file names or folder names. Search will work within the currently selected folder (indicated by a folder icon in the search input) by default, but if desired, can be reset to search within all files by pressing backspace or removing the file icon.
Clone files
Files can be cloned individually or will be recognized as dependencies upon campaign cloning. You can clone files individually by clicking on the 3 dots menu on the file in the Asset Manager or when updating the file.
When cloning, files are copied to the file manager in the target project, including the folder structure. Links to the files used in campaigns will be updated to use the local copy of the file. All standard conflict resolution logic (Duplicate, Replace, Use existing) applies to files as to other assets.
Use files in campaigns
You can access your stored files in the Asset manager from within campaigns in 2 ways:
- Using the (+) asset picker button that is present at the bottom of the campaign editor or action node modal,
- Via an image input type with the integrated [+] button
The visual editor is not supported in the current release but this feature is coming soon.

Both ways, the asset picker modal will be opened either directly within the asset type “Files” or containing other asset types (blocks, snippets) as well. Within the modal, you can either search for an existing file or upload a new one, and then depending on the access type either:
Copy HTML
This option will open the file preview, allow you to input some attributes of the file based on the file type and will generate and copy to clipboard the resulting HTML.
With image file types, you can edit width, height, alt text, and image link, the resulting tag will be an <img> image tag wrapped in a <a> link tag if the image link is provided.
<a href="https://www.bloomreach.com">
<img src="https://storage.googleapis.com/gqa-app-storage/0699cd30-2997-11eb-a8d0-a6a4141bd2d6/media/original/93b1b736-d7f3-11eb-a598-7685f6020f48" width="500"  alt="logo"/>
</a>
With video file types, you can define the width, height, and alternative text, the resulting tag will be a <video> video tag.
<video src="https://storage.googleapis.com/gqa-app-storage/0699cd30-2997-11eb-a8d0-a6a4141bd2d6/media/original/ecc96426-xxx-ce5b6df41c5e" width="300" height="auto">Promo video</video>With other file types, you can define link text, the resulting tag will be a <a> link tag.
<a href="https://storage.googleapis.com/gqa-app-storage/0699cd30-2997-11eb-a8d0-a6a4141bd2d6/media/original/a1afe5aa-xxx-ced1b740f570">Link text</a>Copy URL
This option will copy the file URL to the clipboard.
Select
This option will insert the image URL into the image input type.
Legacy files migration
In the HTML email editor or Blocks, image uploads were part of the personalization menu. Those images were only visible and accessible within the email template or block where they were uploaded. All of those files will be automatically migrated into the new central File manager.
Files will be migrated under the following Folder structure based on where they were uploaded:
Email Campaigns (folder)
- Campaign name 1_campaign id1 (folder)
- image1
- image2
- …
- Campaign name 2_campaign id2 (folder)
- ...
Scenarios (folder)
- Scenario name 1_scenario id1 (folder)
- image1
- image2
- …
- Scenario name 2_scenario id2 (folder)
- …
Email Blocks (folder)
- Block name 1_block id1 (folder)
- image1
- image2
- …
- Block name 2_block id2 (folder)
- …
Email Templates
- ...
For campaigns that were migrated, an infobox will be displayed with a shortcut to the folder containing the files.

For campaigns that were migrated, an infobox will be displayed with a shortcut to the folder containing the files.
Updated 1 day ago