Consent page
The consent page lets customers see all consent categories (including legitimate interests) you've set up in your project settings. Customers can unsubscribe from any category they choose. You should embed the consent page on your website. The opt-out option is crucial for maintaining valid customer consent and keeping your email deliverability rating high.
How it works
The consent page is an editor in Bloomreach Engagement that you embed on your website. Each customer gets a unique link to manage their preferences.
To access the consent page editor:
- Under Settings, select Project settings.
- Under Campaigns, go to Privacy management > Consents.
Generate consent page links
You can generate the unique customer link in two ways:
- Use Jinja:
{{ consent.page }}. - In campaigns, click the personalization button to get:
<a href="{{ consent.page }}">Click here ...</a>
Where to find consent page links
You can find the consent page link in the personalization tabs of:
- Add event (Node in a scenario)
- Experiments
- Facebook message
- Push notifications
- Set property (Node in a scenario)
- SMS
- Tag manager
- Weblayers
Tracking issues
If you use our consent page outside your own domain for subscribing or unsubscribing customers, no
page_visitorsession_startevents are generated.
Test campaigns
The consent link only works in real launched campaigns. It won't work in test emails.
Customize your consent page
You can edit and customize the consent page using HTML, CSS, JavaScript, and Jinja. For example, you can display a specific customer's name.

What appears on the consent page
All categories you create in Project settings > Privacy management > Consents appear on the consent page for customers.
Multi-language support
You can create different language groups for the consent page. Language groups appear once you define your languages in the project settings.
Cache behavior and data freshness
Caching stores data temporarily so pages load faster. This improves performance, but it can sometimes display outdated information to customers.
How consent pages handle caching
Consent pages use strict cache controls to ensure customers always see the latest consent data. The pages include these HTTP headers:
- Cache-Control: no-cache, no-store, must-revalidate
- Pragma: no-cache
- Expires: 0
These headers tell browsers and content delivery networks to fetch the latest version from the server each time customers reload the page. When you update consents in your system, those changes appear immediately when customers refresh.
When customers might see outdated data
If customers keep the consent page open in their browser for extended periods without reloading, they might submit outdated information. This happens because the page wasn’t refreshed to get the latest data. This is a limitation of any web page held open without reload.
Advanced customization
Hide specific categories
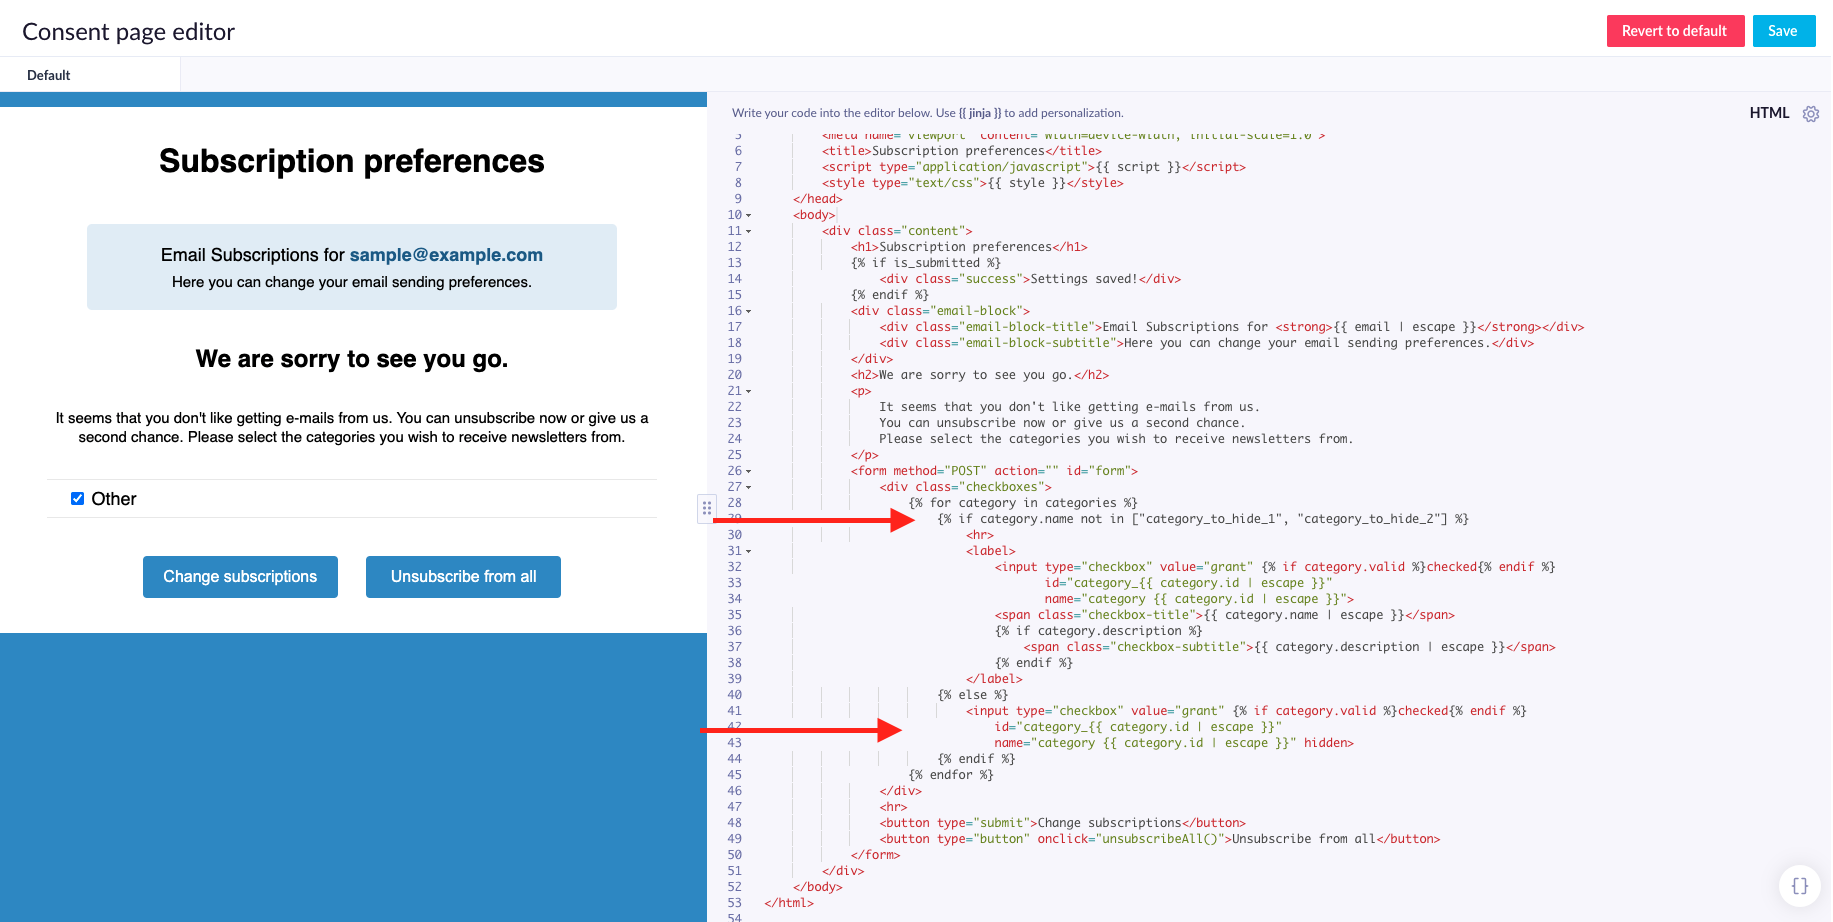
You can hide categories from the consent page using Jinja. This example hides two categories: category_to_hide_1 and category_to_hide_2.
Add this code to your HTML:
{% for category in categories %}
    {% if category.name not in ["category_to_hide_1", "category_to_hide_2"] %}
        <hr>
        <label>
            <input type="checkbox" value="grant" {% if category.valid %}checked{% endif %}
                    id="category_{{ category.id | escape }}"
                    name="category {{ category.id | escape }}">
            <span class="checkbox-title">{{ category.name | escape }}</span>
            {% if category.description %}
                <span class="checkbox-subtitle">{{ category.description | escape }}</span>
            {% endif %}
        </label>
    {% else %}
        <input type="checkbox" value="grant" {% if category.valid %}checked{% endif %}
            id="category_{{ category.id | escape }}"
            name="category {{ category.id | escape }}" hidden>
    {% endif %}
{% endfor %}

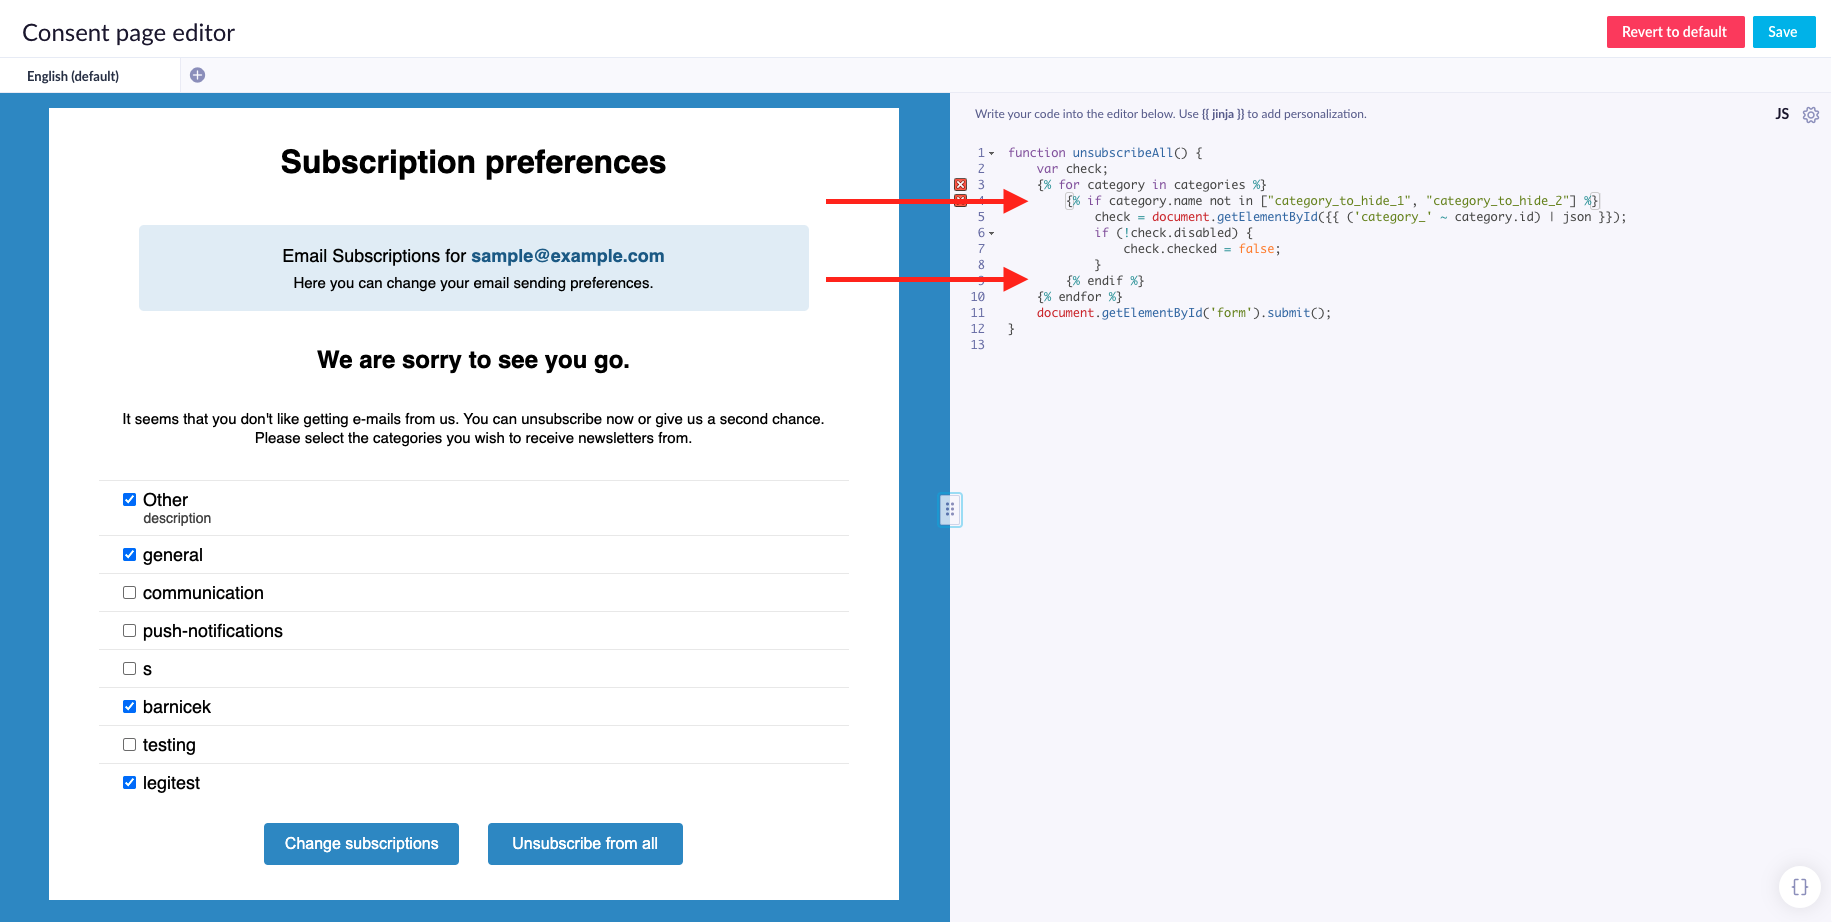
This visually hides the two consent categories. However, if customers click Unsubscribe from all, they'll also unsubscribe from hidden categories.
To prevent the Unsubscribe from all button from affecting hidden categories, add this JavaScript code::
{%- for category in categories -%}
    {% if category.name not in ["category_to_hide_1", "category_to_hide_2"] %}
        check = document.getElementById({{ ('category_' ~ category.id) | json }});
        if (!check.disabled) {
            check.checked = false;
        }
    {% endif %}
{% endfor %}

Create custom sub-categories
You can create custom sub-categories for each category using customer attributes. Use either boolean type (checkbox) or text input.
This example displays "Sales" as a sub-category on the consent page. The matching customer attribute in Bloomreach Engagement is newsletter_sales:
       <label>
	    <input type="hidden" name="property newsletter_sales">
	    <input type="checkbox" {% if customer.newsletter_sales %} checked="true" {% endif %}
 id="newsletter_sales" name="property newsletter_sales">
	    <span class="checkbox-label">Sales</span>
	</label>
Boolean attribute rules
- Names must start with
propertyfollowed by the attribute name:name="property property_name". - Every checkbox input needs a hidden input element with the same name and no value attribute. Hidden inputs detect which checkboxes customers didn't check.
- Hidden input elements must have the same name as the checkbox. In the example above, it's
newsletter_sales. - Use Jinja to load existing values. Don't compare values to
true ({% if customer.newsletter_sales == true %}). Use the format in the example above (line 3). - Checkboxes can't contain empty value attributes. Don't use
value="".
Text attributes
Other attributes can use text inputs and don't need duplicated hidden inputs. Their names must start with property_text:
<label>
	<input type="text" name="property_text property_name" value="{{ customer.property_name }}">
	<span class="title">Property Name</span>
</label>
Changes appear on the consent page immediately after saving. They might take a few minutes to appear in Bloomreach Engagement.
Note
Both techniques (boolean and text) only work if the
<label>tag is inside the
<form method="POST" action="" id="form">tag.
How different updates appear
Consent updates
When you change consents in your system (or when customers update their preferences directly on the page), those changes appear immediately when the page reloads. The strict cache controls ensure customers always see their current consent status.
Customer attribute updates
When you update customer attributes - like names, email addresses, or custom properties - either manually or through tracking, these changes don't appear immediately on the consent page when customers reload it. The system caches customer attributes for 30 minutes to improve performance.
This means if you update a customer's email address at 2:00 PM, that change won't appear on their consent page until after 2:30 PM, even if they reload the page.
Important: The 30-minute cache only applies to customer attributes displayed on the consent page, not to consent data itself. Consent changes always appear immediately upon reload.
Important
The 30-minute cache only applies to customer attributes displayed on the consent page, not to consent data itself. Consent changes always appear immediately upon reload.
Translate category names
You can create multiple language versions of the consent page. To translate category names, use additional Jinja code. This example translates "Newsletter" and "Personalization" into German.
Set up translations. Add this code at the very beginning of your HTML:
{% set translations = [{
	'Newsletter': {
		'name': 'Newsletter_in_German',
		'description':'German description text for the category'
	},
	'Personalisation': {
		'name': 'Personalisierung',
		'description': 'German descriprion text for the category'
	}
}]%}
Now use the translations. If you're translating all categories, find the line {% for category in categories %} and add this code below it:
{{translations[0][(category.name |escape)]['name'] }}
	{% if category.description %}
		{{ translations[0][(category.name |escape)]['description']  }}
	{% endif %}
Pass custom values to consent pages
If you add a query parameter mode to a consent page link, you can access the value from this parameter and change behavior when customers visit the consent page.
For example, if you have a specific marketing campaign and want to show or hide parts of the general consent page, append mode to the URL link:{{consent.page ~ "?mode=Special_campaign"}}.
Then use a Jinja {{mode}} in a consent page to access the URL value. You can use this value in an if condition to show or hide categories on the consent page. If no mode is in the link, the {{mode}} Jinja returns "default" as the value.
Multi-language considerations
If you're using multiple language versions of the consent page, the ?lang parameter always gets added first. Using
?mode=Special_campaign creates an invalid query string like ?lang?mode=Special_campaign when it should be ?lang&mode=Special_campaign. Use &mode=Special_campaign instead of ?mode=Special_campaign.
For customers with and without language properties, use an if-else statement to change the ? sign to & for customers with language properties: {%-if customer.language is defined -%}{{- consent.page ~ "&mode=survey" -}}{%-else -%}{{- consent.page ~ "?mode=survey" -}}{%- endif -%}\
Track consent events
Consent events tracked from consent pages can trigger Scenarios.
Updated 4 months ago
