

Email bounce management
Effective bounce management protects your sender reputation and keeps your emails out of spam folders. Without it, delivery failures accumulate, your domain credibility drops, and engagement suffers. This guide explains how bounces are classified, how suppression works, and how to keep your contact list healthy.
What is an email bounce?
An email bounce occurs when an email fails to reach a recipient's inbox. Common causes include an invalid email address, a full mailbox, or a temporary server issue.
When an email bounces, the recipient's mail server—for example, Gmail or Outlook—sends an automatic response explaining the failure. This response includes the bounce reason, date, and time. The primary categorization of soft or hard bounce comes from the email provider. Bloomreach takes additional steps to reduce the long-term impact of bounces on your sender reputation.
Bounce types and actions
Bloomreach supports the following bounce types:
| Bounce type | Description | Action |
|---|---|---|
| Soft bounce | Caused by temporary issues such as server downtime or inbox overload. This only happens for Mailgun (code 602). | Track campaign event with status=soft_bounced |
| Cumulative soft bounce | Caused by temporary issues such as a full inbox, invalid recipient, or missing MX records. Some issues may resolve over time, while others persist. | Track campaign event with status=soft_bounced and cumulative=true |
| Hard bounce | Happens when an email address is invalid—for example, when the address doesn't exist. | Track campaign event with status=hard_bounced and invalidate the contact |
| Preblocked | The recipient's email service provider (ESP) blocks the email or places it on a suppression list before delivery. | Track campaign event with status=preblocked and invalidate the contact |
| Complained | The email was delivered, but the recipient marked it as spam. | Track campaign event with status=complained and revoke consent for the particular campaign |
ImportantBloomreach doesn't receive spam complaint data from Gmail. Use Google Postmaster Tools to monitor complaints from Gmail users.
How cumulative bounces work
Cumulative bounces track repeated soft bounces (cumulative=true) for the same email address. If an address bounces multiple times, it's automatically suppressed to prevent further delivery attempts and protect your sender reputation.
Suppression logic
- Temporary suppression is triggered after 3 consecutive soft bounces. The email address is suppressed for 14 days.
- No emails are sent to the address during the suppression period.
- A campaign event is recorded with
status="suppressed"and the message"Temporarily suppressed due to repeated soft bounces for this email address". - Suppression expires after the defined period (
valid_until=timestamp).

Campaign event recording temporary suppression due to repeated soft bounces.
- Permanent suppression is triggered if the email address continues to bounce after 2 temporary suppressions. The address is permanently suppressed and the contact is invalidated.
- The system prevents all further email attempts to this address.
- The contact is invalidated, tracking
invalid_contactevent with thereason="Permanently suppressed due to repeated soft bounces for this email address”.
Suppression flow
- First temporary suppression: 3 consecutive soft bounces → 14-day suppression.
- Second temporary suppression: Another 3 consecutive soft bounces after suppression lifts → 14-day suppression.
- Permanent suppression: If another soft bounce occurs after the second temporary suppression, the email address is permanently suppressed.

Timeline of the email suppression flow from soft bounce to permanent suppression.
If a campaign is sent during a temporary suppression period, it's blocked. Once suppression expires, sending resumes normally.
NoteConsecutive soft bounces mean no successful deliveries (no
deliveredorrevalidatedcampaign events) between bounces (cumulative=true). Suppression applies at the next campaign send attempt.
Exceptions
Cumulative logic doesn't apply if the email property doesn't match the recipient in the soft bounce events counted toward the cumulative tota. For example, if the email property was updated between bounces.
Cumulative bounce settings
You can customize the number of soft bounces required before temporary suppression is triggered, and how long the suppression lasts.
To view and adjust the current settings:
- Go to Project settings.
- Under Campaigns > Channels, select Emails.
- Go to Email suppression > Bounce management.
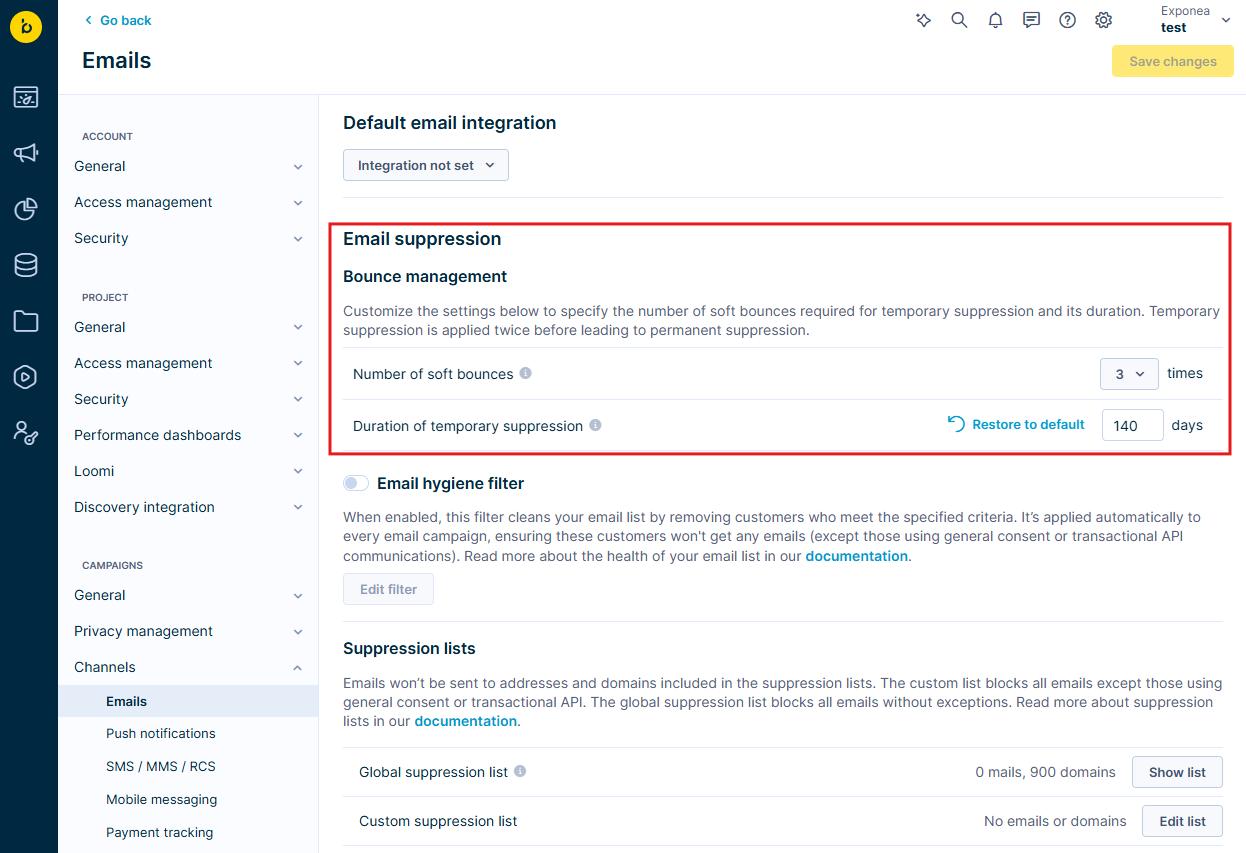
Bounce management settings in Email suppression.
- Review or update the following parameters:
- Number of soft bounces before suppression: The default is 3 for optimal results. If you notice patterns in your bounce data, consult your consultant or email specialist before adjusting this value.
- Temporary suppression duration: Default is 14 days (minimum 1, maximum 180). Adjust based on your sending frequency.
Invalidate contacts
When an email permanently bounces—through a hard bounce, preblocked status, or cumulative soft bounces—Bloomreach automatically invalidates the contact to prevent future sends.
Two actions happen when a contact is invalidated:
- The customer attribute
email_invalidis set totrue. This excludes the profile from all future email campaigns. - An
invalid_contactevent is tracked, logging the following details:- channel: How the invalidation was identified.
- contact_info: The affected email address.
- reason: Why the email was marked invalid.
- source: Where the bounce originated (Bloomreach, ESP).

An invalid_contact event showing the details logged when a contact is invalidated.
ImportantSetting the
email_invalidflag doesn't affect transactional emails. These are always attempted, regardless of suppression rules.
Reengage bounced profiles
If you've confirmed that a suppressed contact is valid, you can reinstate it.
- For permanently suppressed contacts only: Update the
email_invalidattribute tofalse. - For both temporary and permanent suppression: Track a revalidated
campaignevent withstatus=revalidated.
Required campaign event structure
- Status:
revalidated(mandatory) - Recipient: The email address associated with the bounces—mandatory. It must match the profile's current email attribute.
- Message: Custom note explaining the reason for revalidation — optional.
WarningRe-enabling permanently bounced profiles can harm your domain reputation. Use caution before proceeding.
Best practices for bounce management
To keep your deliverability high and your bounce rate low:
- Clean your email list regularly to remove invalid or inactive addresses — these are one of the primary causes of bounces.
- Look for patterns in your bounce data, such as repeated soft bounces from a particular domain or consistent hard bounces from invalid addresses.
- Analyze bounce reasons in your reports to identify issues with email content or technical configuration.
- After fixing issues such as invalid addresses, revalidate contacts to make them eligible for future campaigns.
Manage bounces proactively to protect your sender reputation and maintain high deliverability.
Email bounce report
To learn how to create a bounce report, watch the video.
Deliverability investigation dashboard
To monitor metrics such as delivery rate and hard bounce rate, use the email deliverability dashboard.
- Go to Overview > My dashboards.
- Click Create new dashoard.
- From the predefined dashboards, select the [Email] Deliverability Investigation.

Selecting the Email Deliverability Investigation template when creating a new dashboard.