

Scenarios
Scenarios are a great way to connect with your customers at any point of their journey by using emails, push notifications, or webhooks.
From sending a basic email to complex automated flows with multiple targeted segments and A/B testing, scenarios are easily created using drag and drop. You can also analyze the customer journey as the scenarios provide you with real-time journey orchestration.
Why you should use scenarios
By connecting with your customers, you can increase their engagement and retention, bring back lost customers, or offer highly targeted offers based on the past behavior of every customer. Scenarios also allow you to automatize your communication based on your custom conditions.
Even though scenarios are incredibly powerful when combined with analytics, they are an independent module of Bloomreach Engagement. This means you can use them even if you don't plan on fully integrating your business with Bloomreach Engagement.
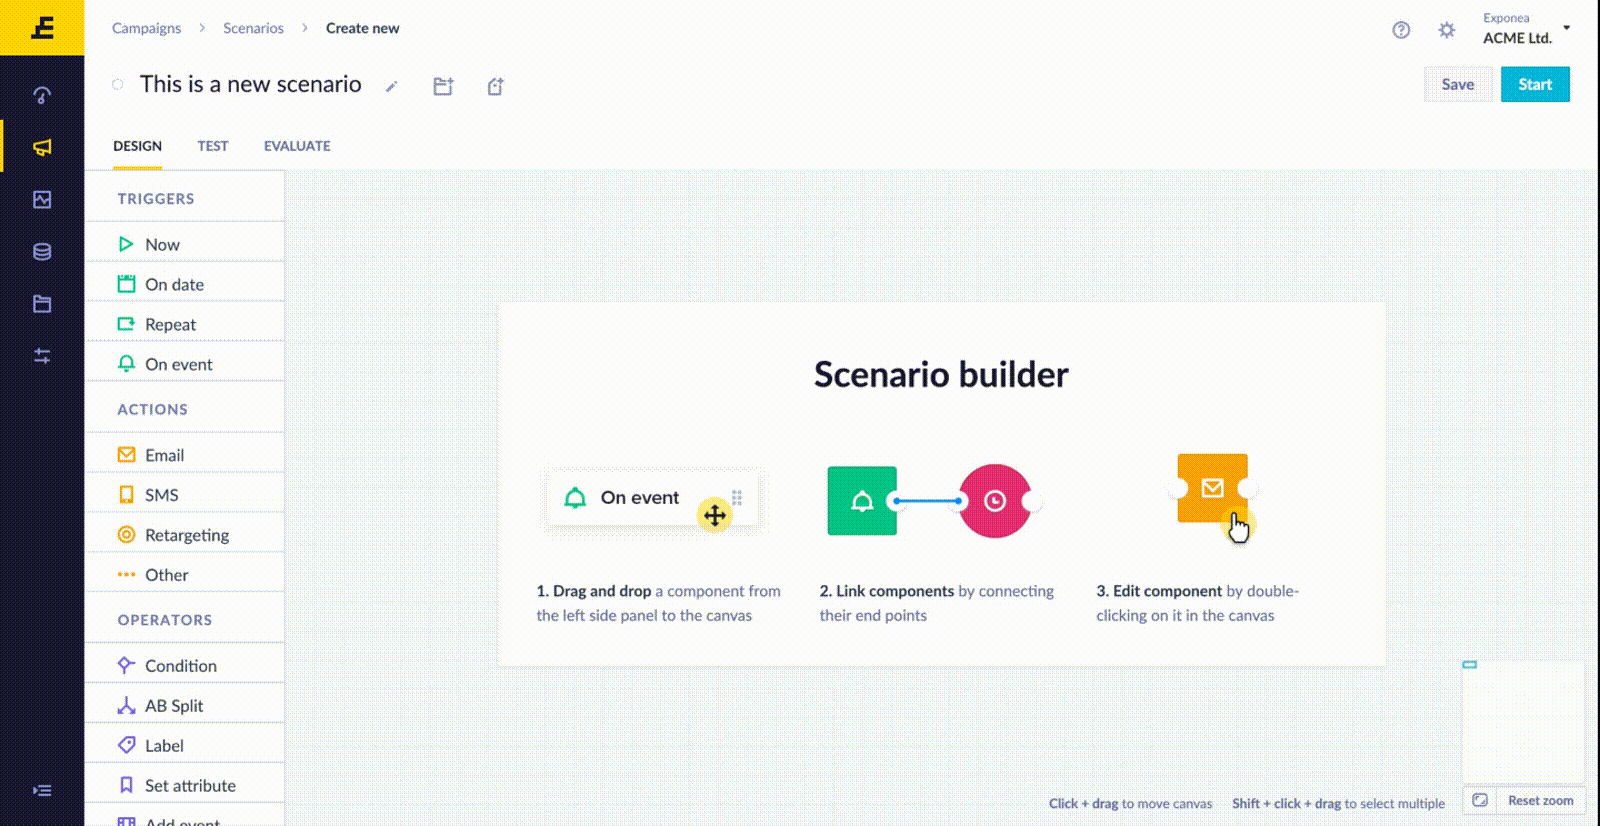
Creating a basic scenario
Open the scenario editor by going to Campaigns > Scenarios > Create new.
Adding, editing, and connecting components
Every scenario is a set of components connected to a flow.
- To add a component, click on the component you want to add or you can drag & drop it onto the board with your left mouse button.
- To edit a component, double-click the component with your left mouse button. This will open a component-specific edit window. Click "save" after you are done.
- To remove a component, select the component by clicking it with your left mouse button and then click on the trash icon, or hit backspace or delete on your keyboard.
- To connect two components, click on the output connector on the right side of the first component and drag the line to the input connector on the left side of the second component, as shown in the animation below. Release your mouse once connected.
- Now you have created a flow. Customers will pass through this flow starting from a trigger (e.g.
On date) to operators (e.g.Condition) and finally into actions (e.g.Email).
- Now you have created a flow. Customers will pass through this flow starting from a trigger (e.g.
While in every meaningful scenario there should be at least one trigger and one action component, there can be multiple flows in a single scenario.
Scenario size recomendations:There is a hard limit for how much data can be stored in one scenario (or email campaign) definition.
Following statements are taking into account average size of scenario node.
Using more nodes can quickly lead to internal error about scenario size limit.
- Scenario should not use more than 100 nodes. Ideally, keep their number below 30 to avoid possible lags.
- Scenario should not use more than 25 email nodes. This includes different language versions. The shorter your email is, the more nodes or translations you can use. As a workaround you can move parts of your email into html blocks. Content of such reference will not count towards given scenario size limit.
- Maximum scenario size is 7.9 MB.
Copy & paste nodes
The nodes and their connections can easily be copied within one scenario or among multiple scenarios.
This can be done by selecting the nodes that one wants to copy, clicking Cmd/Ctrl + c, and then clicking Cmd/Ctrl + v to paste (hold Shift if you want to select multiple nodes).
When copying from one scenario to another for the first time, the browser might ask to allow seeing the nodes copied to the clipboard.

Copy & pasting between scenarios is not allowed between different versions of the app.
Moving, zooming, and selecting multiple components
You can move your position on the canvas by clicking on an empty space and dragging your mouse. To select multiple components, hold shift and do the same. You can delete all selected components by pressing backspace on your keyboard. Zoom in or out using your mouse wheel. If using a touchpad, you can also move by sliding 2 fingers and zoom in/out by pinching 2 fingers. Keyboard shortcuts available: Press 1 to fit the screen, 2 to zoom to selection, and 0 to reset zoom.
You can also click on the minimap in the bottom right corner to navigate your position.
Saving and executing a scenarioDon't forget to save your scenario by clicking the "Save" button in the top right corner. This will save the scenario for later and will not launch it. If you want to launch the scenario now, click the "Start" button. This means that the triggers in the scenario will now start streaming customers into the flow.
Test and preview
Before launching the scenario, you can preview how customers are predicted to flow through the nodes based on the conditions you defined. To do so, click on the "TEST" tab located above the canvas.
The test will dry-run the campaign as if it was executed immediately, taking into consideration all policies, A/B splits, unsubscribes, and other aspects. Bear in mind, however, that this is only an estimate and the individual aspects may change over time.
Please note that it is not possible to use this if you use an "On event" trigger since it is unpredictable. If you still want to see how customers would flow through the individual conditions, insert the "Now" trigger and then replace it again before launch.

Confirmation of Scenario Execution
After clicking on the “Start” button of your scenario, a “Confirm Scenario Execution” window appears. Here it shows how many customers will be affected by the scenario. However, this number does not always represent the number of unique customers. Let´s show the example of the situation: You set up a scenario where you send 3 emails to only one customer. The Confirmation window shows that it will be sent to 3 customers although, in reality, it would be sent to the same customer three times.

Usage warnings
To optimize your campaign's structure, the Scenarios check and inform you about potential usage issues. Results (and possible warnings) of these checks are shown as a warning message in the sidebar of the TEST tab, or in the “Confirm scenario execution” modal window when starting a campaign.
Currently, the warning messages have a purely informational purpose and should help you identify and resolve any usage issues that might negatively influence the performance of the given scenario(s) and/or all scenarios running in parallel.
Currently implemented usage checks are for the following errors:
(1) Jinja condition error
- Occurs when a Condition node containing jinja in some of its filter’s conditions processes more than 100K customers in one run. This can be detrimental to the performance of the whole instance’s campaign structure.
- Results in a warning message: "Too many customers processed by condition node #1 containing Jinja. Don't use Jinja in condition nodes for processing more than 100K customers in one run if the personalized filters are likely to be highly unique - i.e. almost every customer might have a different final filter."
(2) Set property action error
- Occurs when the sum of customers entering all the Set attribute nodes of a campaign exceeds 1 million.
- Results in a warning message: "Set attribute actions count exceeds recommended limit. Please, try limiting the "Set attribute" node usage to maximum 1M updates in one run."
(3) Dynamic wait action error
- Occurs when a Wait node with a Dynamic time period parameter (containing jinja) is processing more than 200K customers.
- Results in a warning message: "Dynamic wait node #2 is processing too many customers in one run. If possible consider reducing their count to less than 200K by using filtering conditions before letting them enter the wait node."
Evaluate
Once the scenario is active, you can open the "EVALUATE" tab to see how customers are actually passing through the flow in real time. This helps with troubleshooting when a lot of customers unexpectedly get stuck somewhere in the scenario. Hover over each node to reveal how many customers have entered, successfully completed, or got stuck in that node.
When you are in the "EVALUATE" section, you can click on "Email campaign result" underneath the button to access the out-of-the-box dashboard that contains all key metrics for evaluating your email campaign or comparing conversions within your A/B testing. Under "Click map" you can find click heatmaps for analyzing your customer's interactions with your campaign. You can watch this video to learn more:
Legacy ResultsUnder the tab
Resultsyou can still access our legacy email dashboard, which will be deprecated in the future.
What happens if I edit a running scenario?
Updating a node - the current users in the node (usually a very small number except wait nodes) finish the scenario with the old version and all new customers coming to that node (no matter where they're coming from) will flow according to the new version.
Deleting a node stops the execution of all unprocessed customers in the node, e.g. customers in the wait nodes will be lost. They won't continue to the next node.
Creating a new node or modifying node connection applies immediately, e.g. modifying outgoing connection from a wait node means that existing customers in the node will use the updated connection once they are finished waiting.
Scenario components explained
Let's have a look now at how each component works. Remember that you can specify each component by double-clicking on it once it has been placed on the canvas.
How are components displayed
Names and search
The name of the node displayed in the Scenario contains the following 3 things:
- The Action ID of the node
- The type of the node
- The user-defined name of the node

Search is available to help clients quickly find the node they are looking for. It is possible to search for the node by its action ID, the type of the node, or its name.

Labels formatting
Labels can be formatted using standard markdown notation. This can be done using either the visual formatting helper bar or by writing markdown directly. The available formatting options are:
- bold
- italic text
- headings (H1-H6)
- unordered lists
- links
Other markdown formatting options are also supported but might not be properly styled in the resulting label.
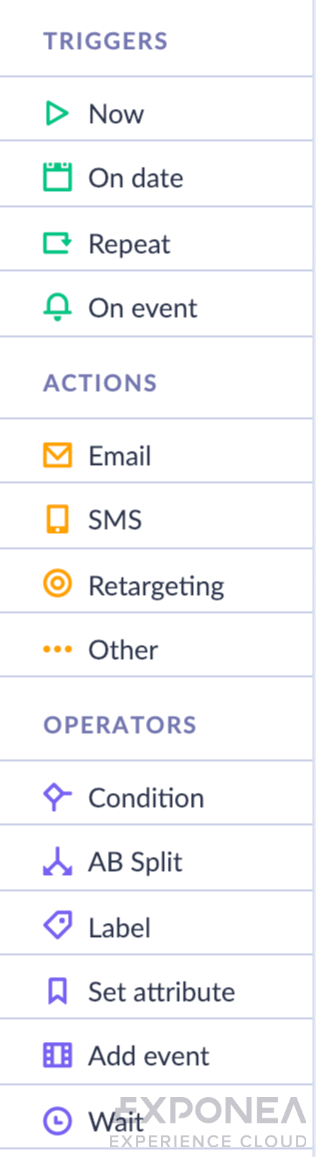
Triggers
| Trigger | Description |
|---|---|
| Now | Will stream all customers to the flow immediately after execution. Once used in a live scenario, it will become inactive and you will need to refresh it manually to make it work again. |
| On date | Will stream all customers to the flow on the specified date and time. The timezone used is set in Settings > User Settings > Timezone. |
| Repeat | Will stream all customers to the flow repeatedly, based on the specified time condition. You can set daily, weekly, and monthly runs and also specify the total time range to set the final date when the scenario should stop repeating the runs. |
| On event | Will stream a single customer to the flow every time the specified event is tracked to this customer. |
Trigger limitations
Certain campaign event statuses do not trigger scenarios when used in the "On event" node. Therefore, you should not use them as triggers in your scenarios. Those statuses include:
enqueuedenqueue_failedsentfailed
Importantly, campaign events that do not have a status attribute altogether, such as A/B tests, will also not trigger a scenario.
Apart from campaign events, there are other events that do not trigger scenarios. Those are listed below:
mergeconsentevent that is generated by manual consent update in the web UI
Additionally, unless the option "Allow scenario triggering" in the add event node is turned on, events added/generated from scenarios don't trigger scenarios with triggers waiting for that particular event.
While importing events, you also need to check the "Trigger on-event campaigns" option if you want to use those events on the trigger.
If you are unsure whether you checked this box or if you forgot to check it and now you want to use those events on the trigger, simply re-import the data, but this time check marked. Importantly, make sure to import it with a different timestamp (millisecond earlier or later) than the events currently in your project.
If you import it with the same timestamp, the Engagement deduplication process will conclude you are importing duplicates and will merge those events with the original ones but without the check-marked option.

The limitation for campaign events only covers the events automatically tracked by the system. Custom-created and tracked campaign events with the 'enqueued enqueue_failed sent failed' statuses will trigger scenarios.
Resetting triggers
Once used in a live scenario, both Now and On date triggers will become inactive. If you want to re-activate them, use the Reset trigger. In the picture below, you can see the triggers as active on the left and inactive on the right, with two highlighted options on how to reset them:

Specifying events using derived attributesIt is not possible to specify events using derived attributes (running aggregates, expressions, event segmentations).
Parallel triggers overload in a single scenarioAs the triggered actions will be processed in the order as requested, a single Scenario with parallel triggers might not work as expected. For example, if both 'On event' and 'On date' triggers are pulled simultaneously the 'On event' trigger would need to wait until the 'On date' trigger is fully processed despite the expectation that it would go into action right after a particular event is tracked. If there are multiple parallel triggers it is recommended to divide them across multiple Scenarios.
Actions
When a customer enters an action component, an action is executed. Each type of action has a unique 'action_id'. Read more about this in the System events article.
| Action | Description |
|---|---|
| Will try sending an email with the specified content (e.g. body of the email, sender, subject) to this customer's email. Learn how to create an email campaign in Bloomreach Engagement here. -Attribute email must have value in order for a customer to receive an email campaign | |
| SMS | Will try sending an SMS with the specified content to this customer's phone number. Learn how to create an SMS campaign in Bloomreach Engagement here. -Attribute phone must have value in order for a customer to receive an SMS campaign |
| Retargeting | Will update your FB or Google audience based on the match of email, phone number or FB ID. Read more about retargeting integrations: Facebook Ads AdForm DMP Google Ads Google Analytics |
| Mobile push notifications | Will try sending a push notification with the specified content to the customer's mobile phone. Learn more about mobile push notifications. |
| Web push notifications | Will try sending a push notification with the specified content to the customer's web browser. Learn more about web push notifications here. |
| Webhook | Will try sending a custom HTTP request to a specified API (e.g. your server's address). Learn more about webhooks. |
| HTML | Will save a piece of HTML content that will be shown to the customer upon the visit of a connected webpage (only available in the JavaScript SDK), which is useful in the instance of homepage customization for different customer segments. |
| Facebook message | Will send a FB message to the customer. Learn more about Facebook messages. |
Locating action IDTo see a particular action ID, go to the Evaluation tab, hover your mouse over the node and the ID will be shown in the format of "#(number)".
Emailing a manually-chosen recipientIf the recipient is used in the scenario's email node is chosen manually, then the campaign policy for the frequency of delivery will be ignored.
Snippets
Snippets are smaller custom pieces of jinja, code, text, or HTML that can be saved and reused across campaigns and scenarios. Their use can range from saving frequently used Jinja macros, to saving snippets of text, such as the unsubscription sentence that you use in all your SMS campaigns. Read more about Snippets.
Operators
Operators are generally used to change the way customers move through the flow. There are the following types of Operators:
| Operator | Description |
|---|---|
| Condition | Functions as a gate - it will stream customers who match the specified condition through the match (green) output connector and customers who don't match through the don't match (red) output connector. After allowing personalization, some Jinja tags become available to use within the condition, e.g. trigger event properties, or report values. This, however, reduces performance and should thus be used with caution. |
| AB Split | Splits customers into two or more distinct groups based on the specified ratios. Note that the AB test with an automatic winner distribution can only be used with theNow and Scheduled triggers (AB test with manually set distribution can be used with On event too). Read more in the AB testing article. |
| Customer limit | Limits the number of customers that go through a scenario flow with an absolute number. |
| Label | A simple text label that you can use to name flows and add a description. |
| Set attribute | Replaces the original value by assigning a completely new value to the specified customer attribute. It works for string, number, boolean, list, and JSON attributes. The maximum number of properties that can be set in a node is 100. (Use a visual or code editor to set up the node.) |
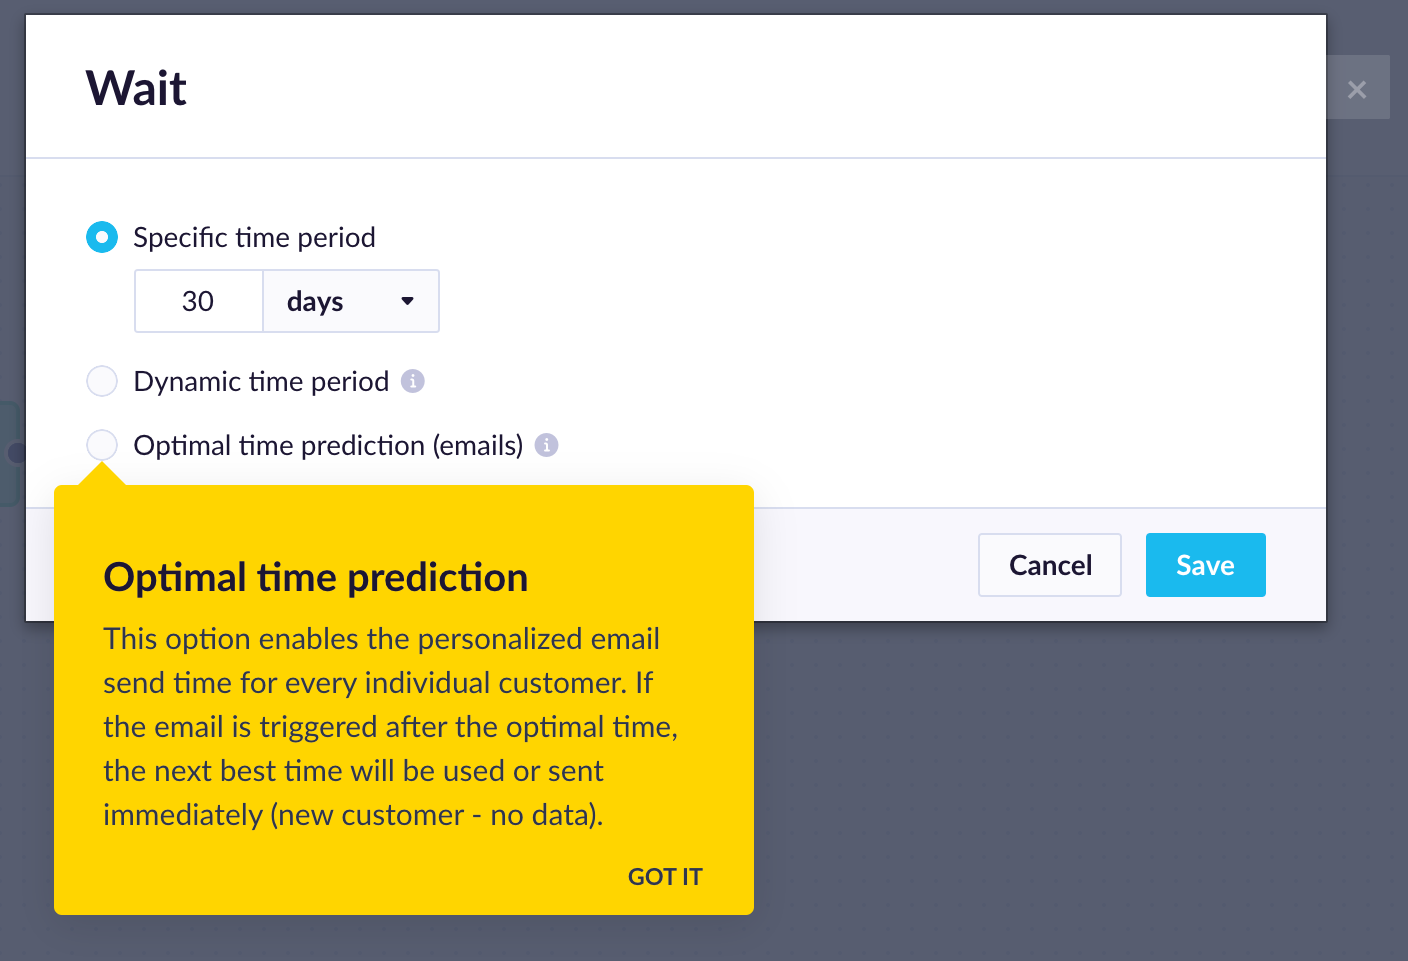
| Wait | After entering this node the customer will wait for the specified amount of time before they are streamed to the flow again. Wait node can be set as a fixed time period, dynamic period based on other events, or set based on the optimal send time for the specific customer when they are most likely to engage with the campaign. If you choose to set a fixed time period, you can set the wait time from minutes up to years. The wait times are specified in a way that: day = 24 hours, week = 7 days. However, they take into account calendar months, hence if you set the waiting period to 1 month, it can take anywhere between 28 and 31 days. The goal is to achieve the same date x months later, e.g. if you set it to 1 month on the 16th of February, the wait time will pass on the 16th of March, not after 30 days. |
| Add event | Records new event records. Events must be defined in the Data Management first. You can use Jinja tags to include contextual information in properties, just like in email templates. The maximum number of events that can be added using one node is 50 and a maximum of 100 properties can be set per event. Note that when a custom timestamp is used in the node, the timestamp is in the past. It means that it falls under event expiration, the event will not be added and will fail. |
| Segmentation fork | Segmentation fork operator allows you to divide customers into smaller groups based on common characteristics. |
Relative time filters use the UTC timezone while absolute time filters use your custom timezone from
Settings>User Settings>Timezone. Note that the relative filters apply only to scenarios, not to your whole project.
Flexible operators
"Set attribute", "Add event" and "Condition nodes" can be defined not only by using a visual editor/customer filter but also by using their code editor. JSON syntax has to be followed and jinja can be used for further personalization and to define a condition.

The following are some syntax examples that can be used in the code editor:
Add event node:
[
	{
		"event_type": "event",
		"timestamp": 1234,
		"properties": {
			"property1": "value1",
			"property2": 1234,
			"property3": true,
			"property4": ["value1", "value2"],
			"property5": {"key1": "value1"},
			"property6": {{ variable | json }}
				// json filter should be set up to keep the Jinja personalization valid for the app
				// (e.g., to ensure that string values are surrounded by double-quotes instead of single-quotes
				// or boolean values are true/false instead of True/False)
		},
		"trigger_scenarios": false
	}
]
Set attribute:
{
	"property1": "value1",
	"property2": 1234,
	"property3": true,
	"property4": ["value1", "value2"],
	"property5": {"key1": "value1"},
	"property6": {{ variable | json }}
		// json filter should be set up to keep the Jinja personalization valid for the app
		// (e.g., to ensure that string values are surrounded by double-quotes instead of single-quotes
		// or boolean values are true/false instead of True/False)
}
Condition:
{% if customer.first_name %}
	True
{% else %}
	False
{% endif %}
or
// Following Jinja will be evaluated as True
-------BEFORE RENDER--------
{% set x = True %}
{{ x }}
--------RENDERED------------
"True"
----------------------------

// Following Jinja will be evaluated as False
--------BEFORE RENDER-------
{% set y = False %}
{{ y }}
--------RENDERED------------
"False"
--------BEFORE RENDER-------
{% set z = 123 %}
{{ z }}
--------RENDERED------------
"123"
----------------------------It is not possible to test preview customers flowing through the Jinja Condition node to the following nodes and therefore, N/A will be displayed in the Test tab instead.
Customer limit
You can only have up to 1000 distinct groups in a limit node, before it starts failing.
The customer limit allows you to set the maximum number of customers who can pass through the node. This can be very useful when your scenario leads your customers to a channel with a limited capacity. For example, you might have limited capacity for the number of calls your call center can handle within a day.
The customer limit node creates two outputs: a successful one for the customers within the limit and the unsuccessful one for the customers over the limit. It is at the moment when a particular customer arrives at the customer limit node in the scenario that it is decided to which output they will go. At first, all customers go to the successful output but once the threshold is reached all the rest go to the unsuccessful output. Since then, all customers will be falling into the unsuccessful output even for the next campaign runs until the number of customers passing through the node is reset back to zero. You can set a period reset of this number in the Specify customer limit reset period.
You can set the limit by filling in the value of the Limit to # of customers. This value can either be an absolute number or a number referenced by jinja (references to the following can be used: metrics, reports, report_value_by_key, catalogs). Read more on jinja references.
You can also Allow drill-down group which lets you use jinja to add multiple limits per node based on the group - a separate limit on each segment of customers using the scenario. You might want to do this if you send out a competition that would be decided on a 'first come, first serve' basis but where you also want to have a specific number of winners from different segments of customers. You can use the same variables as in webhooks like customer attributes, trigger event properties, or webhook response. If you want to use the drill-down group as a parameter in the jinja of the limit the parameter is called limit_group.

Example of the limit with a limit groupTo look into catalog subsidiaries and look for an item that was used as a drill-down group, and reference limit attribute from the catalog item, use:
{{ catalogs.subsidiaries.item_by_id(limit_group).limit }}
Accessing catalogsThe Catalogs cannot be accessed via a condition custom code editor via the item_id function.
Using optimal send time
Based on your customer's past behavior, the optimal send time option in the wait node allows you to automatically send out email campaigns to individual customers at a time, rounded to an hour, when they are most likely to click/open your email. Learn more about Optimal send time
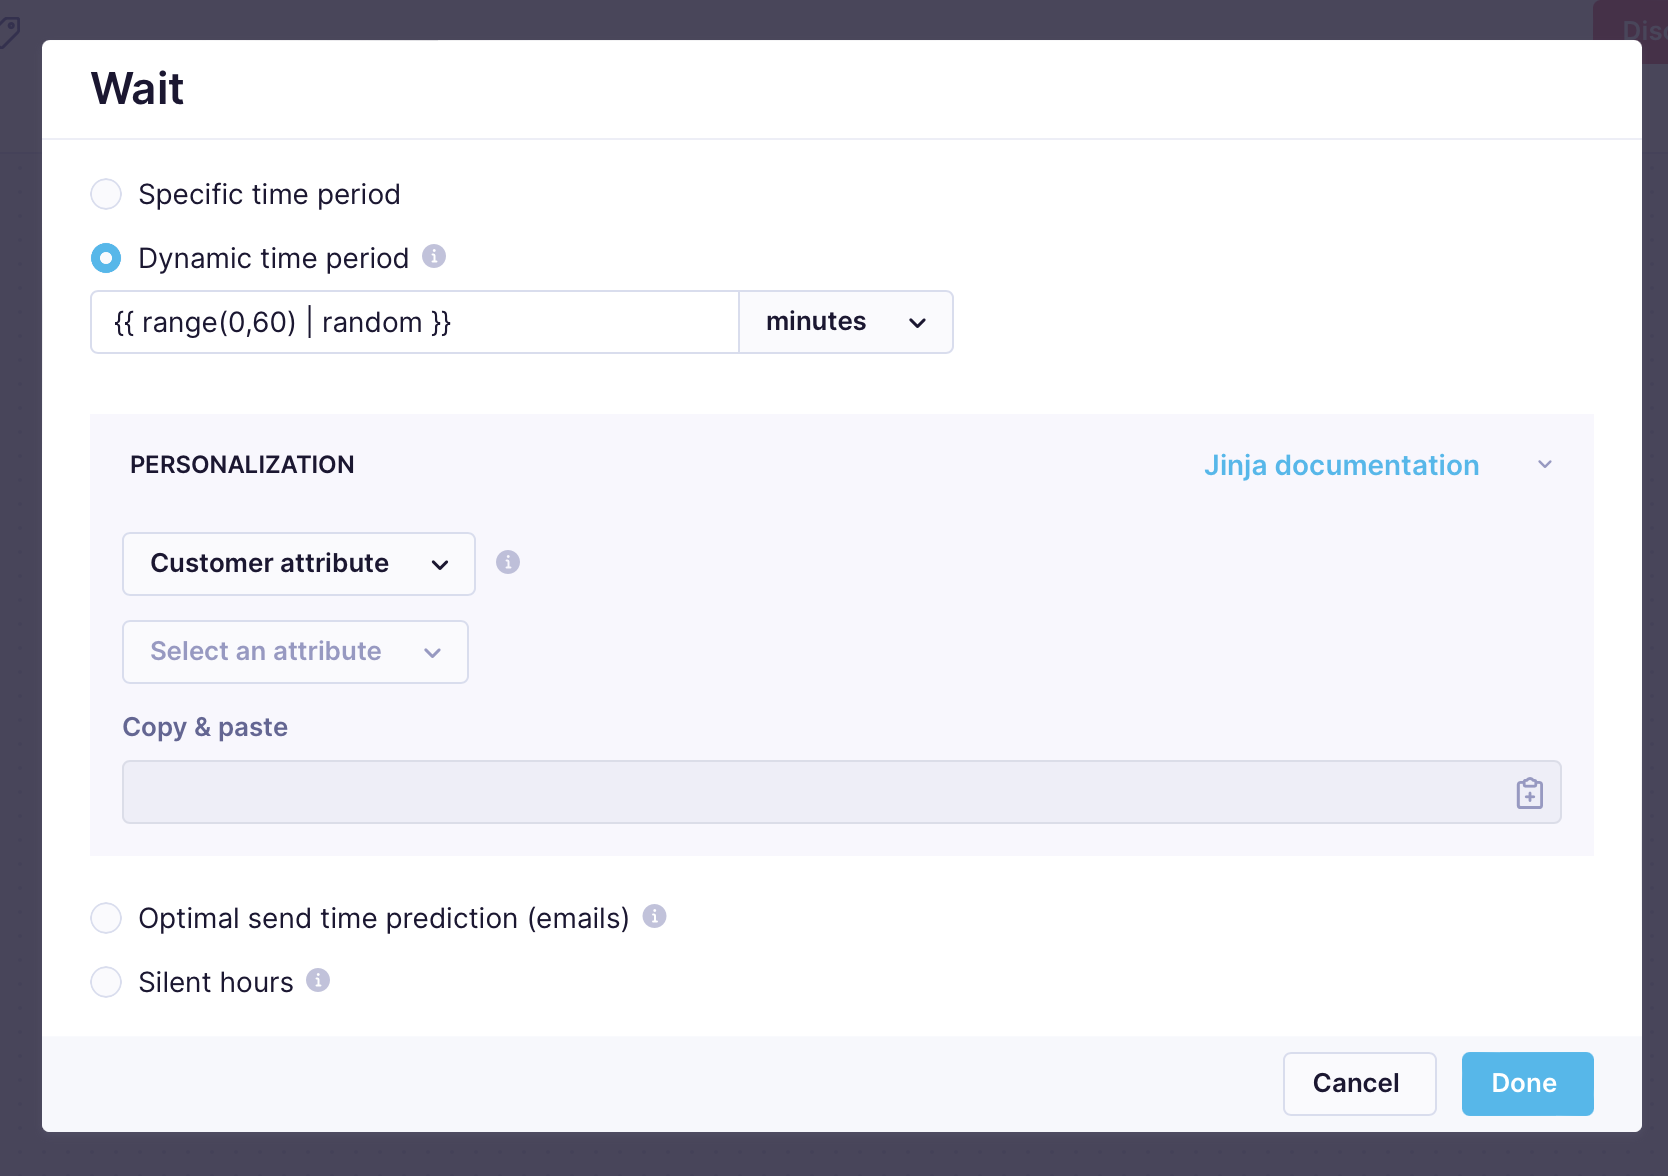
Using Dynamic Time
You can use the dynamic wait time to set a custom wait period using jinja. You can use some project metrics, aggregates, trigger event attributes, or any type of personalization.
Common usage of the dynamic wait time is to spread or throttle the campaign execution over some time period using the random number generator. E.g.: to spread the send approximately within 60 minutes you can use the{{ range(0,60) | random }}.
If the Wait time is set to hours, the number is rounded down (to an integer). For example, when you calculate 1.8 hours wait, Wait node waits only 1 hour. If you want to round up, you can use the Jinja function round (can accept "ceil", "floor" or "common" parameter):
Wait {{ ((event.departure_time - time) / 3600) | round("ceil") }} hours
Wait node does not wait at all if the wait value is zero or lower (executes the following node right away).
Delivery of an SMS campaign can be either successful or unsuccessful. Bloomreach Engagement tracks this information as an attribute of the campaign events.
Using Silent Hours
You can use Silent hours to temporarily pause the sending of your campaigns to the customer during times when you do not want to disturb them, such as at night or on a Sunday. If this node is entered during silent hours, the scenario will wait under their end and only then send the campaign. Silent hours can be set up for a specific time repeated daily or as Silent days which will silence the whole selected day or both options can be used together. A specific timezone can also be selected for the silent hours to be evaluated against.
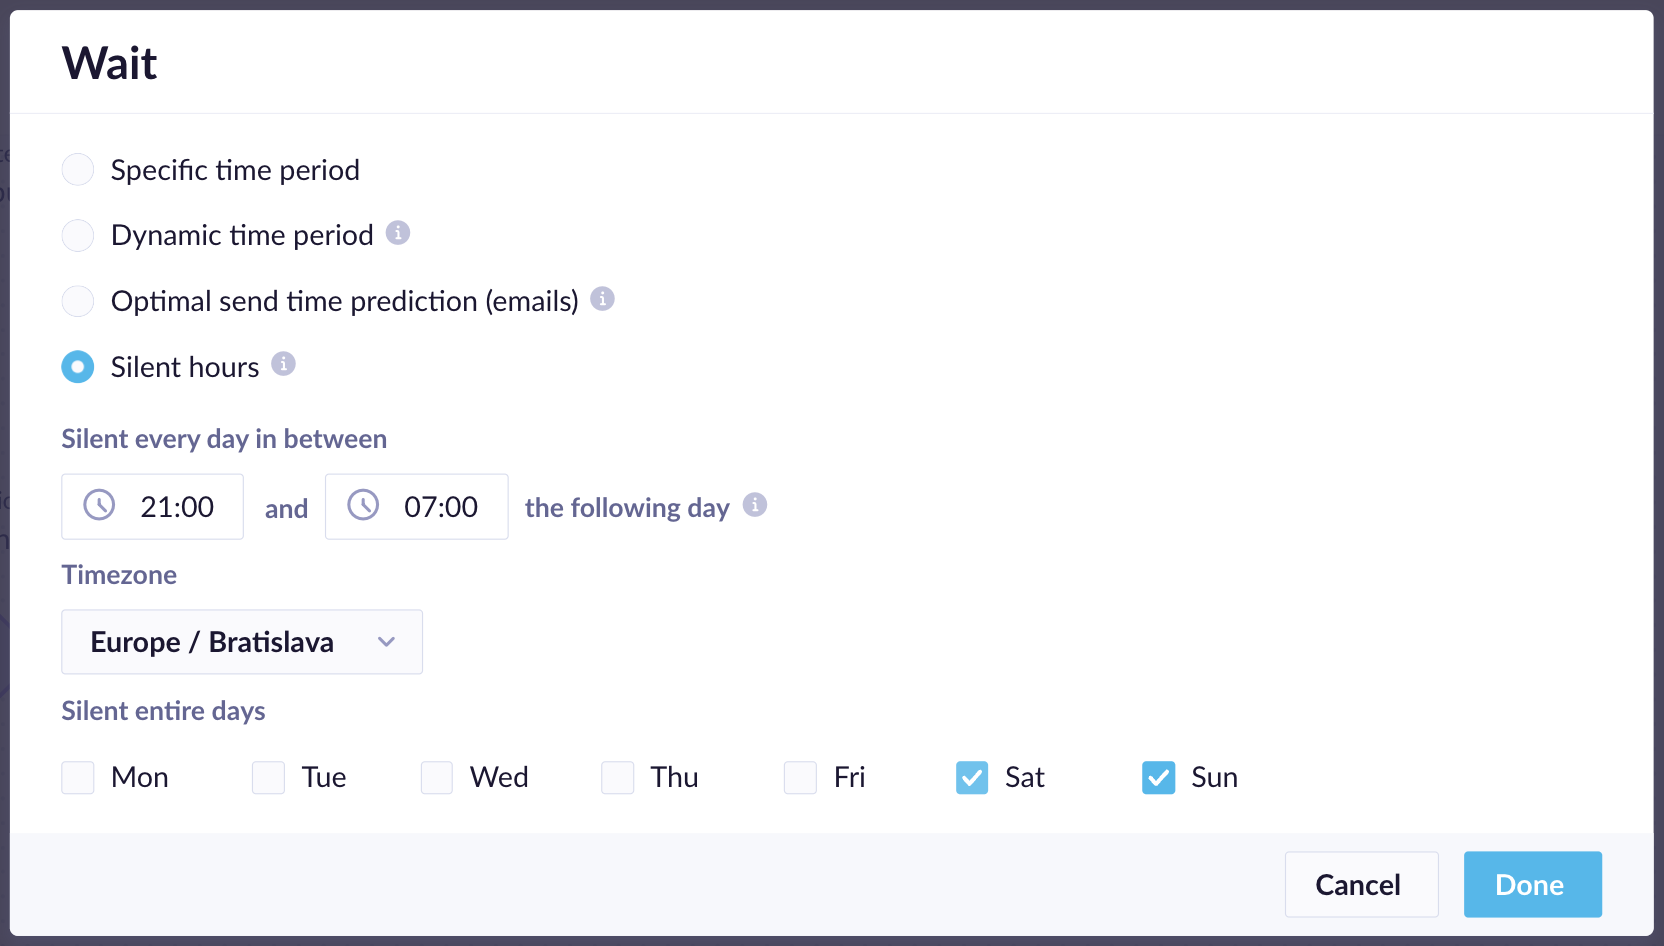
Silent hours can be also set up globally in Project settings > Campaigns > General Campaigns settings. This will pre-fill a Silent hour Wait node when it would be selected in a scenario. The setting can be overridden in a specific node if needed.
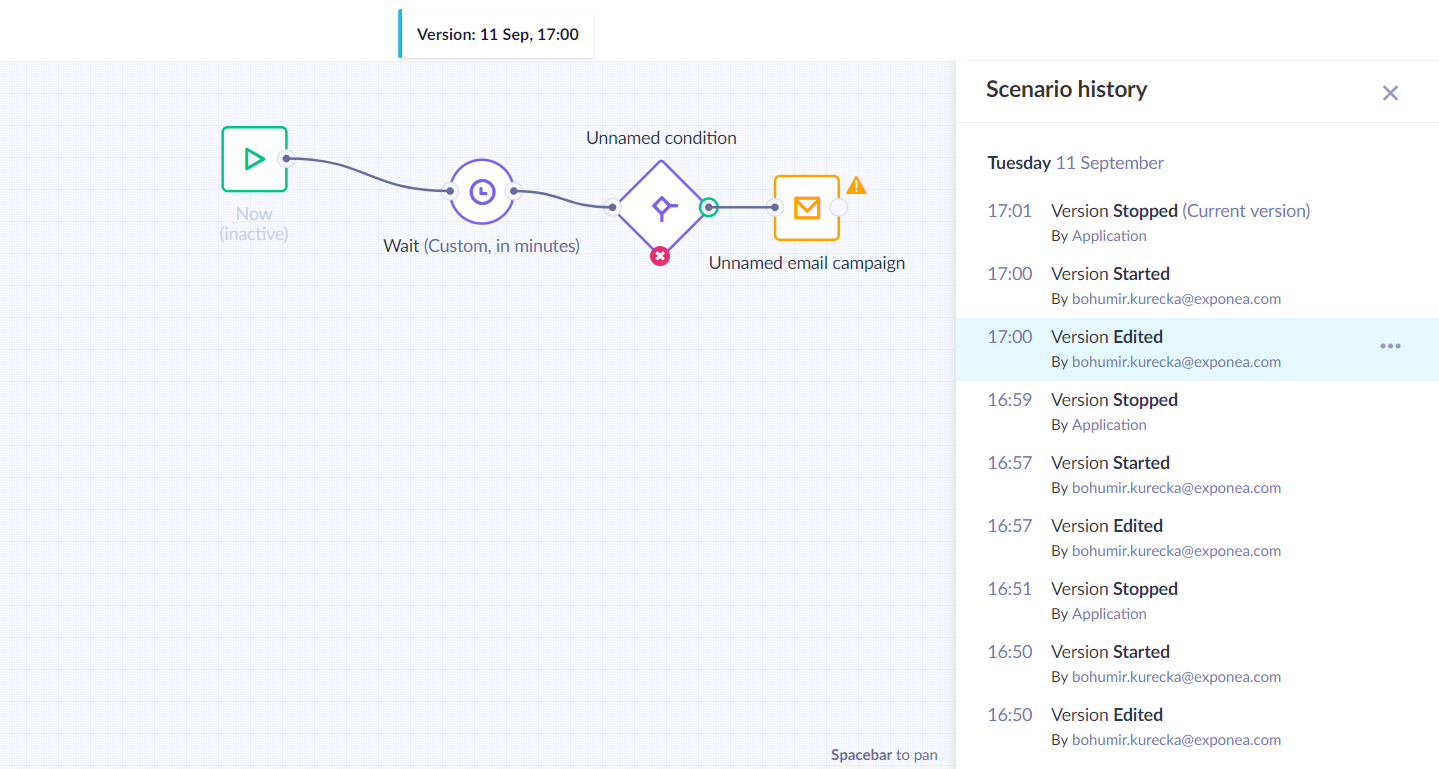
Scenario version history
You can restore accidentally deleted versions and continue working on them. Scenario version history offers also the view of changes, showing specific nodes that have been changed in the scenario. Just go to the specific scenario, click on the three-dots menu, and go to Scenario history.

You will be able to preview the historical changes by clicking on each version, where you can revert to any version or make a copy of it. Nodes that have been changed in that version will be highlighted.
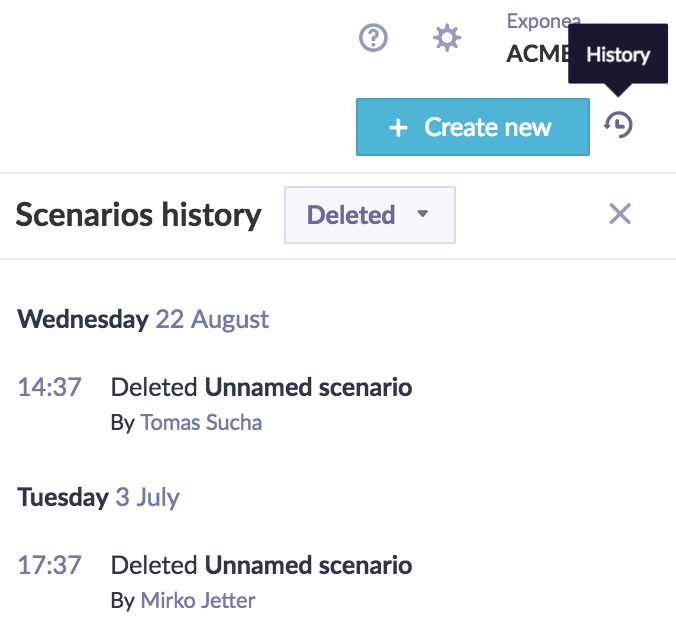
In the list of scenarios view, you can also restore a deleted scenario.
Scenario Status
You can filter scenarios that you want to see on your main page through the Status filter
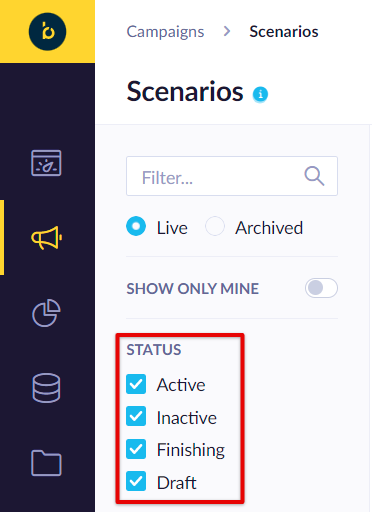
The following labels mean:
- Active - your campaign is running (newly collected event will trigger an action).
- Inactive - your campaign stopped (nothing happens anymore).
- Finishing - your campaign has been requested to stop, however, already running tasks will finish first, and afterward, the campaign will change its status to Inactive.
- Draft - Initial state, your scenario hasn't been started yet.
Clone to another project
This feature allows you to clone Scenarios to other projects you have access. Read more about cloning.
Updated about 1 month ago