

Campaigns
The Campaigns section in Project settings allows you to change settings such as languages, fonts, and privacy management.

NoteDepending on your role and access rights, you might not see or be able to edit some of the sections visible in the screenshots below.
General
You can set the default utm_source parameter under "General campaign settings". Read more about UTM parameters.
Languages
You can define which languages your project uses to create multilingual templates used in campaigns. "Name" is a human-readable name displayed in the UI (English). "Value" is the value tracked in the customer attribute language (en).

Example campaign
When you want to send an email campaign to customers in 3 different countries, you can create just one campaign with 3 different versions. In the screenshot below, all customers with an attribute language = en will receive the English version. The same logic applies to any language. Customers who don't have this attribute filled will receive the campaign in the default language, which would be Polish in this case.
ImportantThe subject line is always tracked from the default language variant.

Set up multiple domains under one project
Sometimes you might prefer to create one project with several language versions/domains. In this case, follow these recommendations.
- Add all the languages to Project settings.
- Make sure the customer's language attribute matches the language in Project settings (that is, both "cs" for Czech, not "cs" and "cz").
- Languages in Project settings define the languages of email templates that you can add. If you are going to need a different email for German and Austrian customers (different logo and so on), you might have to deal with the fact that it isn't an actual language, and add "Austrian" to Project settings as well.
- Remember to set the language attribute for every new customer. Import them with a language attribute through a scenario triggered by the subscription banner that assigns the language attribute based on the banner
country_code.
Fonts
You can define custom fonts in the Email Visual Builder. To set up a custom font:
- Make a CSS file for every font-weight you want.
- Update the font-family to the name of the font.
- Update the source (src) to have the URL of the font-file (which is the Asset Manager link). Update also the format depending on the font format (in our example, this corresponds to 'woff')
@font-face {
    font-family: ‘My Awesome Font’;
    font-style: normal;
    font-weight: 400;
    src: url( https://brxcdn.com/eng-app-storage/8239ddb6-f687-11ee-a211-f217ee5e7c05/media/original/a81cf69e-53d4-11ef-8937-ba2c61377898) format(‘woff’);
}- Upload the CSS file to the Asset Manager.
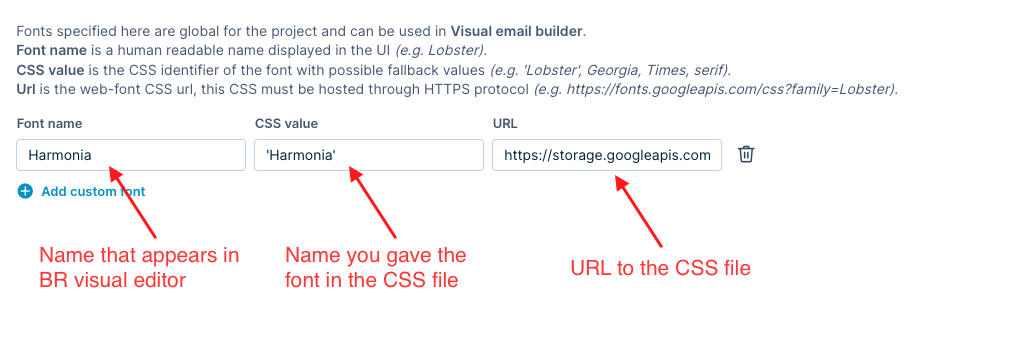
- Set up the font in Project Settings > Fonts:
- Now you should be able to find the font in the list in the Visual Builder.

Google fonts
Google fonts have ready-made CSS files on the Google Fonts site, which are recommended. Creating a new CSS file for Google fonts can cause issues. Use single quotes in the CSS value field, not double quotes.
ImportantWith the CSS it generates, every different font variant is called the same way (for example, "Barlow"), which the Visual Builder can't interpret.
Download the CSS from the URL that Google Fonts generated (with multiple weights) and manually rename each one in the CSS and upload to the Asset Manager.
Throughput policies
Read about how to set up a throughput policy in the Webhooks article.
Privacy management
Frequency policy
Read about the frequency policy and how to set it up in our dedicated article Frequency Policy
Consents
If you are using our consent management, you can set the consent and legitimate interest categories and access and edit the consent page.

ImportantCampaign Groups have been replaced with our new Consents management. If your project is still using Campaign Groups, we recommend switching to consents for easier GDPR compliance.
After enabling consent management, the setting of campaign groups will no longer be available.
You can define categories of emails or SMS from which customers can unsubscribe separately. This will also create a customer attribute unsubscribed_from, which is a list attribute.
Each campaign sent has to belong to a campaign group. By default, there is only one campaign group called All Communication. Campaign groups with their names and descriptions will be shown as options to subscribe to/unsubscribe from on the unsubscribe page ( the link to it can be sent via {{ email.unsubscribe }} ).
Once a customer chooses to unsubscribe from a campaign group, an event subscriptions_changed will be generated, and an attribute unsubscribed_from will be updated. This attribute can also be changed manually when editing the customer or through imports.

You can define your campaign groups if you haven't enabled the consent framework yet.
Updated 4 months ago