Purchase to Session Start Funnel
This guide will help you understand
- What is a Purchase to session start funnel
- Why should you use a Purchase to Session Start Funnel
- How to read the data
- How to create a Purchase to Session Start Funnel
What is a Purchase to Session Start Funnel
Purchase to session start funnel serves as an overview of post-purchase website engagement of first-time buyers. For example, you can have a look at how many customers, who had completed their first and only purchase last month, visited your website again this month but did not make another purchase. In other words, this analysis will help you understand whether your first-time buyers are still interested in your website after completing the first purchase.
However, in order to observe re-purchase patterns (as retention) of your returning customers, use Reordering funnel. That is a broader analysis looking at purchase conversion in general, whereas this is a specific funnel achieving the goal stated above.
Why should you use a Purchase to Session Start Funnel
Using this funnel will not only help you determine whether your first-time buyers are still interested in your website or not after their first purchase but also identify and target them accordingly.
In general, customers who progressed through this funnel are assumed to have a considerably higher potential of final conversion (i.e. they are more likely to complete their subsequent purchase) and of becoming loyal.
There are various techniques for encouraging loyalty and retention doable also in Bloomreach Engagement. Should these techniques prove to be ineffective in terms of retention, you shall seek for the reasons and take all the necessary actions to make your first-time buyers engaged again.
Reading the data

Insights
-
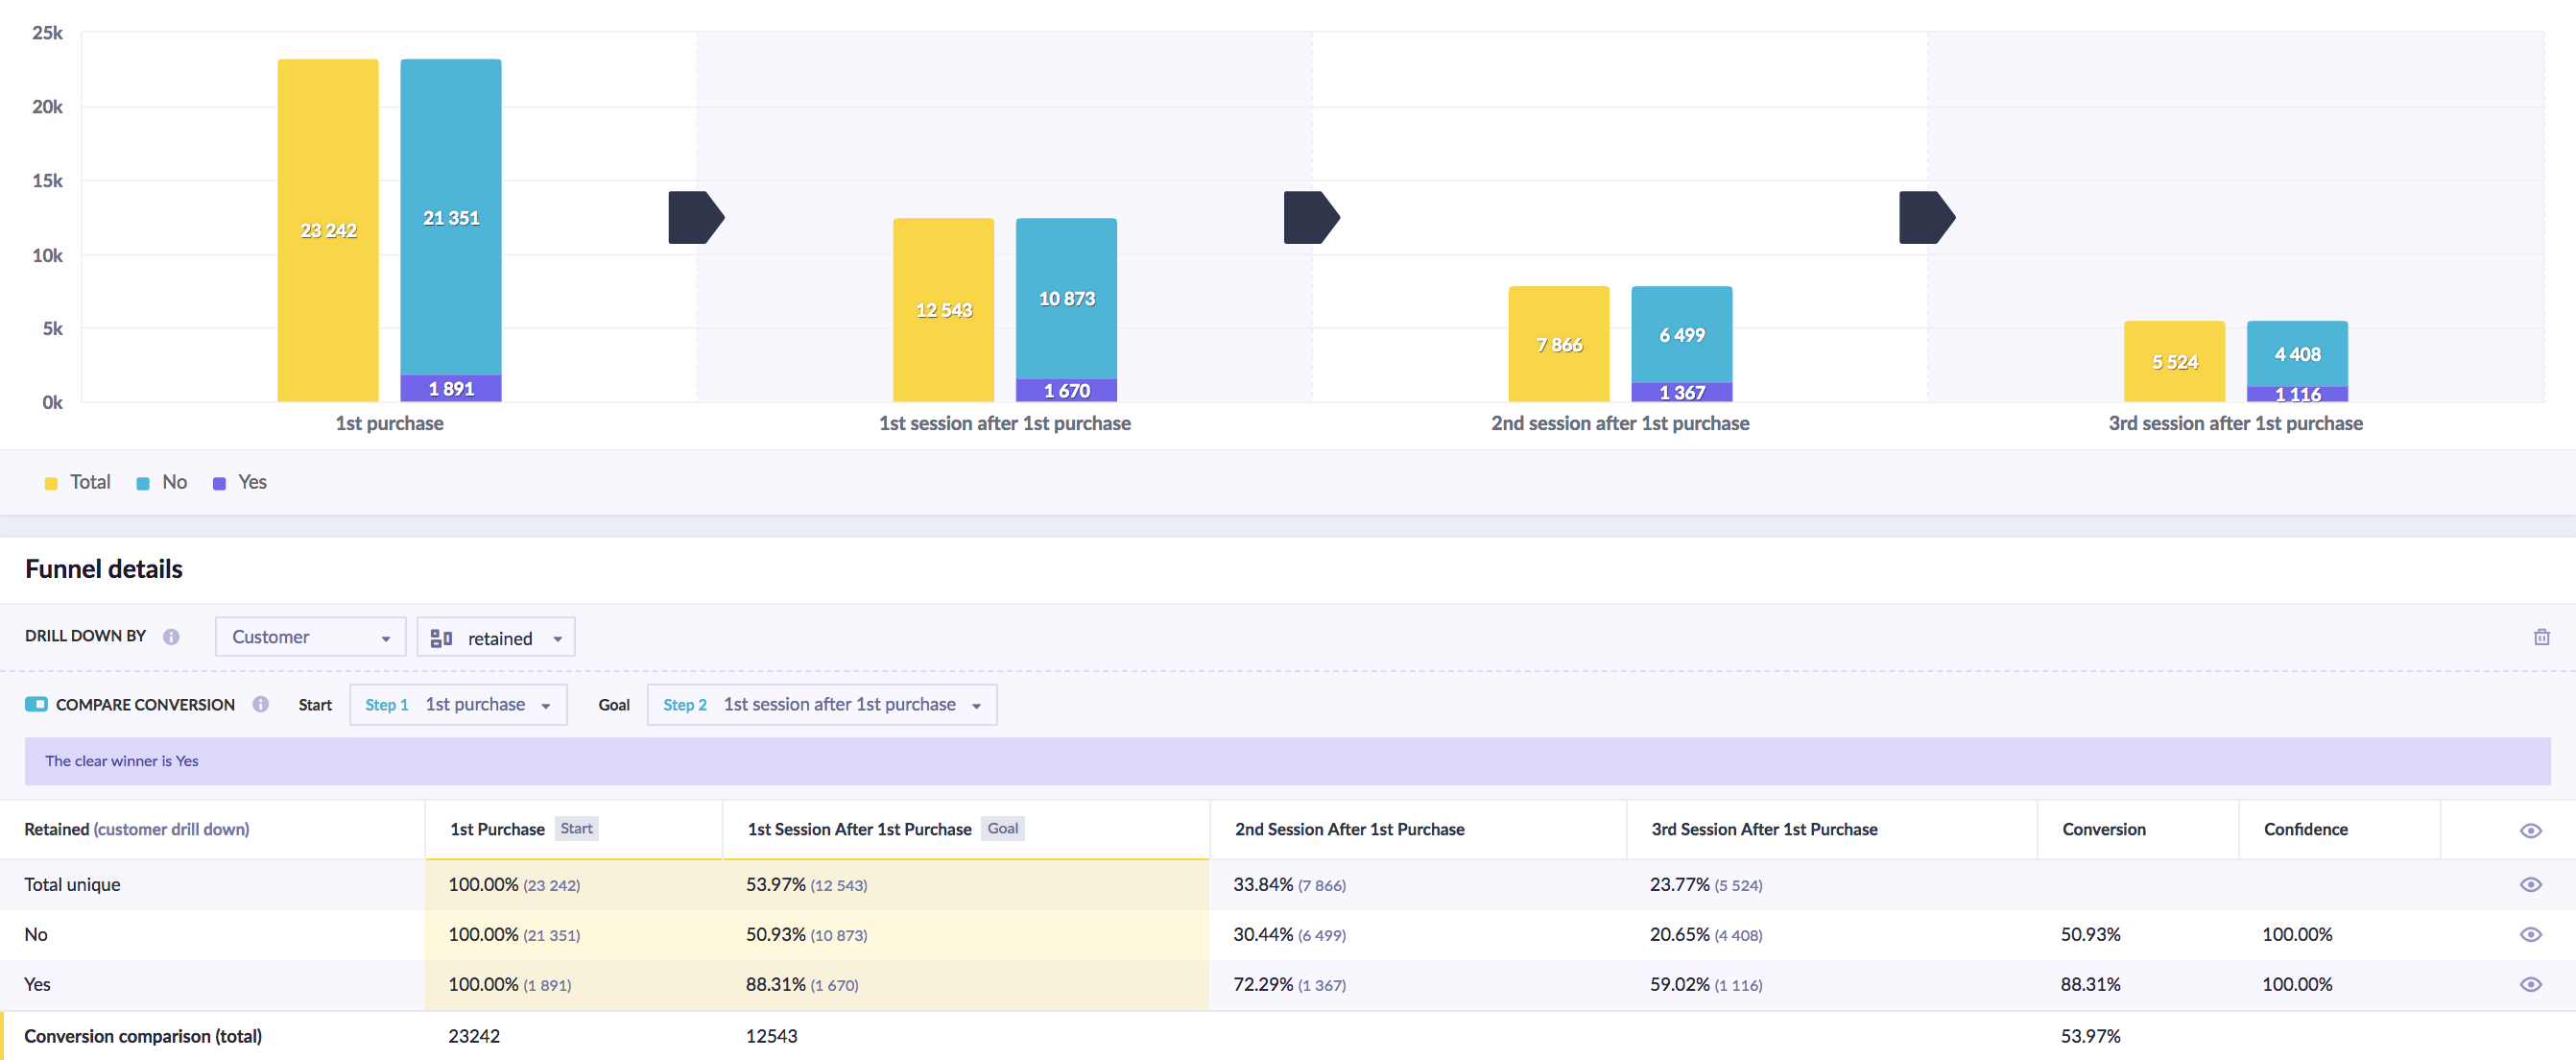
There are 23 242 unique customers in total, who made their first purchase (see the first segment of the bar chart), out of which 1 891 made another subsequent purchase. These customers are called returning customers, who already may be considered as ‘loyal’.
-
More importantly, 10 873 customers visited the website after their first purchase (limited to the timeframes imposed), without making any other purchase later on. That is 50.93% achieved their goal to convert from Step 1 to Step 2 (i.e. first purchase to a session start without a purchase a priori).
-
If the definition of an ‘interested’ or ‘engaged’ customer was a customer with a single purchase followed by at least 3 session starts, then it could be concluded that in the given sample we have 20.65% engagement rate.
Advised Solutions
From the funnel above it is apparent that there are several customers who have not made their second purchase yet, but have visited the website again. You should form specific hypotheses on how to convert these customers again, as they are clearly interested in your website, who have not converted yet.
To convert these potential loyal customers, try our product Recommendations based on the past purchase, vouchers for the 2nd purchase or web layers.
How to create this funnel in Bloomreach Engagement
In order to create this funnel, you will need basic knowledge of Bloomreach Engagement as well as tracked
purchaseandsession_startevents.
This analysis will consist of a customer aggregate, a customer segmentation, and a funnel.
Firstly, you will need to create a customer aggregate for the first-ever purchase timestamp of a customer.
For that, go to Data & Assets > Data manager > Definitions > Aggregates.
Create a new aggregate as shown in the picture below, name it as suggested and save your work.

It is recommended if you keep the aggregate as generic as possible, that is unlimited by time (see the lifetime period). This will generate an aggregate for all existing customers in the dataset. You will impose the time constraint of last month in the funnel itself.
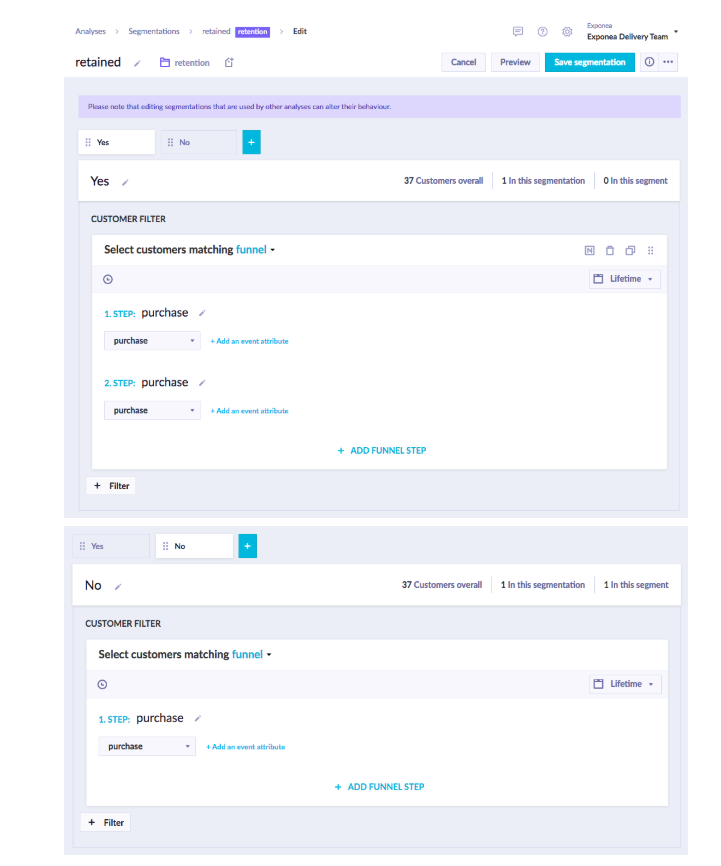
Secondly, create a customer segmentation to distinguish among returning and first-time buyers.
Go to Analyses > Segmentations and create a new segmentation.
You will need to create two segments, a first one named "Yes" with 2 purchases in series and a second one names "No" with one purchase only.

If you have the segmentation created ad saved, you can finally create the purchase to session start funnel itself.
Go to Analysis > Funnels and set the desired funnel steps.
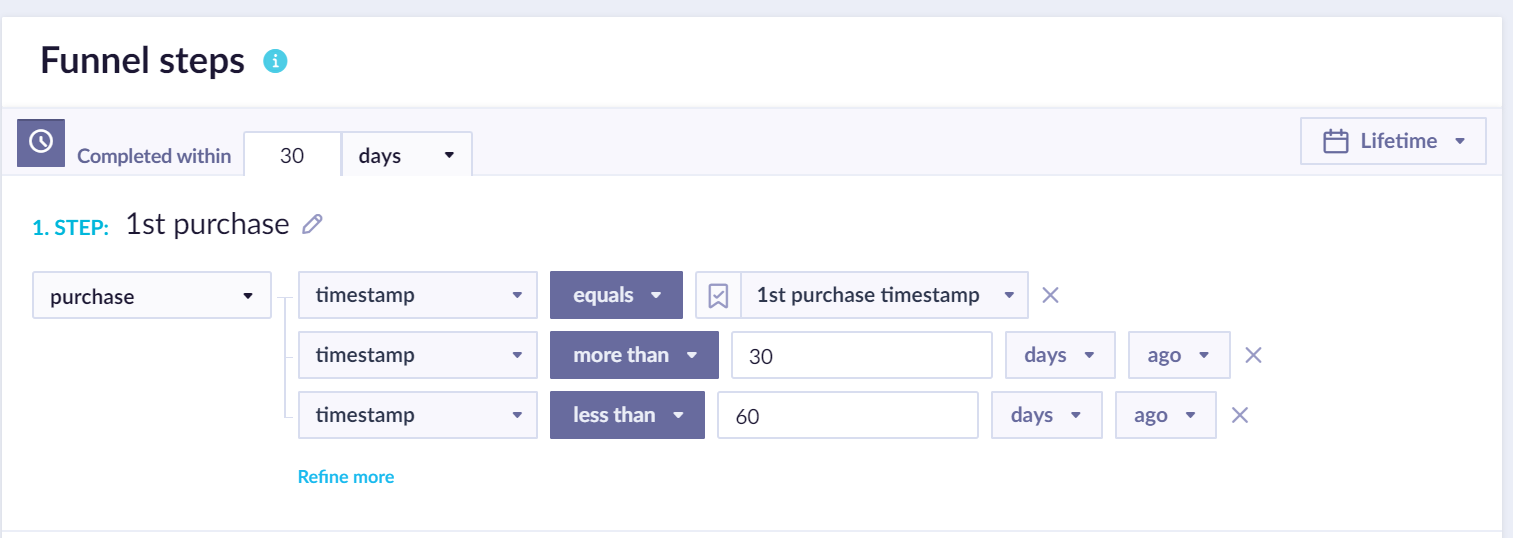
Step 1: Purchase step referencing the 1st purchase timestamp aggregate restricted to last month (i.e. more than 30 and less than 60 days ago)

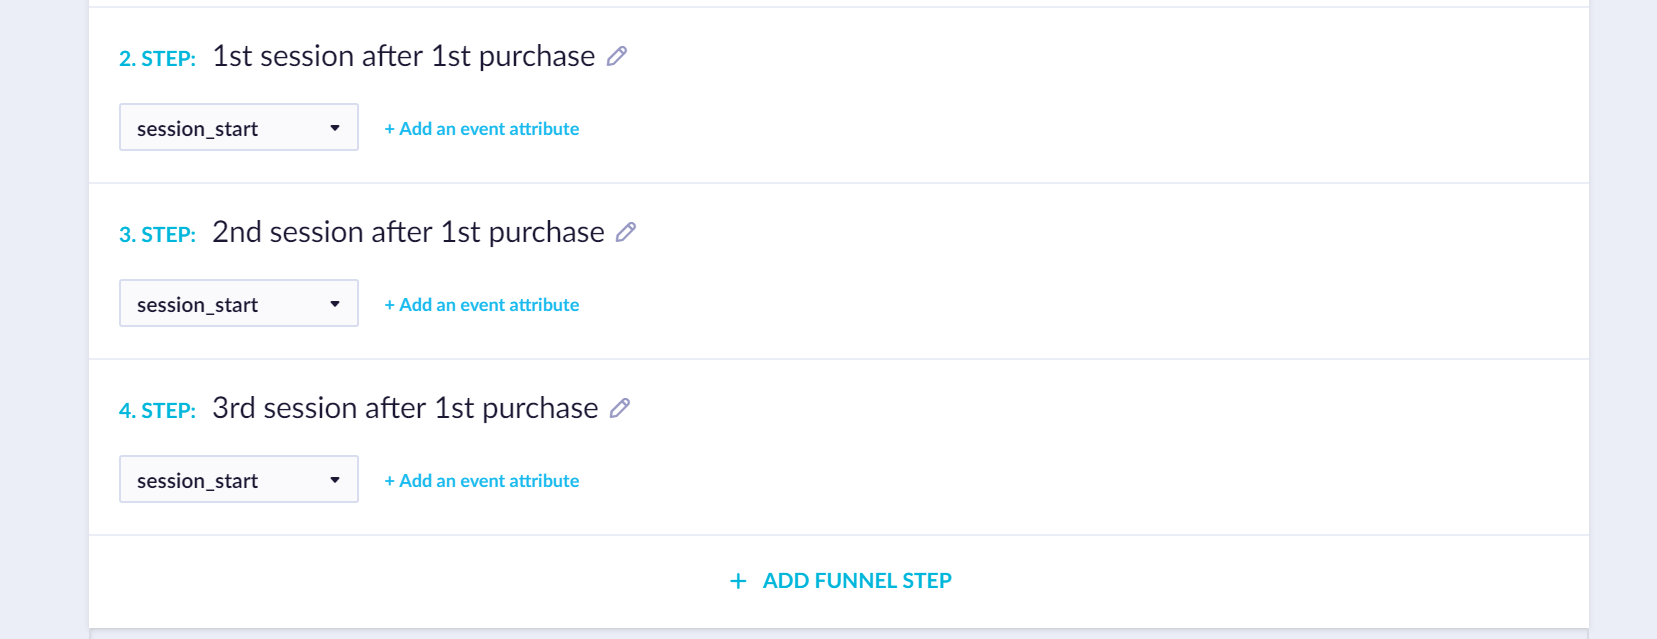
Steps 2-4: Populate these steps with session start events and name them accordingly.

Next, filter the whole funnel down to customers who completed steps within the past 30 days (see ‘Completed within’ at the top of the first step screenshot).
Pay attention to the fact that the lower limit of purchase timestamp (more than xx days ago) should be equal to the completed within yy days value. This will capture the whole sample and allow everyone to convert within that time frame. The upper limit should be equal to xx + yy (or 2xx / 2yy).
You can, of course, adjust the time spans according to your needs. However, due to storage reasons, most clients tend to expire their session_starts event after 3 months.
Lastly, go down to "Funnel details" and filter down by using the customer segmentation we created before to those who have not retained yet (to fulfill the purpose of this analysis). You can do so following the picture below. Optionally, you can set yourself a goal within the Compare conversion section (similarly as in the picture).

After completing all of the steps, you now have a functioning purchase to session start funnel.
Updated about 2 years ago
