Zendesk
Integration
The following is a guide on how to integrate Zendesk with Bloomreach Engagement.
Zendesk is a helpful integration for your Support team when dealing with your customers´ support tickets. The Zendesk Integration with Bloomreach Engagement helps you to pass events relating to the support tickets, to pass updates and events about your customers, and to display customer data using the Bloomreach Zendesk sidebar.
In this guide, we provide you with the following:
- more details about displaying data using the Bloomreach Zendesk sidebar,
- how to export customer data from Zendesk to Bloomreach Engagement,
- how to import customer data to Zendesk.
Before you start setting the integration up, specific prerequisites need to be met. Their list is provided down below. It is also good to know that the supported data are customers, customer properties, and events.
Prerequisites
- A Bloomreach Engagement project with access to scenarios and integrations.
- A Zendesk account with admin permissions (to create webhooks/triggers).
- Managed Endpoints API to set up Zendesk Sidebar Widget.
Bloomreach Zendesk Sidebar Widget
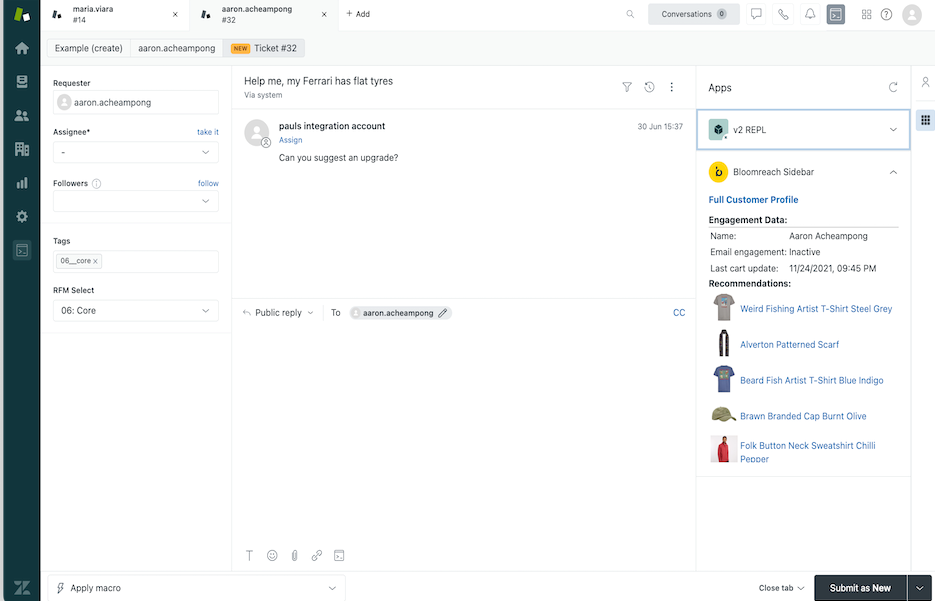
Bloomreach Zendesk Sidebar app allows all Zendesk Service users to view data of customers stored in Bloomreach Engagement when that person has interacted with your Support team.
The benefit of using it is to prioritize your tickets in an efficient way. For example, if you get 100 support tickets all at once, you want to give first priority in your responses to the people that are in the highest Lifetime Value segment or RFM segment. And the app helps you to visualize the priority of tasks better and to see what has to be done first.
The Zendesk Sidebar widget also provides a full view of your customers, too, as all of the Bloomreach Engagement data is directly available inside the Sidebar app. Data you can work with are customer attributes, their segmentations, detailed aggregates, a lifetime value, their loyalty tier, recent interactions with your product and other data linked to the full customer profile stored in Bloomreach Engagement. This approach helps you to deliver a personalized experience for your customers with your support team.

Follow the steps down below and start using Bloomreach Zendesk Sidebar app.
Step 1: Install the app
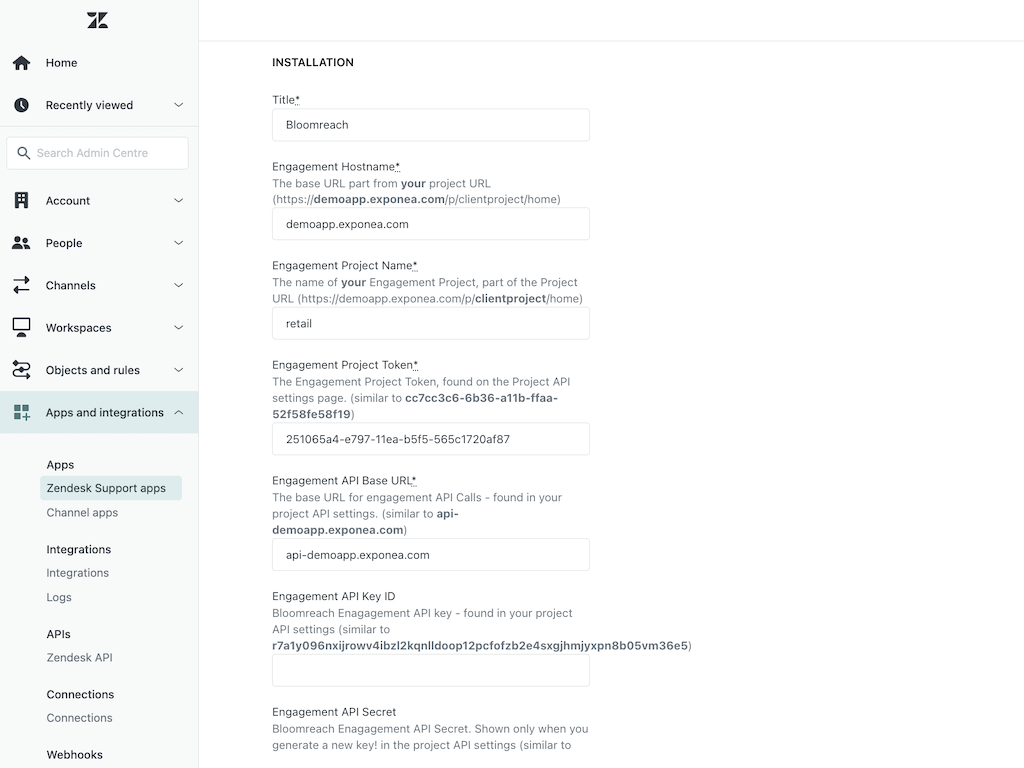
Install the app from the Zendesk Marketplace. During the installation process, you need to configure these setting fields mentioned in the table below:
| Required field | Where to find the information |
|---|---|
| Title | The title will be displayed as a headline of the sidebar widget. Example: Customer Details. |
| Engagement hostname | Retrieve this information from the URL that you use to login to the Bloomreach Engagement project. Make sure that the URL does not contain any HTTPS or any “//” values! The value of this field should be “demoapp.bloomreach.com”. |
| Engagement Project Name | Fill this field with a name of your project that can be also retrieve from your Engagement Project URL. For example, your URL is" https://demoapp.exponea.com/p/clientproject/home" so the project name you need is "clientproject". |
| Engagement Project Token | How to get the information about your project token, please read this article first. The example how it might look like is this value: "cc7cc3c6-6b36-a11b-ffaa-52f58fe58f19". |
| Engagement API Base URL | To get this information, go to Project Settings -> API Base URL in the Engagement app.The example how it should look like: api-demoapp.exponea.com. |
| Engagement API Key ID and API Key Secret | Go to Project Settings -> Project -> Access Management -> API). Generate your API keypair that will belong to a private group that you create. The private group should have read-only access to Managed Endpoint API and all other field you are interested in.Make sure to read the article about the authentication to get more details about different API groups and their setting. |

Installation process of the Zendesk Sidebar Application
Step 2: Configure the fields
The final step of the installation process is to configure the fields you would like displayed correctly. It can be done using Managed Endpoints API.
Make sure to follow our guide how to configure Managed Endpoints API in the Bloomreach Engagement correctly. Do not forget to enable enable the Managed Endpoint API and copy the URL provided for this endpoint into the Engagement Managed Endpoint API URL field.
Ensure the configured API group has access to this newly created Managed Endpoint API!
The Managed Endpoint API payload is fully custom and should look like this:
{
    "Name": "{{ customer.first_name }} {{ customer.last_name }}",
    "Email engagement": "{{ segmentations['5fc3d611a59cf881d45b2ff6'] }}",
    "Last cart update": "{{ expressions['5f5776b57e8f28c9c93d2c90'] | from_timestamp('US')  }}",
    "html": "<b>Recommendations:</b><table>{% for item in recommendations('5f5b6aabd0ef9bf5633ea54b', 8) %}<tr><td><a href='{{ item.url }}' target=_blank><img src='{{ item.image }}' width=64></a></td><td><a href='{{ item.url }}' target=_blank>{{ item.title }}</a></td></tr>{% endfor %}</table>"
  }
Step 3: Configure the webhook
If you want to send data and updates into Bloomreach Engagement, the Webhook configuration is already automatically created for you. How to link triggers to the webhook, set their conditions and other details are described in the next two section of this guide:
Send data from Zendesk to Bloomreach Engagement
These steps are helpful when you want to send support_tickets events from Zendesk to Engagement.
Step 1: Link the webhook to a trigger
The webhook was automatically created via Zendesk Sidebar. Next, you need to link the newly created webhook to a Trigger in Zendesk. To do this, go to Admin > Objects and rules > Business Rules > Triggers. Then create a new trigger, name it, give it a description and category.
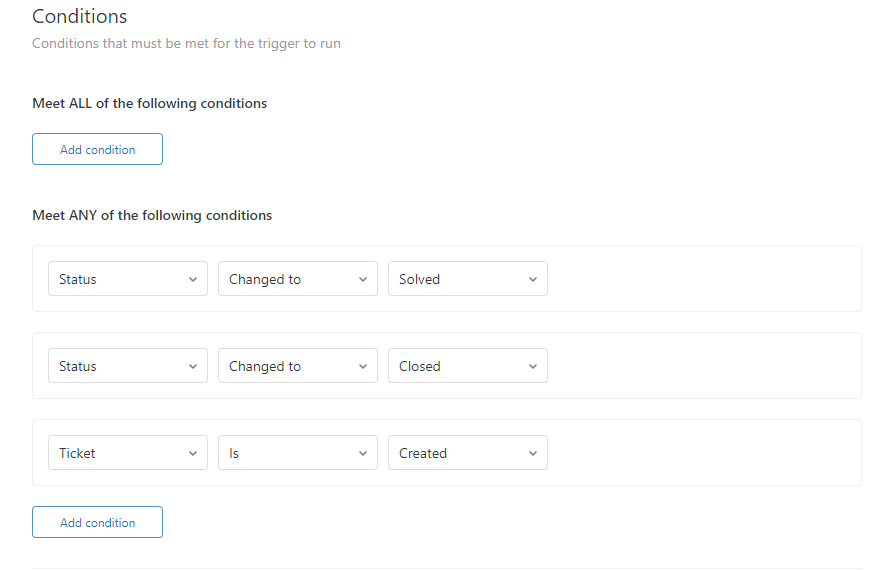
Under Conditions you will need to specify the situations when the Trigger runs. If you want to notify Bloomreach Engagement of a ticket being created and then consequently closed/solved, you can do so using the logic depicted down below.

Under Actions, select Notify active webhook and choose your webhook from the second dropdown.
Configuration of the request body, that will be sent when triggering the webhook, is required. It needs to adhere to the format of the Bloomreach Engagement API endpoint. For example, we just use the Add Event endpoint.
However, you could also use the Customer Update endpoint or even the Batch endpoint if you want to combine a customer update and an event addition in a single API call.
{
	"customer_ids": {
		"registered": "{{ticket.requester.email}}"
	},
	"properties": {
		"body": "{{ticket.description}}",
		"status": "{{ticket.status}}",
		"subject": "{{ticket.title}}",
		"type": "{{ticket.ticket_type}}",
		"ticket_id": "{{ticket.id}}",
		"priority": "{{ticket.priority}}",
		"support_suite": "Zendesk"
	},
	"event_type": "support_ticket"
}
Zendesk Placeholders as Jinja tokens
Zendesk has “Placeholders” which function the exact same as Jinja tokens in Bloomreach Engagement. These will pass dynamic values in the body of your API request when used. For example:
{{ticket.requester.email}}.You can even run functions on top of these Placeholders, just like in Jinja. Placeholders use the Liquid language, so they let you use Liquid Markup to add functions. For example:
{{ticket.requester.email | downcase }}.For more information about Liquid functions, please read the article.
Step 2: Check if it works correctly
Once you are done, just save your Trigger and ensure it is active. Then go over to the regular Zendesk Support UI and create a test ticket to validate that your webhook and trigger are working as expected.
Send data from Bloomreach Engagement to Zendesk
Tip:
Before starting, it is recommended to get familiar with Zendesk´s API by reading the Beginner Guide to Zendesk´s API.
Step 1: Set up the Zendesk API Endpoint
The endpoint used is the Create or Update User (more info in this article). Authentication for the Zendesk API requires Base64 encoding of our username and API token.
First, generate a new Zendesk API token by going to Admin > Apps and integrations > APIs > Zendesk API > Settings.
Copy your API token and paste it somewhere safe where you can have it saved.
Step 2: Webhook template integration
In Bloomreach Engagement, create a new webhook template integration. After you added its description, use a POST request. The URL of the endpoint should look like this:
Example of the payload:
{
	"user": {
	"email": "{{ customer_ids.registered }}",
	"name": "{{ customer.first_name ~ " " ~ customer.last_name }}",
	"user_fields": {
		"rfm": "{# RFM #}{{ segmentations[‘,YOUR SEGMENT ID>’] }}",
		"lifetimevalue": "{# Lifetime value ($) #}{{aggregates['<YOUR
	AGGREGATE ID>'] }}"
		}
	}
}
How does it work?
The endpoint is going to look for a customer based on the email field. If a customer does not exist with that email, it will create one. If a customer does exist, it will update that record. Values sent in the request will overwrite existing values for the customer.
You can, of course, customize this request payload to include any fields you want to pass from Bloomreach to Zendesk. These can be the regular customer fields in Zendesk and/or the custom User Fields that a client has defined in their instance.
Possibilities for error messages
If you try to send a field that is not defined within Zendesk, the API won’t throw an error. It will just ignore that field.
If you try to send a value to a field that does not match the data type (String vs integer vs decimal vs boolean etc.) the API will throw you an error.
Step 3: Finish the setup
It will process the response as JSON. Add applicable throughput policy and consent category as needed and then save it. You can now use this saved Zendesk webhook in a scenario in Bloomreach Engagement.
Limitations
Zendesk has a rate limit of 5 requests per minute for each unique end user profile. For example, you can make 10 calls per second as long as you make five calls for one user and five calls for another user. The rate limiting mechanism behaves as described in Usage Limits in the API introduction provided by Zendesk. It is also recommended that you obey the Retry-After header values.
Updated 12 months ago
