

Klaviyo
Integration
This guide will help you understand:
- How to integrate Klaviyo with Bloomreach Engagement
- How to use an automated warm-up scenario to migrate your email sending from Klaviyo
Integration
The Klaviyo integration allows data sync between Bloomreach Engagement and Klaviyo itself. It provides a more accurate view of your customers, detailed analytics via advanced reporting, synchronized Engagement segments, and compliance by Bloomreach Engagement consent management.
In this guide, you will learn about:
- how the imports and exports of your data work,
- how to set up the integration,
- what data are synced,
- its use cases and limitations.
Use cases
- Advanced reporting - including profiles and campaign events from Klaviyo
- Synchronisation of lists/segments - both way integration
- Customer data platform - all data sources sync into one platform
How the integration works
After the first successful setup of Klaviyo integration, the initial data load is triggered. It exports an entire current customer base from Klaviyo, as well as all historical consent events (like add/delete from the list). Historical campaign metrics are also exported, but they are limited to the last month only due to possible high volumes.
Then customer base is updated daily, and new profiles appear in Klaviyo right after the daily import. Please mind, the consent and campaigns are synchronized every two hours.
The integration uses REST API, which allows the synchronisation of Klaviyo and Bloomreach data. Klaviyo integration syncs customer profiles, lists as consent and campaign (Email & SMS) events from Klaviyo into Bloomreach. Here is the list of tracked events in both Engagement and Klaviyo.
Klaviyo into Bloomreach:
- Subscribed to List, Unsubscribed from List, Unsubscribed, Unsubscribed from SMS, Consented to Receive SMS
- Bounced email, Clicked email, Dropped email, Opened email, Received email, Marked email as spam
- Sent SMS, Clicked SMS, Received SMS, Failed to deliver Automated Response SMS, Failed to Deliver SMS, Received Automated Response SMS
From Bloomreach to Klaviyo:
- Customer profiles
- Segments
- Consent (adding/removing)
Prerequisites
- An existing Bloomreach Engagement project. You can choose from one of our Predefined Project Templates or create your own.
- If you are a Shopify client, use the Shopify project structure template to make your initial set-up with Klaviyo easier.
- Set up the following IDs correctly:
email_id- It is a hard ID, lowercased, trimed. Email address is a primary identifier for customers in Bloomreach Engagement.klaviyo_id- It is a hard ID and represents profile id of a customer in Klaviyo.cookie- It is a soft ID and represents device unique cookie identifier.
How to set it up
Step 1: Authentication
After you have checked your prerequisites, you need to set up the authentication first. Please follow these steps in order to do so:
- To start integrating with Klaviyo, you need to go to your Bloomreach Engagement account. There, go to
Data & Assets>Integrations> and selectKlaviyo. - You will need the Klaviyo private API key which can be created via the following page, in order to send data to Engagement.
- To support all data synchronisation, the API key has to have at least: Profiles Read, Metrics Read, Events Read, Profiles Write, List Write, Subscriptions Write.
Step 2: Customer ID and their property mapping
Under the API key field, you can find Customer ID and Customer property mapping between Klaviyo and Bloomreach. Thanks to this mapping, you can decide which customer properties from Klaviyo should be exported on a daily basis to Bloomreach Engagement and under what name they should be tracked.
Our recommendation is to map Customer IDs to existing properties like email_id and klaviyo_id. If you use Klaviyo as your only source of data, then we also recommend mapping customer properties to the already existing customer profiles (example of these properties are first_name, or surname). If you use different sources of data, our recommendation would be to create new properties and name them as klaviyo_first_name, klaviyo_last_name. You can also decide not to map customer properties and then the following customer fiels will not be exported.
Customer properties mapping & different data sourceIn case you are collecting data from multiple sources like Shopify integration, please be very careful while setting customer attribute mapping! For example, mapping Klaviyo phone to a phone property in Bloomreach means that the phone customer attribute will be overwritten by Klaviyo on a daily basis and then it can also overwrite a phone number collected by a Shopify integration, or by a weblayer. That is why we recommend to map those fields with distinct different names, such as klaviyo_phone.
Step 3: Save the integration
Once all steps above are done, click on the Save button and the integration is successfully created. The initial data load has begun and customer profiles and campaigns start being retrieved by Bloomreach Engagement. Consent events are triggered only after their mapping is set and saved.
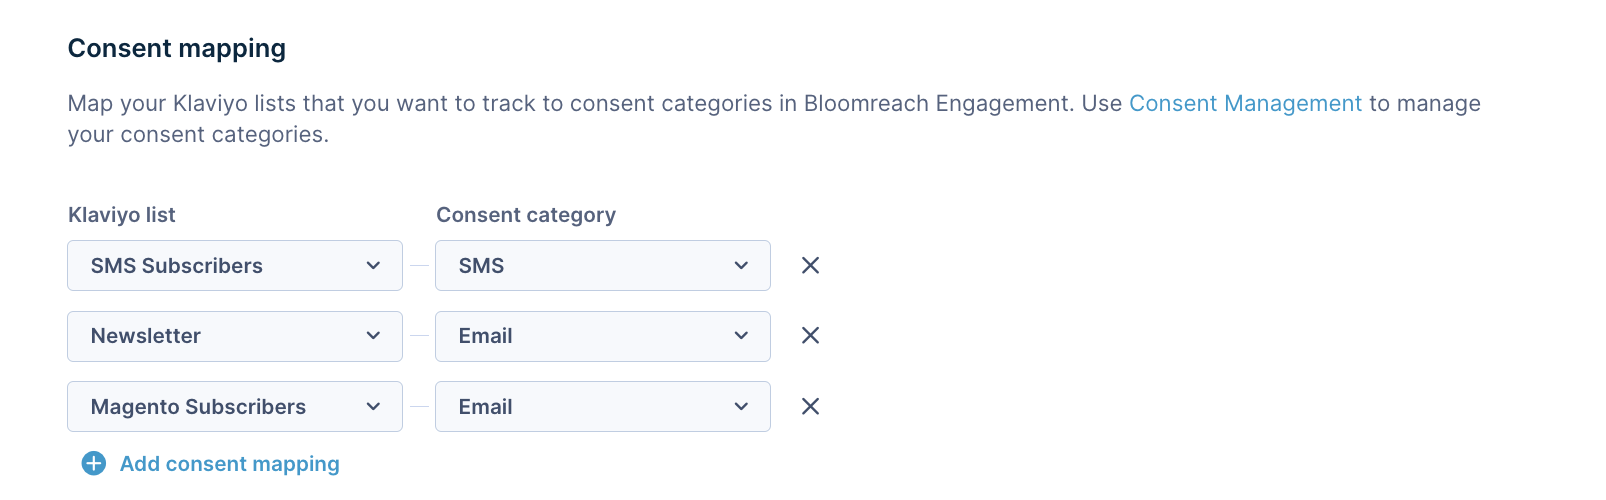
Consent mapping
Klaviyo does consent categories through lists. Therefore after successful setup, you can map your Klaviyo lists to specific consent categories in Bloomreach Engagement. Here, we provide you with a list of events related to consent. how they are mapped and what happens in Klaviyo, as well as Engagement.
| Event | Event mapping in Engagement | Event mapping in Klaviyo |
|---|---|---|
| Subscribed to List | a consent accepted event with the assigned category | a profile is added to a list via Klaviyo signup form a profile is added to a list with email consent via Quick Add a profile is added to a list with email consent via CSV upload a profile is added Klaviyo-built integration, or certain third-party integrations |
| Unsubscribed from List | a consent rejected event with the assigned category | a profile is unsubscribing from an email/SMS sent using list |
| Unsubscribed from Email Marketing | a consent rejected event for all mapped consents categories for this integration | a profile is unsubscribing from email sent using segment |
| Unsubscribed from SMS | consent rejected event for all mapped consents categories for this integration | a profile is unsubscribing from email sent using segment |
Manual removal in KlaviyoIf you are manually removing profiles from lists, or supressing profiles in Klaviyo, please bare in mind that these actions will not be reflected in Bloomreach Engagement. The reason is based on the Klaviyo API limitations. In case you do changes manually in Klaviyo, make sure to do the same actions in Bloomreach Engagement, too.
Example: you are suppressing a single profile present in multiple lists in Klaviyo and have an active integration with Bloomreach Engagement where you map those lists into specific consents categories. You need to be aware that this action will not be reflected in Bloomreach due to the Klaviyo API limitation and you need to reject consent categories for this profile manually.
Consent management
Klaviyo does consent categories through lists and its consent management view on customer profiles is basic, displaying if a customer profile is consented. Read more about Klaviyo consent management in their official documentation.
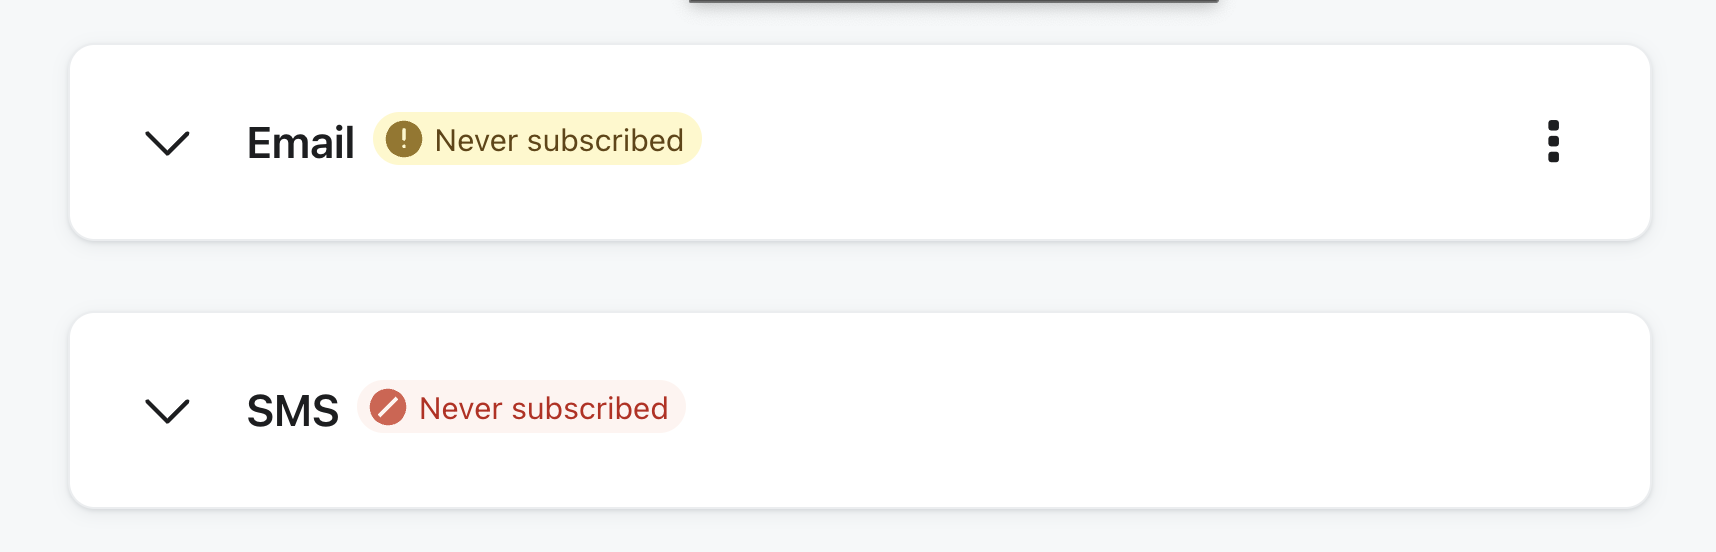
There are three statuses available in Klaviyo:
- Subscribed (green label) - The profile can receive marketing because they have subscribed for the corresponding channel and are not suppressed.
- Never Subscribed (yellow label) - The profile has neither subscribed nor opted out of email marketing. They can receive emails (e.g., an abandoned cart flow email), but you should exercise caution when contacting them.
- Suppressed (red label) - The profile is unable to receive marketing through the channel. This may be because they opted out of marketing, or they are suppressed for a different reason. Note that consent status and suppression status are separate from each other (e.g., a profile that is subscribed can be manually suppressed).
On the integration page, you can see the following customer properties related to the Klaviyo checkmark on a profile level:
- SMS Consent (
Subscribed,Unsubscribed,Never Subscribed) - Email Consent (
Subscribed,Unsubscribed) - Email Consent Double Opt-In (e.g.,
1546214400) - SMS Consent Timestamp (
True/False) - Email Consent Timestamp (
True/False)
Those attributes in Bloomreach reflect the Profile Consent Statuses inside Klaviyo.
Attributed Consent Values ChangeKlaviyo Consent customer attributes such as Klaviyo Email Consent and Klaviyo SMS Consent will return now values such as
Subscribed,Never SubscribedandSuppressedinstead ofTrueandFalsevalues as it previously did.
NEVER_SUBSCRIBED Status is Not Imported for that SMS Consent AttributeDue to the logic on Klaviyo API side,
NEVER_SUBSCRIBEDstatus for SMS Consent is not passed via API. A value for profiles with such status will be empty for SMS Consent inside Bloomreach.
These attributes will be set up to true only if a profile is added with marketing consent approved via Klaviyo signup form, Klaviyo subscribe page, Klaviyo upload feature, Shopify form or Shopify checkout with approved marketing communication. In other scenarios it will be set up as false.
Webhook settings
If you want to send segments, or filter profiles in Klaviyo from Engagement, you will need to setup a webhook in scenario. You can use webhook templates to easily create a segment that can be exported to the Klaviyo list. With the templates, you can easily:
- create a new profile in Klaviyo,
- add a profile to the Klaviyo list,
- remove a profile from a list in Klaviyo,
- subscribe profiles,
- unsubscribe profiles.
However, before using webhooks, you need to set up the right authentication. Please follow these steps to do so:
- Go to
Data & Assets->Integrations->Add new integration->HTTP Authentication Schemas. Fill in the following fields accordingly.- Endpoint: https://a.klaviyo.com/api
- **Select:**Custom Headers
- Key: Authorization
- Value: Klaviyo-API-Key your-private-api-key
- Type: Secret
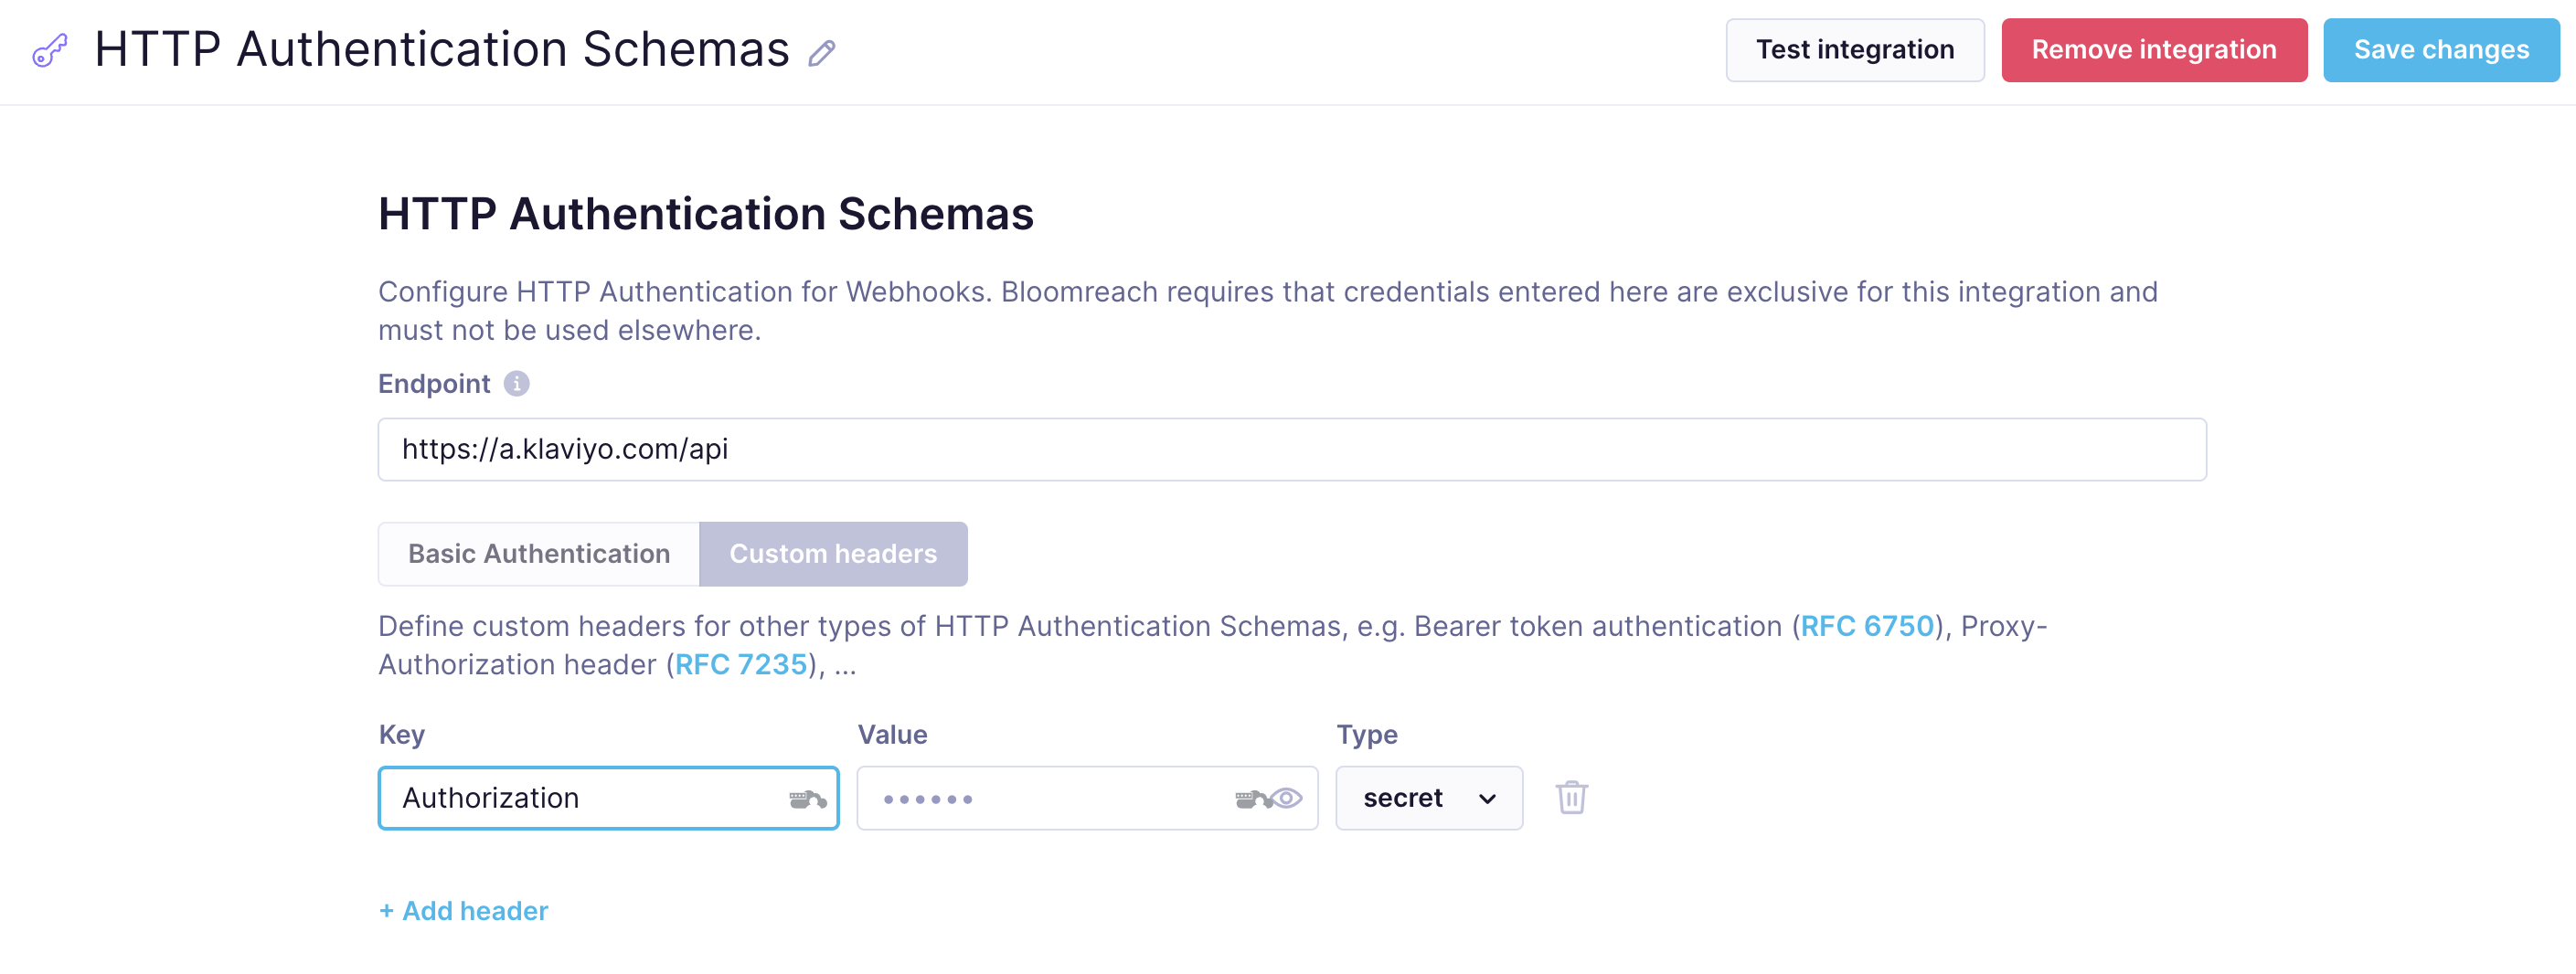
- Rename the title to be Klaviyo related and save it. Klaviyo webhooks can be found in
Scenarios>Actions - Other.
Example of webhook in scenario
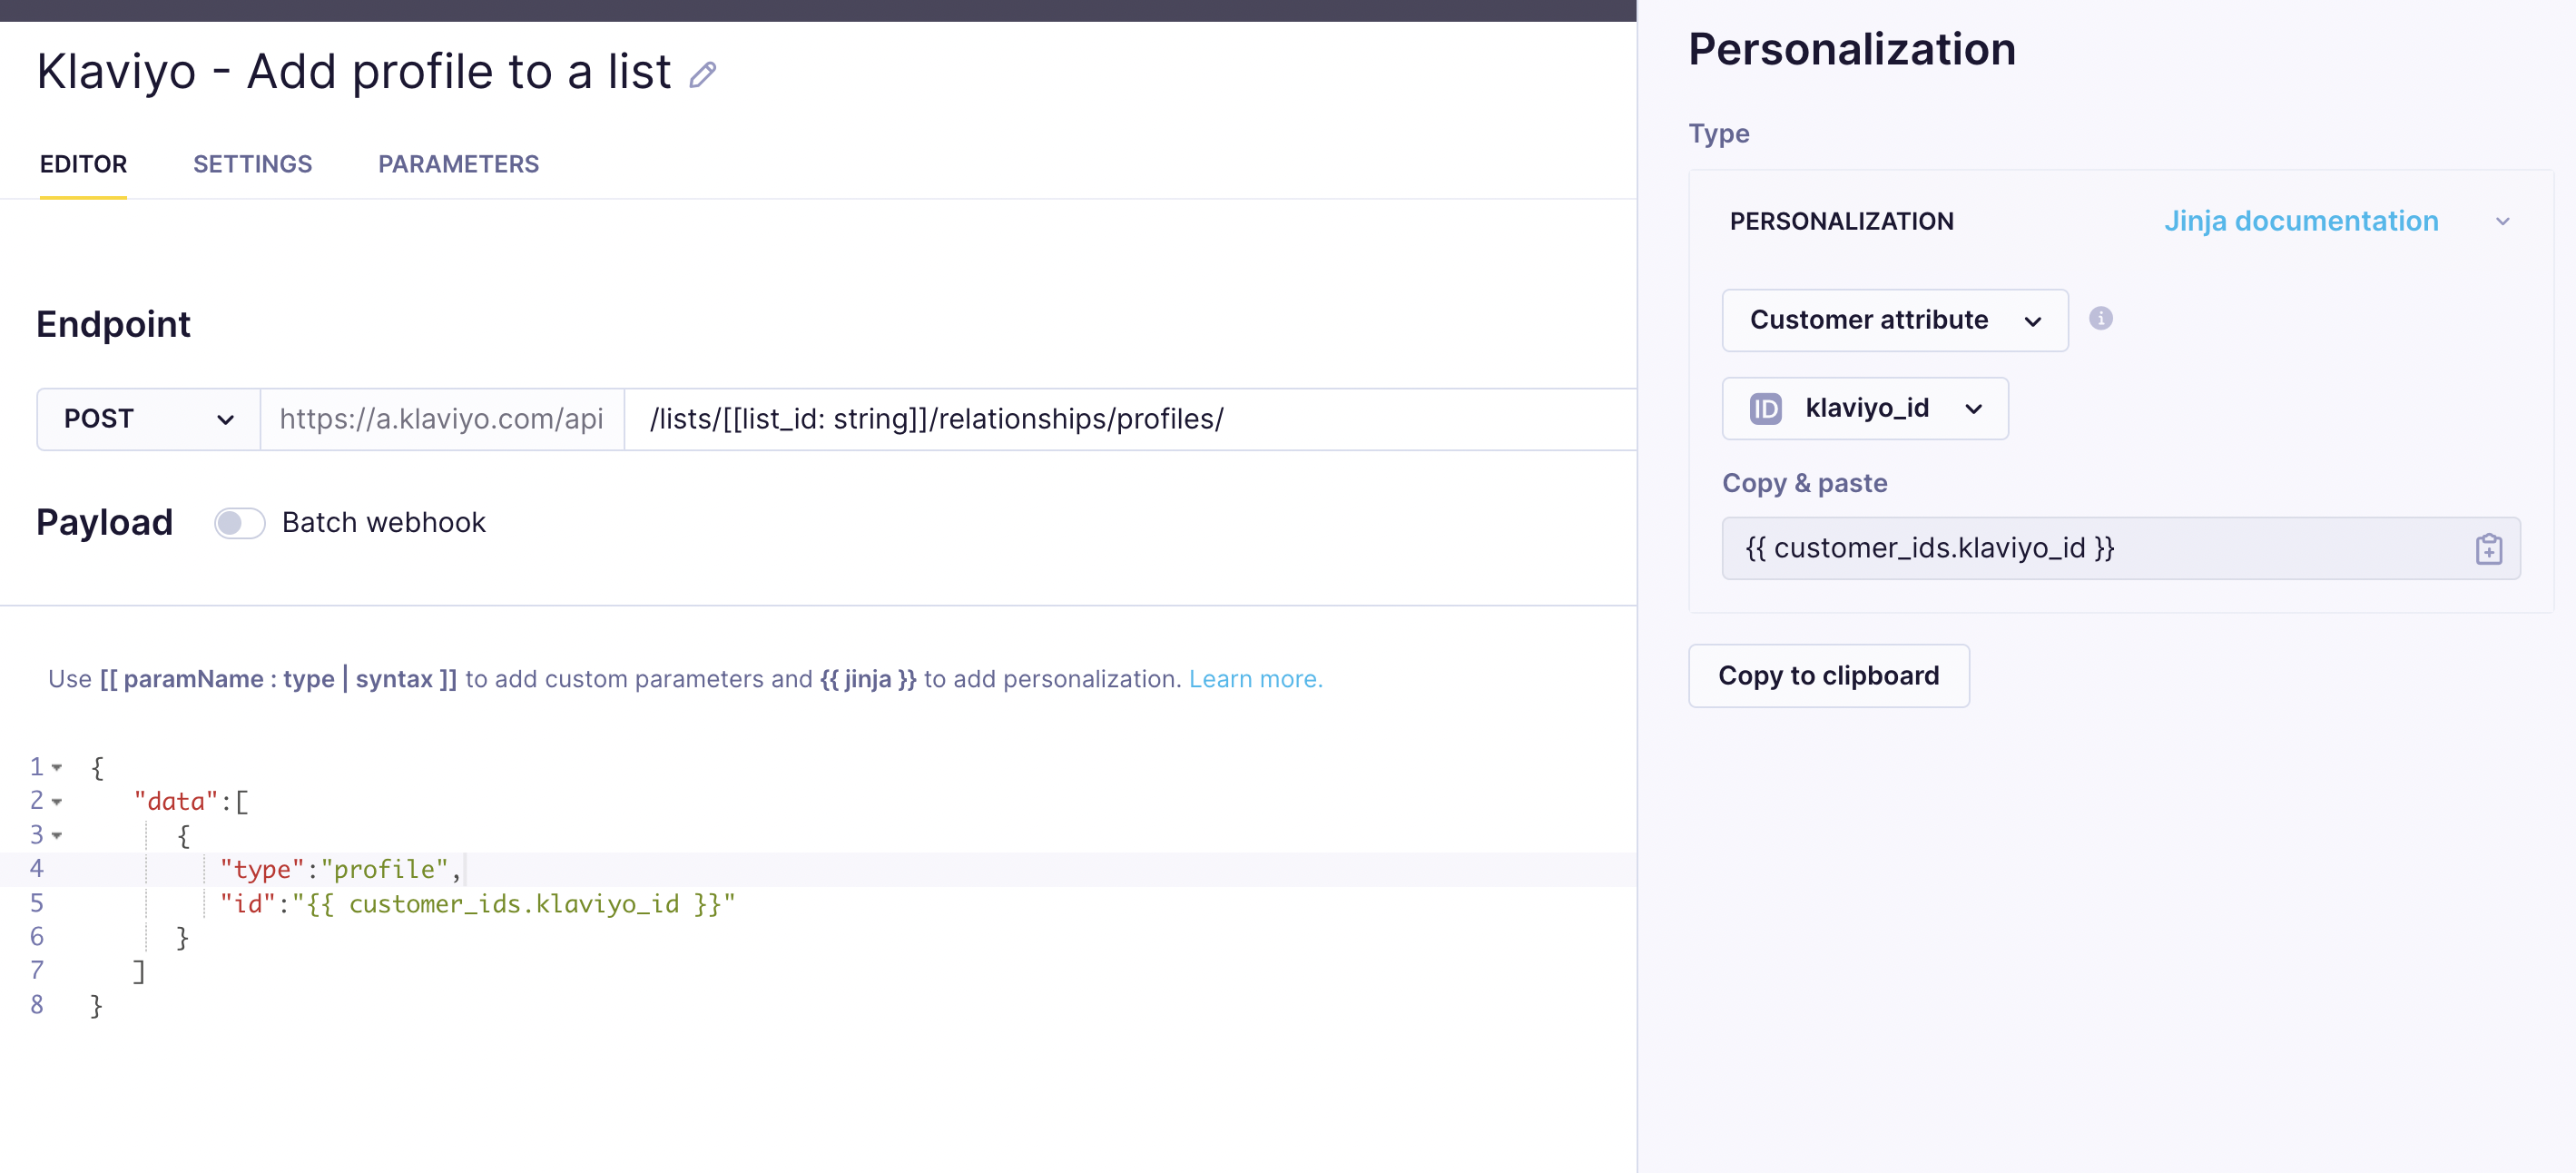
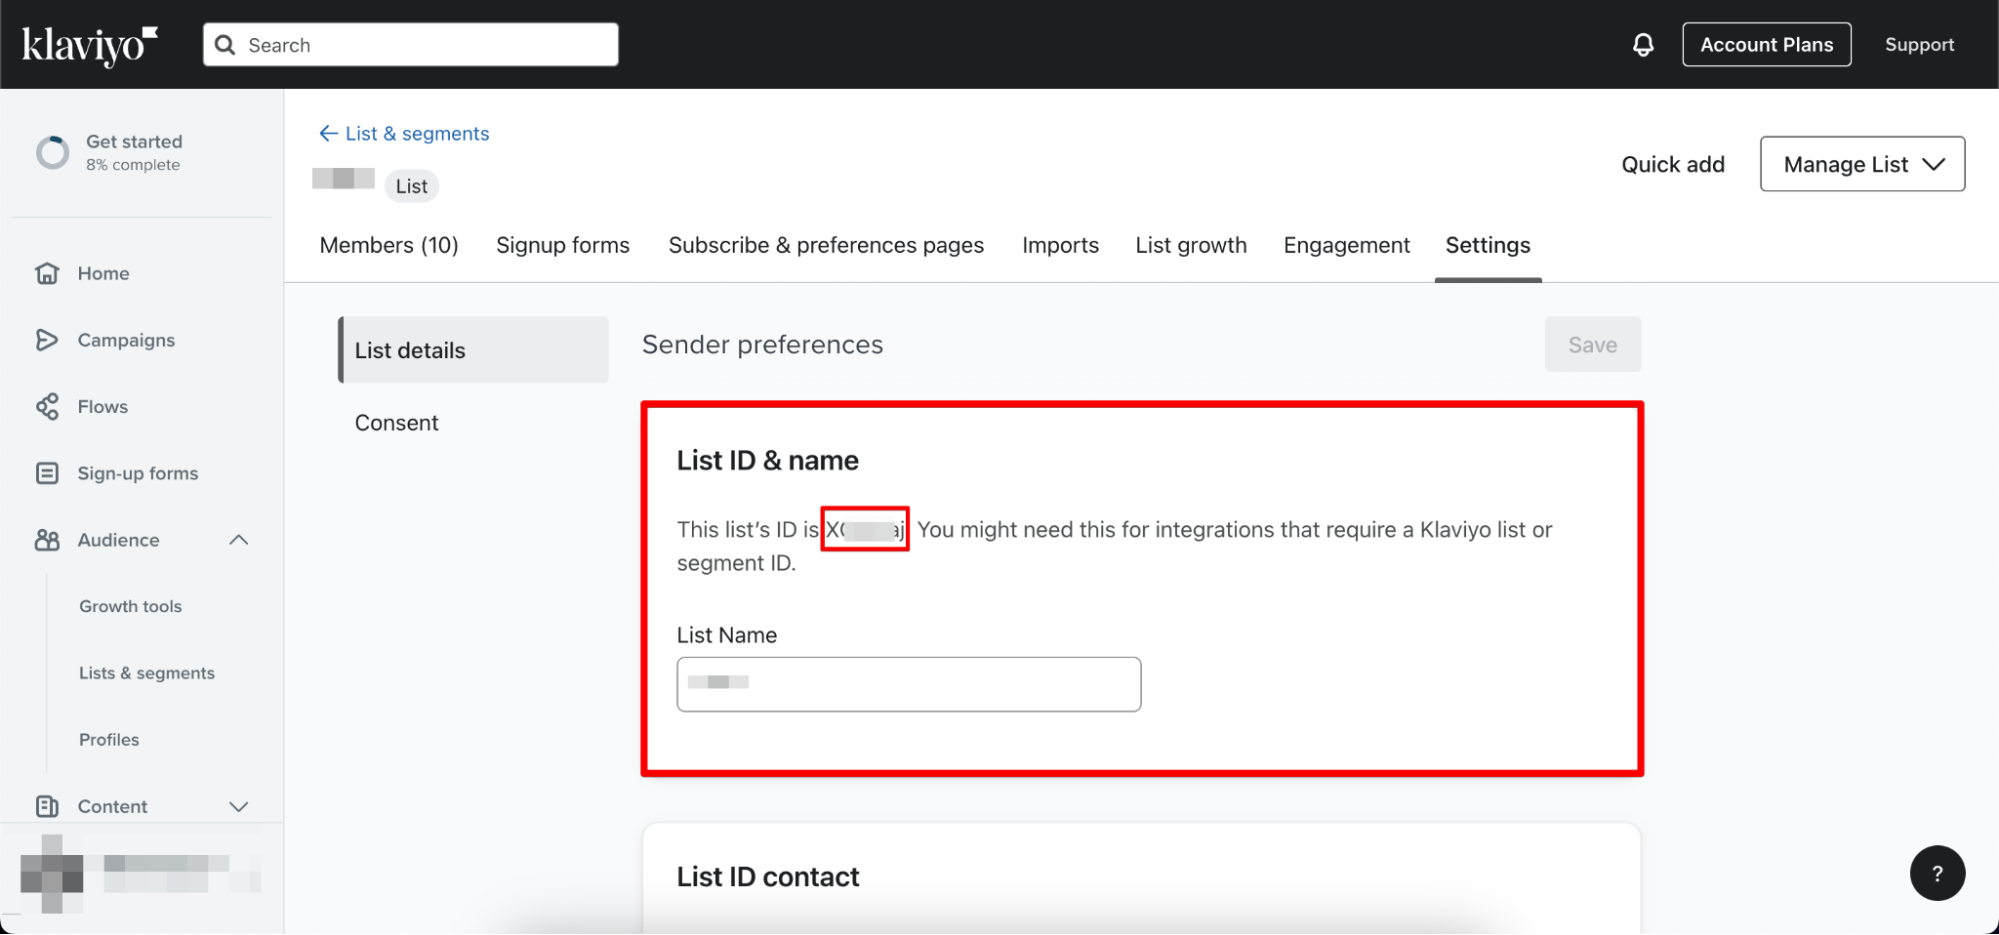
Here, we show you how to set up and use the webhook on more practical example. In this example webhook, a list id parameter is mandatory. To find it, go to your Klaviyo account > select a list you want to manage > copy the url. The value after the list/ is the list id which need to be pasted into the Klaviyo webhook template.
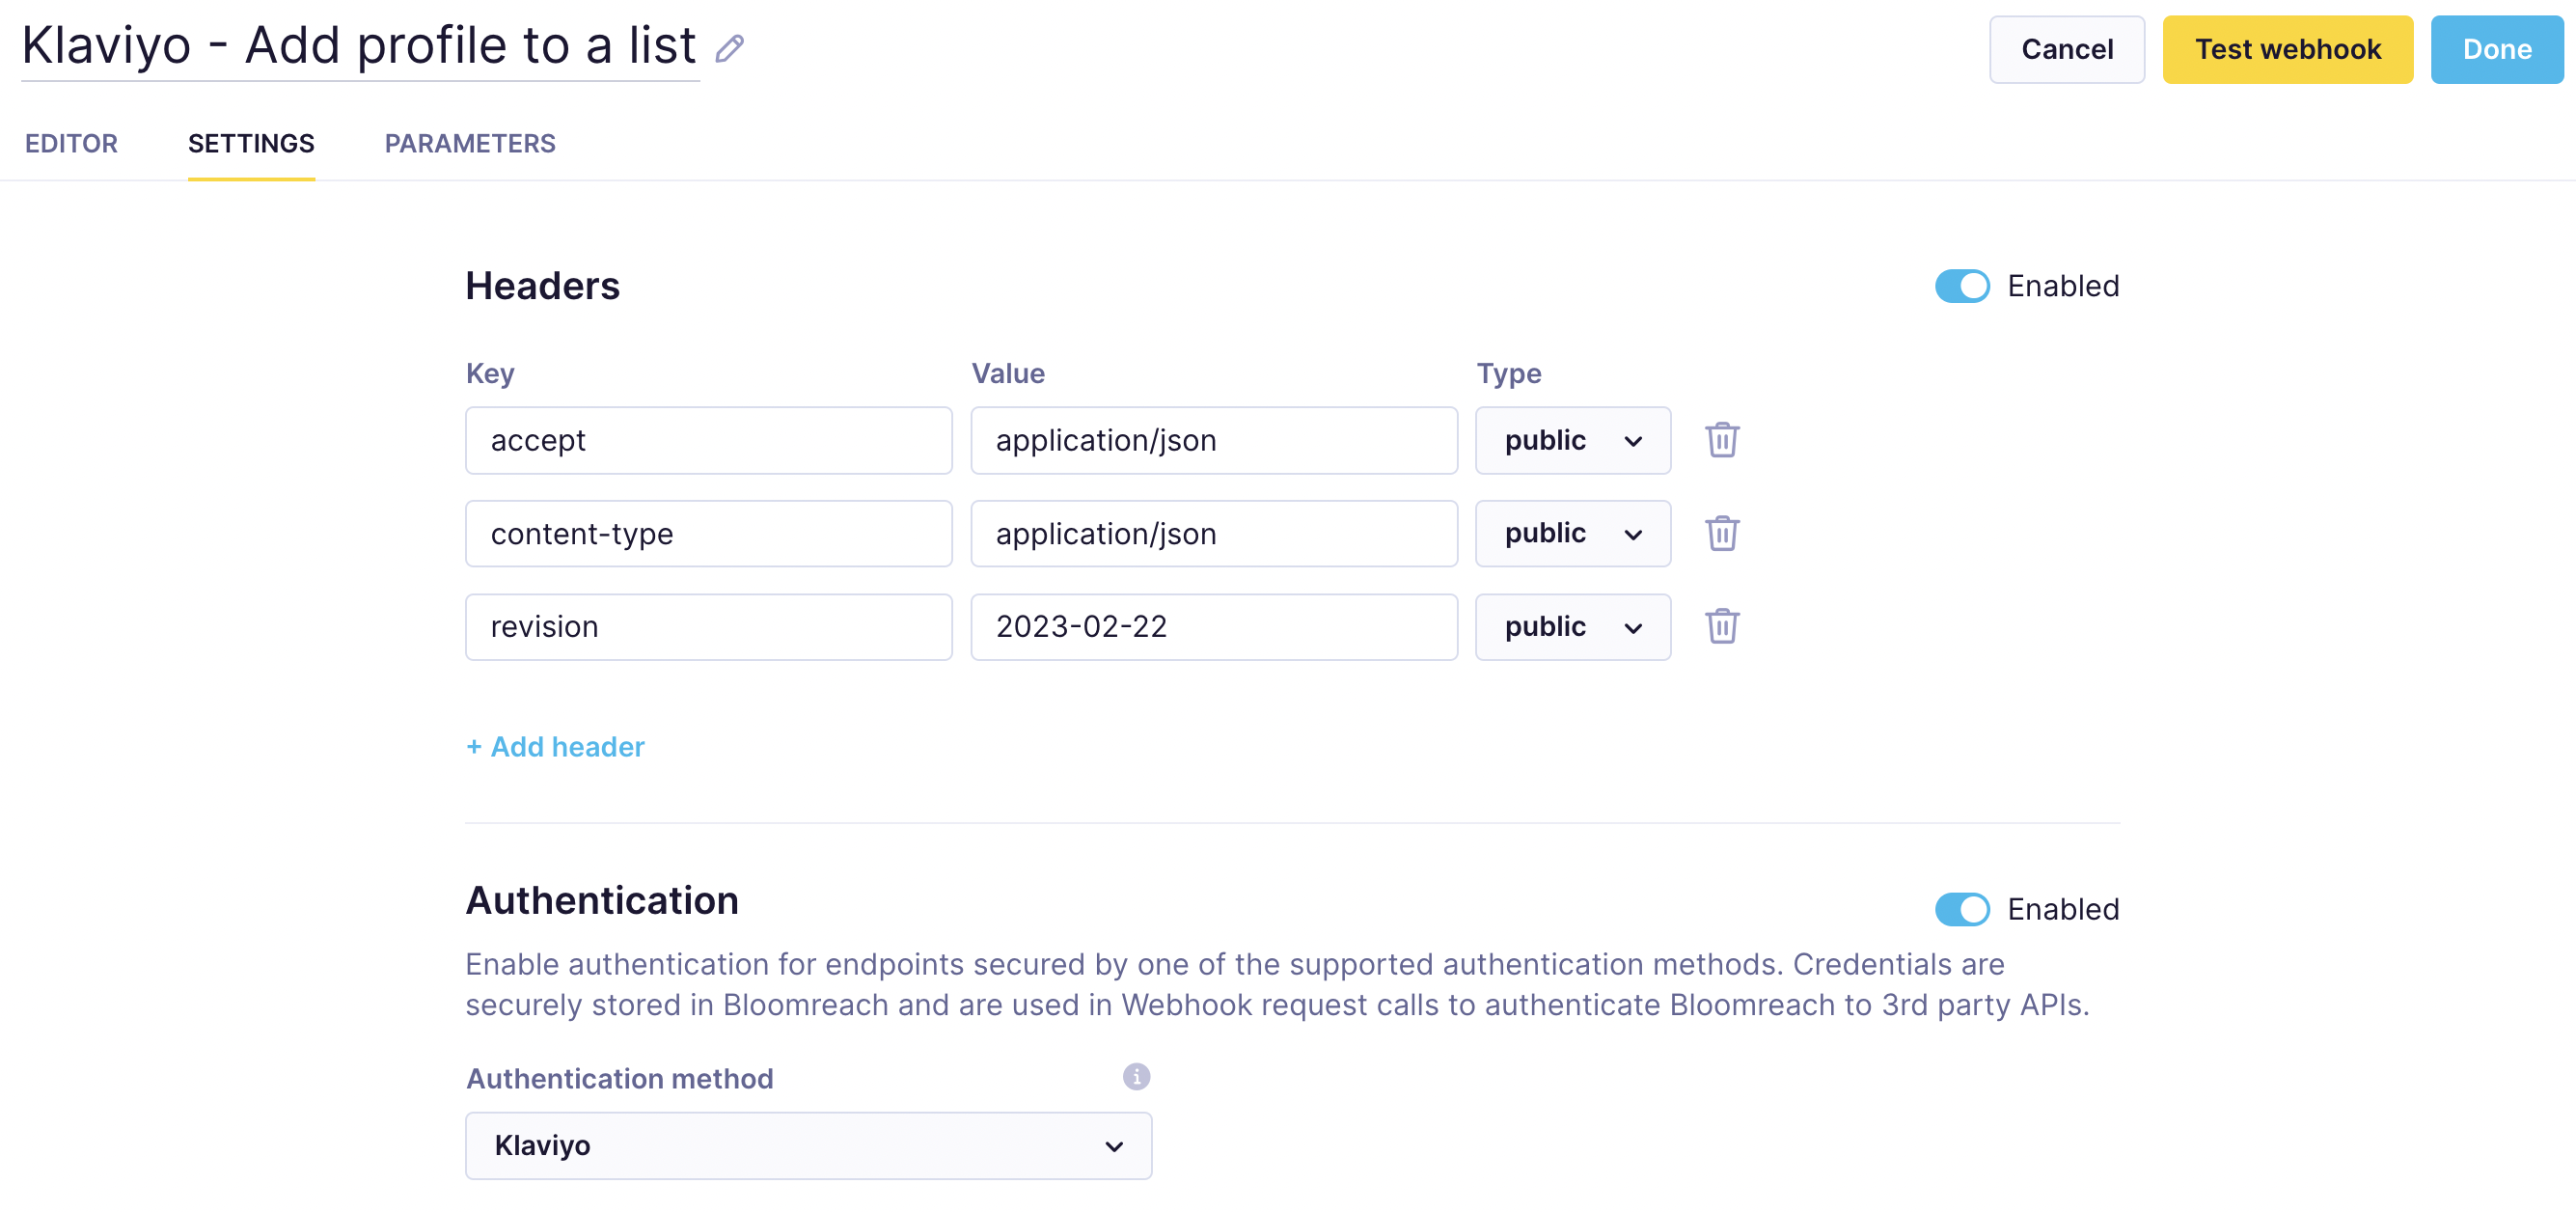
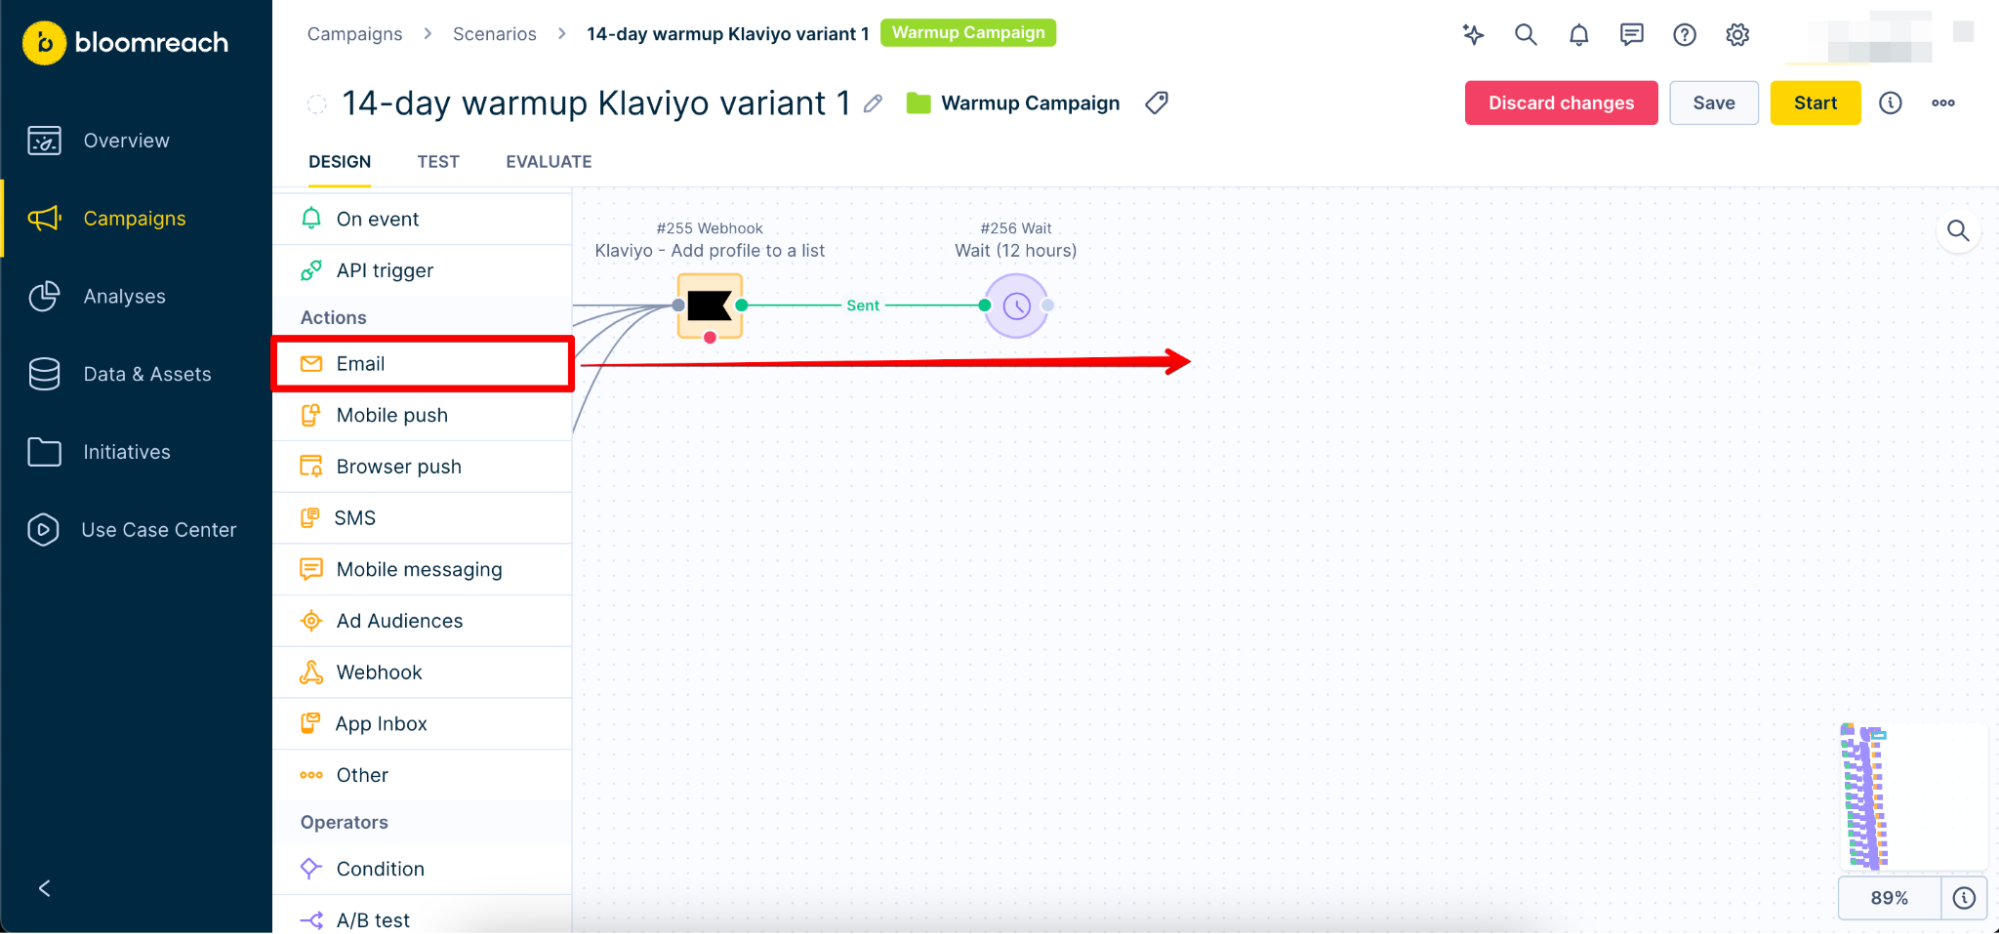
For all Klaviyo webhooks you are using, go to the Editor inside each Klaviyo webhook and set up required parameters. Replace all values called <Insert number via Jinja/Manually> using Jinja available under the bracket icon. In the screenshot below, you can see an example of Add profile to a list webhook with Klaviyo Id attribute.
Last thing to set us is the authentication. Go to the settings of the Klaviyo webhook and enable the Authentication. From the list, select the previously created authentication method. After it is selected, click done.
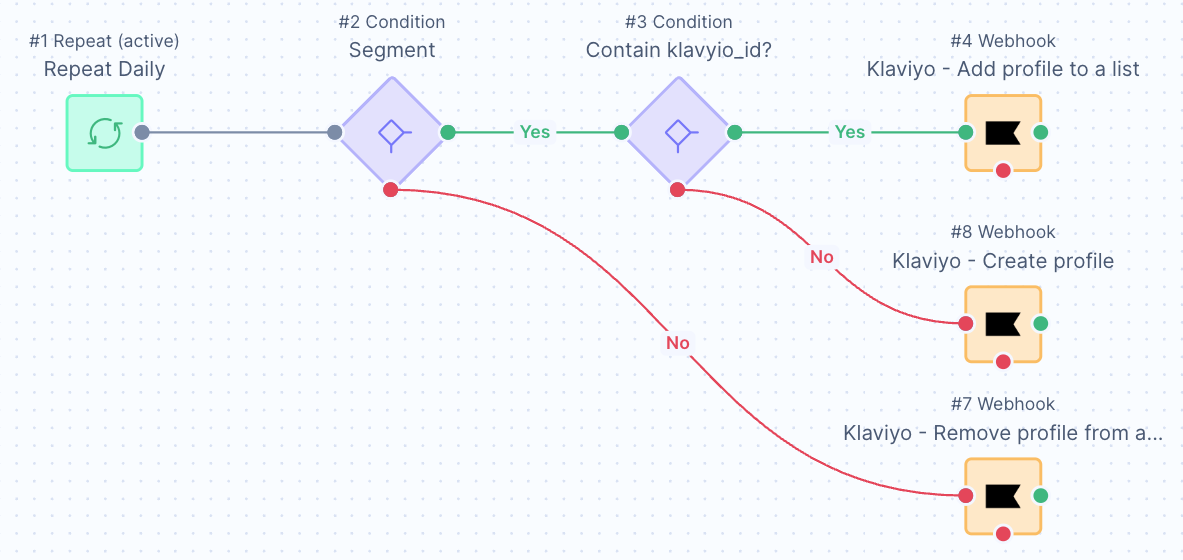
Now you can build various scenarios to send filtered profiles or segments from Bloomreach Engagement to Klaviyo. Below you can see an example of a scenario presenting sending profiles from a segment to a list in Klaviyo.
Limitations
- You can use only the Klaviyo accounts with a number of customer profiles lower then 850,000 and a number of generated events 42,000,000 per hour.
- The customer base is updated on a daily basis so new profiles in Klaviyo appear right after the daily import. The consent and campaign events are synchronised every two hours. It means that some events like Subscribed to List, Clicked email, Unsubscribe etc. might take up to 2 hours to to appear in Bloomreach Engagement. For new profiles and profile attributes it might take up to 24 hours.
- The integration tracks consent information through Klaviyo lists. In some cases, events such as "Subscribed to List" or "Unsubscribed from List" may not be recorded as events, which is caused by the Klaviyo API. This can occur, for example, when a client is imported via CSV and then the events are not properly tracked.
Available on some instances onlyThe Klaviyo integration is available on some instances only. This means that some single-tenant instances and new multi-tenant instances may need manual activation of the Klaviyo integration by the engineering team first. This is generally requested during a new instance setup or can be requested any time later by contacting our Live chat or your Customer Success Manager.
Migrating email sending
You can use the automated Warm-Up Scenario to make your migration from Klaviyo to Bloomreach more efficient. The setup is simple and will allow you to automate a gradual increase in email sending volume in Bloomreach while decreasing sending volume in Klaviyo.
How To Set It Up
Migrate Klaviyo Customer Profiles
To migrate your Klaviyo Profiles:
- Go to
Klaviyo > Audience > List & segments
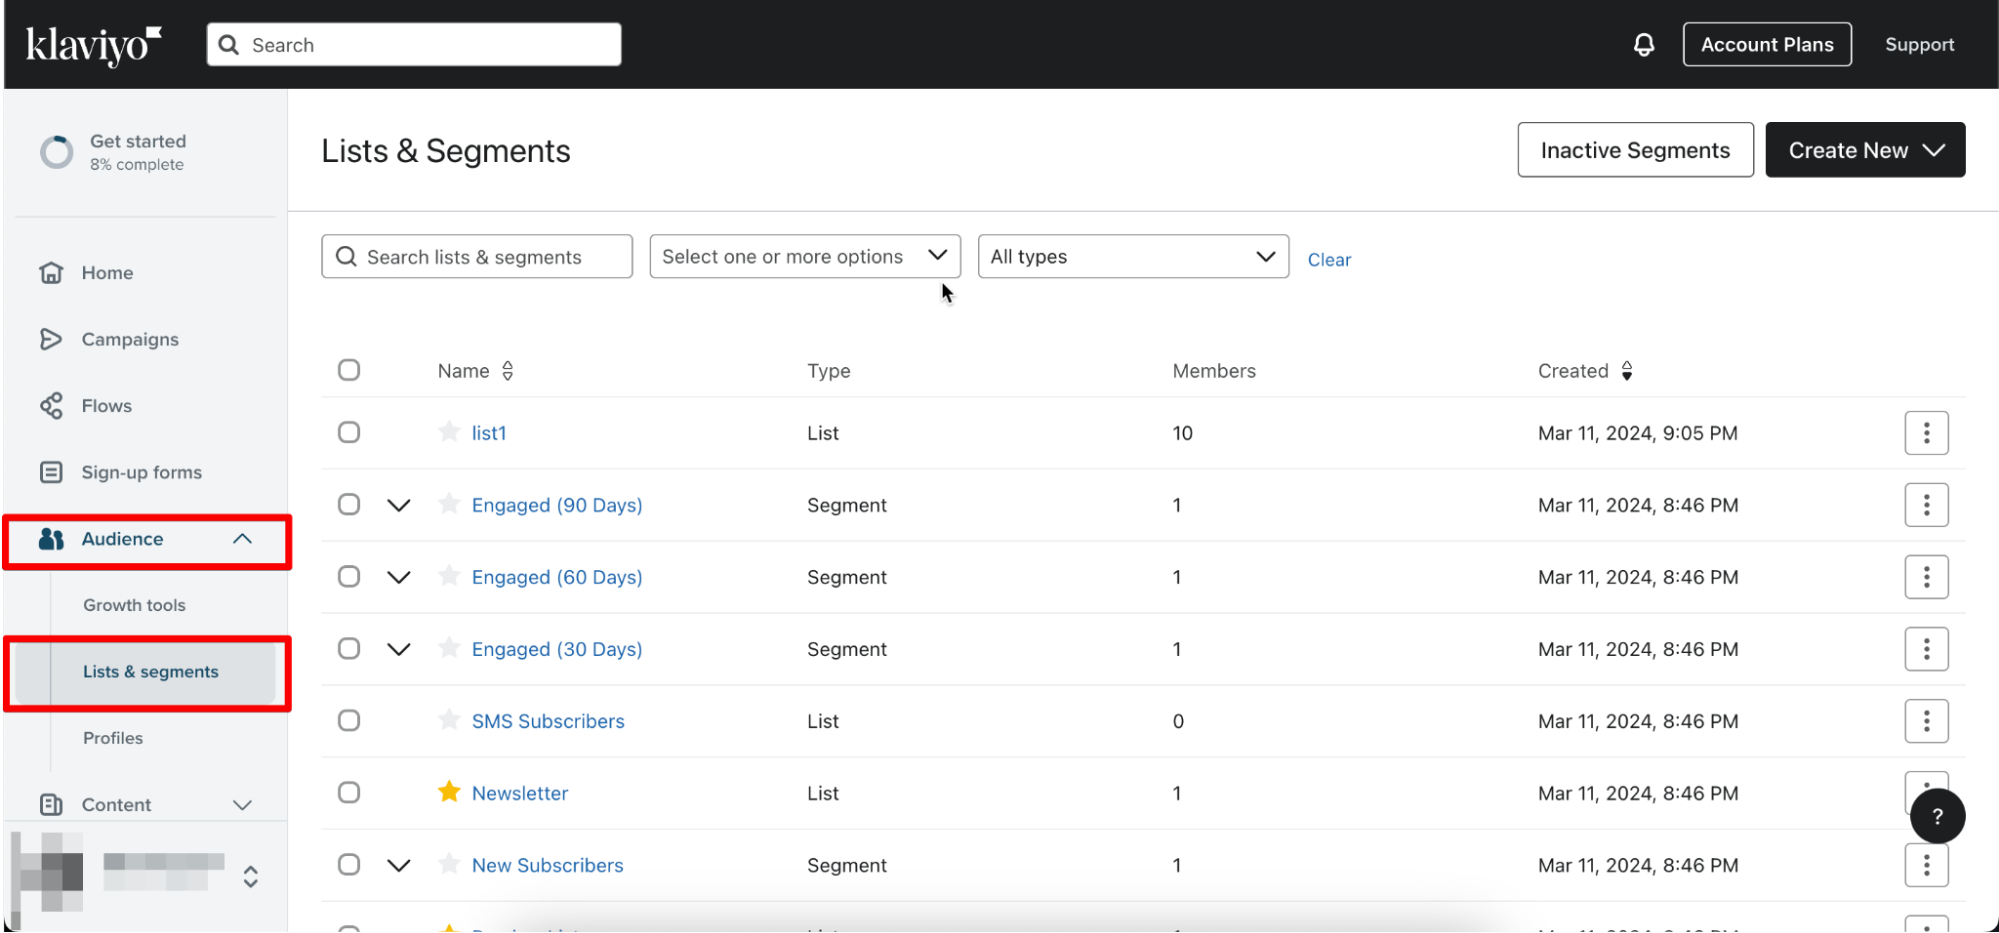
- Click on the Engaged (90 Days) Segment
- Go to
Manage List > Export List to CSV. The list will automatically download to your device. - Go to
Bloomreach Engagement > Data & Assets > Imports > + New import
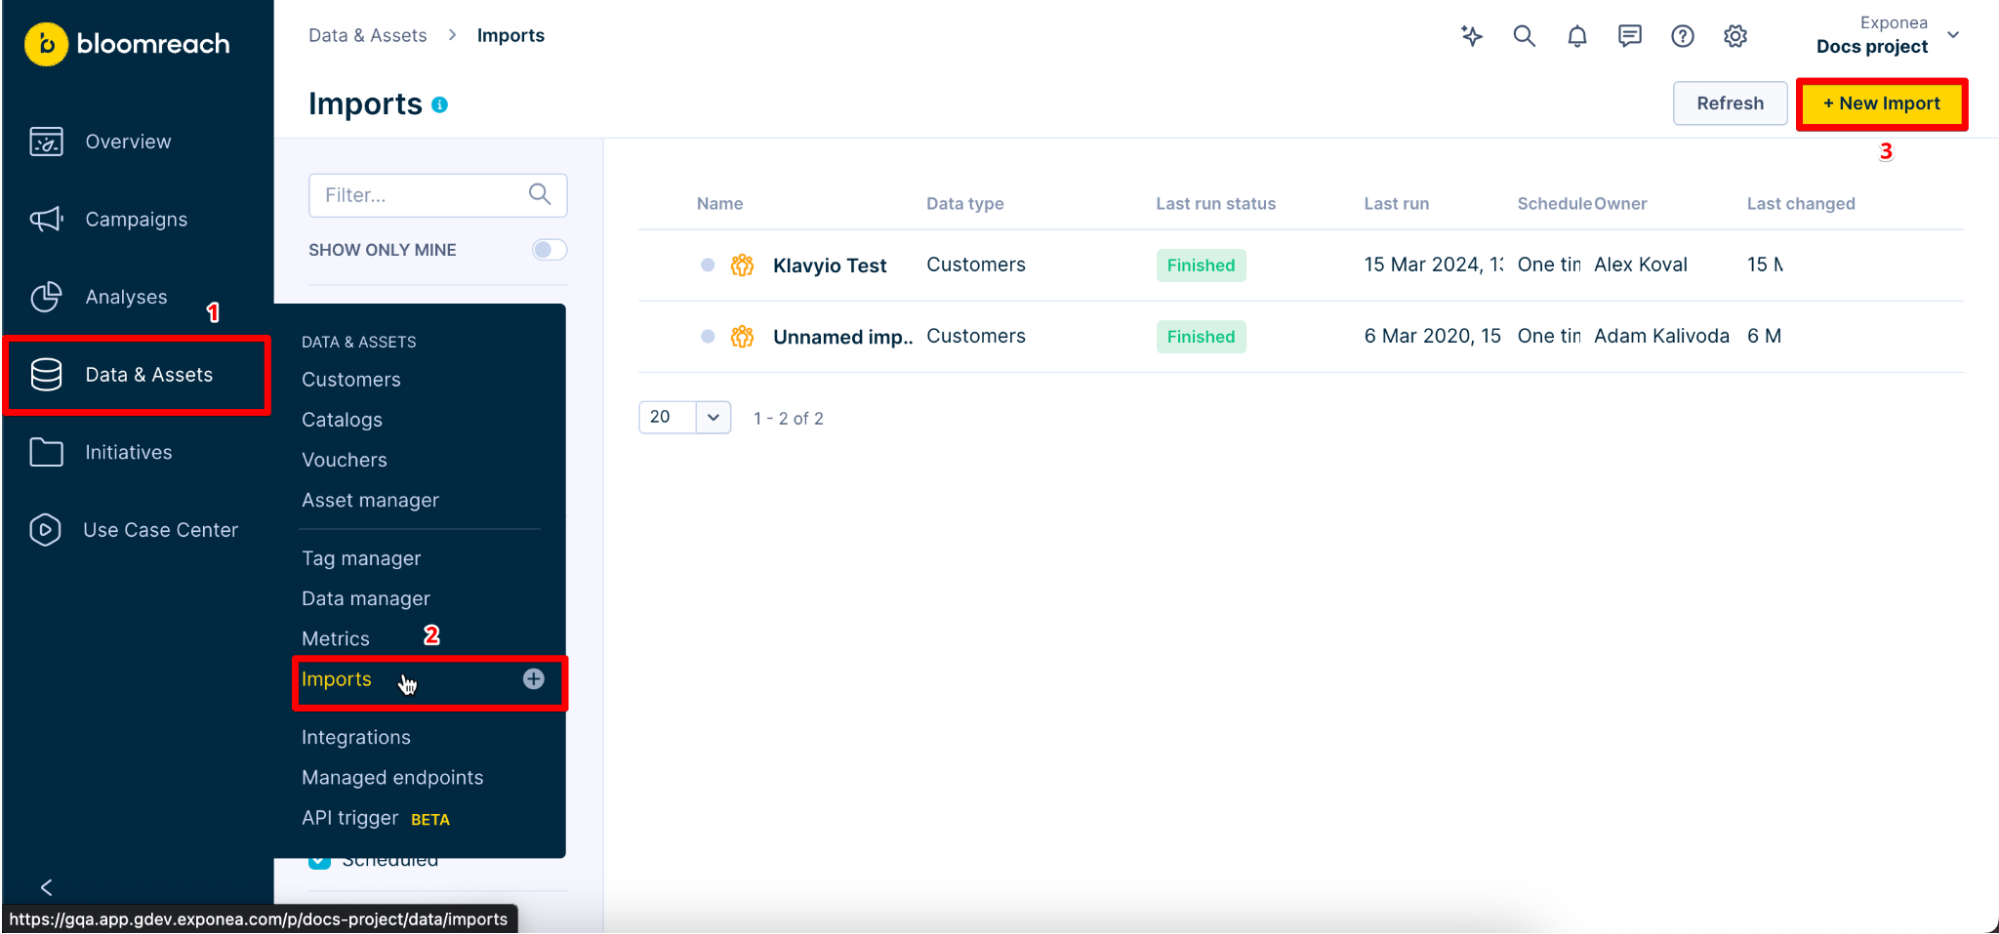
- Click on
Customers
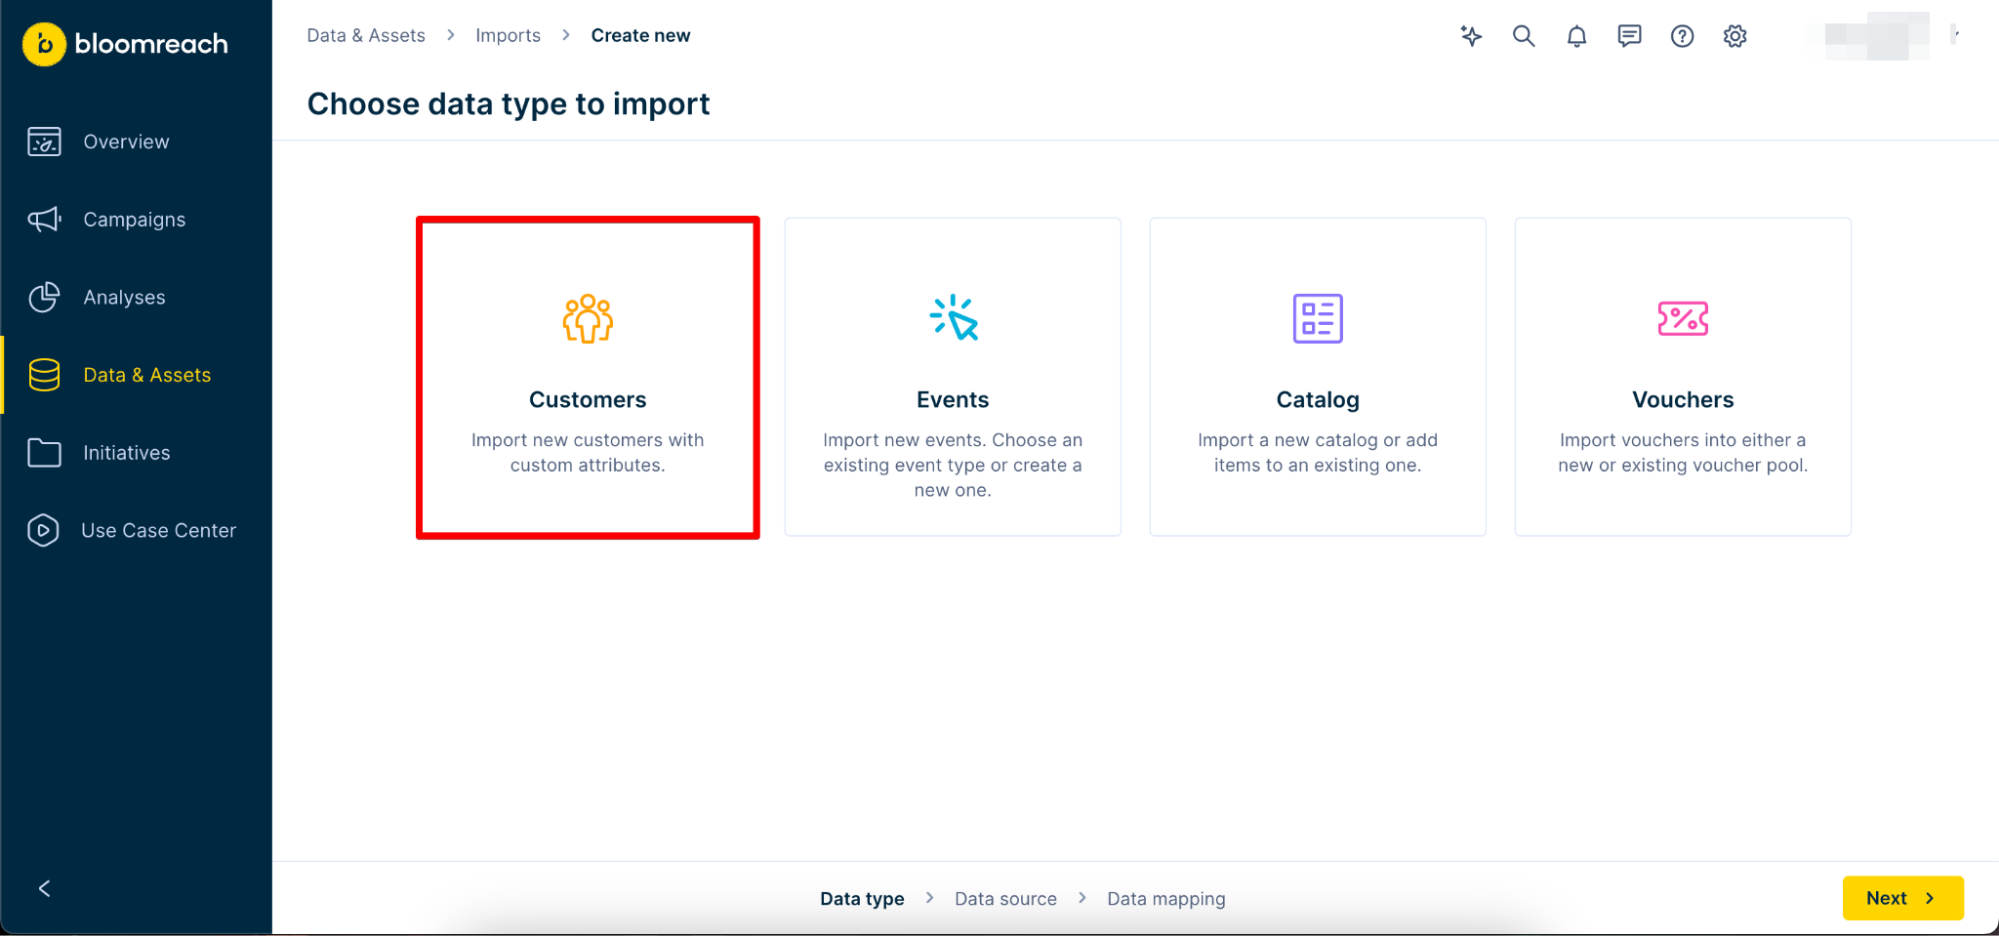
- Move to the
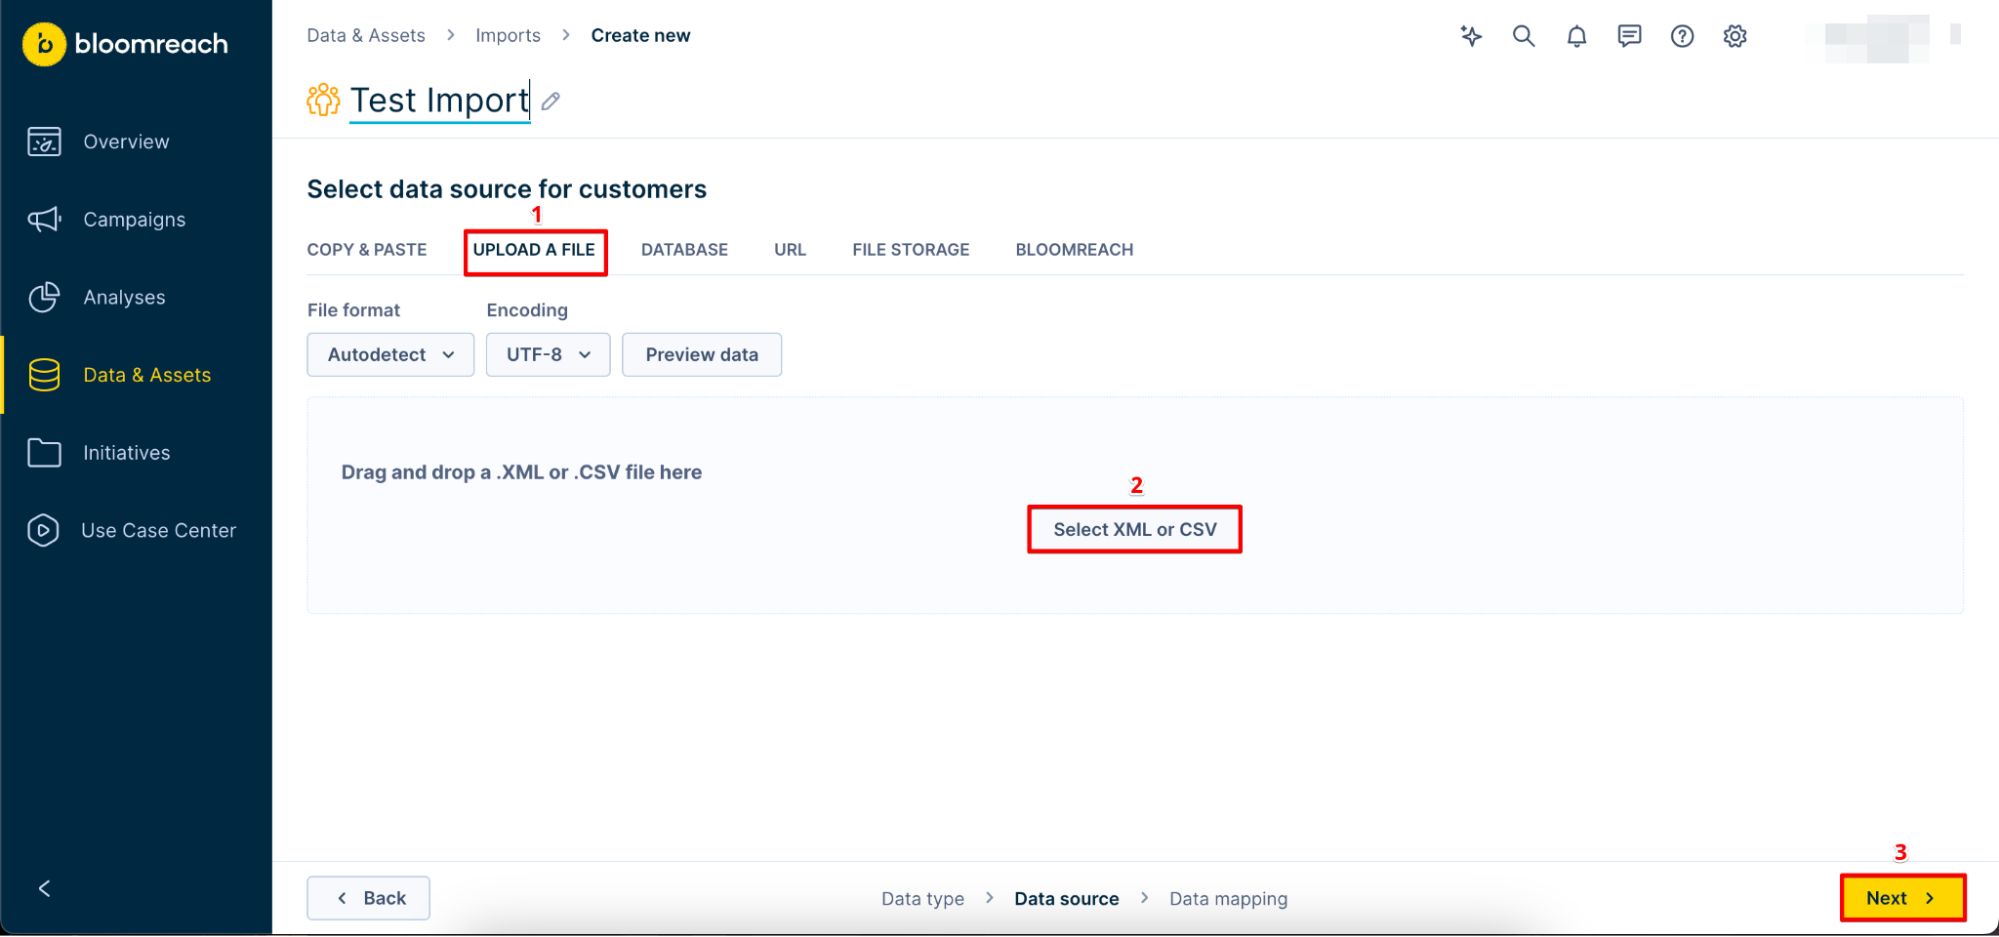
Upload a Filesection and upload the CSV file. Give your import a name and clickNext.
- Assign at least one Customer ID and click on
Run import
Add Klaviyo Integration
Now that you have migrated your customer profiles to Bloomreach, it's time to add the Klaviyo integration:
- Go to
Data & Assets > Integrations > Add new integration

- Look for Klavyio and click on
+ Add integration
Adjust the Integration
You will need your Klavio API key for this part. To get it, go to your Klaviyo account and follow these steps:
- Click on your account located at the bottom left and click on
Settings
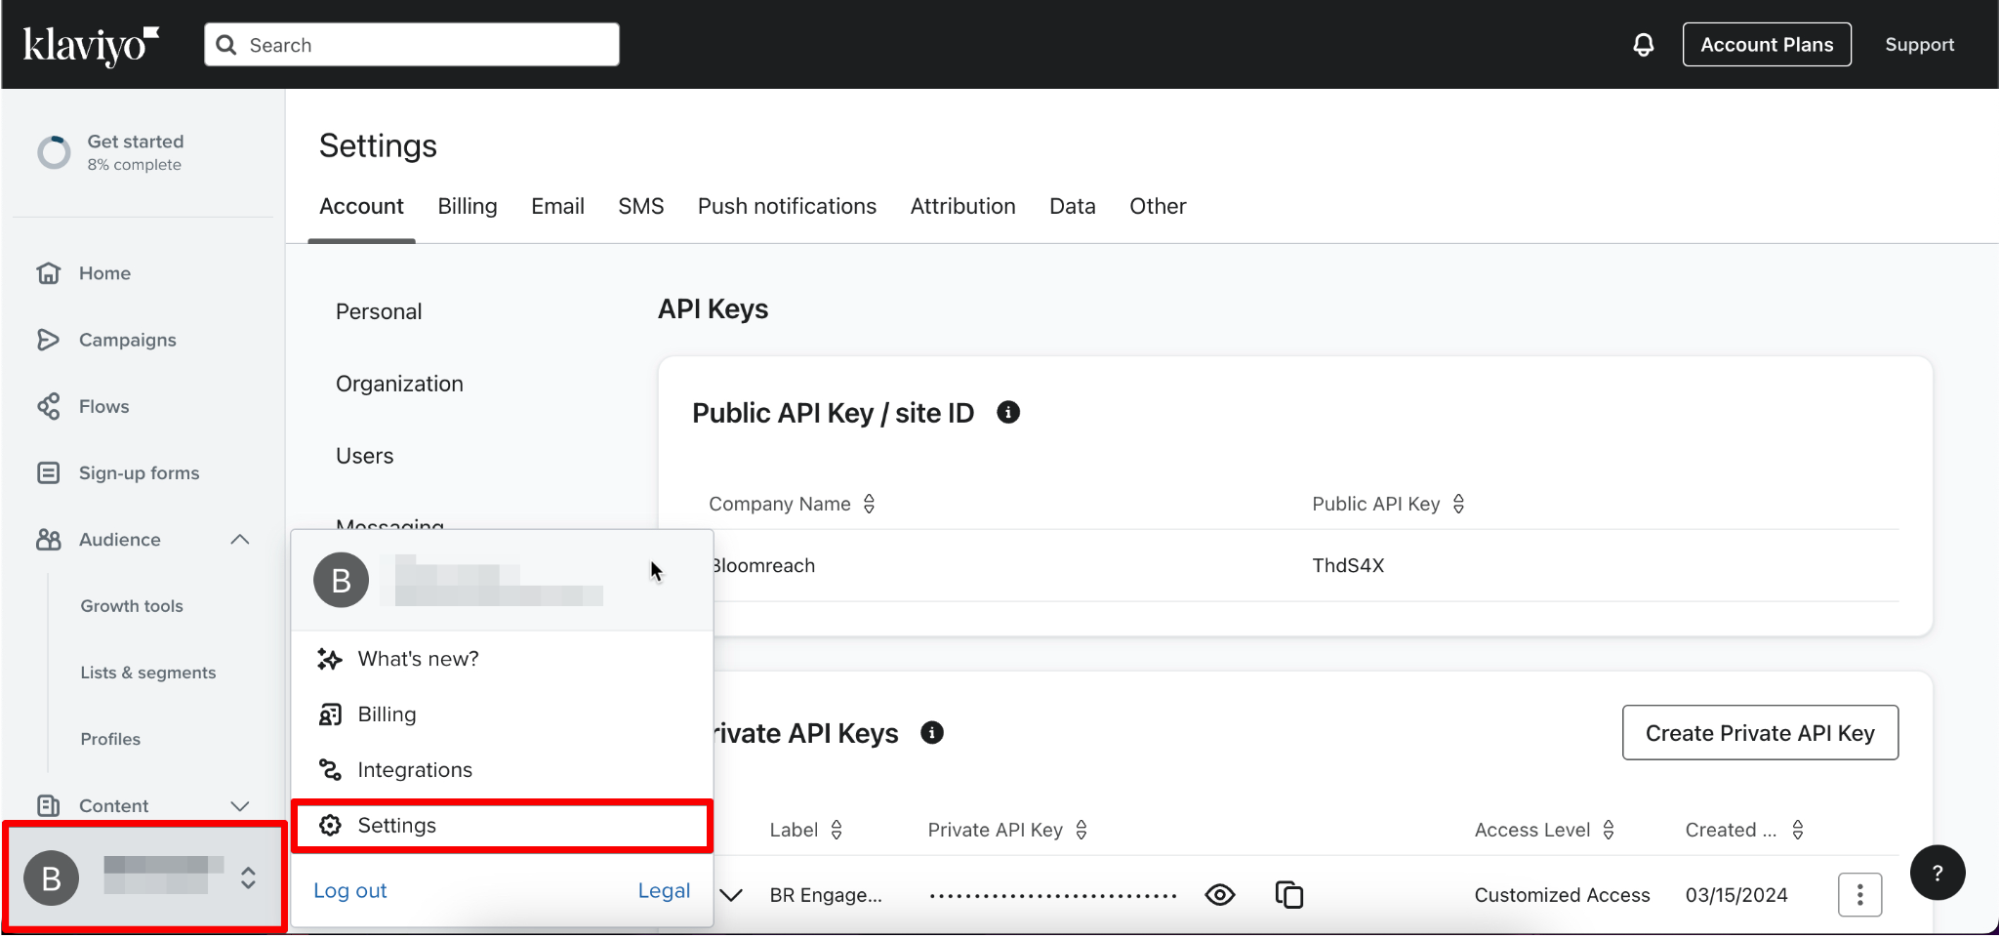
- Click on
Create Private API Key - Name your API Key and assign your chosen accesses
- Click on
Createand save your API - Go back to your Klaviyo Integration in Bloomreach Engagement and paste your API Key
- Adjust the Customer property mapping to suit your needs
- Click on
Save integration
Get Your List ID
- In Klaviyo, go to
Audience > Lists & Segments - Find the Engaged (90 Days) Segment, and click on the three dots next to it
- Click on
List settings
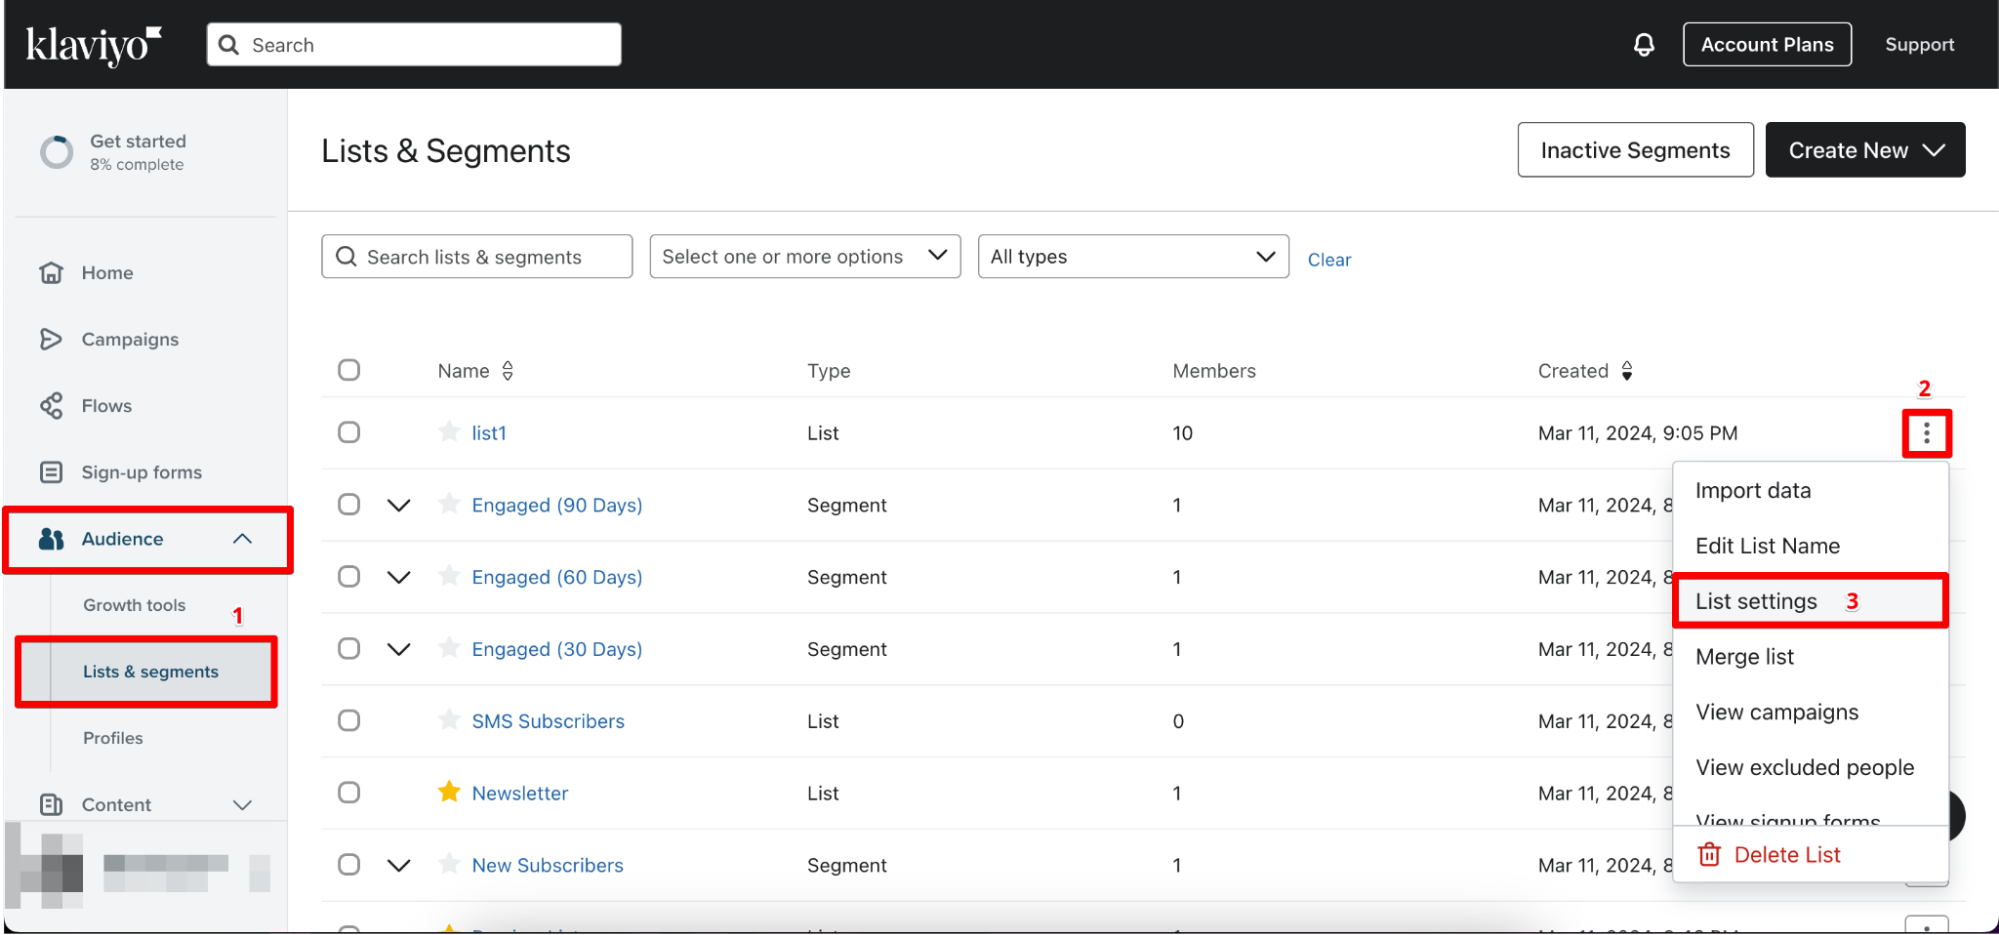
- Copy and note down the List ID. You will need it later.
Customize the Warmup Campaign
You can choose from two different initial Email campaigns.
Variant 1 lets you send different email templates each sending day to previous and new customers.
Variant 2 lets you reuse existing templates, as some customers will be excluded in the following sending days.
Variant 1
The #296 Consent reject node ensures that customers who unsubscribe trigger a flow that also unsubscribes them in Klaviyo.
Add the Unsubscribe List ID
- Go to Klaviyo, find the Unsubscribe list, and click on the three dots next to it
- Click on
List settings - Copy and paste the ID into the #297 Unsubscribe List node
Day 1
The flow starts at midnight each sending day, so you will have the most recent data to add customers to the list.
Adjust Dates in the Scenario
Click on the #229 On date node and adjust the date of your first Email
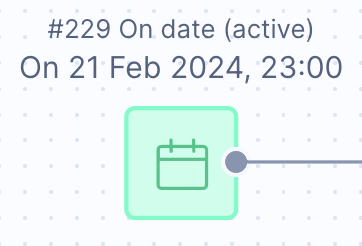
NoteThis step needs to be done manually for each day. Make sure that the days correspond to the day number in the scenario.
Adjust Customer Consent and Email
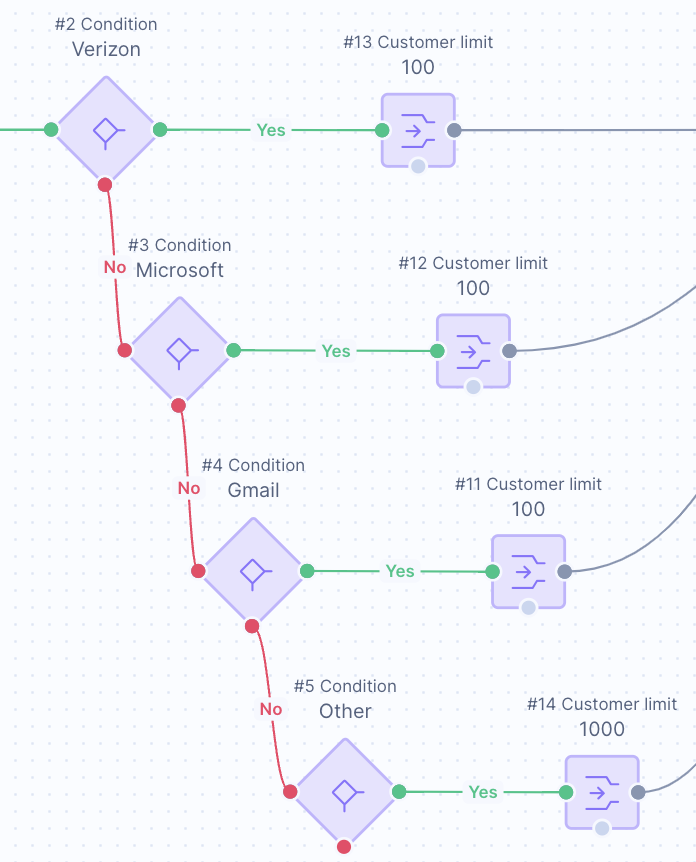
- Click on the #7 Condition node
- Adjust the Consent and Email
The #19 Total Audience node checks whether the customers are in the active segment. This segment will be imported from Klaviyo or new customers.
Each provider gets assigned a specific customer limit on each sending day based on the pre-defined warmup plan.
Exclusion List ID
Klaviyo Exclusion List ID needs to be added in each flow so it's clear which customers to exclude in Klaviyo for every sending day:
- Click on the #225 Webhook node
- Paste the exclusion list ID and click on
Save
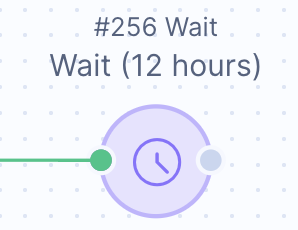
Adjust Waiting Time
Edit the #256 Wait node in each flow based on the appropriate sending time each sending day. The flows are triggered at midnight.
Add a New Email Template
NoteEach template should only be used once during Warmup
- Drag and drop the Email node and connect it with the #256 Wait node
- Double-click the Email node and adjust the template to your liking
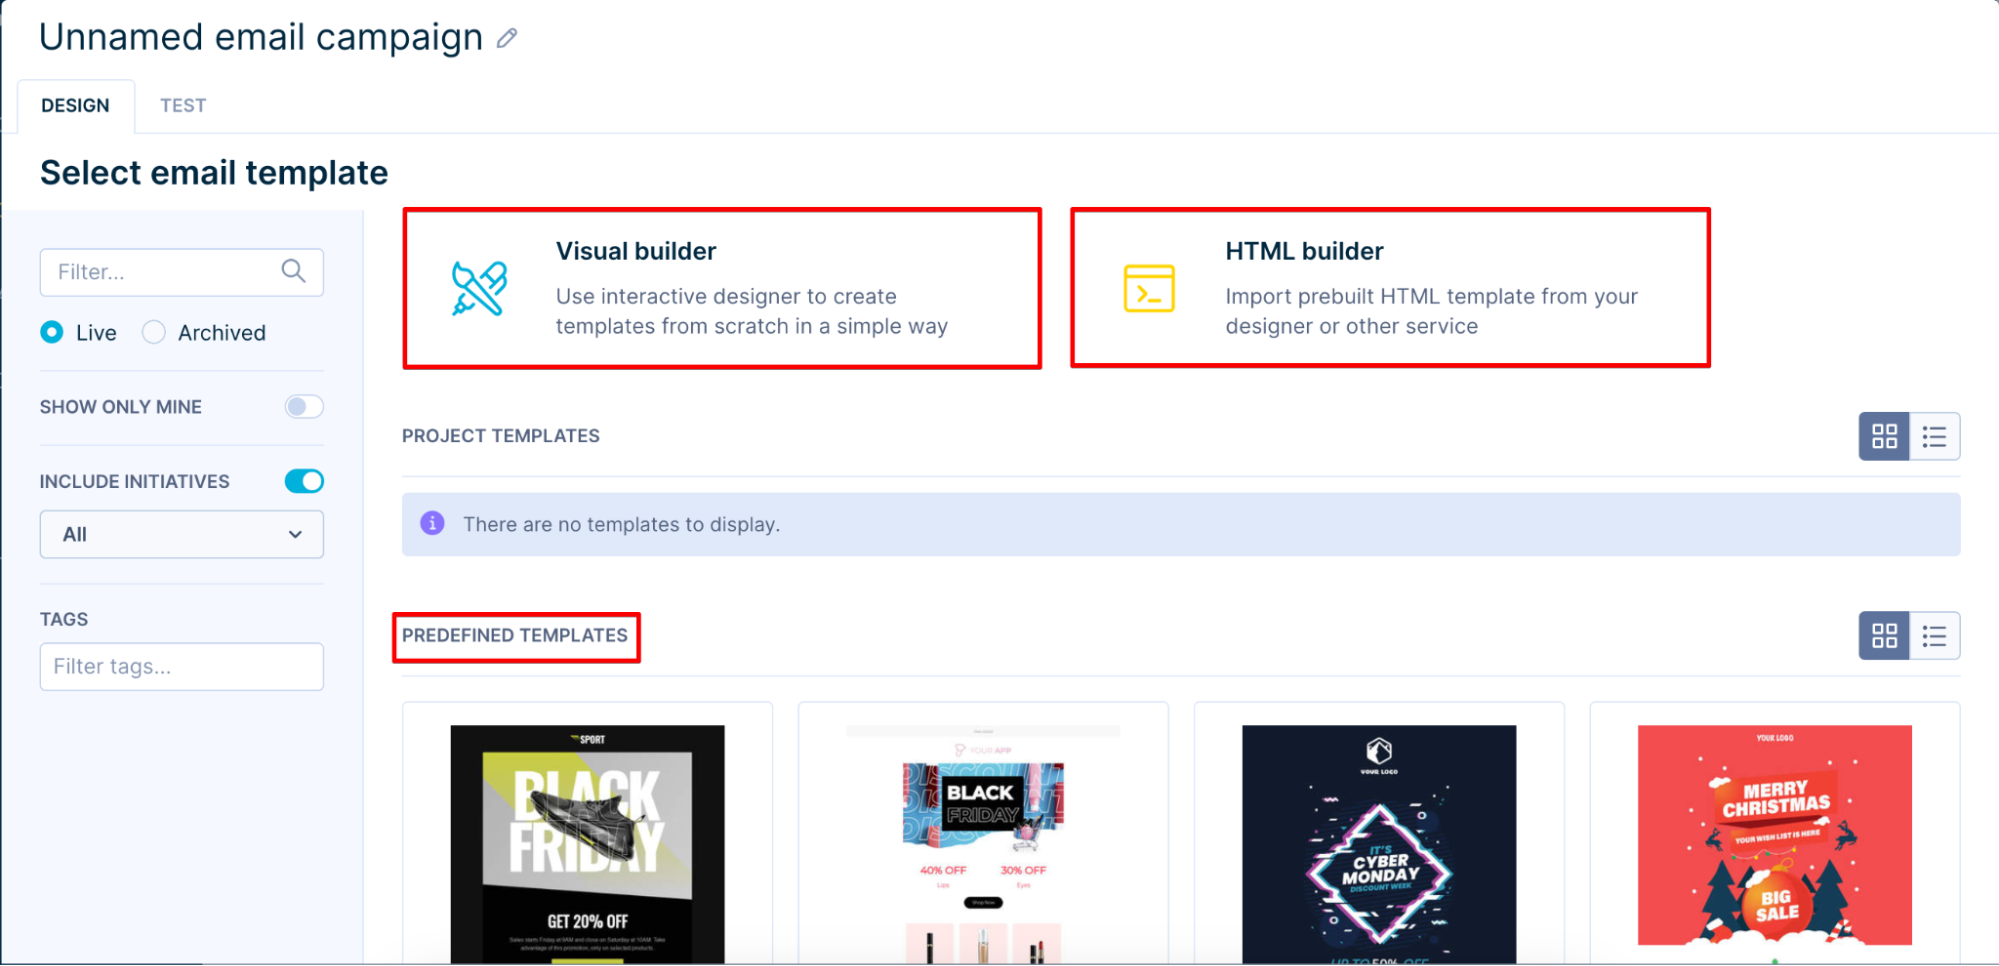
You can choose from pre-defined templates or create your own with the Visual builder or the HTML builder

Day 2
Since there is no volume increase, repeat the steps from the previous day with the same audience as in Day 1.
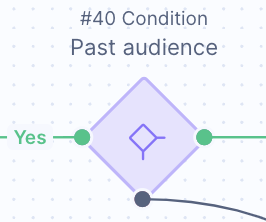
The #40 Past audience node checks customers already received the Warmup campaign email. Once the customers receive an email from Bloomreach, they will remain part of the next sending days.
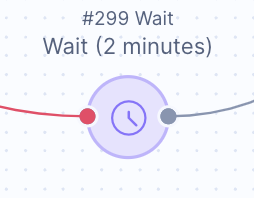
The #299 Wait node ensures that the customers from previous days will go through the flow first
Days 3-14
Repeat the steps from previous days. From now on, new audiences will automatically be added to the sending list each day.
Variant 2
The #296 Consent reject node ensures that customers who unsubscribe trigger a flow that also unsubscribes them in Klaviyo
Add the Unsubscribe List ID
- Go to Klaviyo, find the Unsubscribe list, and click on the three dots next to it
- Click on
List settings - Copy and paste the ID into the #297 Unsubscribe List node
Day 1
The flow starts at midnight each sending day, so you will have the most recent data to add customers to the list.
The trigger should always start X amount of days before sending the campaign from Klaviyo
NoteX = number of days you are using the same email template
Adjust Dates in the Scenario
Click on the #229 On date node and adjust the date of your first Email


NoteThis step needs to be done manually for each day. Make sure that the days correspond to the day number in the scenario.
Adjust Customer Consent and Email
- Click on the #7 Condition node
- Adjust the Consent and Email
The #19 Total Audience node checks whether the customers are in the active segment. This segment will be imported from Klaviyo or new customers.
The #331 Past Audience node checks whether the customer has received this email template before.
NoteThe name of the corresponding flow template needs to be updated in each "Past Audience" condition
Each provider gets assigned a specific customer limit on each sending day based on the pre-defined warmup plan

Exclusion List ID
Klaviyo Exclusion List ID needs to be added in each flow so we know which customers to exclude in Klaviyo for every sending day:
- Click on the #225 Webhook node
- Paste the exclusion list ID and click on
Save
Adjust Waiting Time
Edit the #256 Wait node in each flow based on the appropriate sending time each sending day. The flows are triggered at midnight.

Add a New Email Template
- Drag and drop the Email node and connect it with the #256 Wait node
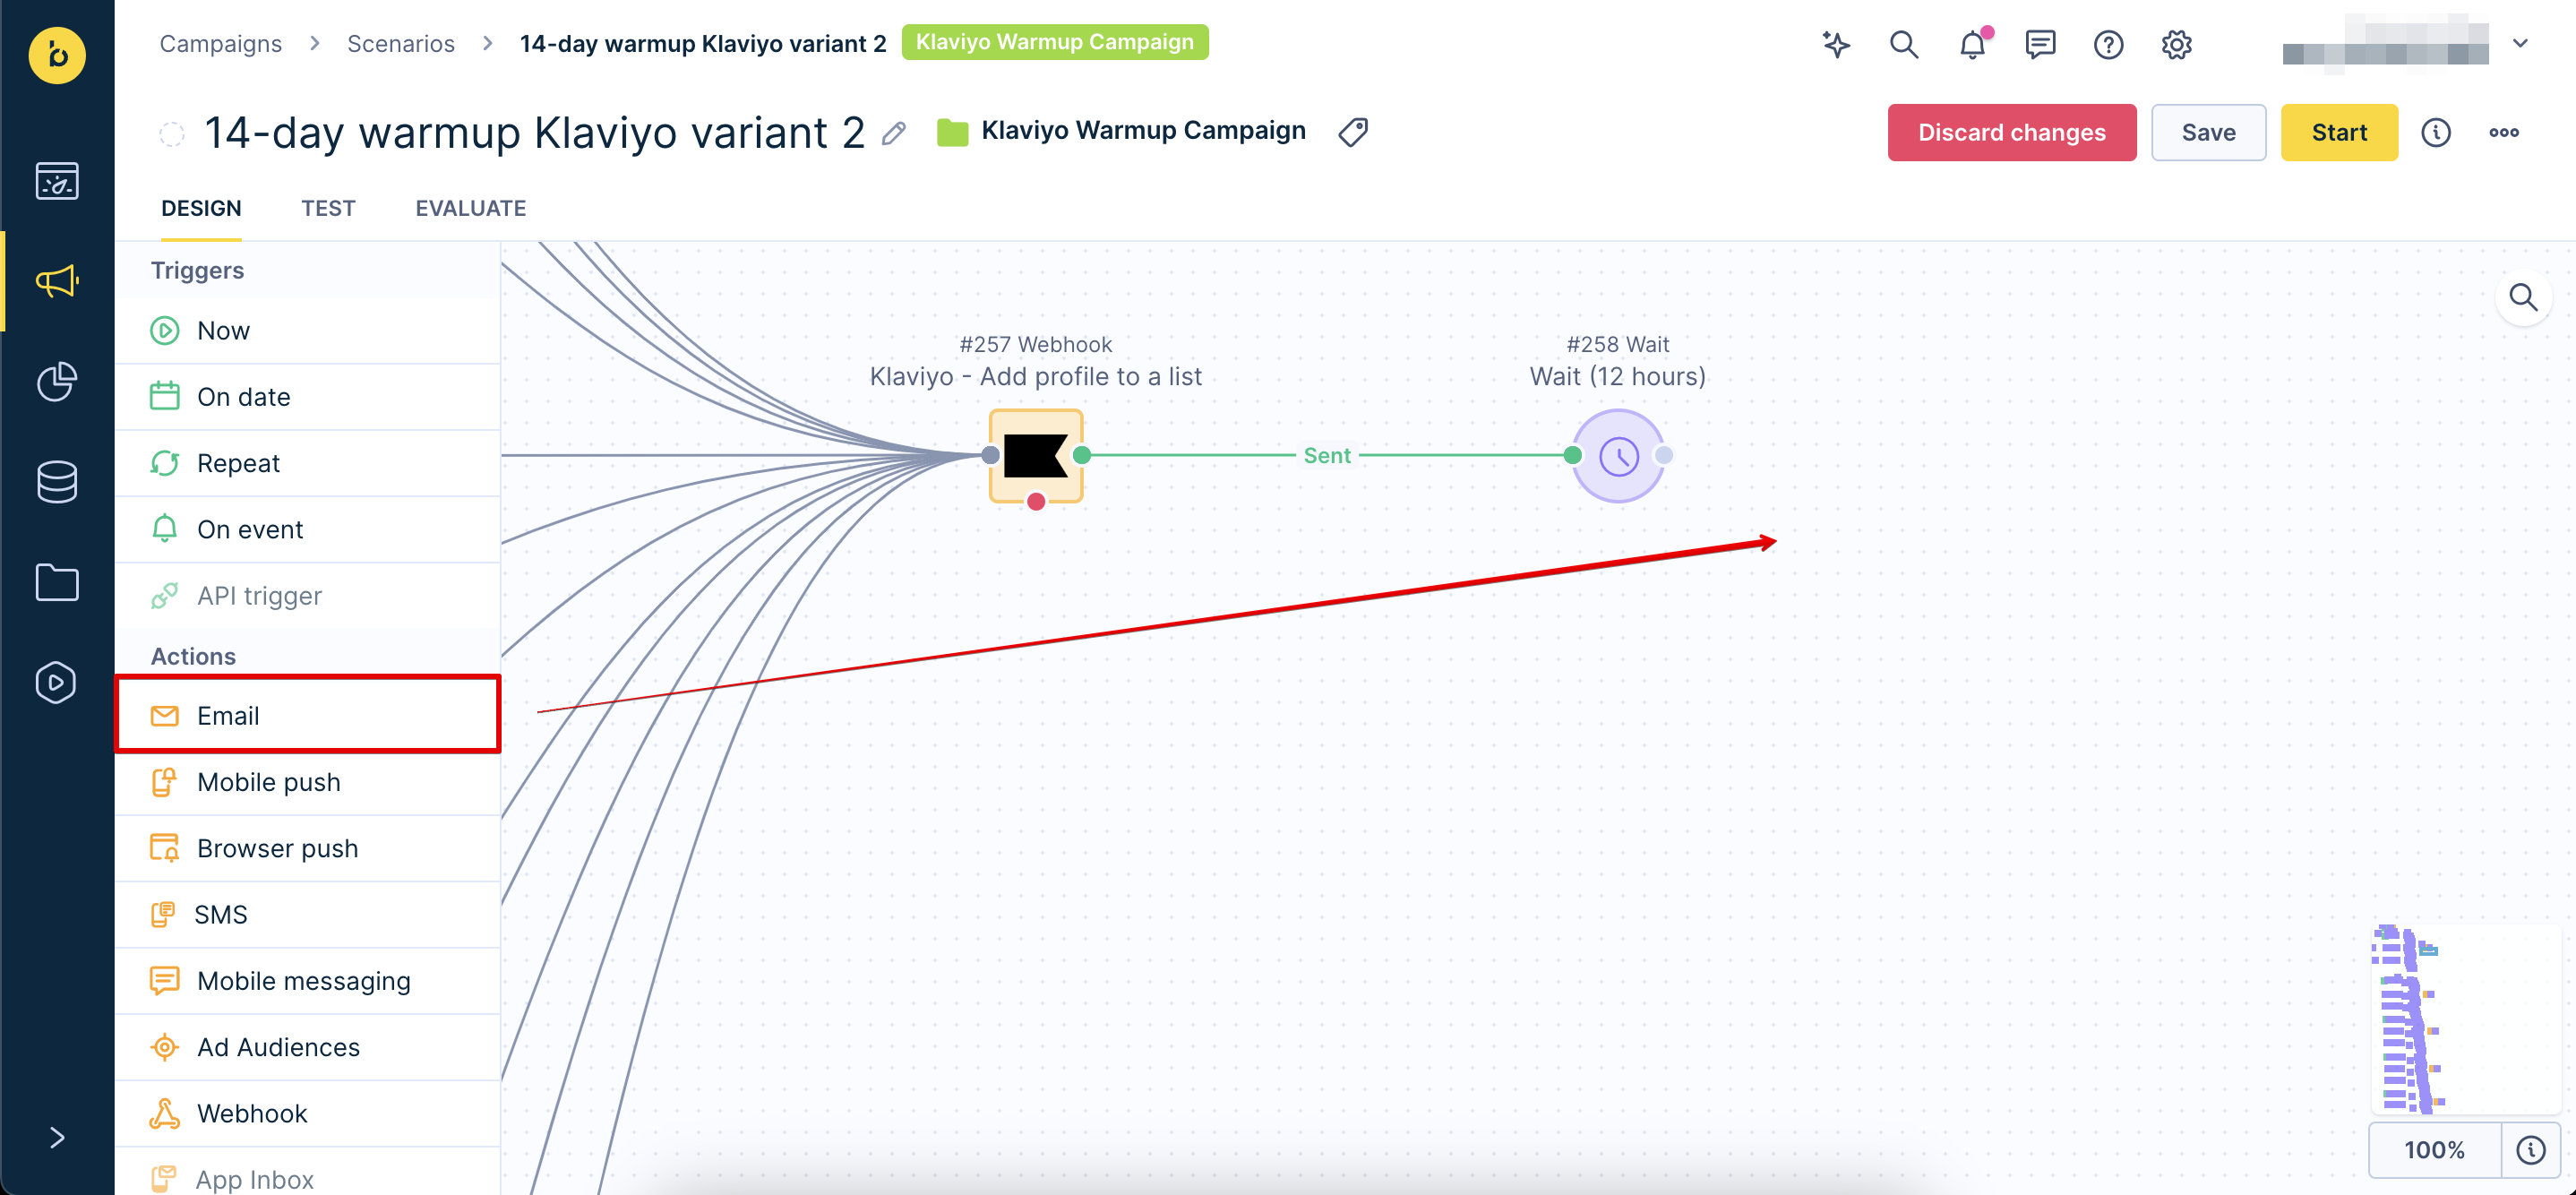
- Double-click the Email node and adjust the template to your liking
You can choose from pre-defined templates or create your own with the Visual builder or the HTML builder
Day 2
Since there is no volume increase, repeat the steps from the previous day with the same audience as in Day 1.
Day 3
Repeat the steps from Day 1. From now on, new audiences will automatically be added to the sending list each day.
Days 4-14
Repeat the steps from Day 1-3.
Additionally, check the #558 Already in exclusion list node. This condition checks whether the customer is already a part of the exclusion list. You should target these customers first.
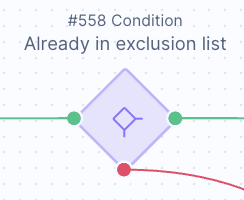
Additionally, check the #558 Already in exclusion list node. This condition checks whether the customer is already a part of the exclusion list. You should target these customers first.