Optilyz
At Bloomreach, we provide an Action webhook preset option for working with Optilyz. This preset is available for the endpoint: /api/v2/automations/:id/recipient - Optilyz Individual Post preset.
Imagine you're running an online store. Sometimes customers put items in their shopping cart but don't complete their purchase. When this happens, let Optilyz know about these abandoned carts so personalized messages can be emailed to customers. Use the "Optilyz Individual Post" preset for this.
How the integration works
With Optilyz you can target specific segmentations, send out A/B tests, or personalize content even more efficiently. Optilyz is automatically triggered by real-time events and actions set by you.
Once triggered, personalized content will print and post whenever your customers are tempted to shop.
Prerequisites
Before you start the setup, create an Optilyz Integration API key. An Integration API key allows authentication for incoming webhook requests.
Optilyz
- Understand the parameters required by the Enqueue one recipient API endpoint.
Bloomreach Engagement
- Identify your audience and scenario execution requirements.
- You already possess relevant customer properties, for example, postal address, in the Data Manager.
Configure the webhook authentication for Optilyz in Bloomreach Engagement. This will allow data to be passed securely in the webhook request. You will need this webhook authentication later to create a scenario.
Configure webhook authentication
To configure webhook authentication, follow these steps.
Add new integration
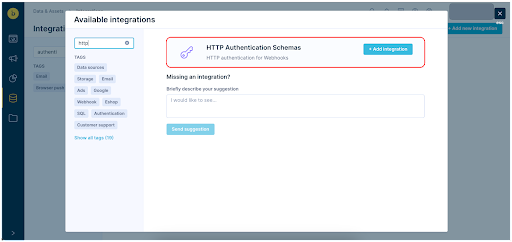
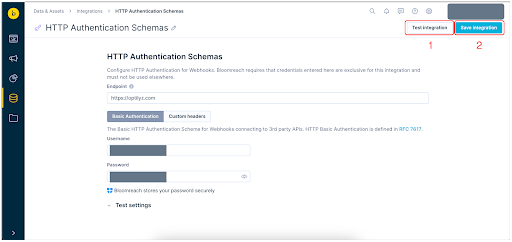
First, go to Data & Assets > Integrations and click on + Add new integration. Search for HTTP Authentication Schemas and click + Add integration.
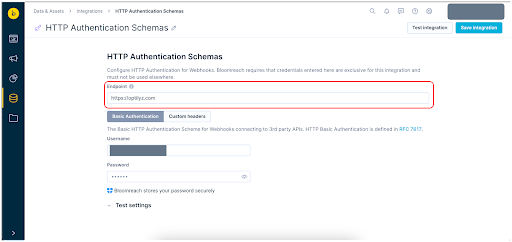
Change the name of the created Authentication to something that is easy to recognize as Authentication for Optilyz. Then in the Endpoint field, enter the Optilyz API base URL which is https://www.optilyz.com.
Authenticate the integration
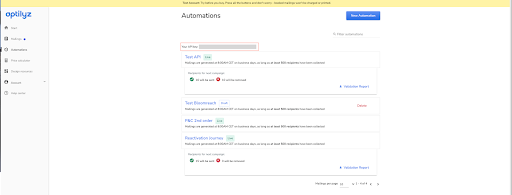
To authenticate the integration, visit your Optilyz account and click the Automations tab.
Copy the API key located at the top of the page.
Go to Bloomreach Engagement and paste the API key into the Username field. Next, type a space into the Password field.
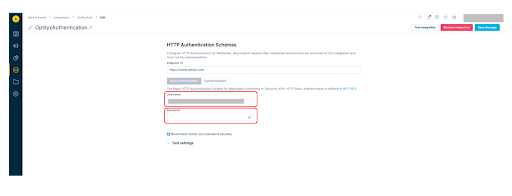
Now test the integration - when all is set up properly, authentication will be successful. Then, click on Save integration.
Create a webhook
Follow the steps below to create a scenario. This will automate the communication with your users based on custom conditions.
You will use an action node to send a webhook request to Optilyz for post, mail, or card sending. Use the webhook presets that are created specifically for our integration with Optilyz.
Note
Your scenario path may vary from the following steps depending on the actions you decide to implement and the dynamic data you choose to include in your user communication. See Personalization Using Jinja.
-
In Bloomreach Engagement, open
Campaigns > Scenarios > + New Scenario. -
(Optional) Click the edit symbol in the scenario name to change it.
-
Create and configure the triggers and operators that best suit your campaign needs.
-
Create an action node with the webhook request to Optilyz.
- In Scenario select
Other > Optilyz Individual Post.
- In Scenario select
-
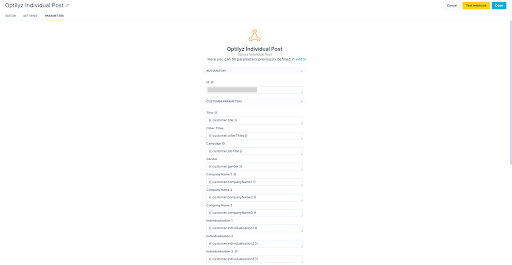
Fill in the parameters in the
Parameterstab of the action node. Automation ID is a required parameter and can be found in Campaign details in the Optilyz UI.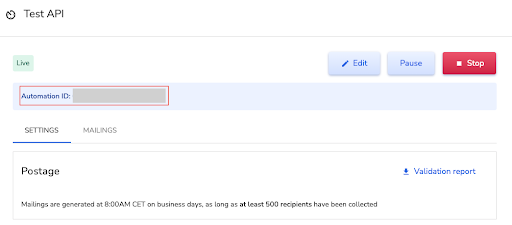
-
You can send a post to all users who abandoned their cart for a day, for example. Use the "Optilyz Individual Post" preset for that.
Choose appropriate consents
In the Settings tab of the action node:
- Enable Authentication and select the authentication you created in step 1.
- In Other, select the appropriate consent category for your users.
Customize customer properties
Remember to customize customer properties. Otherwise, no data will be sent in either example. You can modify either one of the values in the parameters tab or directly modify the JSON file.
Customer properties that are required:
- companyName1 - Mandatory without 'fullName' or 'lastName'
- lastName - Mandatory without 'fullName' | optional in combination with 'companyName1' | not allowed in combination with 'fullName'.
- fullName - Mandatory without 'lastName' | optional in combination with 'companyName1' | not allowed in combination with 'lastName' or 'firstName'.
- street - Mandatory without 'address1' | not allowed in combination with 'address1'.
- address1 - Mandatory without 'street' | not allowed in combination with 'street' or 'houseNumber'.
- zipCode
- city
Add individualizations
You can also send vouchers or any other personalization data. Open the editor tab in the webhook preset and add it in this format:
“individualizationX” : “voucherCode” where X is a number.
For example: “individualization1” : “voucher123”.
You can add multiple individualizations (individualization2, individualization3, individualization5), and they don’t have to be in order. You can use any number as long as it is unique.
You can choose one of the presets (individualization1, individualization2, and individualization3) to serve as a template. Change these according to your preferences.
For more information visit the Optilyz Documentation.
Finish the integration setup
Before you launch your scenario, click Save at the top right corner. Then, you can test and preview the complete workflow in the Test tab. After you click on Start, you will see a confirmation window that indicates how many customers will be affected by the scenario run.
Use case
In your scenario, you can use a combination of operators and actions to send physical posts using Optilyz to relevant users based on custom conditions.
You can also use the Optilyz Individual Post action to catch error responses returned by this Action node and update your account data, notify your team to check the address of the customer, or notify the customer via other channels - email or SMS.
Remove invalid addresses from future submissions - either via consent revocation or adding a flag to the customer record that signifies the postal address is not valid until corrected.
More information
The following section showcases additional features including Endpoints and Extended Implementation.
Using a different endpoint, you can target more than a single customer and target groups of customers based on common attributes.
Extended Implementation allows for updates on emails sent out to customers. This step requires consultation with Optilyz to ensure the feasibility of this option in your account.
Endpoints
Optilyz also provides an /api/v2/automations/:id/recipients endpoint, which functions almost identically to the /api/v2/automations/:id/recipient endpoint.
Suppose you want to send either a batch of reminders to customers whose subscriptions are about to expire soon or a reactivation campaign to customers who made their last purchase a while ago. You'd use the /api/v2/automations/:id/recipients endpoint in that case.
In a nutshell, the /api/v2/automations/:id/recipient endpoint is for individual pieces of information, like abandoned shopping carts.
The /api/v2/automations/:id/recipients endpoint is for sending campaign information, like reminders, lapsed customers reactivations, or VIP treats.
If you want to use the /api/v2/automations/:id/recipients endpoint, use the Optilyz Individual Post preset and modify it as shown below.
This is the editor part of the Optilyz Individual Post:
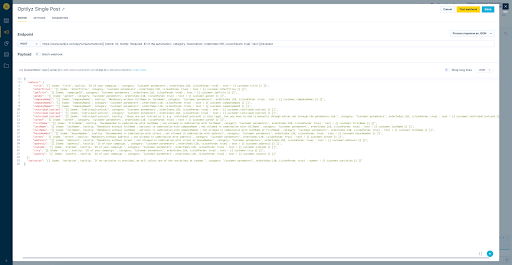
Change it accordingly:
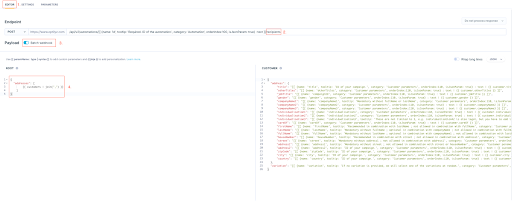
- Click on the
Editortab - Change endpoint ../recipient into ../recipients
- Click on the
Batch webhookbutton - Click on
Turn on and reset template - Copy this code into the root part:
{
  "addresses": [
		{{ customers | join(",") }}
	]
}
The last two settings are based on what is recommended by Optilyz. The throughput policy should be limited to one to two concurrent requests. Since these are batch requests, you would allow Optilyz to process 100-200 recipients at a time before sending over the next batch. Hence, adjust the policy accordingly in the Settings tab in the webhook:
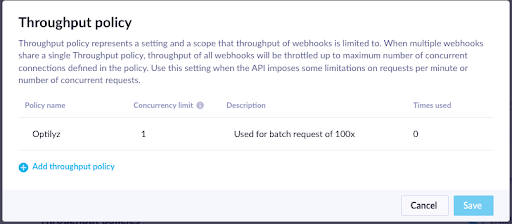
Set the batch size to 100:

Extended implementation
Consider reaching out to your Optilyz consultant or account manager before you proceed with the extended implementation.
Similar to the integration with ESPs, which provides updates like "delivered", "opened", and "soft_bounce", you can also receive updates on email status from Optilyz. Note that this isn't a native integration like with ESPs and requires effort from both sides. Optilyz will set up webhooks manually to send data to our Tracking API.
In other words, you need to provide Optilyz with the structure of an API call along with your project information as it is defined in our documentation.
To enable this in Bloomreach Engagement, append the data to the webhooks that can identify the customer once they come back. This requires a slight adjustment in the “Payload” - “CUSTOMER” section:
{# Cookie #}

{% set cookie = "" %}
{% if customer_ids.cookie %}
	{% if customer_ids.cookie[0] | length > 1 %}
		{% set cookie = customer_ids.cookie [0] %}
	{% else %}
		{% set cookie = customer_ids. cookie %}
	{% endif %}
{% else %}
{# not set #}
{% endif %}

{
	"address":
    "title": "{{ customer.salutation }}",
    "firstName": "{{ customer.firstName }}",
    "lastName": "{{ customer.lastName }}",
    "address1": "{{ customer.street }}",
    "zipCode": "{{ customer.zipCode }}",
    "city": "{{ customer.city }}",
    "individualisation1": "{{ customer_ids.registered }}",
    "individualisation2": "{{ cookie }}",
    "individualisation3": "{{ scenario.id }}"
	}
}
This example follows the Optilyz documentation for automations (similar to the one in the previous section). There is an option to append “individualization” fields which are used to transfer the necessary data to identify customers on the way back to Bloomreach Engagement.
Customer identification
Ensure that at least one of the "individualization" fields includes a customer ID. In the provided example code, both the "registered" hard ID and the "cookie" soft ID are sent to Optilyz. The code is designed to verify that the "cookie" has at least one value before sending it. It's crucial to communicate to your Optilyz consultant that it is not permitted to send empty IDs back to Bloomreach Engagement.
If, for instance, a customer has a cookie but no "registered" ID, it's important to emphasize that in such cases. It is not allowed to send "registered" with no value to prevent errors. Please refer to our Tracking API documentation for more information.
Campaign reference (optional)
Similarly to the requirements for customer identification, you can send a reference to the campaign or scenario that sends the recipients to Optilyz in the first place. This reference can be the scenario ID from the URL, a custom name, or something else. This is up to you.
You are advised to use the URL ID in Bloomreach Engagement and build a similar event to the “campaign” event. Optilyz will then build a webhook that sends a payload like this:
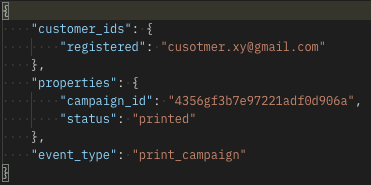
This will be shown in the events section in the profiles of your customers:
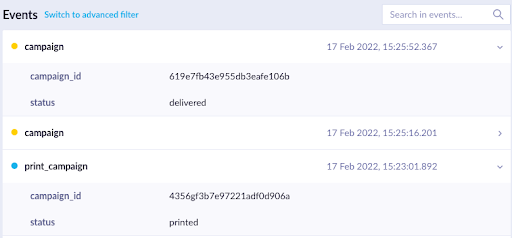
You can extend this implementation with any event properties you want. Remember that your Optilyz consultant must adjust this, so it must be communicated clearly.
Updated 5 months ago
