Freshdesk
Integration
The following is a guide on how to integrate Freshdesk with Bloomreach Engagement.
Freshdesk is a useful integration for your Customer Support Team, offering you tools and features that help you manage tickets from customers and provide them with support and advice. Integrating Freshdesk with Bloomreach Engagement will allow you to pass events relating to customer support tickets from Freshdesk to Engagement and customer updates from Engagements to Freshdesk.
This guide will help you understand how to export customer updates and events from Freshdesk to Bloomreach Engagement and how to import customer updates to Freshdesk using the Freshdesk Integration.
Prerequisites
- Bloomreach Engagement project with Scenario and Integration access.
- Freshdesk account with admin permission (to create webhooks/triggers)
Send data from Freshdesk to Bloomreach Engagement
Send “support_ticket” events from Freshdesk to Bloomreach Engagement
- Follow this guide to create a webhook in Freshdesk automation. Go to Admin > Workflows > Automations.
- Select the criteria that will trigger the automation according to your needs.
- The example in the picture below will notify Bloomreach Engagement when a customer has a support ticket open.

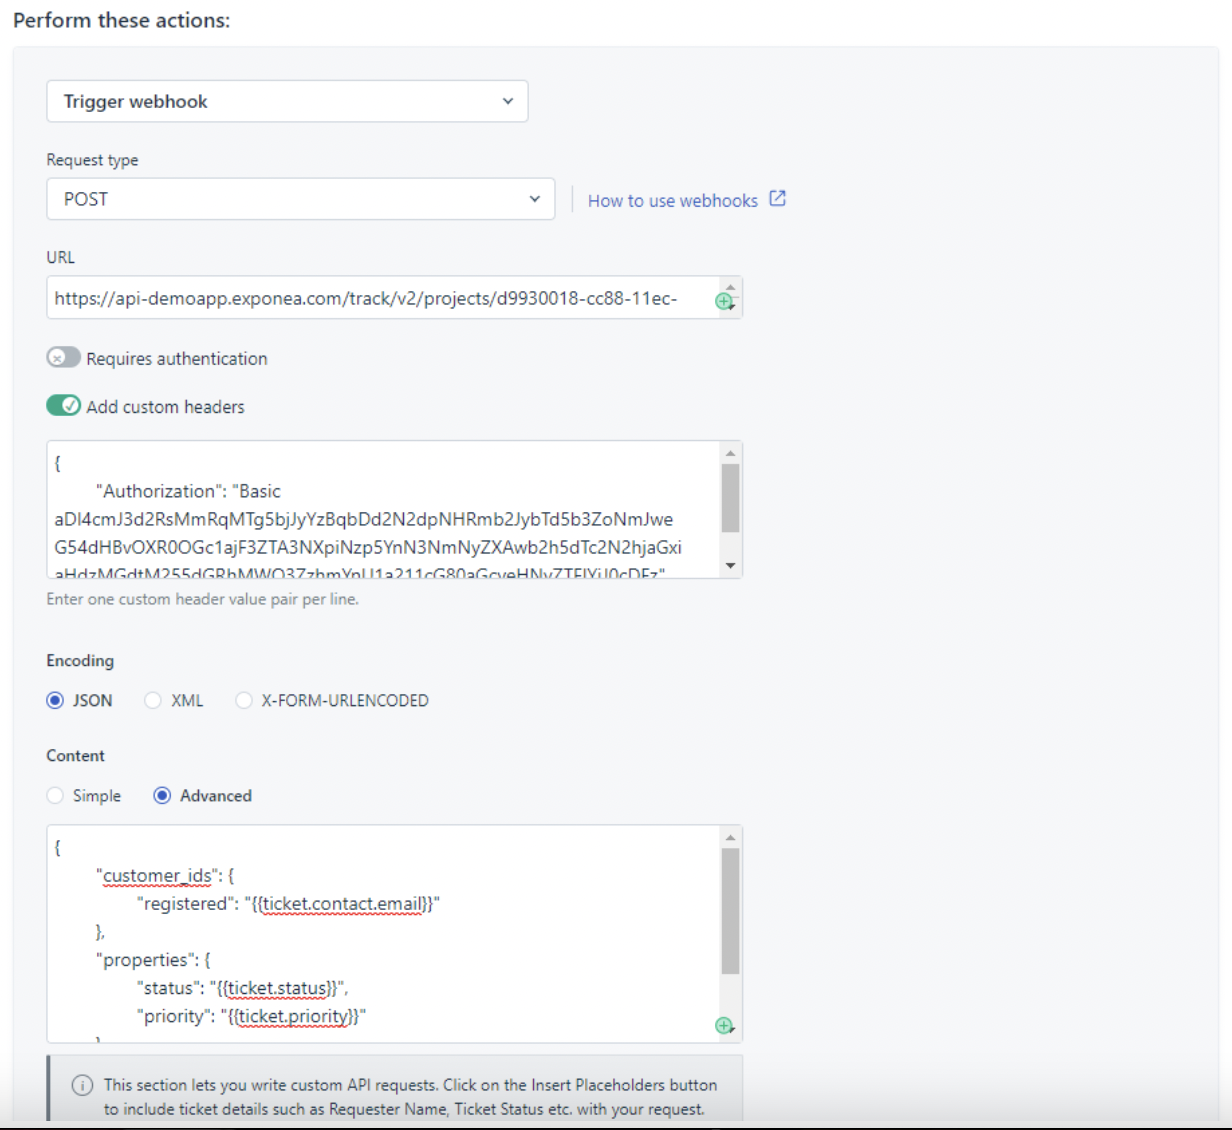
- Change the action of the automation to Trigger Webhook.
- Configure the webhook to call the Bloomreach Engagement Add Event API Endpoint. Use Custom headers in the webhook to add your Authorization.
- You can use a public API group key from Bloomreach Engagement.
- Add the code below to the custom header:
{
"Authorization": "Token YOUR_API_KEY"
}
- Select JSON Encoding.
- Select Advanced for Content.
- Configure your JSON request based on the Engagement API endpoint you call. Replace any hardcoded values with “Placeholders” in the request for dynamic values. See this example:
{
"customer_ids": {
"registered": "{{ticket.contact.email}}"
},
"properties": {
"status": "{{ticket.status}}",
"priority": "{{ticket.priority}}"
},
"event_type": "support_ticket"
}
- Save and test.

Send data from Bloomreach Engagement to Freshdesk
Trigger a webhook from Bloomreach Engagement scenario to call Freshdesk’s API to update a customer profile
When setting up these triggers, you need to consult the API documentation of Freshdesk.
Updating customers’ custom fields or properties in Freshdesk from Bloomreach is the most probable use case. Therefore, an example used for the guide below is passing CLTV or RFM/Loyalty segment data to Freshdesk for a customer, which would be aggregates or segments in Bloomreach Engagement.
- Freshdesk API Resource used in this example is for Contacts.
- You can find the Authentication for the Freshdesk API here. You can retrieve your API key from your profile. You will then need to BASE64 Encode this API key.
If you are sure that your credentials are correct but are still unable to access your helpdesk, make sure that the
APIkey:Xis Base64-encoded before passing it as an “Authorization” header.
- Then, take the base64 encoded API key and, in your request, add a :X at the end. Use this in the Authentication header of your request, like this:
Authorization: VnFSUWVMT2NOG5RNWhPVFFsbw==:X. - You will also need a header for the “Content-Type” of “application/json”.
The “Update a Contact” API endpoint only allows you to update the customer using the PROPRIETARY FRESHDESK CUSTOMER ID. Chances are that this ID is not stored for each customer in Bloomreach Engagement. You can read more here.
This means that you will need to make 2 calls to Freshdesk’s API (assuming that you do not have the Freshdesk Customer ID already stored in Bloomreach Engagement).
- The first API call is to the “Search Contacts” endpoint to retrieve the customer’s Freshdesk ID.
GET
https://exponeadev.freshdesk.com/api/v2/[email protected]
Headers:
Authorization: YOUR_BASE64_ENCODED_APIKEY:X
Content-Type: application/json
- This will return a multitude of data about that customer, including the customer’s Freshdesk ID.
- We strongly suggest storing this Freshdesk customer_id as a custom property in Bloomreach Engagement. This will limit future calls to this endpoint after the initial one.
- The Jinja to retrieve the customer’s Freshdesk ID from the request-response is: {{ webhook.data[0].id }}
- Store this in a property like ‘freshdesk_id’ in Bloomreach.

- The second API call you can now make, once you have the customer’s Freshdesk ID, is to update that contact’s fields in Freshdesk with fields from Bloomreach.
- Use the “Update a Contact” endpoint.
- The end of this URL expects the customer’s Freshdesk ID, which you will be updating, so you will have to either reference the property just created in the previous step or use the Jinja to retrieve this ID from the previous API call’s response. The endpoint will either be:
<https://exponeadev.freshdesk.com/api/v2/contacts/{{> customer.freshdesk_id }}
Or:
<https://exponeadev.freshdesk.com/api/v2/contacts/{{> webhook.data[0].id }}
- You will need to use the same Authentication method as in the previous step with your base64 encoded API key. Use this as a header again. You will also need a header for “Content-Type” of “application/json”.
- Now, you need to write your payload for the request. An example payload would be:
{
    "name": "{{ customer.first_name ~" "~ customer.last_name }}",
    "custom_fields": {
        "rfm": "{{ segmentations['YOUR_SEG_ID'] }}",
        "lifetime_value": {{ aggregates['YOUR_AGG_ID'] }}
    }
}
Warning
If you are going to be updating custom fields in Freshdesk, you will need to have a nested object within your request. See the example above.
Note
You cannot update the
first_nameandlast_namefields. Only thenamefield can be updated.
- Save and test.
Updated about 1 year ago
