

Quantum Metric integration
The Quantum Metric integration connects Bloomreach customer data with Quantum Metric's digital analytics platform, giving you a complete view of the customer experience — including segmentation, weblayer events, and experiment data — directly in Quantum Metric reporting.
This guide explains how to set up the integration and start using Bloomreach data in Quantum Metric.
Set up the Quantum Metric integration
The Quantum Metric integration has three parts — each part builds on the previous one and sends a different type of data to Quantum Metric.
Send customer properties to Quantum Metric
To set up customer properties:
- Go to Data & Assets > Tag manager > + Create new.
- Name your preset.
- Select Custom JavaScript code.
You can choose which customer properties to expose to Quantum Metric. The code below provides some examples. With Jinja, you can add or remove as many as you want.
WarningAll Jinja expressions must be wrapped in quotes as shown in the example. Missing quotes will cause the integration to fail.
- Paste the following code:
window.bre_qm = window.bre_qm || {};
window.bre_qm.segments = window.bre_qm.segments || {};
window.bre_qm.segments.cdp_segments = {
  "Number of sessions": "{{ aggregates['012390ba87vb8234asd786'] }}", // Aggregate Value
  "RFM Segment": "{{ segmentations['087asbdy8qbe081bba'] }}", // Segment Name
  "Gender": "{{customer.gender}}", // Customer Property
}- Click Save.
Send weblayer events to Quantum Metric
To set up weblayer events:
- Go to Data & Assets > Tag manager > + Create new.
- Name your preset.
- Select Custom JavaScript code.
- Paste the following code exactly as written — unlike the customer properties code, this script intercepts fetch requests and must not be modified to function correctly.
const originalFetch = window.fetch
window.fetch = async function (url, options) {
  if (url.includes("/bulk") && options.method === "POST") {
    const requestBody = JSON.parse(options.body)

    requestBody.commands.forEach((command) => {
      if (command.name === "crm/events" && command.data.type === "banner") {
        triggerQuantumEvent(command)
      }
    })
    }

  return originalFetch.apply(this, arguments)
}

function triggerQuantumEvent(command) {
  let properties = command.data.properties
  if (typeof QuantumMetricAPI !== "undefined") {
    QuantumMetricAPI.sendEvent(516, 0, `Weblayer ${properties.action} event: Name: '${properties.banner_name}' - Variant: '${properties.variant_name}'`)
  } else {
    window.bre_qm = window.bre_qm || {}
    window.bre_qm.segments = window.bre_qm.segments || {}
    window.bre_qm.segments.weblayer_segments = window.bre_qm.segments.weblayer_segments || {}
    window.bre_qm.segments.weblayer_segments[properties.banner_name] = {
      action: properties.action,
      variant: properties.variant_name,
      timestamp: command.data.timestamp,
    }
  }
}- Click Save.
The code above lets Quantum Metric know whenever a Bloomreach banner event is sent.
Send experiment data to Quantum Metric
Repeat this step for each experiment you want to track in Quantum Metric. Unlike the previous steps, this is configured per experiment rather than once globally. In your experiment, go to the Settings tab.
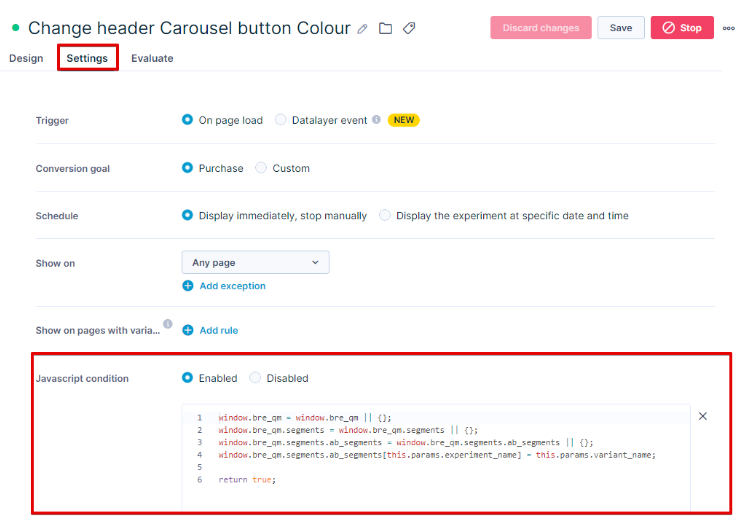
Settings tab showing the JavaScript condition field with the transformation code enabled.
-
Scroll to JavaScript condition and enable it.
-
Paste the following code into the provided space:
window.bre_qm = window.bre_qm || {}
window.bre_qm.segments = window.bre_qm.segments || {}
window.bre_qm.segments.ab_segments = window.bre_qm.segments.ab_segments || {}
window.bre_qm.segments.ab_segments[this.params.experiment_name] = this.params.variant_name

return true
The code exposes the experiment details to Quantum Metric and makes them available in your Quantum Metric reporting and segmentation.
Weblayer visibility in Quantum Metric
Some weblayers use the Shadow DOM to isolate their styling from your site. This prevents them from appearing correctly in Quantum Metric session replays. If your weblayers aren't visible in Quantum Metric, apply the following fix. For each affected weblayer, find and replace the Shadow DOM code as shown below.
In the weblayer editor, open the JavaScript tab and locate the following code.
// use shadow DOM if browser suports it
if (parentElement.attachShadow) {
  createBannerInShadowDom(banner, parentElement)
} else {
  parentElement.insertAdjacentElement("afterbegin", banner)
  self.banner = banner
}
NoteDepending on your browser and the code editor in Bloomreach, CTRL + F may not work to locate the code. Scroll manually or use your browser's developer tools to find the correct section.
Replace it with the simplified version below, which removes the Shadow DOM wrapping and allows Quantum Metric to render the weblayer correctly.
parentElement.insertAdjacentElement("afterbegin", banner)
self.banner = banner
You can now view these weblayers correctly in Quantum Metric. To verify the full integration is working, trigger a weblayer on your site and check Quantum Metric for the corresponding session data.
Updated 3 days ago