

Push notifications for iOS SDK
Enable push notifications in your app using the iOS SDK
Marketing enables sending push notifications to your app users using scenarios. The mobile application handles the push message using the SDK and renders the notification on the customer's device.
Push notifications can also be silent, used only to update the app’s interface or trigger some background task.
To learn how to create push notifications in the Marketing web app, refer to Mobile push notifications.
Also see Mobile push notifications FAQ at Bloomreach Support Help Center.
Deprecation of automatic push notificationsPrevious versions of the SDK used method swizzling to register for push notifications automatically. This sometimes caused issues and, therefore, is no longer supported. Refer to Implement application delegate methods below for a list of delegate methods your application needs to implement to process push notifications properly.
Prerequisites
To be able to send push notifications from Marketing, you must:
- Obtain an Apple Push Notification service (APNs) authentication token signing key
- Add and configure the Apple Push Notification Service integration in the Marketing web app
If you haven't set this up yet, Follow the instructions in Configure Apple Push Notification Service for iOS SDK.
Integration
This section describes the steps to add the minimum push notification functionality (receive alert notifications) to your app.
Step 1: Enable push capabilities
Select your application target in Xcode, and on the Signing & Capabilities tab, add the following capabilities:
Push Notifications
Required for alert push notifications.Background Modes(selectRemote notifications)
Required for silent push notifications.App Groups(create a new app group for your app)
Required for application extensions that handle push notification delivery and rich content.
An Apple developer account with a paid membership must add the
Push Notificationscapability.
Step 2: Configure the SDK
Configure the SDK with pushNotificationTracking: .enabled(appGroup:) to enable push notifications. Use the app group you created in the previous step.
Project/Marketing mode:
Exponea.shared.configure(
    Exponea.ProjectSettings(
        projectToken: "YOUR_PROJECT_TOKEN",
        authorization: .token("YOUR_API_KEY")
    ),
    pushNotificationTracking: .enabled(appGroup: "YOUR_APP_GROUP")
)Stream/Data hub mode:
Exponea.shared.configure(
    Exponea.StreamSettings(
        streamId: "YOUR_STREAM_ID",
        baseUrl: "https://api.exponea.com"
    ),
    pushNotificationTracking: .enabled(appGroup: "YOUR_APP_GROUP")
)
// Provide JWT after configuration:
Exponea.shared.setJwtErrorHandler { context in
    yourBackend.fetchNewJwt { newToken in
        Exponea.shared.setSdkAuthToken(newToken)
    }
}
Exponea.shared.setSdkAuthToken("YOUR_STREAM_JWT_TOKEN")
Push token tracking (
notification_stateevents) and the push self-check work the same way regardless of integration type.
The SDK provides a push setup self-check feature to help developers successfully set up push notifications. The self-check will try to track the push token, request the Marketing backend to send a silent push to the device, and check if the app is ready to open push notifications.
To enable the setup check, set
Exponea.shared.checkPushSetup = truebefore initializing the SDK:
Step 3: Implement application delegate methods
For your application to be able to respond to push notification-related events, it must have three delegate methods:
application:didRegisterForRemoteNotificationsWithDeviceToken:
Called when your application registers for push notifications.application(_:didReceiveRemoteNotification:fetchCompletionHandler:)
Called when a silent push notification or alert push notification arrives while your app is in the foreground.userNotificationCenter(_:didReceive:withCompletionHandler:)
Called when the user opens an alert push notification.
The ExponeaAppDelegate class in the SDK provides default implementations of these methods. We recommend that you extend ExponeaAppDelegate in your AppDelegate.
For applications using the UIKit lifecycle, ensure that your AppDelegate class subclasses ExponeaAppDelegate:
@UIApplicationMain
class AppDelegate: ExponeaAppDelegate {
    override func application(
        _ application: UIApplication,
        didFinishLaunchingWithOptions launchOptions: [UIApplication.LaunchOptionsKey: Any]?
    ) -> Bool {
        // don't forget to call the super method!!
        super.application(
            application,
            didFinishLaunchingWithOptions: launchOptions
        )
        Exponea.shared.checkPushSetup = true
        Exponea.shared.configure(...)
        return true
    }
}
For applications using the SwiftUI lifecycle, register an UIApplicationDelegateAdaptor referencing an AppDelegate that subclasses ExponeaAppDelegate.
// YourApp.swift
@main
struct YourApp: App {
    @UIApplicationDelegateAdaptor(YourAppDelegate.self) var appDelegate
    init() {
        // ... your app init here
        // you may init SDK here or in AppDelegate implementation
    }
}

// YourAppDelegate.swift
class YourAppDelegate: ExponeaAppDelegate {
    override func application(
        _ application: UIApplication,
        didFinishLaunchingWithOptions launchOptions: [UIApplication.LaunchOptionsKey: Any]?
    ) -> Bool {
        // don't forget to call the super method!!
        super.application(
            application,
            didFinishLaunchingWithOptions: launchOptions
        )
        Exponea.shared.checkPushSetup = true
        Exponea.shared.configure(...)
        return true
    }
}
If you don't want to or are unable to extend ExponeaAppDelegate, you can use it as a reference for implementing the three delegate methods yourself.
Checklist
Make sure that:
- Your
application:didRegisterForRemoteNotificationsWithDeviceToken:delegate method callsExponea.shared.handlePushNotificationToken. - Your
application(_:didReceiveRemoteNotification:fetchCompletionHandler:)anduserNotificationCenter(_:didReceive:withCompletionHandler:)methods callExponea.shared.handlePushNotificationOpened - You call
UNUserNotificationCenter.current().delegate = self - When you start your application, self-check should be able to receive and track the push notification token.
Pre-init APNs token bufferingIf
application:didRegisterForRemoteNotificationsWithDeviceToken:fires beforeExponea.shared.configure(...)completes — a common timing issue during cold launch — the SDK buffers the token to local storage and replays it through the normal tracking path once configuration is initialized. The buffer persists to disk, so the first APNs token is never lost even if the app crashes between the APNs callback and SDK initialization.No action is required from the host app — the behavior is automatic. The SDK's token-registration path and
tokenTrackFrequencyrules handle duplicate replays, so no duplicatenotification_stateevents are tracked regardless of which frequency mode is active.
Step 4: Register to receive push notifications
Your app needs to register to receive push notifications. It’s important to ensure you have the correct authorization to receive push notifications. You require explicit permission from the user to receive "alert" notifications visible to the user. You don't need authorization to receive silent push notifications (background updates).
You can request authorization and subsequently register to receive notifications using the following code:
UNUserNotificationCenter.current()
    .requestAuthorization(options: [.badge, .alert, .sound]) { (granted, _) in
        if granted {
            DispatchQueue.main.async {
                UIApplication.shared.registerForRemoteNotifications()
            }
        }
    }
If the user hasn't granted permission yet, this code will trigger an alert asking the user to allow push notifications. If the user previously granted permission, the granted property will be true, and the code will directly execute the closure and register the app for receiving notifications.
By default, the SDK only tracks the push notification token if the app is authorized (unless the push setup check is enabled). Refer to Silent Push Notifications below to learn how to track the push token even when the app isn't authorized.
❗️Important
SDK versions 3.8.0 and higher use event-based token tracking to support multiple mobile applications per project. Learn more about Token tracking via notification_state event.
Checklist:
- Marketing should now be able to send push notifications to your device. For instructions, refer to the Creating a new notification guide.
Customization
This section describes the customizations you can implement once you have integrated the minimum push notification functionality.
Handle received push notifications
To handle incoming push notifications, you must specify a delegate to be called when the user opens a push notification or when a silent push notification is received.
The delegate must implement PushNotificationManagerDelegate and have the pushNotificationOpened method. The notification payload and the user's selected action are passed as arguments. Optionally, you can also implement the silentPushNotificationReceived method to handle silent push notifications.
You can set the delegate by setting Exponea.shared.pushNotificationsDelegate directly or by specifying the delegate parameter on pushNotificationTracking: .enabled.
import ExponeaSDK
import UserNotifications

@UIApplicationMain
class AppDelegate: ExponeaAppDelegate {

    var window: UIWindow?

    override func application(
        _ application: UIApplication,
        didFinishLaunchingWithOptions launchOptions: [UIApplication.LaunchOptionsKey: Any]?
    ) -> Bool {
        super.application(application, didFinishLaunchingWithOptions: launchOptions)

        Exponea.shared.configure(
            Exponea.ProjectSettings(
                // ...
            ),
            pushNotificationTracking: .enabled(
                appGroup: "YOUR APP GROUP",
                delegate: self,
                requirePushAuthorization: false
            )
        )

    }
}

extension AppDelegate: PushNotificationManagerDelegate {
    func pushNotificationOpened(
        with action: ExponeaNotificationAction,
        value: String?,
        extraData: [AnyHashable : Any]?
    ) {
        // app open, browser, deeplink or none(default)
        print("push action: \(action)")
        // deeplink url, nil for open app action
        print("value for action: \(value)")
        // data payload you specified in Exponea web app
        print("extra payload specified: \(extraData)")
    }

    // this function is optional
    func silentPushNotificationReceived(extraData: [AnyHashable: Any]?) {
        // data payload you specified in Exponea web app
        print("extra payload specified: \(extraData)")
    }
}Refer to
AppDelegatein the Example app for iOS SDK for a basic example.
❗️Important
SDK versions 3.8.0 and higher use event-based token tracking to support multiple mobile applications per project. Learn more about Token tracking via notification_state event.
Silent push notifications
Silent push notifications don't trigger any visible or audible notifications on the device but wake up the application to allow it to perform tasks in the background.
To receive push notifications, the app must track the push token to the Marketing backend. The SDK does this automatically only if push notification tracking is enabled and properly implemented and the app is authorized to receive alert push notifications.
Silent push notifications don't require authorization. To track the push token even when the app isn't authorized, set the configuration variable requirePushAuthorization to false. This causes the SDK to register for push notifications and track the push token at application startup.
The token is still tracked, but the
validfield on the resultingnotification_stateevent reflects the OS authorization status directly — if the user has not granted (or has revoked) push permission, the event carriesvalid=false/description="Permission denied"regardless ofrequirePushAuthorization. See thevalid/descriptiontruth table for all combinations.
    Exponea.shared.configure(
        Exponea.ProjectSettings(
            projectToken: "YOUR-PROJECT-TOKEN",
            authorization: .token("YOUR-AUTHORIZATION-TOKEN"),
            baseUrl: "YOUR-BASE-URL"
        ),
        pushNotificationTracking: .enabled(
            appGroup: "YOUR-APP-GROUP",
            requirePushAuthorization: false
        )
    )
To respond to silent push notifications, set the Exponea.shared.pushNotificationsDelegate and implement the silentPushNotificationReceived method. Refer to Handle received push notifications above for details.
Silent push notifications require
Background ModesandRemote notificationscapabilities.
The Official Apple documentation states that you should not try to send more than two or three notifications per hour.
❗️Important
SDK versions 3.8.0 and higher use event-based token tracking to support multiple mobile applications per project. Learn more about Token tracking via notification_state event.
Rich push notifications
Rich push notifications can contain images, buttons, and audio. To enable this functionality, you must add two application extensions: a Notification Service Extension and a Notification Content Extension.
For each extension, follow the instructions in Notification extensions for iOS SDK to set it up correctly to use the Exponea Notification Service included in the SDK.
Using the ExponeaNotificationContentService.didReceive() method will enhance the notification body with an image and actions delivered within the UNNotification payload. The notification actions shown by ExponeaNotificationContentService are registered with configurations to open your application with the required information and handle campaign clicks automatically.
Checklist:
- Check that push notifications with images and buttons sent from Marketing are correctly displayed on your device. Push delivery tracking should work.
- If you don't see buttons in the expanded push notification, the content extension is not running. Double check
UNNotificationExtensionCategoryinInfo.plist- notice the placement insideNSExtensionAttributes. Check that theiOS Deployment Targetis the same for the extensions and the main app.
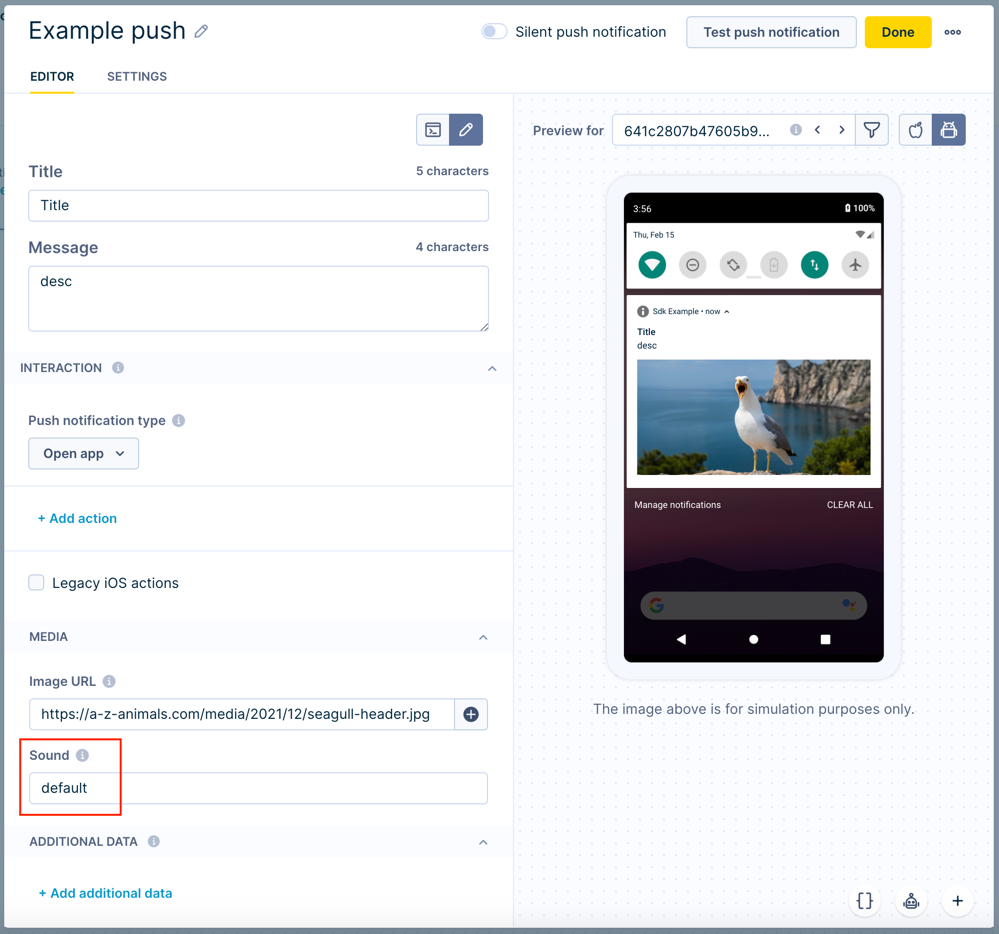
Push notification alert sound
You must implement rich push notifications in your app to enable push notification alert sounds.
Received push notifications handled by ExponeaNotificationService.process() can play a default or customized sound when the notification is displayed.
To use the default sound for a notification, enter default as the value for Media > Sound in your push notification scenario in the Marketing web app.
 Marketing
To use a custom sound for a notification, you must create a sound file that iOS supports. Include the sound file in your Xcode project and add it to the app's target.
Once the custom sound is in place in your app, enter the sound file's file name as the value for Media > Sound in your push notification scenario in the Marketing web app. Ensure that you enter the exact file name (case sensitive) without an extension.
Track delivered notifications
To track the delivery of push notifications, implement a Notification Service Extension as described for rich push notifications above.
Calling ExponeaNotificationService.process in didReceive will track the notification delivery as a campaign event in Marketing.
Delivered eventstatesemanticsThe
campaignevent includes astateproperty that indicates whether the notification was visible to the user. The value is determined at delivery time by the Notification Service Extension.
| Value | Meaning |
|---|---|
shown | The notification was displayed to the user. |
not_shown | The notification was delivered silently — either a silent-push payload or the user has revoked notification permission. |
Upgrading from an earlier SDK versionAfter upgrading,
state == "shown"filters in your scenarios or analytics may return fewer results. Silent and permission-denied deliveries now correctly reportstate = "not_shown". Review anystate == "shown"filters and either accept the more accurate behavior or broaden the filter (for example,state IN ("shown", "not_shown")) if you need the previous behavior.
Retrieve push notification token manually
Sometimes, your application may need to retrieve the current push token while running. You can do this using the Exponea.shared.trackPushToken method. Refer to Tracking for iOS SDK for details.
Note that tracking the push notification token manually isn't necessary after calling the
Exponea.shared.anonymize()method. In this case, the push notification token is automatically transferred to the new anonymous customer profile and the app will continue to receive push notifications.When subsequently calling
Exponea.shared.identifyCustomer, always use a hard ID. Using a soft ID could unintentionally cause the push notification token to be associated with an incorrect customer profile.
Show foreground notifications
By default, if an iOS app receives a notification while the app is in the foreground, the notification banner is not displayed.
In iOS 10 and later, you can show foreground notifications by implementing a UNUserNotificationCenterDelegate and telling iOS to display the banner.
- Create a class that implements
UNUserNotificationCenterDelegate. - Override
userNotificationCenter(center:willPresentNotification:withCompletionHandler)and return at least the alert type to its completion handler - Set it as the default
UNUserNotificationCenter's delegate.
For an example see https://sarunw.com/posts/notification-in-foreground/.
Token tracking via notification_state event
Starting with SDK version 3.8.0, push notification tokens are tracked using notification_state events instead of customer
profile properties. This change enables support for multiple mobile applications per project,
allowing you to track multiple push tokens for the same customer across different apps and devices.
Token storage by SDK version
SDK versions below 3.8.0:
- Tokens are stored in customer profile properties:
apple_push_notification_id - One token per customer profile
- Single application per project
SDK versions 3.8.0 and higher:
- Tokens are stored as
notification_stateevents - Multiple tokens per customer (grouped by Application ID)
- Multiple applications per project supported
- Backward compatibility maintained for Application ID
default-application
When notification_state events are tracked
The SDK automatically tracks notification_state events in the following scenarios:
- SDK initialization
- App transitions from background to foreground
- New token received from APNs
- Manual token tracking using
Exponea.trackPushToken(...)(this method allows you to force tracking/sending the current push token via notification_state event) - User anonymization via
Exponea.anonymize() - OS push authorization status flips (granted ↔ denied) since the last tracked
notification_state— this happens regardless of the configuredtokenTrackFrequency, so thevalidflag always reflects the current OS permission. - SDK version changes (app update)
application_idchanges in the SDK configuration- 30 days have passed since the last successful
notification_statetrack — this ensuresonTokenChangeusers stay within the validity window when their APNs token hasn't changed.dailyandeveryLaunchmodes track frequently enough that this doesn't apply in practice.
You can inspect the current authorization state at any time using UNAuthorizationStatusProvider.current.isAuthorized(...); this call only reads the OS-reported status and does not by itself track a notification_state event.
UNAuthorizationStatusProvider.current.isAuthorized { granted ->
    print("Push notifications are allowed: \(granted)")
}
The frequency of notification_state event tracking depends on the tokenTrackFrequency configuration property. See SDK configuration.
notification_state event properties
| Property | Description | Example values |
|---|---|---|
push_notification_token | Current push notification token | Token string |
platform | Mobile platform. Lowercase counterpart of os_name — kept on the wire for cross-platform parity and reserved for future multi-OS support. | ios |
valid | Token validity status | true or false |
description | Token state description | Permission granted, Permission denied, or Invalidated |
application_id | Application identifier from SDK configuration | Custom ID or default-application (default) |
device_id | Unique device identifier | UUID string |
sdk | SDK identifier (constant string tracked by the iOS SDK) | Exponea iOS SDK |
sdk_version | Version of the Bloomreach iOS SDK | 4.1.0 |
os_name | Operating-system name | iOS |
os_version | Operating-system version | 17.4 |
device_model | Device model name resolved from the hardware identifier. Devices released after the SDK version in use report the raw hardware identifier (for example, iPhone20,1) instead of the model name, retaining device-specific signal until the SDK is updated. | iPhone 15 Pro, iPad Air (5th generation) |
device_type | Device form factor | mobile or tablet |
app_version | Host app version from CFBundleShortVersionString | 1.0, 2.3.1 |
NoteIf you don't specify an
application_idin your SDK configuration, the default valuedefault-applicationis used. See SDK configuration.
Understanding token states
The combination of valid and description properties indicates the token's current state:
| Valid | Description | When this occurs |
|---|---|---|
false | Invalidated | New token received (old token becomes invalid) or Exponea.anonymize() called |
false | Permission denied | The OS push authorization status is neither authorized nor provisional (for example, the user denied the permission prompt, or hasn't been prompted yet). The valid flag reflects the OS authorization state directly and no longer depends on requirePushAuthorization. |
true | Permission granted | The OS push authorization status is either authorized or provisional and a token is available (all other cases) |
Configuring Application ID
Each mobile app integrated with the SDK requires an application_id that matches the Application ID configured in Marketing.
For configuration instructions, see Configure Application ID.
NoteThe push setup self-check (
Exponea.shared.checkPushSetup = true) also carries the configuredapplication_idin its request to the Bloomreach backend. In multi-mobile-app projects, this lets the backend route the test silent push to the correct app/bundle even when several apps in the same Bloomreach workspace are running self-check concurrently. Ifapplication_idis left unset, the defaultdefault-applicationvalue is used.
Event creation requirements
The SDK automatically generates notification_state events. Before upgrading to SDK 3.8.0 or higher, ensure your Marketing project meets these requirements:
- Event creation is enabled for your project
- If your project uses custom event schemas or restricts event creation, add
notification_stateto the list of allowed events
ImportantIf your project blocks creation of new event types, push token registration will fail silently. No tokens will appear in customer profiles or the event stream after SDK initialization, and push notifications will not be delivered.
Verifying token tracking
You can verify that tokens are being tracked correctly in the Marketing web application:
- Navigate to Data & Assets > Customers
- Locate the customer profile
- Check for
notification_stateevents in the customer's event history - Verify the
push_notification_tokenproperty contains a valid token value
For SDK versions below 3.8.0, check the customer profile properties apple_push_notification_id instead.
Advanced use cases
Multiple push notification sources
The SDK only handles push notifications sent from the Marketing platform. If you use platforms other than Marketing to send push notifications, you must implement some of the notification handling logic yourself.
Conditional processing
Implement application delegate methods above describes the delegate methods required for Marketing push notification handling to work. You can use the Exponea.isExponeaNotification(userInfo:) method in the delegate implementations to check if an incoming notification is coming from Marketing and, if not, process the notification using an implementation for a different notification source.
Manual tracking
You can completely disable notification tracking and use the methods Exponea.shared.trackPushToken and Exponea.shared.trackPushOpened to track push notification events manually. trackPushOpened expects the Marketing payload format. You can always track a campaign event manually for any payload format.
The behavior of
trackPushReceivedandtrackClickedPushmay be affected by the tracking consent feature, which in enabled mode considers the requirement of explicit consent for tracking. Read more in the Tracking consent for iOS SDK documentation.
Custom notification actions in iOS 11 and lower
To support the action buttons on iOS 11 and lower that can be configured in the Marketing web app, you must implement custom notification categories that are used to hook up the button actions and titles. The SDK provides a convenient factory method to simplify the creation of such a category.
The category identifier you specify here must be identical to the one you specify in the Marketing backend.
// Set legacy exponea categories
let category1 = UNNotificationCategory(
    identifier: "EXAMPLE_LEGACY_CATEGORY_1",
    actions: [
        ExponeaNotificationAction.createNotificationAction(
            type: .openApp,
            title: "Hardcoded open app",
            index: 0
        ),
        ExponeaNotificationAction.createNotificationAction(
            type: .deeplink,
            title: "Hardcoded deeplink",
            index: 1
        )
    ],
    intentIdentifiers: [],
    options: []
)

UNUserNotificationCenter.current().setNotificationCategories([category1])
Payload example
{
    "url": "https://example.com/ios",
    "title": "iOS Title",
    "action": "app",
    "message": "iOS Message",
    "image": "https://example.com/image.jpg",
    "actions": [
        {"title": "Action 1", "action": "app", "url": "https://example.com/action1/ios"},
        {"title": "Action 2", "action": "browser", "url": "https://example.com/action2/ios"},
    ],
    "sound": "default",
    "aps": {
        "alert": {"title": "iOS Alert Title", "body": "iOS Alert Body"},
        "mutable-content": 1,
    },
    "attributes": {
        "event_type": "campaign",
        "campaign_id": "123456",
        "campaign_name": "iOS Campaign",
        "action_id": 1,
        "action_type": "mobile notification",
        "action_name": "iOS Action",
        "campaign_policy": "policy",
        "consent_category": "General consent",
        "subject": "iOS Subject",
        "language": "en",
        "platform": "ios",
        "sent_timestamp": 1631234567.89,
        "recipient": "[email protected]",
    },
    "url_params": {"param1": "value1", "param2": "value2"},
    "source": "xnpe_platform",
    "silent": false,
    "has_tracking_consent": true,
    "consent_category_tracking": "iOS Consent",
}
Debug with the iOS simulator
Xcode 12+ supports remote push notifications with the simulator. The behavior is the same as with an actual device. You'll get the token for APNs (or FCM for Firebase) from the app delegate's methods.
    func application(_ application: UIApplication, didRegisterForRemoteNotificationsWithDeviceToken deviceToken: Data) // Native
    func messaging(_ messaging: Messaging, didReceiveRegistrationToken fcmToken: String?) // Firebase
Updated 4 days ago