

Set up SMS in scenarios
Bloomreach lets you run personalized SMS campaigns through scenarios, enabling one-to-one communication with your customers. This guide walks you through adding the SMS action node to a scenario, configuring its settings, and launching your campaign.
Prerequisites
Before you set up your SMS campaign in a scenario, review the SMS campaigns documentation. It covers:
- Message size and character limits.
- SMS customization options.
- Consent policies.
- How to include links in your messages.
Create a scenario
Go to Campaigns > Scenarios and click + New scenario. Configure your scenario's entry conditions before adding the SMS action node.
Add the SMS action node
In the scenario builder, find the SMS node in the Nodes panel and drag it onto the canvas. Click the node to open the template selection panel, where you can choose from:
- Blank SMS: Start from scratch.
- Predefined templates: Templates from the built-in template library.
- Project templates: Templates you've built and stored in the Asset Manager.
NoteTemplates can be reused across campaigns. If you update a shared template, you'll be prompted to apply the new settings or keep your existing campaign settings.
Click the SMS node in your scenario to access both template types.
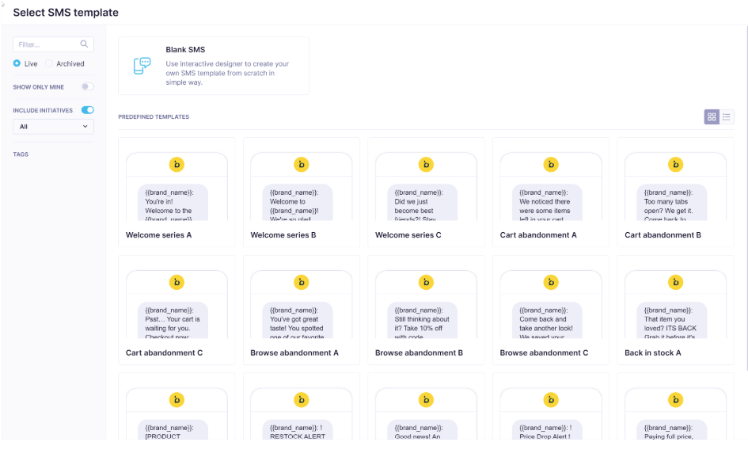
SMS template selection page showing predefined templates.
Configure the settings
Access the SMS campaign settings through the Settings tab of the SMS action node. Some settings — link shortener, transfer identity to URL links, link transformation, and custom campaign tracking — are disabled by default in the template. Enable them in the template before creating a campaign to have them prefilled automatically.
The following parameters are available:
Campaign governance
| Function | Description |
|---|---|
| Frequency policy | Defines how many SMS messages a customer can receive within a specified time frame. |
| Consent category | Specifies which consent a customer must have to receive this campaign. Selecting the correct consent category is required for regulatory compliance — customers without the specified consent won't receive the message. For guidance on consent categories, see SMS campaigns documentation. |
| Tracking consent category | Ensures you only track customers who have given specific permission. Opens and clicks in SMS campaigns are not tracked without a selected consent. |
Link and tracking settings
| Function | Description |
|---|---|
| Link shortener | Shortens all hyperlinks in SMS/MMS automatically when enabled. |
| Transfer identity to URL links | Available only when the link shortener is enabled. Uses URL links for customer identification. Options: Disabled, Enabled - first click only (recommended), Enabled - all clicks. |
| Link transformation | Modifies UTM tags for campaign tracking. Auto: Applies default UTM settings. Manual: Lets you modify utm_campaign, utm_medium, and utm_source tags. |
| Custom campaign tracking | Adds custom event attributes to campaign events across all campaign statuses. |
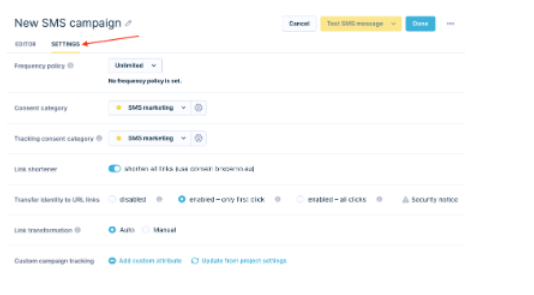
SMS campaign Settings tab showing frequency policy, consent, and link options.
Personalize the message
Use the message editor to write your SMS content. Use Jinja personalization to insert dynamic, customer-specific content — for example, first name or recent purchase. See Jinja personalization for syntax and examples.
The editor also includes a character counter to track message length and automatic highlighting of special characters that may affect encoding. For messages that exceed a single SMS length, a fallback SMS option is available.
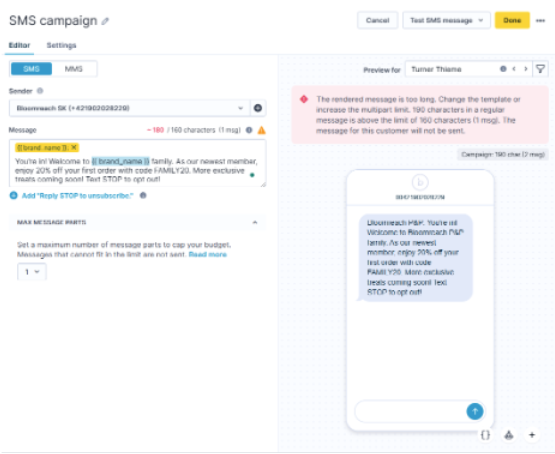
SMS campaign editor with message preview and character counter.
Set up a sender profile
To send SMS messages, set up an integration as a sender profile. Go to Project settings > Campaigns > SMS / MMS / RCS. For details, read the SMS campaigns documentation.
Test your message
Before launching, send a test message to verify your content. Click Send test SMS in the editor and choose one of two options:
- Send to a specific phone number — for example, your own — to check how the message renders on a real device.
- Send to a previewed customer to confirm personalisation and Jinja variables resolve correctly.
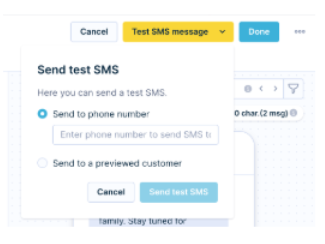
Send test SMS dialog with options to send to a phone number or a previewed customer.
Launch the campaign
Once you've configured your scenario, go to the scenario overview and click Start. Monitor send progress in the Results tab — you can track delivery status, click rates, and opt-outs as the campaign runs.
Updated 3 months ago