

How to set up DMARC records
Email spoofing impacts businesses, causing million-dollar losses annually. Your "from" address can be vulnerable without Domain-based Message Authentication, Reporting, and Conformance (DMARC) despite strict security. This article explains what DMARC is and how to set up DMARC records.
ImportantMandatory DMARC record setup for emailing
What is DMARC
DMARC is a safeguard established in 2012 to prevent email impersonation. Today, it's an industry standard and your frontline defense against malicious emails in your sender program. You may already use DMARC. If you're not sure, this tool provides a quick check.
What makes DMARC unique are its policy settings. Use them to handle any action that comes from somewhere pretending to be your domain name. This gives you an extra safety layer and lets you control your email sending better.
Why DMARC matters
While email has been around as long as the internet, refining its authentication continues to be an ongoing process. Before DMARC, providers like Google used rigorous filters and user reports to pinpoint spammers, sometimes inadvertently blocking valid senders and domains.
With DMARC, senders can analyze feedback reports to develop authentication protocols, guiding receiving mail servers about the authentic IPs on your domain. A DMARC policy instructs ISPs to reject emails from fraudulent IPs attempting to use your domain.
With 90% of network attacks executed through email infrastructure, email attacks are evolving. Phishing attacks can compromise your
- ISP reputation
- Deliverability rates
- Brand reputation
How DMARC works
DMARC is a code line you insert into your DNS TXT record. But it's not just about coding - it's a constant process that works before and after you implement it, ensuring your email system keeps working smoothly. Let's break down DMARC's three main parts to understand this standard better.
Before DMARC: SPF and DKIM
To comprehend DMARC, familiarize yourself with its older cousins, Sender Policy Framework (SPF) and DomainKeys Identified Mail (DKIM).
SPF is an authentication technique allowing senders to list the trusted SMTP servers' IPs authorized to send from a domain. The receiving server verifies the email against this record before letting it into the inbox. Conversely, DKIM authentication is a signature in your public DNS records, confirmed with a private key in your email header.
This matters to DMARC because DMARC relies on these two to decide if a message should pass or fail based on the SPF and DKIM alignment.
During DMARC: the record
A DMARC record consists of simple tags and values. Only two fields are mandatory, while others are optional. We will focus on the essential requirements, although Google provides a complete list of advanced tags.
Consider this simple DMARC record as an example: v=DMARC1; p=reject; rua=mailto:[email protected];
The initial tag, v=, must always be 'DMARC1' since no other versions are available.
The second tag, p=, instructs the recipient's email server for emails failing authentication. You have three options:
- None: Logs the entry but takes no action.
- Quarantine: Marks the email as spam.
- Reject: Bounces the email message.
For BIMI users, the p= tag must be set to 'quarantine' or 'reject', as 'none' isn't supported.
The third tag, rua=, or Report Email Address, specifies the mailbox where DMARC reports land.
Dmarcian offers a free DMARC record generator tool if you prefer not to compile the record.
After DMARC: analyze DMARC reports
With DMARC implemented, reports start entering your designated inbox, providing details on the following:
- The servers or third parties sending mail from your domain and their pass or fail status.
- The reactions of each receiving mail server to unauthenticated messages.
- The total DMARC pass rate percentage.
There's an optional reporting tag, ruf=, directing ISPs where to send fail or forensic reports. Although it's not universally supported due to data reasons (Gmail stands out), it offers more profound insights into the content of failed emails than a standard aggregate report.
These reports help you refine your DMARC policy. If most messages pass through the email receiver's servers successfully, you may want a stricter policy to detect spoofers. Everyday report analysis and troubleshooting are essential.
DMARC setup
Get your domain ready for DMARC setup
Activate SPF and DKIM for your domain: DMARC requires activated SPF and DKIM.
- For SPF, add a DNS TXT record from your ESP settings to your DNS provider.
- For DKIM signatures, copy the DKIM record from your ESP and paste it into your DNS provider's TXT DNS file.
NoteAll Bloomreach clients have SPF and DKIM values.
Create a dedicated mailbox for reports. You'll get XML reports tracking emails across locations and ISPs. These can accumulate quickly, so create an independent mailbox. Depending on your organization's size, consider a third-party service to manage and decipher these reports.
Audit your sending domains as your DMARC reports arrive. Having your list of sending domains ready can help identify legitimate from fake ones. It's helpful to audit your domains beforehand, which will save you time, especially for larger teams.
Select a policy
With DMARC, email senders dictate their authentication policy, defining actions for non-matching domain name messages, much like a traffic light system. You aim to transition your policy from "none" (green) to "quarantine" (orange) and, finally, to "reject" (red).
- None: The p=none tag doesn't alter your current setup. The inbox provider continues as usual. This is an excellent starting point for monitoring initial DMARC reports. Note that BIMI doesn't support p=none.
- Quarantine: The quarantine policy sends unqualified mail to the spam folder until you verify its origins.
- Reject: p=reject is DMARC's ultimate goal. However, choosing it too soon may cause legitimate emails to bounce. Implement a reject policy after a thorough report analysis.
Volume Regulate your authentication rollout by applying your policy to a small message percentage at first, e.g., pct=5. Adjust this value based on your time, resources, and risk tolerance. A gradual increase is a safe approach; otherwise, the default volume is 100%
Post your TXT record
After defining your DMARC policy, it's time to publish.
- Visit your domain host's DNS settings in the management console.
- Enter the record name (_dmarc.yourdomain.com) under the DNS hostname.
- Input your DMARC record under the DNS record value (refer to the "Understanding the Record" section).
- Save your changes.
4. Examine your reports
With a DMARC record installed, reports arrive in your mailbox, indicating which messages pass or fail SPF and DKIM authentication. A typical raw XML DMARC report looks like this:
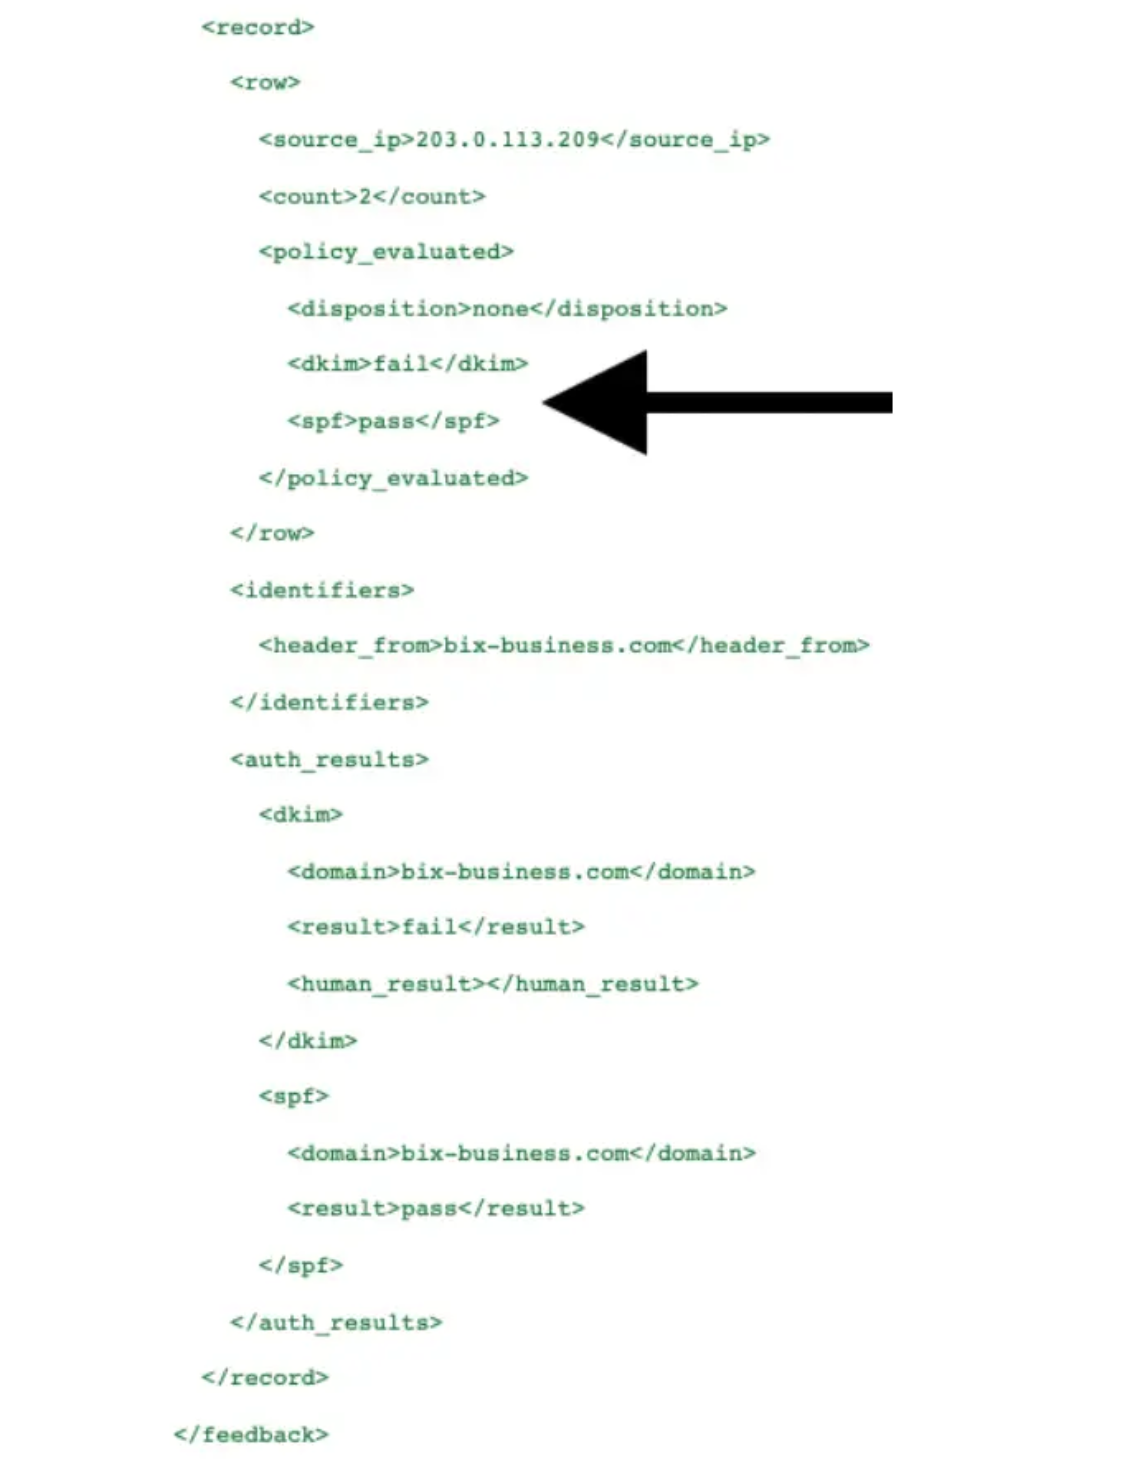
Report is paraphrased
XML files are primarily for machine-reading and can be challenging for human interpretation. To make these reports clearer, you can:
- Transform the records into a tabular format using a relational database.
- Change XML to HTML using an XSL style sheet.
- Employ a third-party SaaS provider to handle and analyze your reports.

Example of tabular format
With the record clear, you should recognize the IP addresses as your own. Remembering all the IPs from your third-party apps might be tricky. In dealing with these email streams, follow a 3-step process:
- Asses: Audit your sender IPs and correlate with the IPs on your reports.
- Remediate: Apply DMARC records to all confirmed sending sources.
- Maintain: Confirm a successful rollout and troubleshoot if necessary.
Implement your strategy gradually
Your DMARC policy should evolve progressively from p=none to p=quarantine and, finally, to p=reject. It allows for data collection and careful report analysis. A safe rollout could look like this:
- v=DMARC1; p=none; pct=100; rua=mailto:
[email protected]. Here, messages are delivered as usual. Reports are generated, helping identify trusted senders. Collect data for about 6 weeks before progressing. - v=DMARC1; p=quarantine; pct=5; rua=mailto:
[email protected]. Gradually increase the pct= value as you gather data until you reach 100%. Once satisfied with message quarantining, move to the next step. - v=DMARC1; p=reject; pct=5; rua=mailto:
[email protected]. Keep increasing the pct= value gradually, ensuring all legitimate emails reach the inbox. Once you reach 100%, you successfully and securely execute your DMARC implementation.
Updated 4 days ago