

Example app
Build, run, and navigate the example app included with the MAUI SDK
The Bloomreach MAUI SDK includes an example application you can use as a reference implementation. You can build and run the app, test Engagement features, and compare the code and behavior of your implementation with the expected behavior and code in the example app.
Prerequisites
You must have the following software installed to be able to build and run the example app:
- Visual Studio
- .NET 6 SDK
- .NET 7 SDK
- Java JDK 11 or 17
- Git
- Android Studio with a virtual or physical device set up to run the app on Android
- Xcode and CocoaPods with a virtual or physical device set up to run the app on iOS
Build and run the example app
- Clone the bloomreach-maui-sdk repository on GitHub:
git clone https://github.com/exponea/bloomreach-maui-sdk.git - Enter the
bloomreach-maui-sdkdirectory:cd bloomreach-maui-sdk/ - To build the app for iOS:
- Enter the
BloomreachSDKMauiIOSdirectory:cd BloomreachSDKMauiIOS - Run CocoaPods to install dependencies:
pod install - Run the script to build frameworks:
./buildFramework.sh
- Enter the
- To build the app for Android:
- Enter the
BloomreachSDKMauiAndroiddirectory:cd BloomreachSDKMauiAndroid - Run Gradle to build the Android library:
./gradlew clean build
- Enter the
- Open
ExampleApp.slbin Visual Studio. - In the Visual Studio solution explorer, select ExampleApp (root) and run
Restore NuGet Packagesfrom the context menu. - Open the
Buildmenu and selectClean all. - Select the target device in the top of the Visual Studio screen.
- Click on the Run (triangle) button for the ExampleApp module.
To enable push notifications in the example app, you must also configure the Apple Push Notification Service integration (for iOS) or the Firebase integration or Huawei integration (for Android) in the Exponea web app.
Navigate the example app
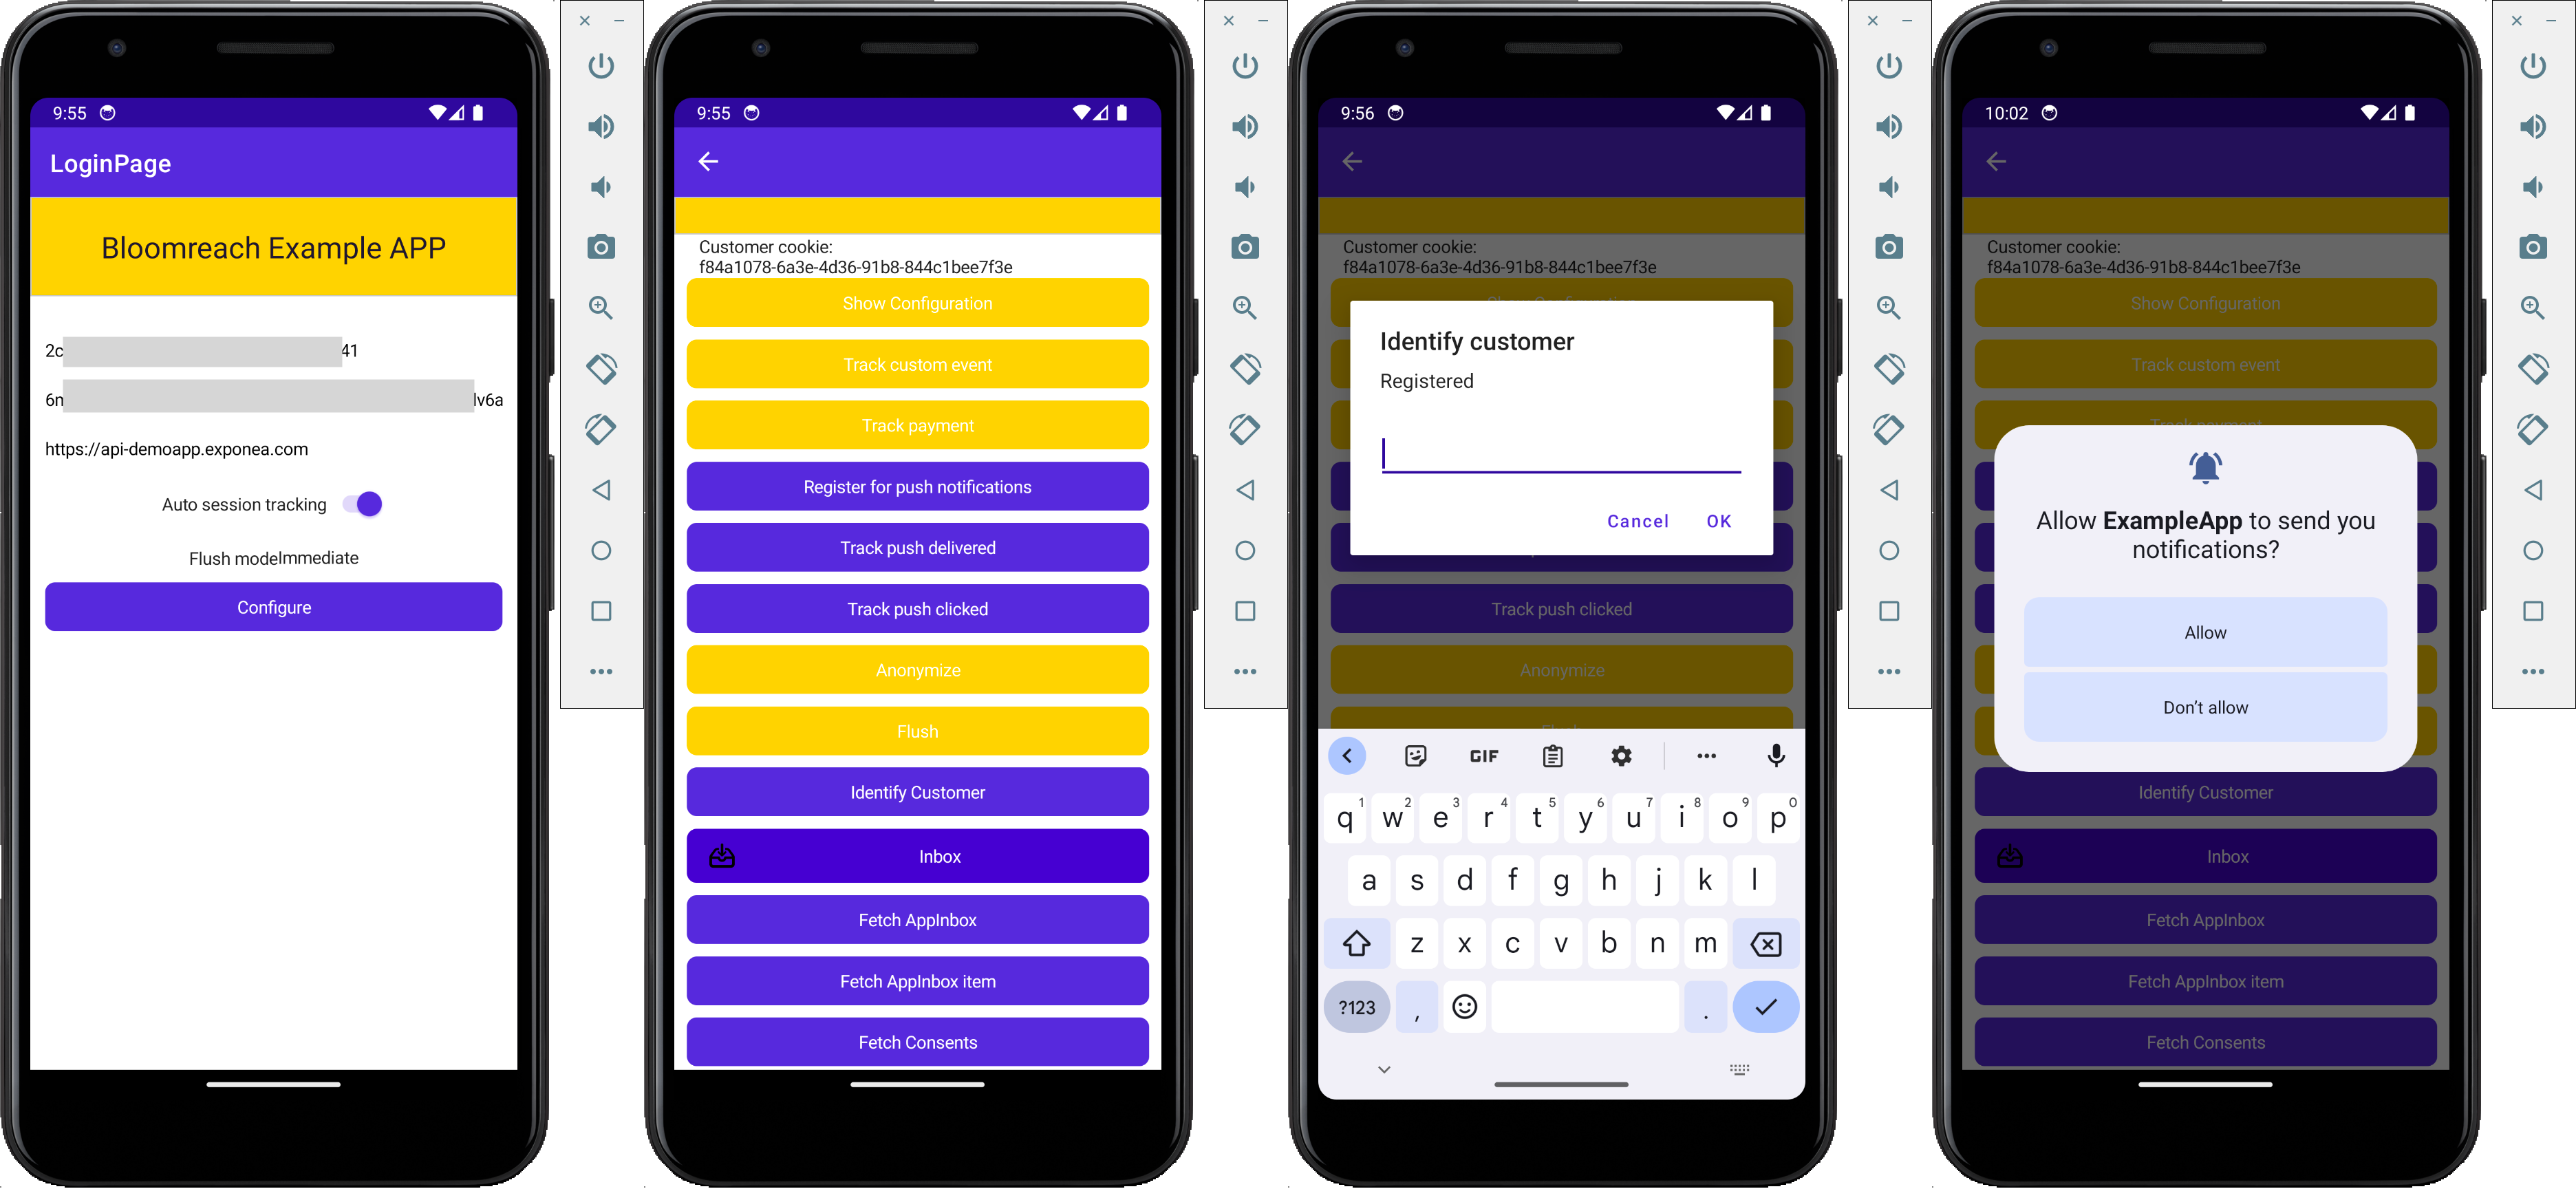
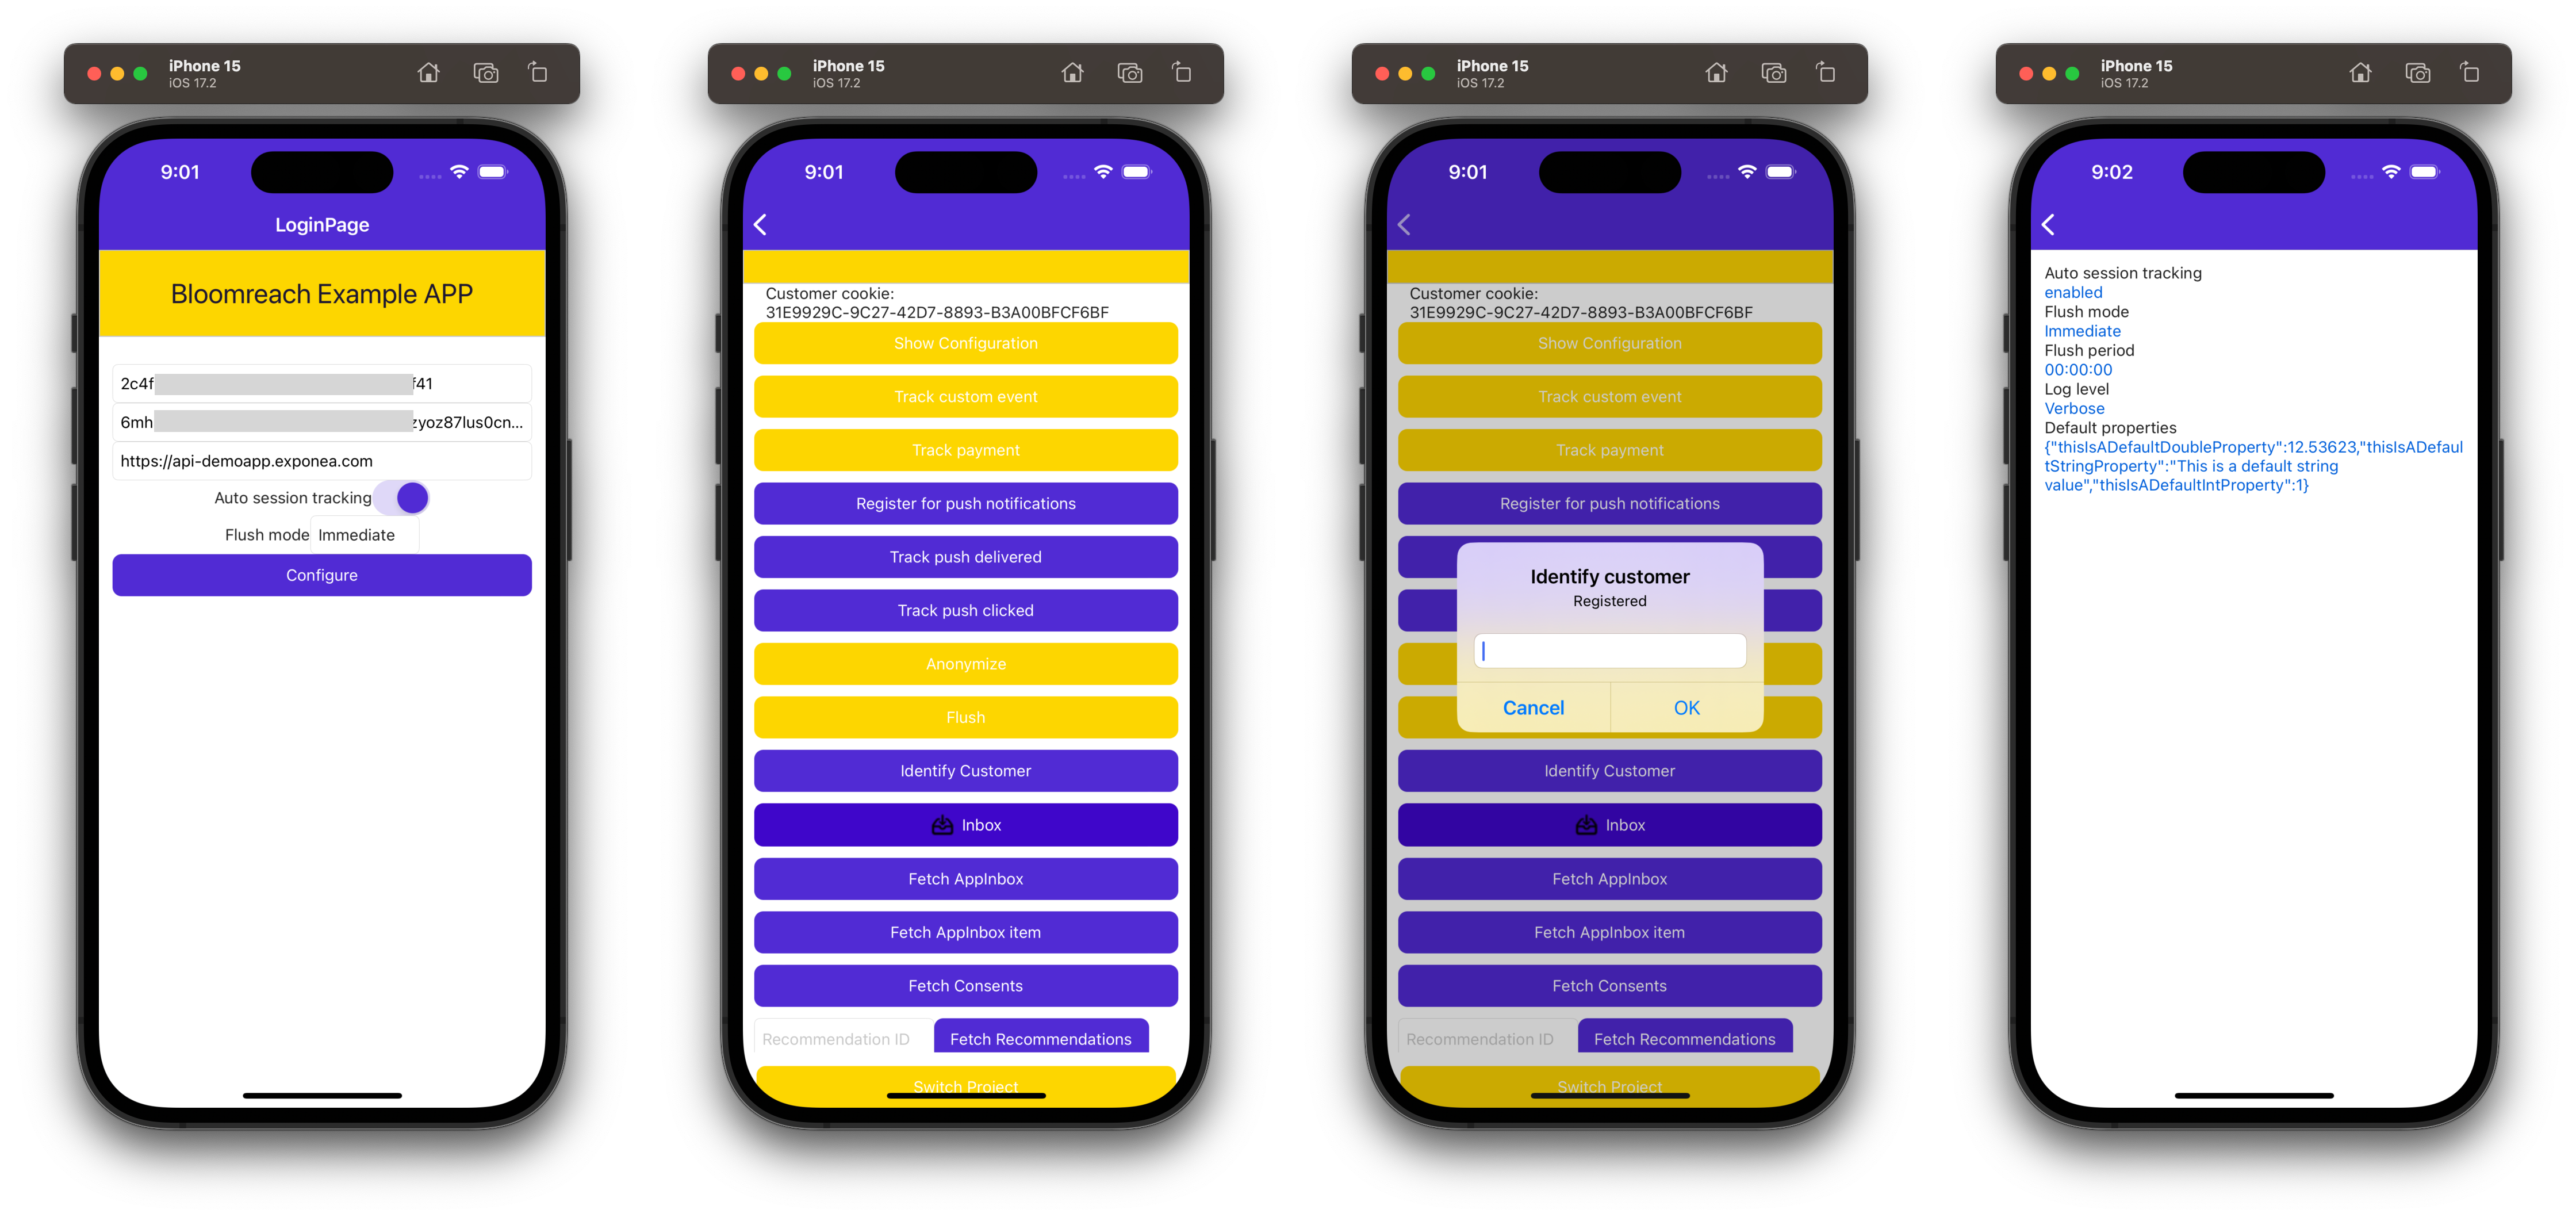
When you run the app in the simulator, you'll see the LoginPage. Enter your project token, API token, and API base URL. Optionally, disable Auto Session Tracking using the switch (default enabled) and select a flush mode (default Immediate). Then click Configure to initialize the SDK.
The MainPage provides several buttons to test the different SDK features.
-
Show Configurationopens a screen listing several SDK configuration parameters including Auto session tracking, Flush mode, Flush period, Log level, and Default properties. -
Track custom eventtracks acustom_eventevent.Track paymenttracks apaymentevent with some dummy product and payment data. -
Register for push notificationsrequests the user's permission to receive push notifications.Track push deliveredtracks acampaignevent with status "delivered".Track push clickedtracks acampaignevent with status "clicked". -
Anonymizecalls the anonymize function for the current customer.Flushperforms a manual data flush. -
Identify Customerlets you enter a hard ID (registered) and one customer property name and value pair to identify the current customer. -
Inboxopens the App Inbox screen.Fetch AppInboxfetches all App Inbox messages, whileFetch AppInbox Itemfetches the first message only. -
Fetch Consentsfetches the customer's consents.
Try out the different features in the app, then find the customer profile in the Engagement web app (under Data & Assets > Customers) to see the properties and events tracked by the SDK.
By default, the customer is tracked anonymously using a cookie soft ID, displayed at the top of the main screen. You can find the corresponding profile in the Engagement web app.
Once you use Identify Customer in the app to set the registered hard ID (use an email address as value), the customer is identified and can be found in Engagement web app by their email address.
Refer to Customer Identification for more information on soft IDs and hard IDs.
Troubleshooting
Error APT2260: resource mipmap/appicon_example (aka com.exponea.example:mipmap/appicon_example) not found
This happens occasionally because building is done in parallel steps and sometimes compilation finishes sooner than resource processing.
Repeat the steps Restore NuGet Packages, Build > Clean All, run ExampleApp.
Error: Could not find any available provisioning profiles for ExampleApp on iOS
To be able to run the app on iOS from Visual Studio, you need to have a valid Apple Developer Account and a provisioning profile for the app's Bundle ID linked to the account. The default Bundle ID of the example app (com.exponea.ExponeaSDK-Example2) is already assigned to the SDK development team, you must create a new unique Bundle ID for your account and use that for the example app.
- Add your Apple Developer Account to Xcode. Select
Xcode>Settings>Accounts, add your Apple Developer Account and select the appropriate team (if applicable). - Create a new dummy iOS app in Xcode. Select the app and on the
Signing & Capabilitiestab, make sure that:Automatically manage signingis checked- The appropriate
Teamis selected. - The
Bundle Identifieris something unique and available.
- Run the dummy app on the iOS simulator. This will create the provisioning profile for the Bundle ID.
- Add your Apple Developer Account to Visual Studio. Select
Visual Studio>Preferences>Publishing>Apple Developer Accounts, add your Apple Developer Account and select the appropriate team (if applicable). - Open
ExampleApp.slnin Visual Studio. OpenExampleApp/Platforms/iOS/Info.plistand change theBundle identifierto the same one you used for the dummy app in Xcode. - Follow the steps for iOS in . The app should now run on the iOS simulator.
Updated 4 months ago