iOS push notifications
Enable push notifications on iOS using the MAUI SDK
The MAUI SDK relies on the native iOS SDK to handle push notifications on iOS. This guide provides shortened instructions for iOS within the context of the MAUI SDK and refers to the push notifications documentation for the Android SDK for details.
The behaviour of push notification delivery and click tracking may be affected by the tracking consent feature, which, if enabled, requires explicit consent for tracking. Refer to the tracking consent documentation for details.
Prerequisites
To be able to send push notifications to iOS devices from Engagement, you must:
- Obtain an Apple Push Notification service (APNs) authentication token signing key
- Add and configure the Apple Push Notification Service integration in the Engagement web app
Follow the instructions in Configure Apple Push Notification Service in the native iOS SDK documentation if you haven't set this up yet.
Integration
This section describes the steps to add the minimum push notification functionality (receive alert notifications) to your app.
Step 1: Enable push capabilities
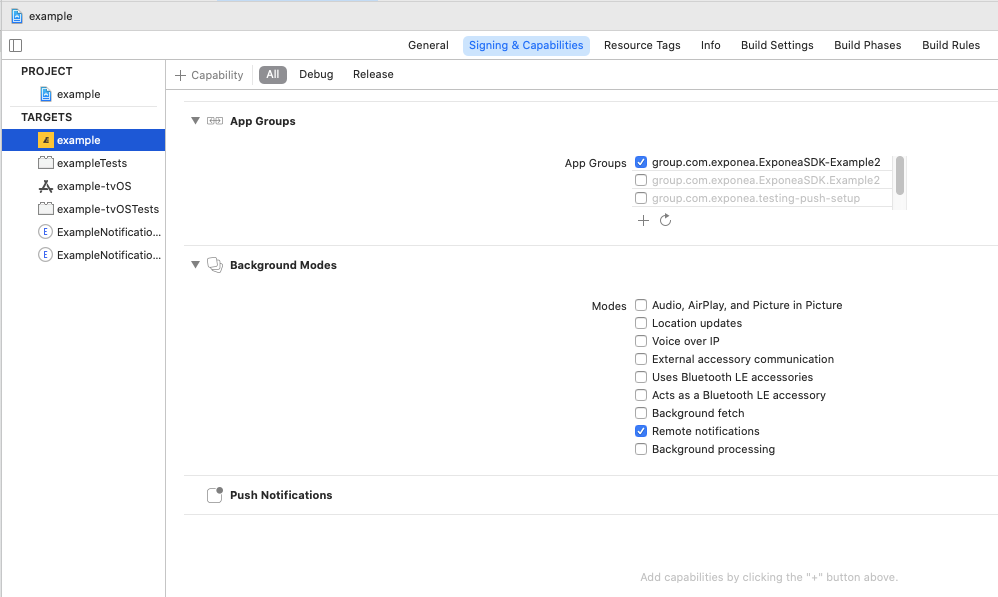
In Xcode, select your application target, and on the Signing & Capabilities tab, add the following capabilities:
Push Notifications
Required for alert push notifications.Background Modes(selectRemote notifications)
Required for silent push notifications.App Groups(create a new app group for your app)
Required for application extensions that handle push notification delivery and rich content.
An Apple developer account with a paid membership is required to add the
Push Notificationscapability.

Step 2: Implement application delegate methods
For your application to be able to respond to push notification-related events, its AppDelegate must implement several methods (see the native iOS SDK documentation for details):
RegisteredForRemoteNotificationswill be called when your application registers for push notifications.DidReceiveRemoteNotificationwill be called for silent push notifications and alert push notifications while your app is opened.DidReceiveNotificationResponsewill be called when a user opens an alert push notification.
using Bloomreach;
using Foundation;
using UIKit;
using UserNotifications;

[Register("AppDelegate")]
public partial class AppDelegate : MauiUIApplicationDelegate, IUNUserNotificationCenterDelegate {

    public override bool FinishedLaunching(UIApplication application, NSDictionary launchOptions)
    {
        UNUserNotificationCenter.Current.Delegate = this;
        return base.FinishedLaunching(application, launchOptions);
    }

    [Export("application:didReceiveRemoteNotification:fetchCompletionHandler:")]
    public void DidReceiveRemoteNotification(UIApplication application, NSDictionary userInfo, Action<UIBackgroundFetchResult> completionHandler)
    {
        // Notification is automatically 'opened' if not shown:
        // - is silent push
        // - foreground app is not showing notification (default 'willPresentNotification' behaviour)
        BloomreachSDK.HandlePushNotificationOpened(NotificationAction.Parse(userInfo));
        completionHandler(UIBackgroundFetchResult.NewData);
    }

    [Export("userNotificationCenter:didReceiveNotificationResponse:withCompletionHandler:")]
    public void DidReceiveNotificationResponse(UNUserNotificationCenter center, UNNotificationResponse response, Action completionHandler)
    {
        // Notification is opened by user interaction
        BloomreachSDK.HandlePushNotificationOpened(NotificationAction.Parse(response));
        completionHandler();
    }

    [Export("application:didRegisterForRemoteNotificationsWithDeviceToken:")]
    public void RegisteredForRemoteNotifications(UIApplication application, NSData deviceToken)
    {
        BloomreachSDK.HandlePushToken(deviceToken);
    }
}
Make sure that:
- Your
RegisteredForRemoteNotificationsdelegate method callsHandlePushToken. - Your
DidReceiveRemoteNotificationandDidReceiveNotificationResponsecallsHandlePushNotificationOpened. - You call
UNUserNotificationCenter.Current.Delegate = this;
Step 3: Configure app group
When you initialize the SDK, you must set the AppGroup property to the app group you created in step 1:
var config = new Configuration("YOUR_PROJECT_TOKEN", "YOUR_API_KEY", "YOUR_API_BASE_URL")
{
    AppGroup = "group.your.app.group"
};
Bloomreach.BloomreachSDK.Configure(config);
Step 4: Request notification permission
Your app requires explicit permission from the user to receive "alert" notifications that are visible to the user.
You can request authorization as follows:
public void RegisterForRemoteNotifications()
{
    if (UIDevice.CurrentDevice.CheckSystemVersion(8, 0))
    {
        var pushSettings = UIUserNotificationSettings.GetSettingsForTypes(
                            UIUserNotificationType.Alert | UIUserNotificationType.Badge | UIUserNotificationType.Sound,
                            new NSSet());

        UIApplication.SharedApplication.RegisterUserNotificationSettings(pushSettings);
        UIApplication.SharedApplication.RegisterForRemoteNotifications();
    }
    else
    {
        UIRemoteNotificationType notificationTypes = UIRemoteNotificationType.Alert | UIRemoteNotificationType.Badge | UIRemoteNotificationType.Sound;
        UIApplication.SharedApplication.RegisterForRemoteNotificationTypes(notificationTypes);
    }
}
Push notification authorization status is tracked as customer property
apple_push_notification_authorized.
Checklist:
- Engagement should now be able to send push notifications to iOS devices. Refer to the Creating a new notification guide for instructions.
- At this point, your app doesn't show images or actions in push notifications. Follow the instructions to implement rich push notifications if you want to support this.
Customization
This section describes the customizations you can implement once you have integrated the minimum push notification functionality.
Handle received push notifications
The SDK provides methods to handle push notification data and invoke actions.
using Bloomreach;
using Foundation;
using UIKit;
using UserNotifications;

[Register("AppDelegate")]
public partial class AppDelegate : MauiUIApplicationDelegate, IUNUserNotificationCenterDelegate {

    public override bool FinishedLaunching(UIApplication application, NSDictionary launchOptions)
    {
        UNUserNotificationCenter.Current.Delegate = this;
        return base.FinishedLaunching(application, launchOptions);
    }

    [Export("application:didReceiveRemoteNotification:fetchCompletionHandler:")]
    public void DidReceiveRemoteNotification(UIApplication application, NSDictionary userInfo, Action<UIBackgroundFetchResult> completionHandler)
    {
        // Notification is automatically 'opened' if not shown:
        // - is silent push
        // - foreground app is not showing notification (default 'willPresentNotification' behaviour)
        BloomreachSDK.HandlePushNotificationOpened(NotificationAction.Parse(userInfo));
        completionHandler(UIBackgroundFetchResult.NewData);
    }

    [Export("userNotificationCenter:didReceiveNotificationResponse:withCompletionHandler:")]
    public void DidReceiveNotificationResponse(UNUserNotificationCenter center, UNNotificationResponse response, Action completionHandler)
    {
        // Notification is opened by user interaction
        BloomreachSDK.HandlePushNotificationOpened(NotificationAction.Parse(response));
        completionHandler();
    }
}
Silent push notifications
Silent push notifications don't trigger any visible or audible notifications on the device but wake up the application to allow it to perform tasks in the background.
The app must track the push token to the Engagement backend to receive push notifications. The SDK does this automatically only if push notification tracking is enabled and properly implemented, and the app is authorized to receive alert push notifications.
Silent push notifications don't require authorization. To track the push token even when the app is not authorized, set the configuration variable RequirePushAuthorization to false. This causes the SDK to register for push notifications and track the push token at application startup. The push notification authorization status is tracked as the customer property apple_push_notification_authorized.
var config = new Configuration("YOUR_PROJECT_TOKEN", "YOUR_API_KEY", "YOUR_API_BASE_URL")
{
    AppGroup = "group.your.app.group",
    RequirePushAuthorization = false
};
Bloomreach.BloomreachSDK.Configure(config);
Silent push notifications require
Background ModesRemote notificationscapability.
The official Apple documentation states that you should not try to send more than two or three notifications per hour.
Rich push notifications
Rich push notifications can contain images and buttons. To enable this functionality, you must add two application extensions: a Notification Service Extension and a Notification Content Extension.
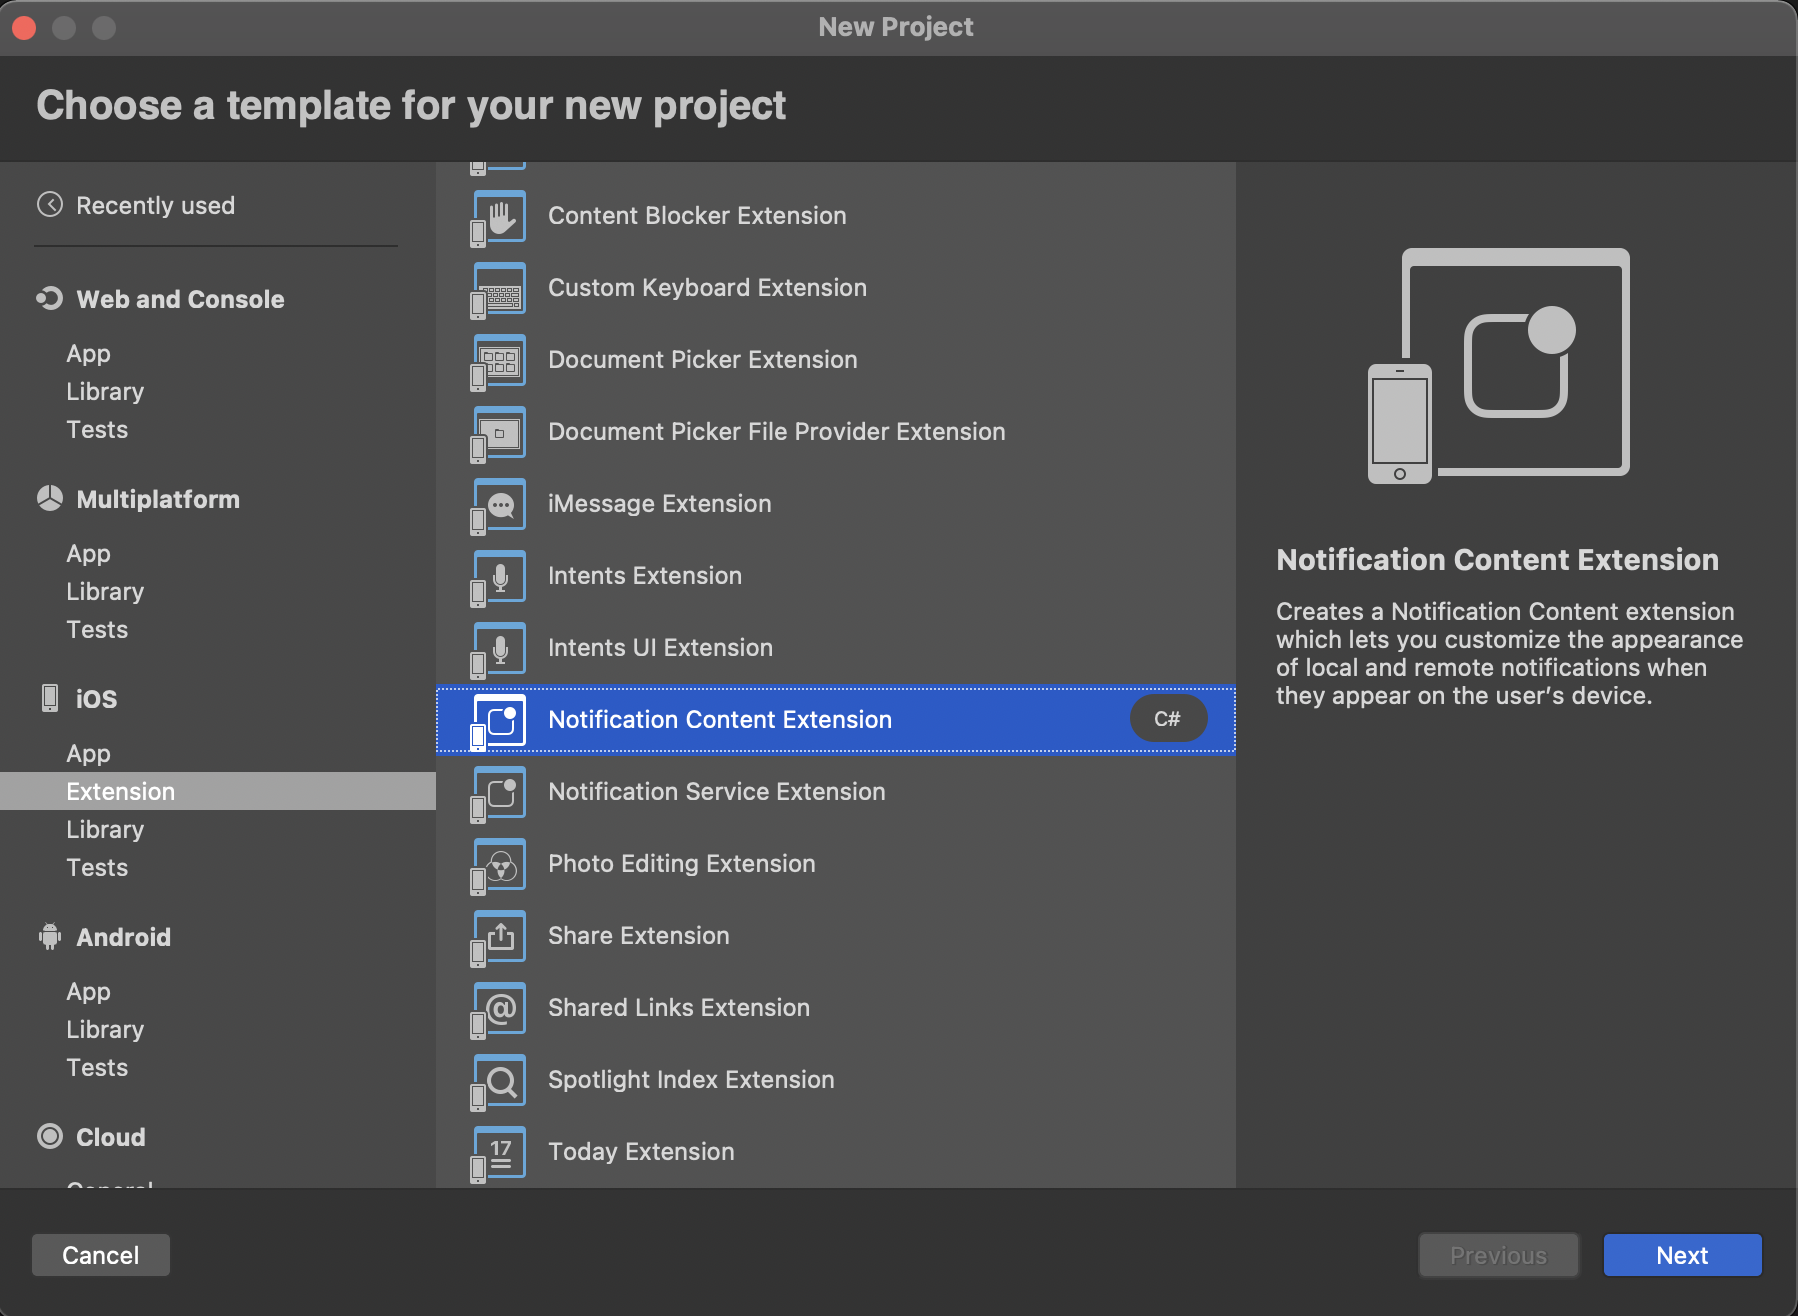
To add an extension, navigate to File > Add > Project... > iOS Extension in Visual Studio and select the extension type (Notification Service Extension or Notification Content Extension).

Make sure that the
iOS Deployment Targetof your extension is the same as for your main app.
Both extension types require a dependency on the BloomreachSDK.iOS.Notifications package so they can access the relevant SDK methods for processing notifications and handling timeouts.
Step 1: Create a Notification Service Extension
This type of extension lets you customize the content of a push notification before it's displayed to the user.
Create a new Notification Service Extension and add the App Groups capability, selecting the same group you used for your main app.

Implement the extension as follows:
using ObjCRuntime;
using UserNotifications;
using Bloomreach;

namespace ExamplePushServiceExtension
{
    [Register("NotificationService")]
    public class NotificationService : UNNotificationServiceExtension
    {

        #region Constructors
        protected NotificationService(IntPtr handle) : base(handle)
        {
            // Note: this .ctor should not contain any initialization logic.
        }
        #endregion

        #region Override Methods
        public override void DidReceiveNotificationRequest(UNNotificationRequest request, Action<UNNotificationContent> contentHandler)
        {
            if (!Bloomreach.BloomreachSDK.HandleRemoteMessage("group.your.app.group", request, contentHandler))
        {
            Console.WriteLine("Remote Message received without Bloomreach content");
        }
        }

        public override void TimeWillExpire()
        {
            Bloomreach.BloomreachSDK.HandleRemoteMessageTimeWillExpire();
        }
        #endregion
    }
}
Refer to ExampleNotificationService.cs in the example app for a reference implementation.
Step 2: Create a Notification Content Extension
This type of extension lets you customize the way a push notification is presented to the user.
A default storyboard file will be created. Delete it, you won't need it.
You'll now modify the default view controller implementation.
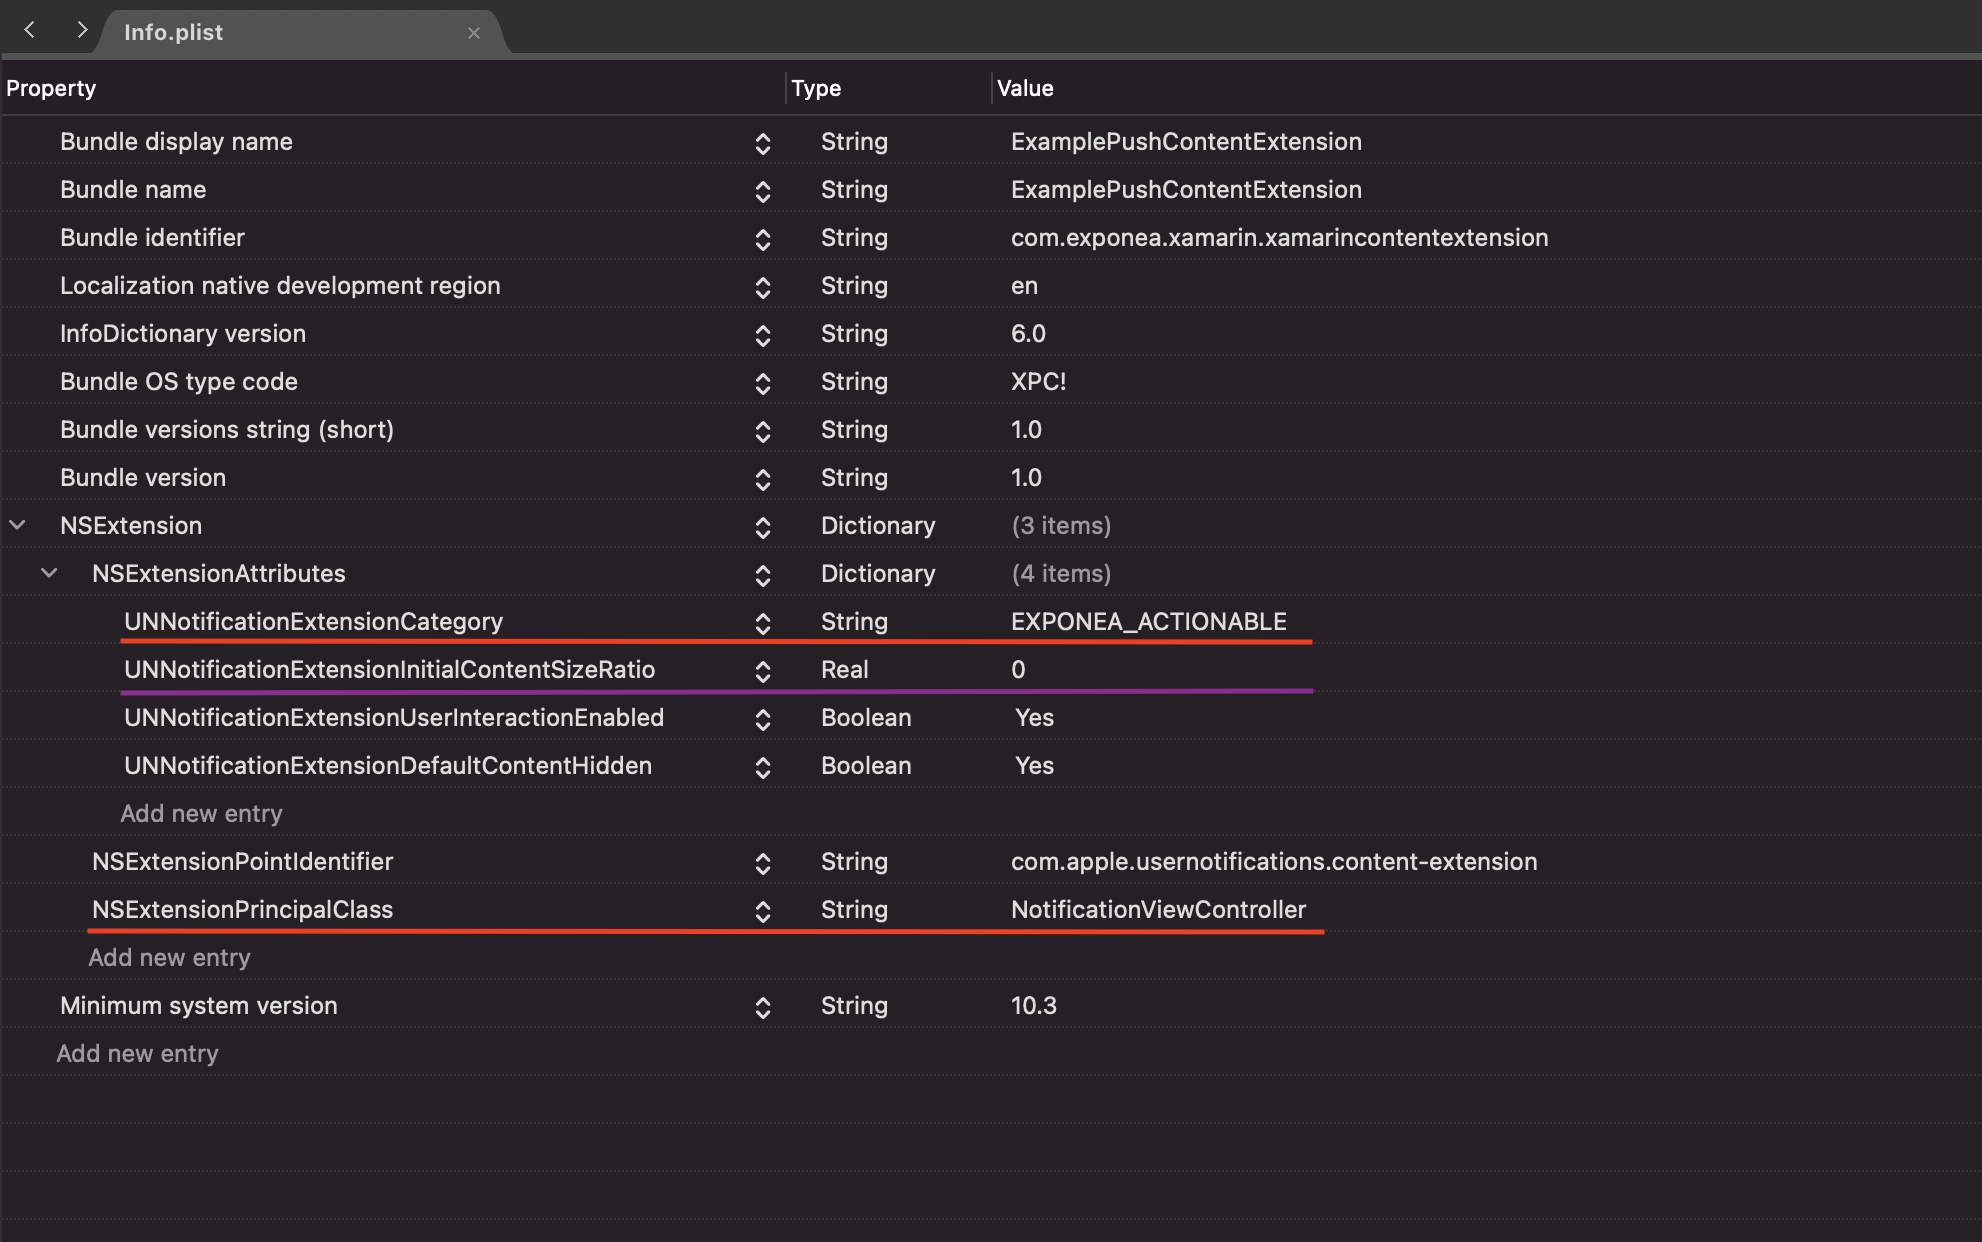
The service extension you created in the previous step will change the notification categoryIdentifier to EXPONEA_ACTIONABLE. You must configure the content extension to display push notifications with that category.
Open Info.plist in the content extension group.
- Under
NSExtension>NSExtensionAttributes:- Set
UNNotificationExtensionCategorytoEXPONEA_ACTIONABLE.
- Set
- Under
NSExtension:- Remove
NSExtensionMainStoryboard. - Add
NSExtensionPrincipalClassand set its value to your view controller class, for example,NotificationViewController.
- Remove

Notice the parameter UNNotificationExtensionInitialContentSizeRatio (with the default value 1). It specifies the ratio between the width and height of the content in the push notification. By default, the content is as high as it is wide. This setting is not part of the SDK but can cause unwanted blank space when no image is present. Change this value to 0 if you want the height to be dynamic (it will scale to the correct height if an image is present, but there will be no blank space if there is not).
We also recommend setting UNNotificationExtensionUserInteractionEnabled and UNNotificationExtensionDefaultContentHidden attributes to true.
Your view controller class should forward the notification to the SDK, which will render the rich notification:
using System;
using Foundation;
using UIKit;
using UserNotifications;
using UserNotificationsUI;
using BloomreachSdkNotifications;


namespace ExamplePushContentExtension
{

    [Register("NotificationViewController")]
    public partial class NotificationViewController : UIViewController, IUNNotificationContentExtension
    {

        protected internal NotificationViewController(NativeHandle handle) : base(handle)
        {
            // Note: this .ctor should not contain any initialization logic.
        }

        public override void ViewDidLoad()
        {
            base.ViewDidLoad();
            // Do any required interface initialization here.
        }

        public void DidReceiveNotification(UNNotification notification)
        {
            Bloomreach.BloomreachSDK.HandleNotificationReceived(notification, ExtensionContext, this);
        }
    }
}
Refer to NotificationViewController.cs in the example app for a reference implementation.
Checklist:
- Check that push notifications with images and buttons sent from Engagement are correctly displayed on your device. Push delivery tracking should work.
- If you don't see buttons in the expanded push notification, the content extension is not running. Double check
UNNotificationExtensionCategoryinInfo.plist- notice the placement insideNSExtensionAttributes. Check that theiOS Deployment Targetis the same for the extensions and the main app.
Track delivered notifications
To track the delivery of push notifications, implement a Notification Service Extension as described for rich push notifications above.
The behavior of push notification delivery and click tracking may be affected by the tracking consent feature, which in enabled mode considers the requirement of explicit consent for tracking. Read more in the tracking consent documentation.
Show foreground notifications
If your app is in the foreground when a notification arrives, the shared user notification center calls userNotificationCenter:willPresentNotification:withCompletionHandler which asks the delegate how to handle the notification. Refer to the Apple documentation for more info.
If you want to show a notification in foreground mode, override the behaviour as:
[Export("userNotificationCenter:willPresentNotification:withCompletionHandler:")]
public void WillPresentNotification(UNUserNotificationCenter notificationCenter, UNNotification notification,Action<UNNotificationPresentationOptions> completionHandler)
{
    completionHandler(
        UNNotificationPresentationOptions.Sound
        | UNNotificationPresentationOptions.Alert
        | UNNotificationPresentationOptions.Badge
    );
}
Advanced use cases
Multiple push notification sources
The SDK only handles push notifications sent from the Engagement platform. If you use platforms other than Engagement to send push notifications, you must implement some of the notification handling logic yourself.
Conditional processing
Step 2 (Implement application delegate methods) above describes the delegate methods required for Engagement push notification handling to work. You can use the Bloomreach.BloomreachSDK.IsBloomreachNotification(NotificationPayload.Parse(userInfo)) method in the delegate implementations to check if an incoming notification is coming from Engagement and, if not, process the notification using an implementation for a different notification source.
Manual tracking
You can completely disable notification tracking and use the methods Bloomreach.BloomreachSDK.TrackPushToken, Bloomreach.BloomreachSDK.TrackDeliveredPush, and Bloomreach.BloomreachSDK.TrackClickedPush to track push notification events manually. You can always track a campaign event manually with TrackEvent(Event event) and any payload you need.
The behavior of push notification delivery and click tracking may be affected by the tracking consent feature, which in enabled mode considers the requirement of explicit consent for tracking. Read more in the tracking consent documentation.
Updated over 1 year ago
