iOS push notifications
Enable push notifications on iOS using the Flutter SDK
The Flutter SDK relies on the native iOS SDK to handle push notifications on iOS. This guide provides shortened instructions for iOS within the context of the Flutter SDK and refers to the push notifications documentation for the iOS SDK for details.
The SDK provides a push setup self-check feature to help developers successfully set up push notifications. The self-check will try to track the push token, request the Engagement backend to send a silent push to the device, and check if the app is ready to open push notifications.
To enable the setup check, call
ExponeaPlugin().checkPushSetup()before initializing the SDK:
❗️Important
SDK versions 2.3.0 and higher use event-based token tracking to support multiple mobile applications per project. Learn more about Token tracking via notification_state event.
The behaviour of push notification delivery and click tracking may be affected by the tracking consent feature, which, if enabled, requires explicit consent for tracking. Refer to the tracking consent documentation for details.
Prerequisites
To be able to send push notifications to iOS devices from Engagement, you must:
- Obtain an Apple Push Notification service (APNs) authentication token signing key
- Add and configure the Apple Push Notification Service integration in the Engagement web app
Follow the instructions in Configure Apple Push Notification Service in the native iOS SDK documentation if you haven't set this up yet.
Integration
This section describes the steps to add the minimum push notification functionality (receive alert notifications) to your app.
Step 1: Enable push capabilities
Open the Xcode project located in the ios folder in your Flutter project.
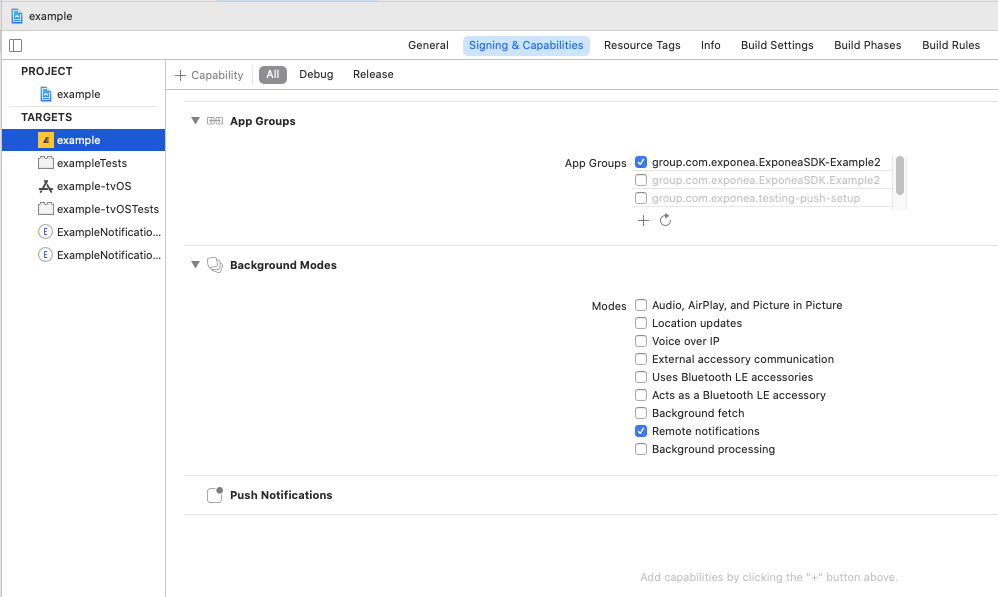
In Xcode, select your application target, and on the Signing & Capabilities tab, add the following capabilities:
Push Notifications
Required for alert push notifications.Background Modes(selectRemote notifications)
Required for silent push notifications.App Groups(create a new app group for your app)
Required for application extensions that handle push notification delivery and rich content.
An Apple developer account with a paid membership is required to add the
Push Notificationscapability.

Step 2: Implement application delegate methods
For your application to be able to respond to push notification-related events, its AppDelegate must implement several methods (see the native iOS SDK documentation for details).
The ExponeaFlutterAppDelegate class in the Flutter SDK provides default implementations of these methods. We recommend that you extend ExponeaFlutterAppDelegate in your AppDelegate.
Open AppDelegate.swift and replace the contents with the following:
import Foundation
import Flutter
import exponea

@UIApplicationMain
@objc class AppDelegate: ExponeaFlutterAppDelegate {

    override func application(
        _ application: UIApplication,
        didFinishLaunchingWithOptions launchOptions: [UIApplication.LaunchOptionsKey: Any]?
    ) -> Bool {
        GeneratedPluginRegistrant.register(with: self)
        return super.application(application, didFinishLaunchingWithOptions: launchOptions)
    }
}
If, for some reason, you don't want to or are not able to extend ExponeaFlutterAppDelegate, you can use it as a reference for implementing the required delegate methods yourself.
Step 3: Configure app group
When you initialize the SDK, you must set the appGroup property to the app group you created in step 1:
import 'package:exponea/exponea.dart';

final _plugin = ExponeaPlugin();
_plugin.configure(ExponeaConfiguration(
  // ...
  ios: IOSExponeaConfiguration(
    appGroup: 'your app group',
  ),
));
Step 4: Request notification permission
Your app requires explicit permission from the user to receive "alert" notifications that are visible to the user.
You can request authorization by calling ExponeaPlugin().requestPushAuthorization():
_plugin.requestPushAuthorization()
.then((accepted) => print("User has ${accepted ? 'accepted': 'rejected'} push notifications."))
.catchError((error) => print('Error: $error'));
Push notification authorization status is tracked as customer property
apple_push_notification_authorized.
Checklist:
- Engagement should now be able to send push notifications to iOS devices. Refer to the Creating a new notification guide for instructions.
- At this point, your app doesn't show images or actions in push notifications. Follow the instructions to implement rich push notifications if you want to support this.
Customization
This section describes the customizations you can implement once you have integrated the minimum push notification functionality.
Rich push notifications
Rich push notifications can contain images and buttons. To enable this functionality, you must add two application extensions: a Notification Service Extension and a Notification Content Extension.
For each extension, follow the instructions in Notification Extensions in the native iOS SDK documentation to set it up correctly to use the Exponea Notification Service included in the iOS SDK.
Calling the ExponeaNotificationContentService.didReceive() method will enhance the notification body with the image and actions delivered within the UNNotification payload. Notification actions shown by ExponeaNotificationContentService are registered with configurations to open your application with required information and handle campaign clicks automatically.
Checklist:
- Check that push notifications with images and buttons sent from Engagement are correctly displayed on your device. Push delivery tracking should work.
- If you don't see buttons in the expanded push notification, the content extension is not running. Double check
UNNotificationExtensionCategoryinInfo.plist- notice the placement insideNSExtensionAttributes. Check that theiOS Deployment Targetis the same for the extensions and the main app.
Retrieve push notification token manually
Sometimes, your application may need to retrieve the current push token while running. You can do this using the Exponea.shared.trackPushToken method.
A common use case is when the ExponeaPlugin().anonymize() method is called. Invoking anonymize removes the push notification token from local storage. Hence, it needs to be updated right after anonymize, or before or after identifyCustomer, depending on your push notifications usage.
Messaging.messaging().token { token, error in
  if let token = token {
    SwiftExponeaPlugin.handlePushNotificationToken(deviceToken: token)
    resolve(nil)
  } else {
    reject(error)
  }
}
Show foreground notifications
The system calls the following method if the app is in the foreground while a push notification arrives. The default implementation shows the push notification. You can override this method if you want to change the default behavior.
    override func userNotificationCenter(_ center: UNUserNotificationCenter, willPresent notification: UNNotification, withCompletionHandler completionHandler: @escaping (UNNotificationPresentationOptions) -> Void) {
        // show notification even if the app is in the foreground
        if #available(iOS 14, *) {
            completionHandler([.banner])
        } else {
            completionHandler([.alert])
        }
    }
Updated 2 months ago
