

Talon.One
Integration
The following is a guide on how to integrate Talon.One with Bloomreach Engagement.
Talon.One is an API-based loyalty and promotion engine. With Talon.One you can create rich, engaging and automated incentive campaigns - without the need to code.
Bloomreach Engagement can integrate with Talon.One using its generic customer engagement platform (CEP) and generic customer data platform (CDP) endpoints through webhooks. This guide explains how to set up the integration with Talon.One and provides three use cases as examples of how you could use Talon.One with Bloomreach Engagement. Two using CEP endpoints and one using CDP endpoints.
How to set it up
1. Create a Talon.One integration API key
Create a coupon or get loyalty ledger
Go through the following steps if you want to create a coupon or get a loyalty ledger.
An Integration API key allows authentication for incoming webhook requests. The CEP API key will help with authentication in a later step.
To create an API key:
- Go to your Talon.One Application
- Go to Settings > Developer settings.
- Press Create API Key.
- Select Yes under Do you want to use this API Key with a 3rd party service?.
- Select Customer Engagement Platform from Platform.
- Select an expiration date, and press Create API Key.
- Copy and save the key. You will need it later.
Update a customer profile
Go through the following steps if you want to update a customer profile.
An Integration API key allows authentication for incoming webhook requests. The API key will help with authentication in a later step.
To create an API key:
- Go to your Talon.One Application
- Go to Settings > Developer settings.
- Press Create API Key.
- Select Yes under Do you want to use this API Key with a 3rd party service?.
- Select Customer Data Platform from Platform.
- Select an expiration date, and press Create API Key.
- Copy and save the key. You will need it later.
2. Configure webhook authentication
For CEP Integration
In Bloomreach Engagement, configure the webhook authentication for Talon.One so that data can be passed securely in the webhook request. You will use this webhook authentication when you create a scenario in a later step.
To configure webhook authentication in Bloomreach Engagement:
-
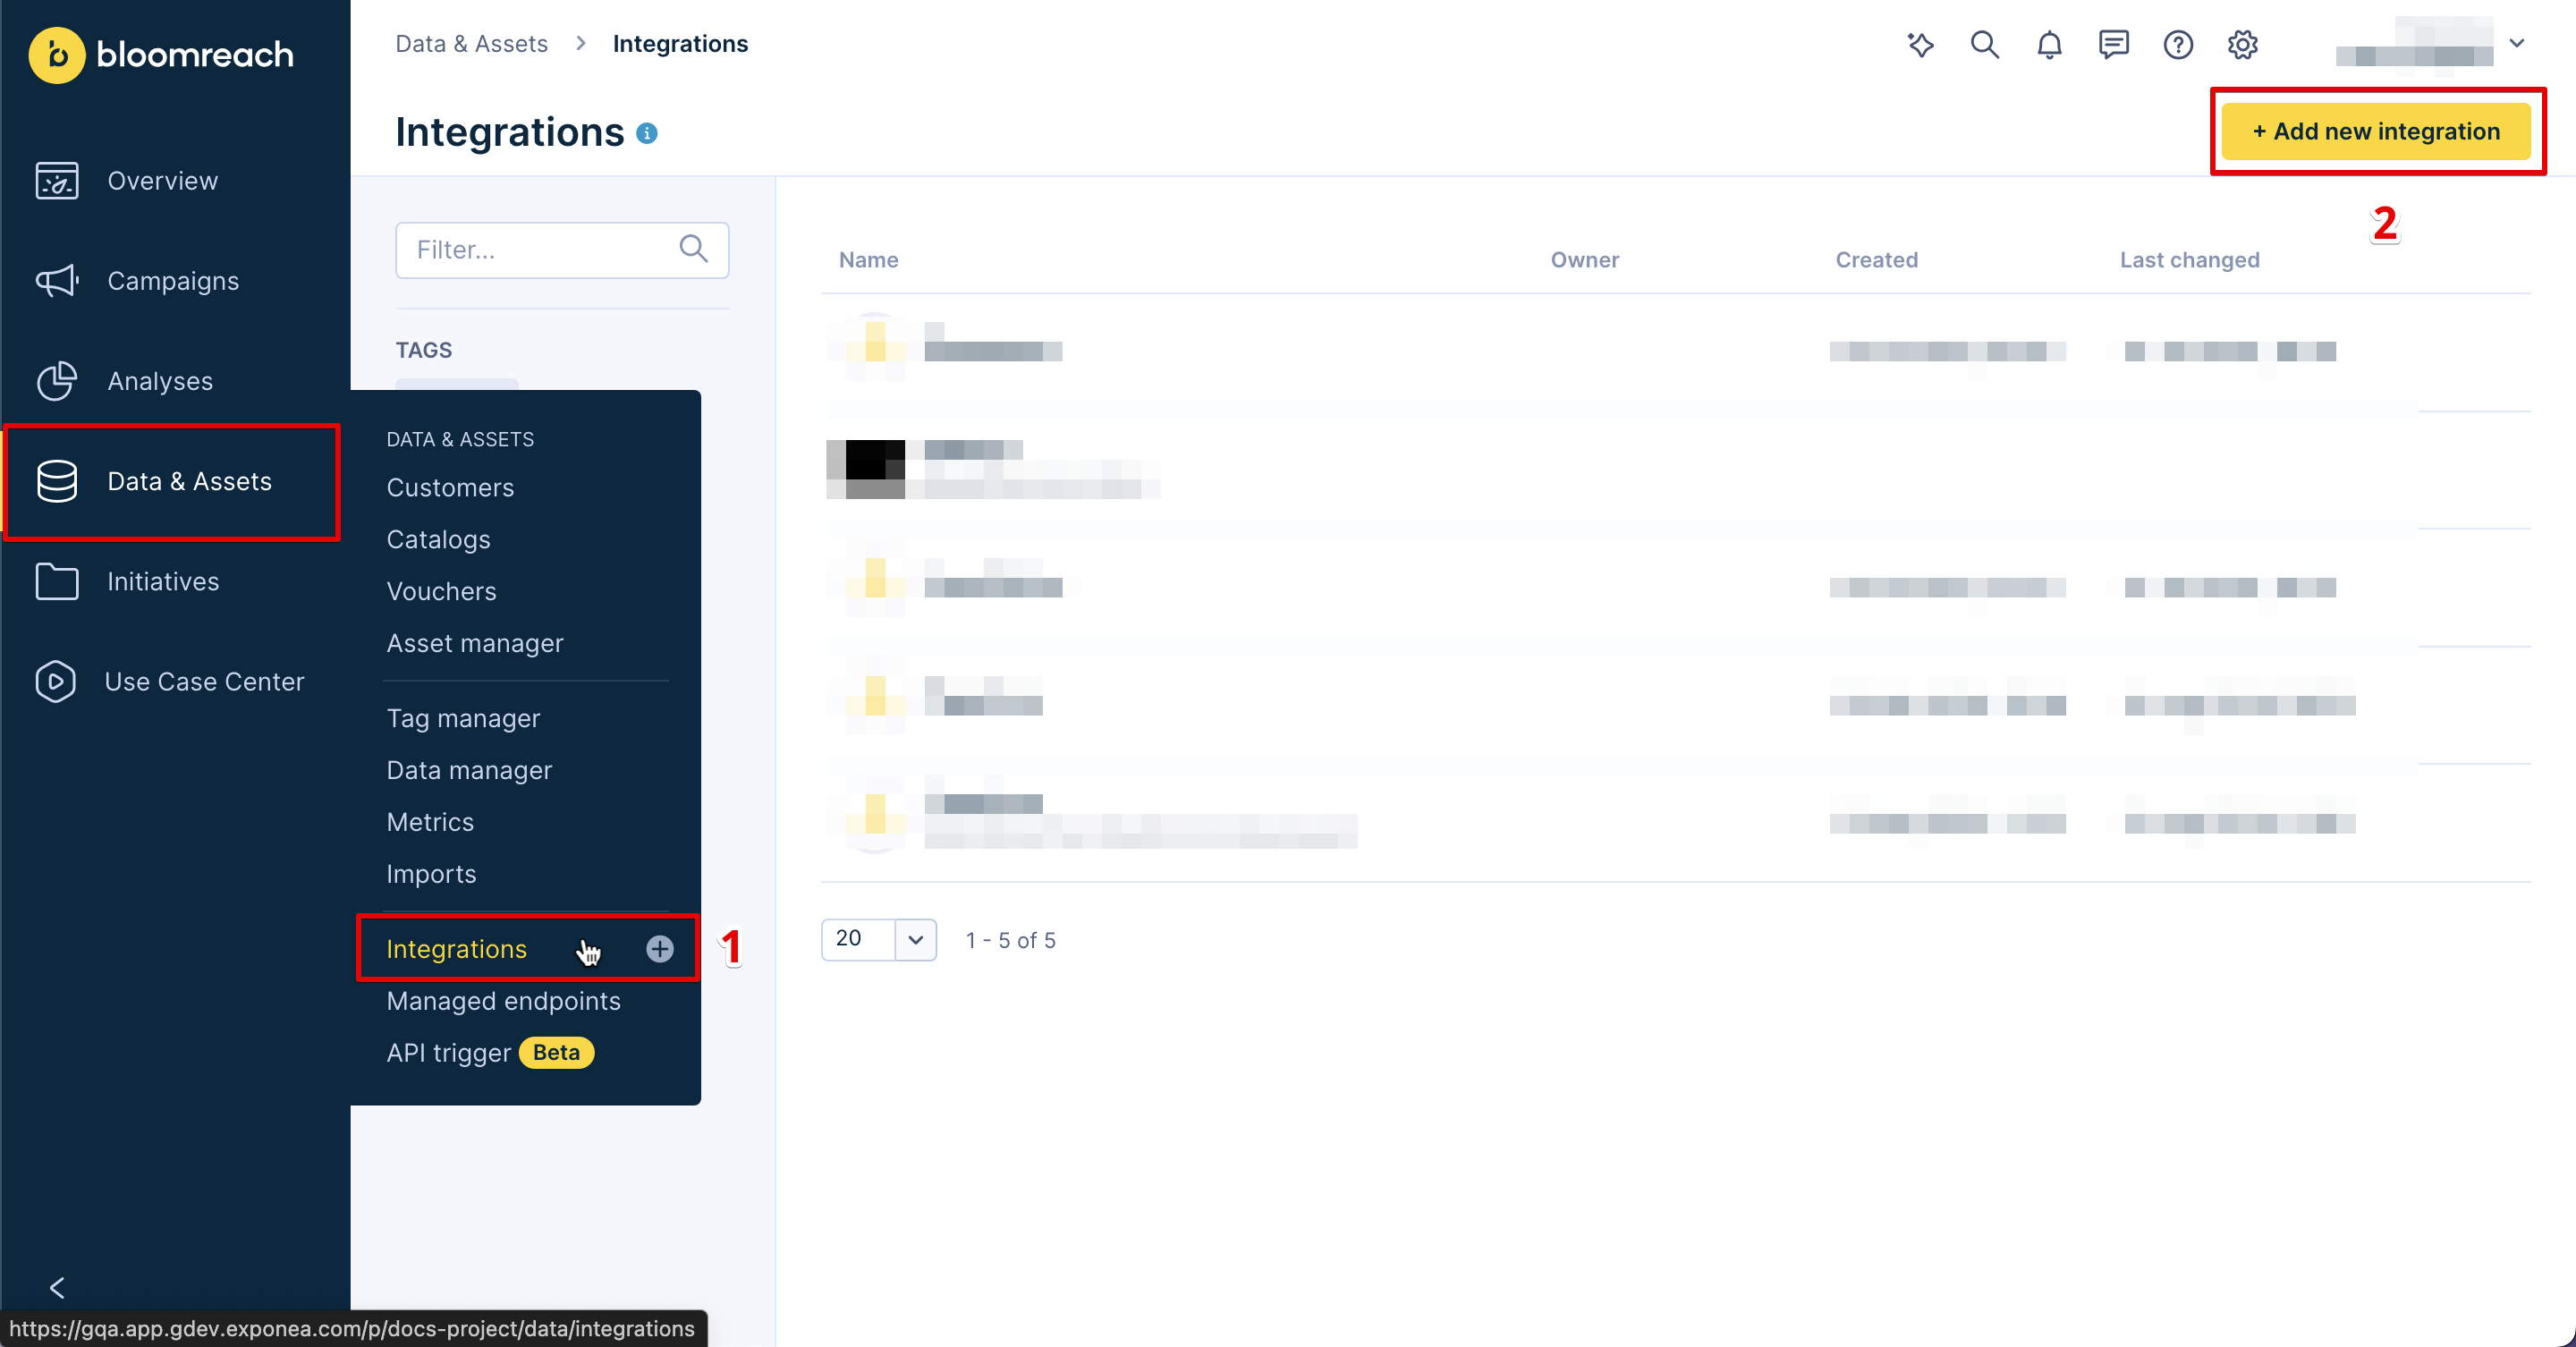
Go to Data & Assets > Integrations.
-
Press + Add new integration.

- Search for HTTP Authentication Schemas and press + Add integration.
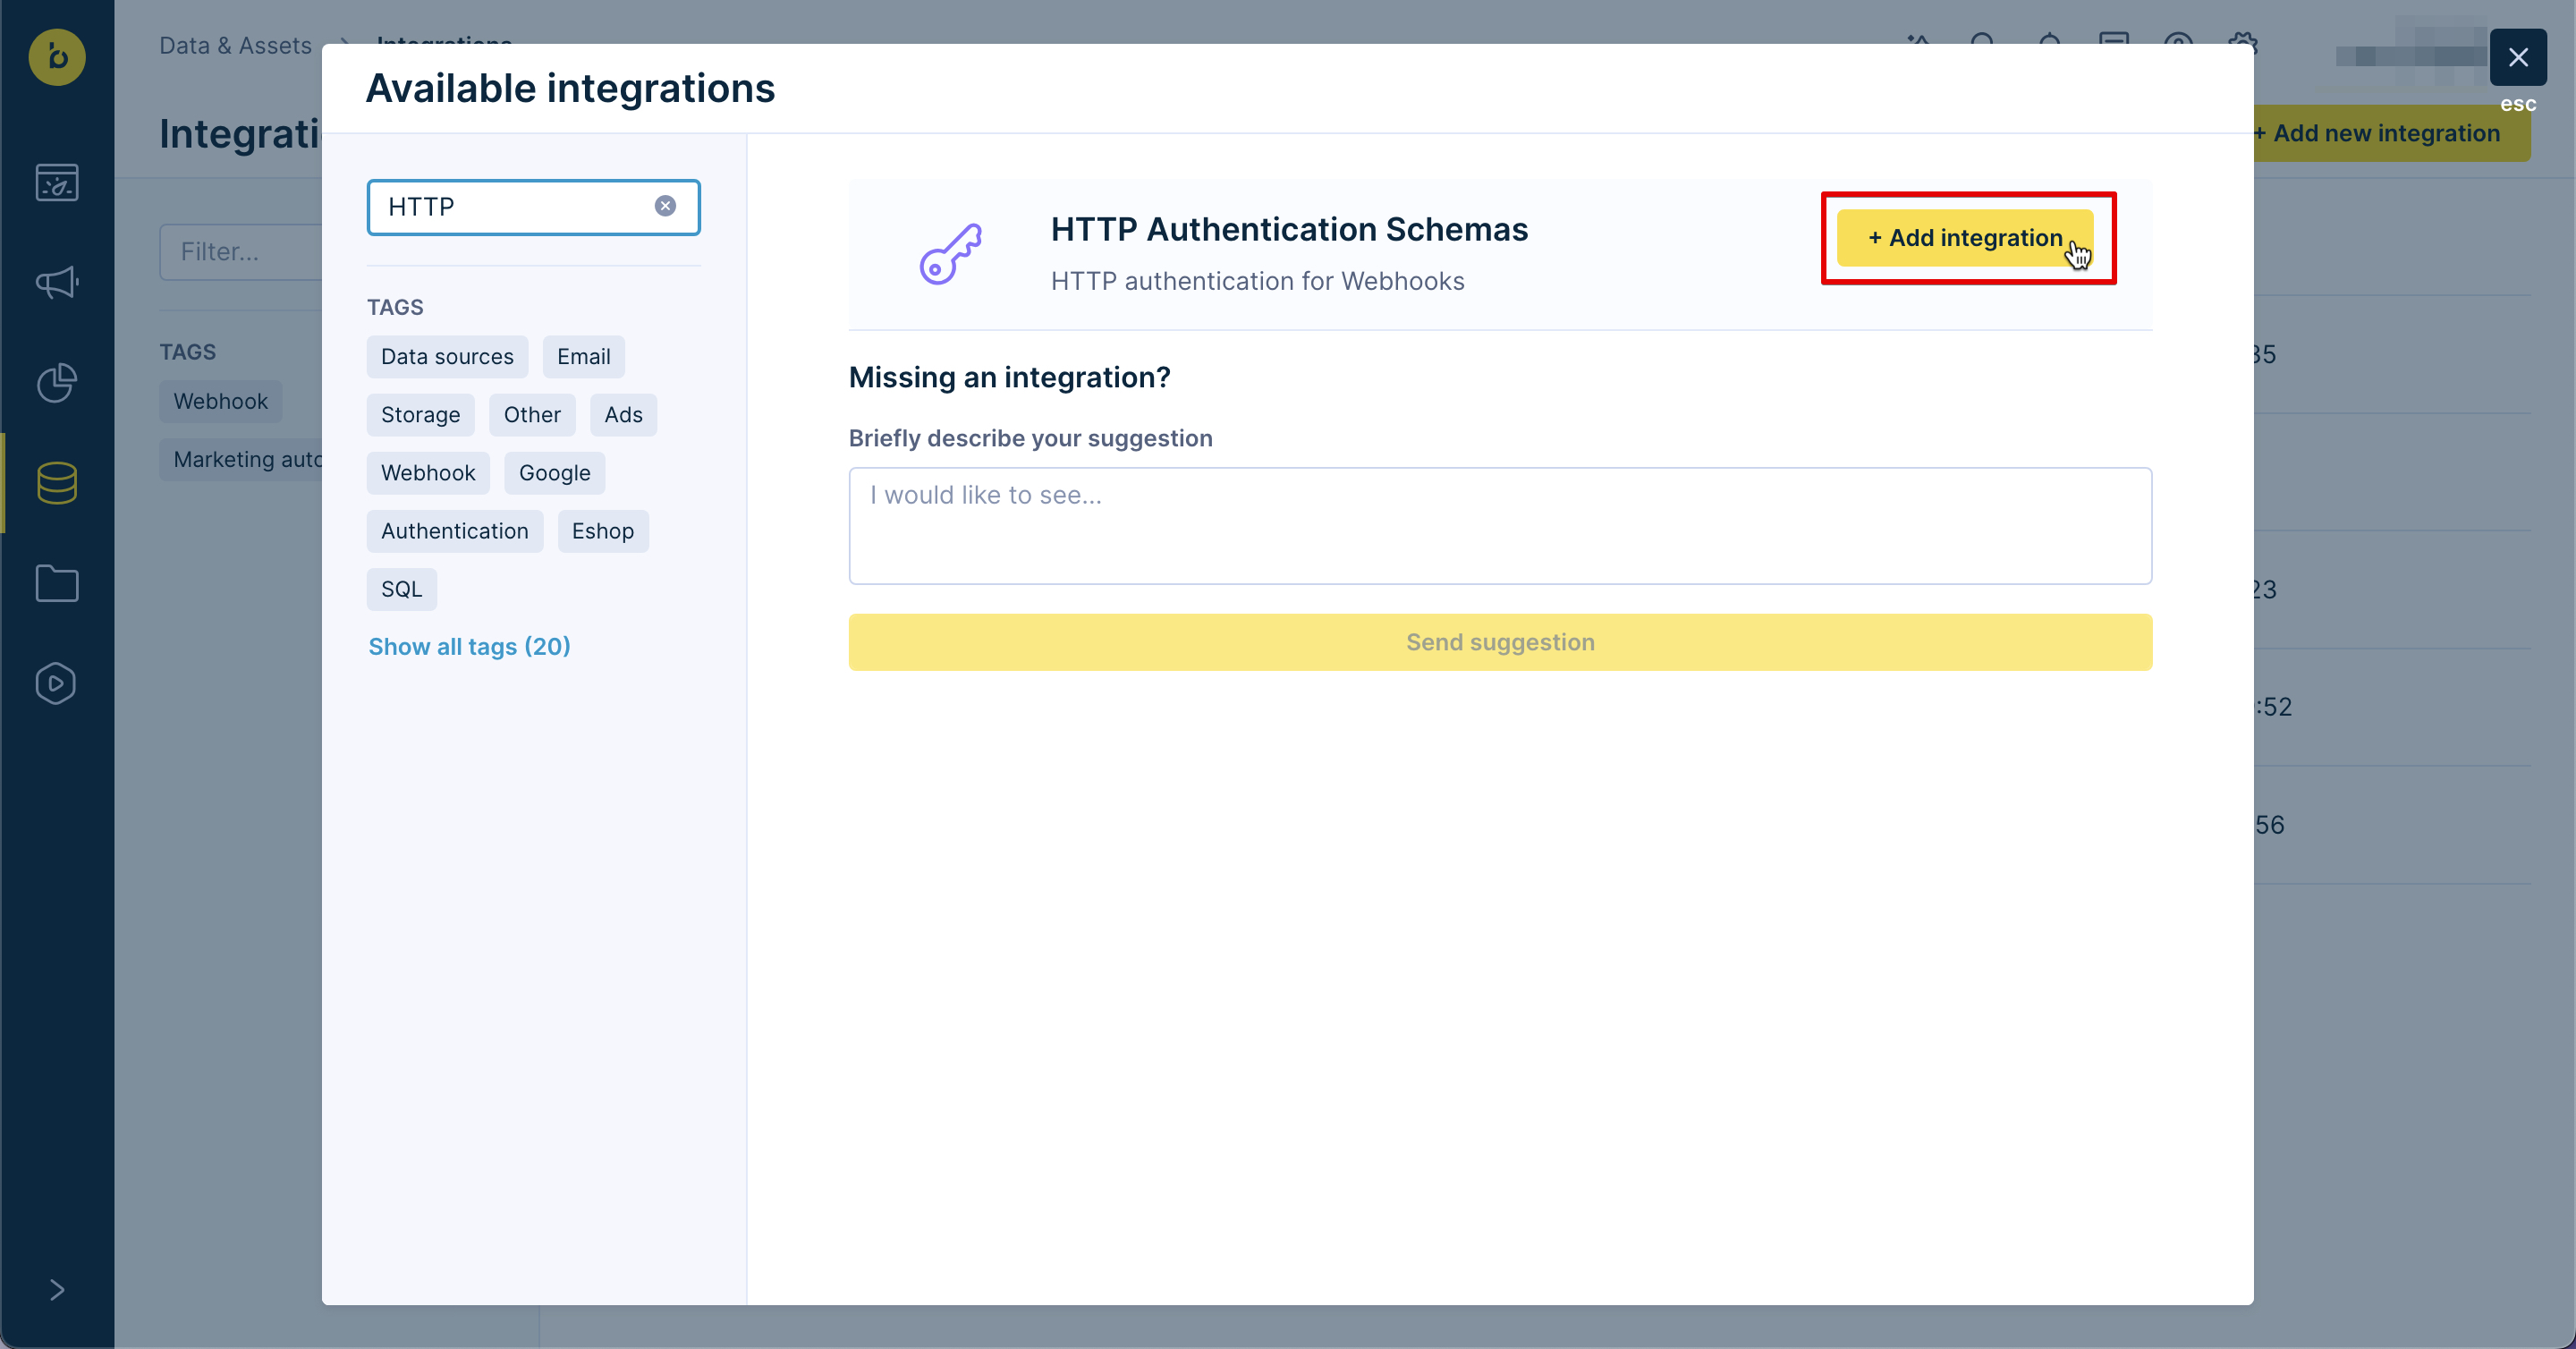
- In Endpoint, enter the Talon.One API base URL:
https://integration.talon.one- Go to Custom headers, and enter the following headers:
| KEY | VALUE | TYPE |
|---|---|---|
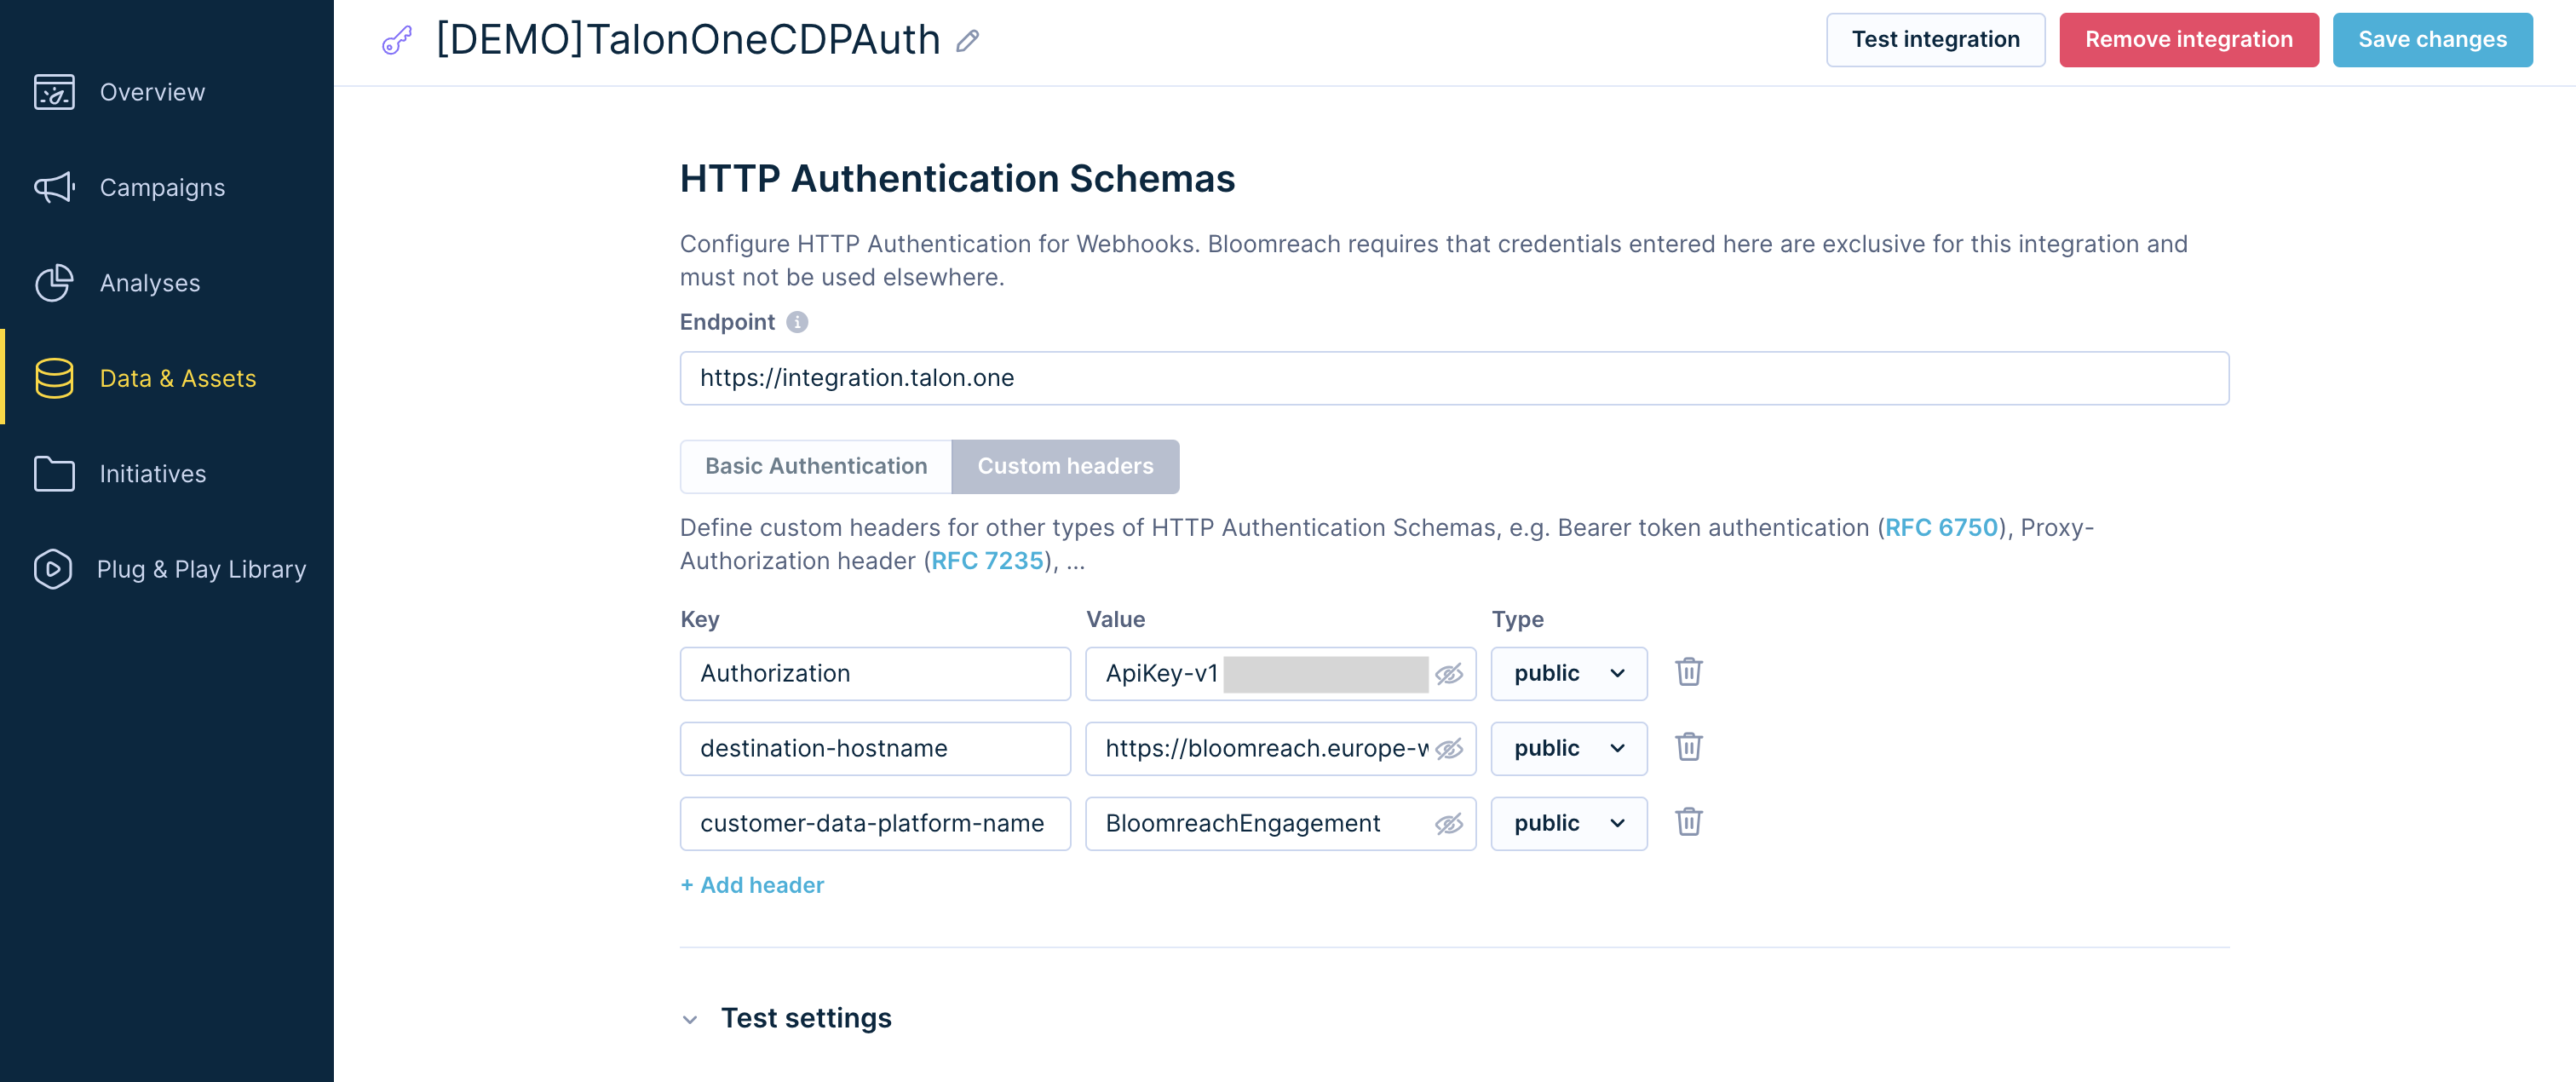
Authorization | ApiKey-v1 <API-key>, where <API-key> represents the CEP API key you generated. | public |
destination-hostname | <base-url>.europe-west1.talon.one, where <base-url> represents the base URL of your Talon.One deployment. | public |
customer-engagement-platform-name | BloomreachEngagement | public |
- Rename the integration appropriately.
- Press Save integration.

HTTP authentication schema for CEP Talon.One
For CDP Integration
In Bloomreach Engagement, let's configure the webhook authentication for Talon.One so that data can be passed securely in the webhook request. You will use this webhook authentication while creating a scenario in a later step.
To configure webhook authentication:
-
In Bloomreach Engagement, go to Data & Assets > Integrations.
-
Press + Add new integration.
- Search for HTTP Authentication Schemas and press + Add integration.

- In Endpoint, enter the Talon.One API base URL:
https://integration.talon.one- Select Custom headers, and enter the following headers:
| KEY | VALUE | TYPE |
|---|---|---|
Authorization | ApiKey-v1 <API-key>, where <API-key> represents the CDP API key you generated. | public |
destination-hostname | <base-url>.europe-west1.talon.one, where <base-url> represents the base URL of your Talon.One deployment. | public |
customer-data-platform-name | BloomreachEngagement | public |
- Rename the integration appropriately.
- Click Save integration.
HTTP authentication schema for CDP Talon.One
NoteYou can also create a webhook preset, which is a reusable webhook template that you can use in your scenarios.
Use cases
Create coupons using Talon.One
To make the most of the integration with Talon.One, you can create coupon codes directly from Bloomreach Engagement using Talon.One's generic CEP endpoints and use them in your customer engagement efforts.
In your scenario, you can use a combination of operators and actions to send coupon codes generated in Talon.One to relevant users based on custom conditions. For example, on a given date, you can email a coupon code to all users who are celebrating their birthday.
Prerequisites
- Talon.One
- You understand the parameters required by the Create coupon endpoint, for example, a valid campaign ID.
- Bloomreach Engagement
- You know your audience and scenario execution requirements, for example, your preferred email provider.
- You created the relevant events and properties in the Data Manager.
Create a scenario
Create a scenario to automate the communication with your users based on custom conditions.
Specifically, you will use an action to send a webhook request to Talon.One for a new coupon code. For that you will use webhook presets that are created specifically for our integration with TalonOne. You will use another action to forward the received value from the first webhook's response in an email to your users.
NoteYour scenario path may vary from the following steps depending on the actions you decide to implement and the dynamic data you choose to include in your user communication. See Personalization Using Jinja.
-
Create a Scenario.
-
Create and configure the triggers and operators that best suit your campaign needs.
-
Create an action with the webhook request to Talon.One.
-
In Sceario select Other > Talon.One - Get Coupon.
-
In the Settings tab of the action:
- Enable Authentication and select the CEP webhook authentication you created.
- In Other, select the required consent category for your users.
-
In the Parameters tab of the action fill in the parameters. In this example, the Application ID is
198, the campaign ID is373and the External Campaign ID is10. The three parameters are required, but as you can see, you can customize the webhook further. For more information you can read tooltips by hovering with a cursor over the i symbol, or refer to the Talon.One documentation.
-
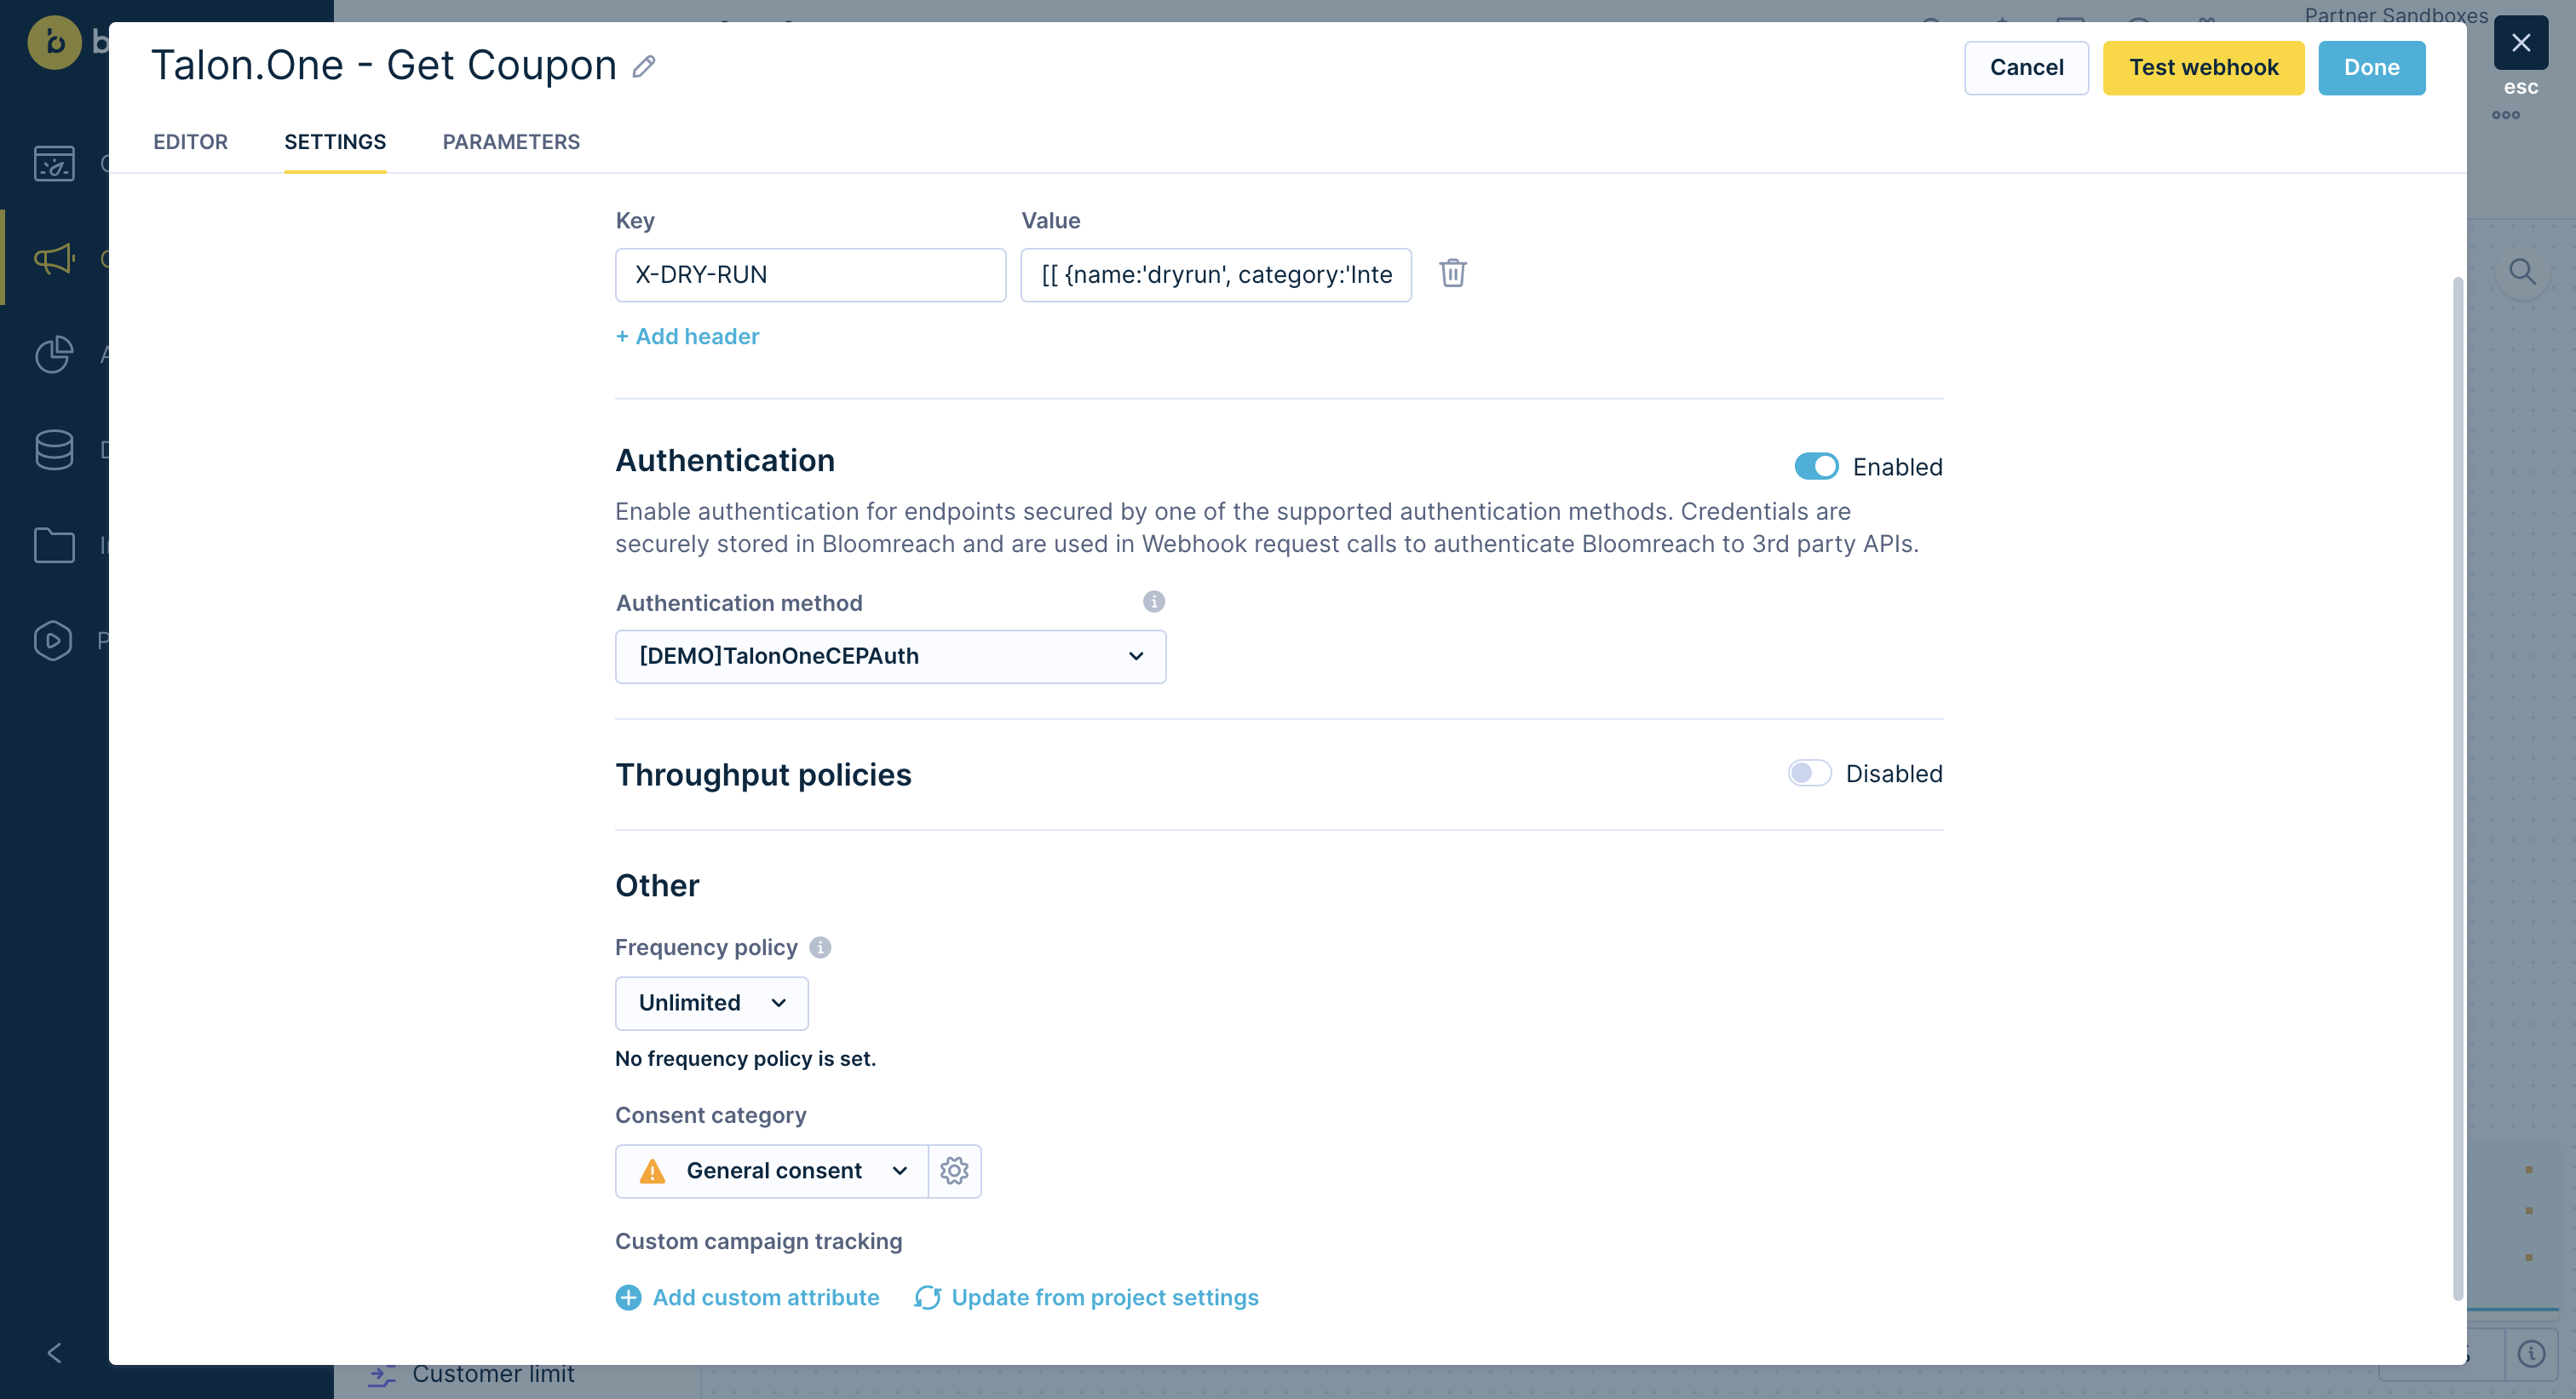
Coupon webhook preset action settings
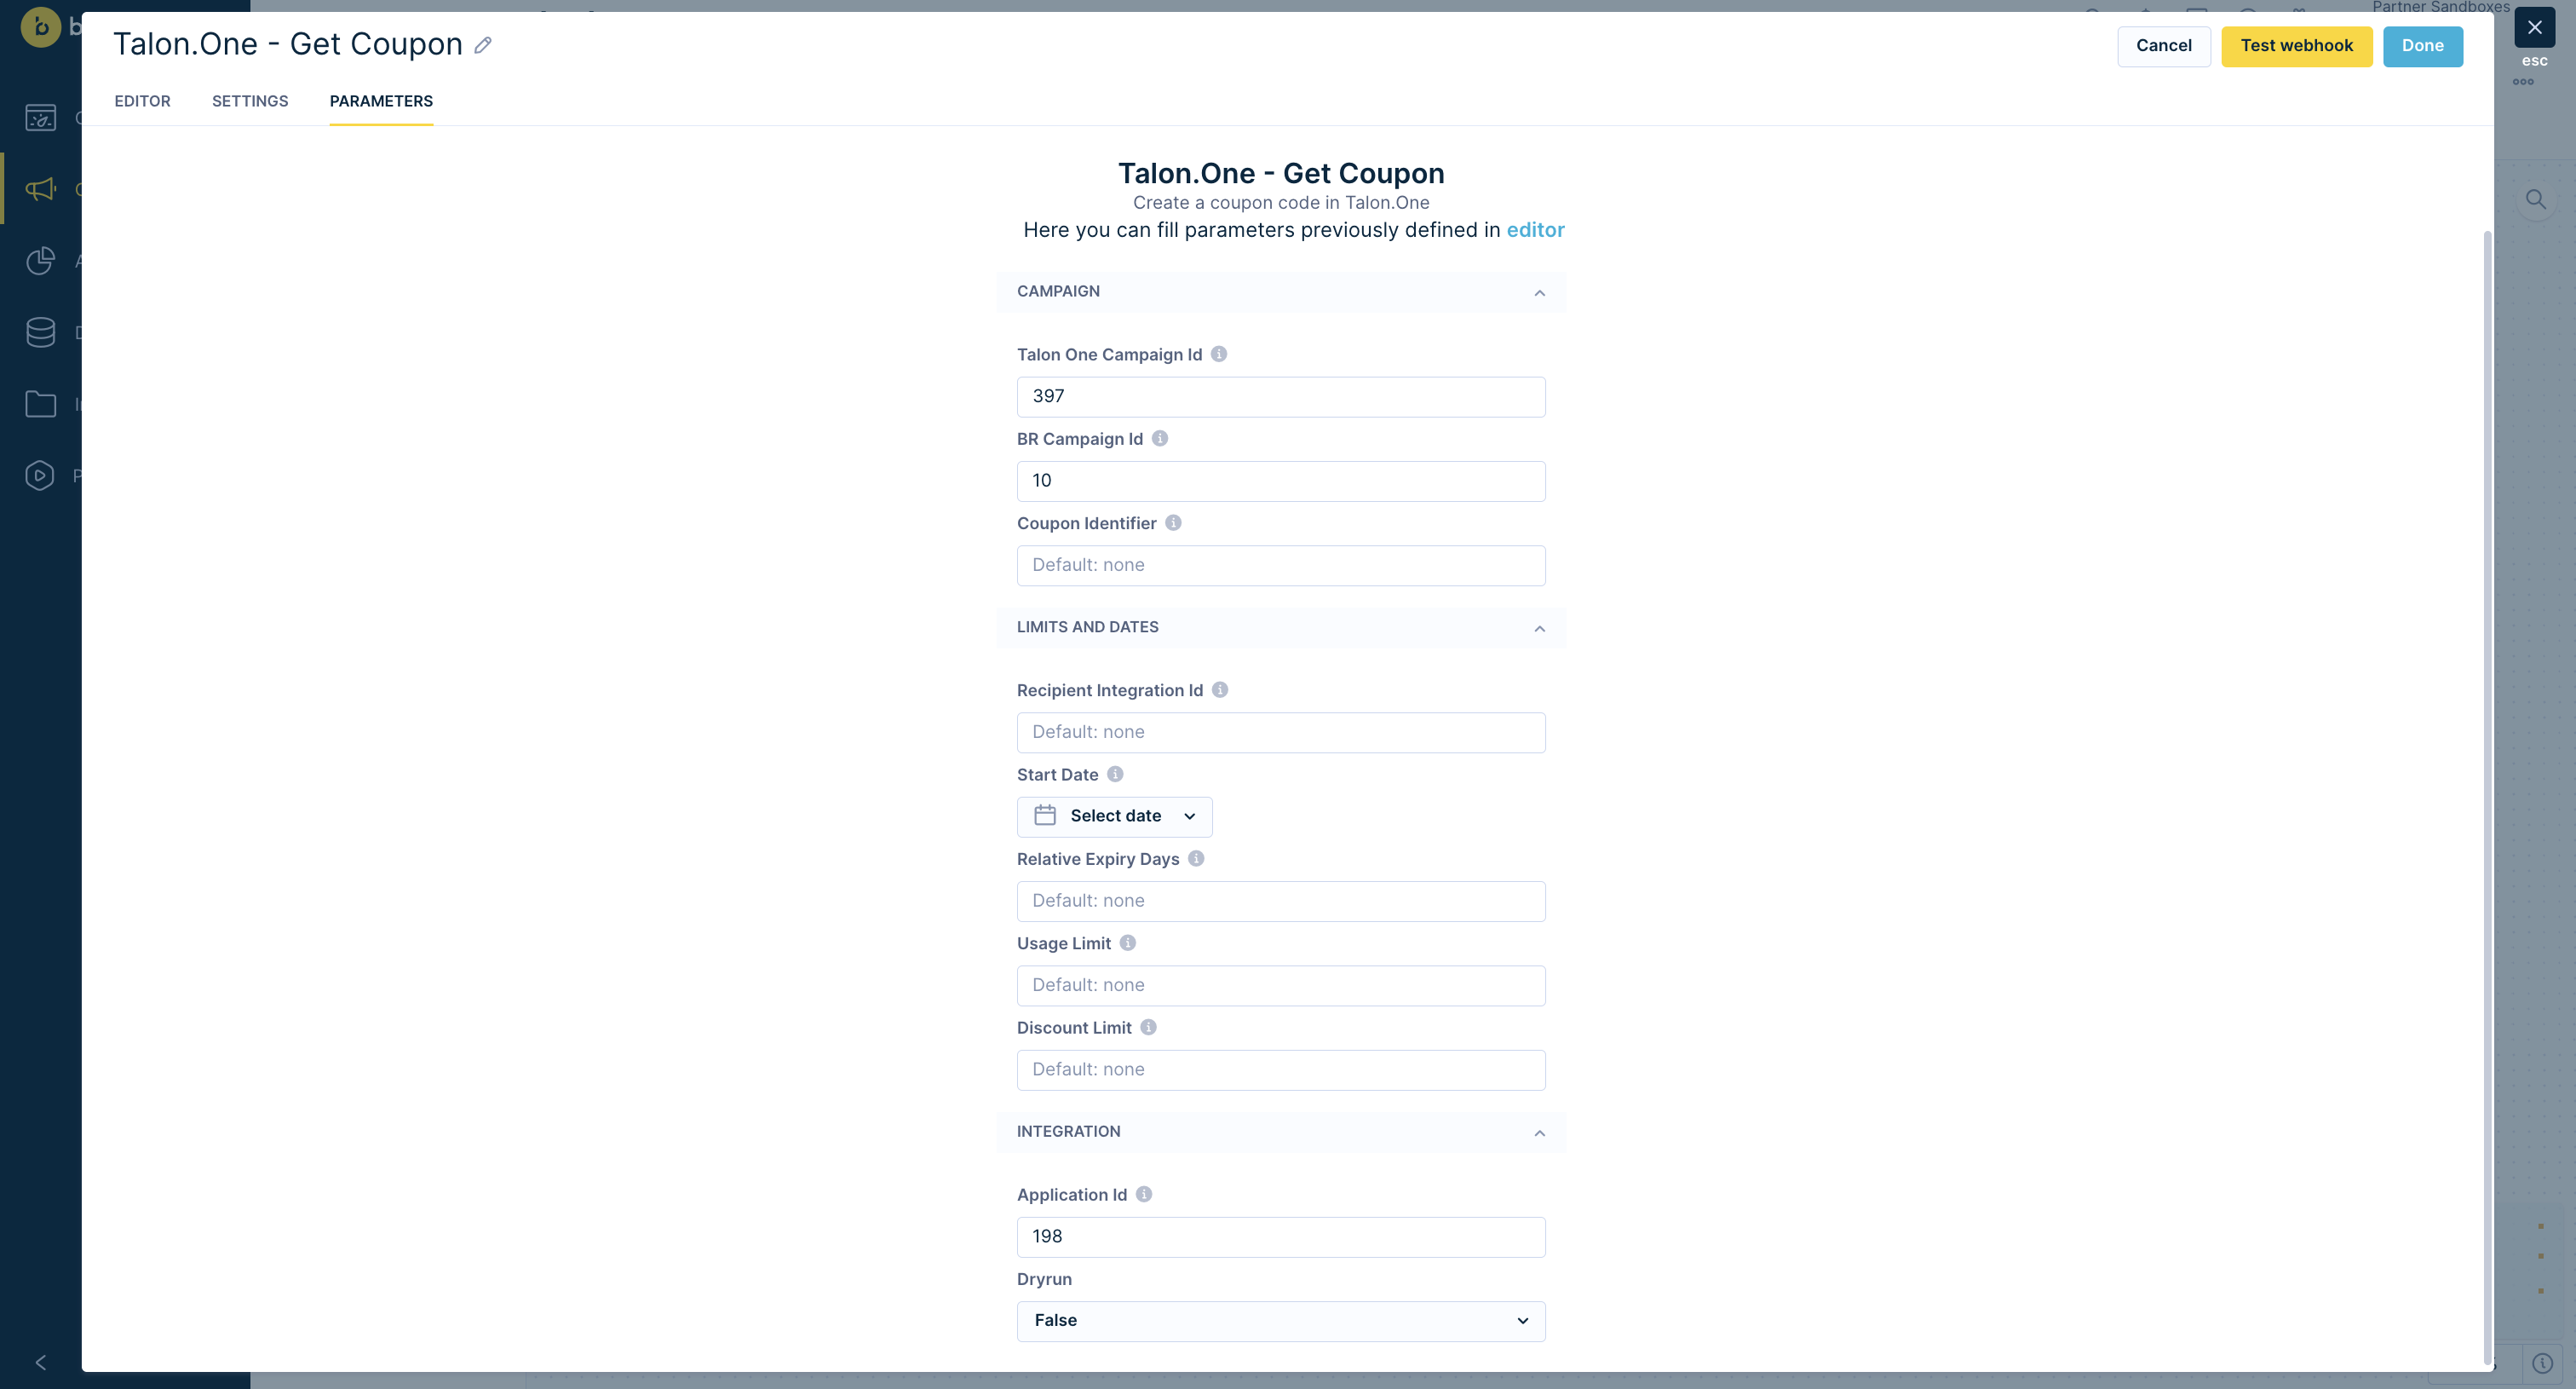
Coupon webhook preset action parameters
-
Create another action to send the generated coupon code in a message to your users. For example, create an Email or SMS action.
-
In the Editor tab of the action, compose your message with the desired personalization.
-
In the message composition field, type the following placeholder value so the generated coupon code is populated dynamically when the scenario runs:
{{ webhook.Value }}WarningProperty names are case-sensitive. Type
webhook.Valuewith an uppercaseV, according to the response of the Create coupon endpoint. -
In the Settings tab of the action, review your recipients and the tracking consent category.
-
Press Done.
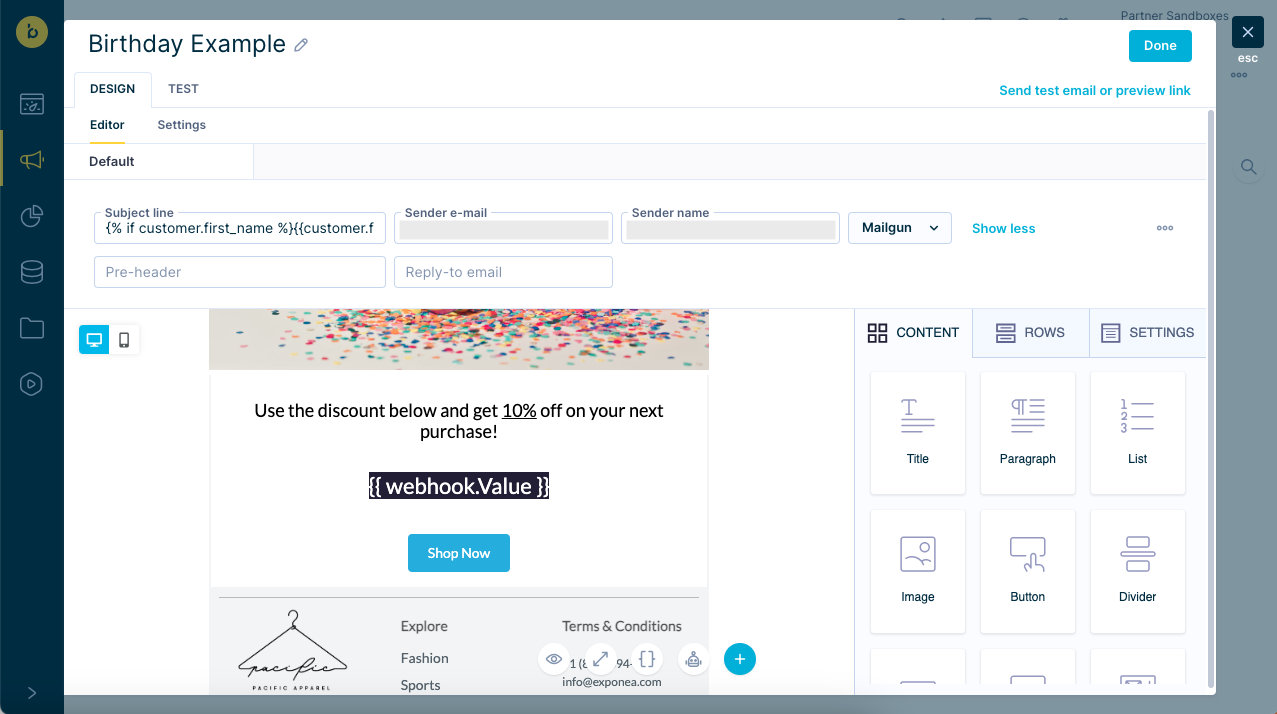
Email message composition with webhook value placeholder
- Press Save.
Get loyalty ledger using Talon.One
To make the most of the integration with Talon.One, you can get loyalty ledger directly from Bloomreach Engagement using Talon.One's generic CEP endpoints and use them in your customer engagement efforts.
In your scenario, you can use a combination of operators and actions to get the loyalty ledger of a customer in Talon.One from relevant users based on custom conditions. For example, on regular bases, you can send a newsletter to all users and include customization to tell them how many points they need to collect to get to the next tier.
Prerequisites
- Talon.One
- You understand the parameters required by the Get loyalty ledger endpoint, for example, a valid Profile Integration ID.
- Bloomreach Engagement
- You know your audience and scenario execution requirements, for example, your preferred email provider.
- You created the relevant events and properties in the Data Manager. In this case you have to have talonone_id in customer_ids
Create a scenario
Create a scenario to automate the communication with your users based on custom conditions.
Specifically, you will use an action to send a webhook request to Talon.One to get a loyalty ledger. For that you will use webhook presets that are created specifically for our integration with TalonOne. You will use another action to forward the received value from the first webhook's response in an email to your users.
NoteYour scenario path may vary from the following steps depending on the actions you decide to implement and the dynamic data you choose to include in your user communication. See Personalization Using Jinja.
-
Create a Scenario.
-
Create and configure the triggers and operators that best suit your campaign needs.
-
Create an action with the webhook request to Talon.One.
-
In Sceario select Other > Talon.One - Get Loyalty Ledger.
-
In the Settings tab of the action:
- Enable Authentication and select the CEP webhook authentication you created.
- In Other, select the required consent category for your users.
-
In the Parameters tab of the action fill in the parameters. In this example, the Profile Integration ID is
{{ customer_ids.talonone_id | urlencode }}, the Loyalty Program ID is456. The two parameters are required. For more information you can read tooltips by hovering with a cursor over the i symbol or refer to the Talon.One documentation.
-
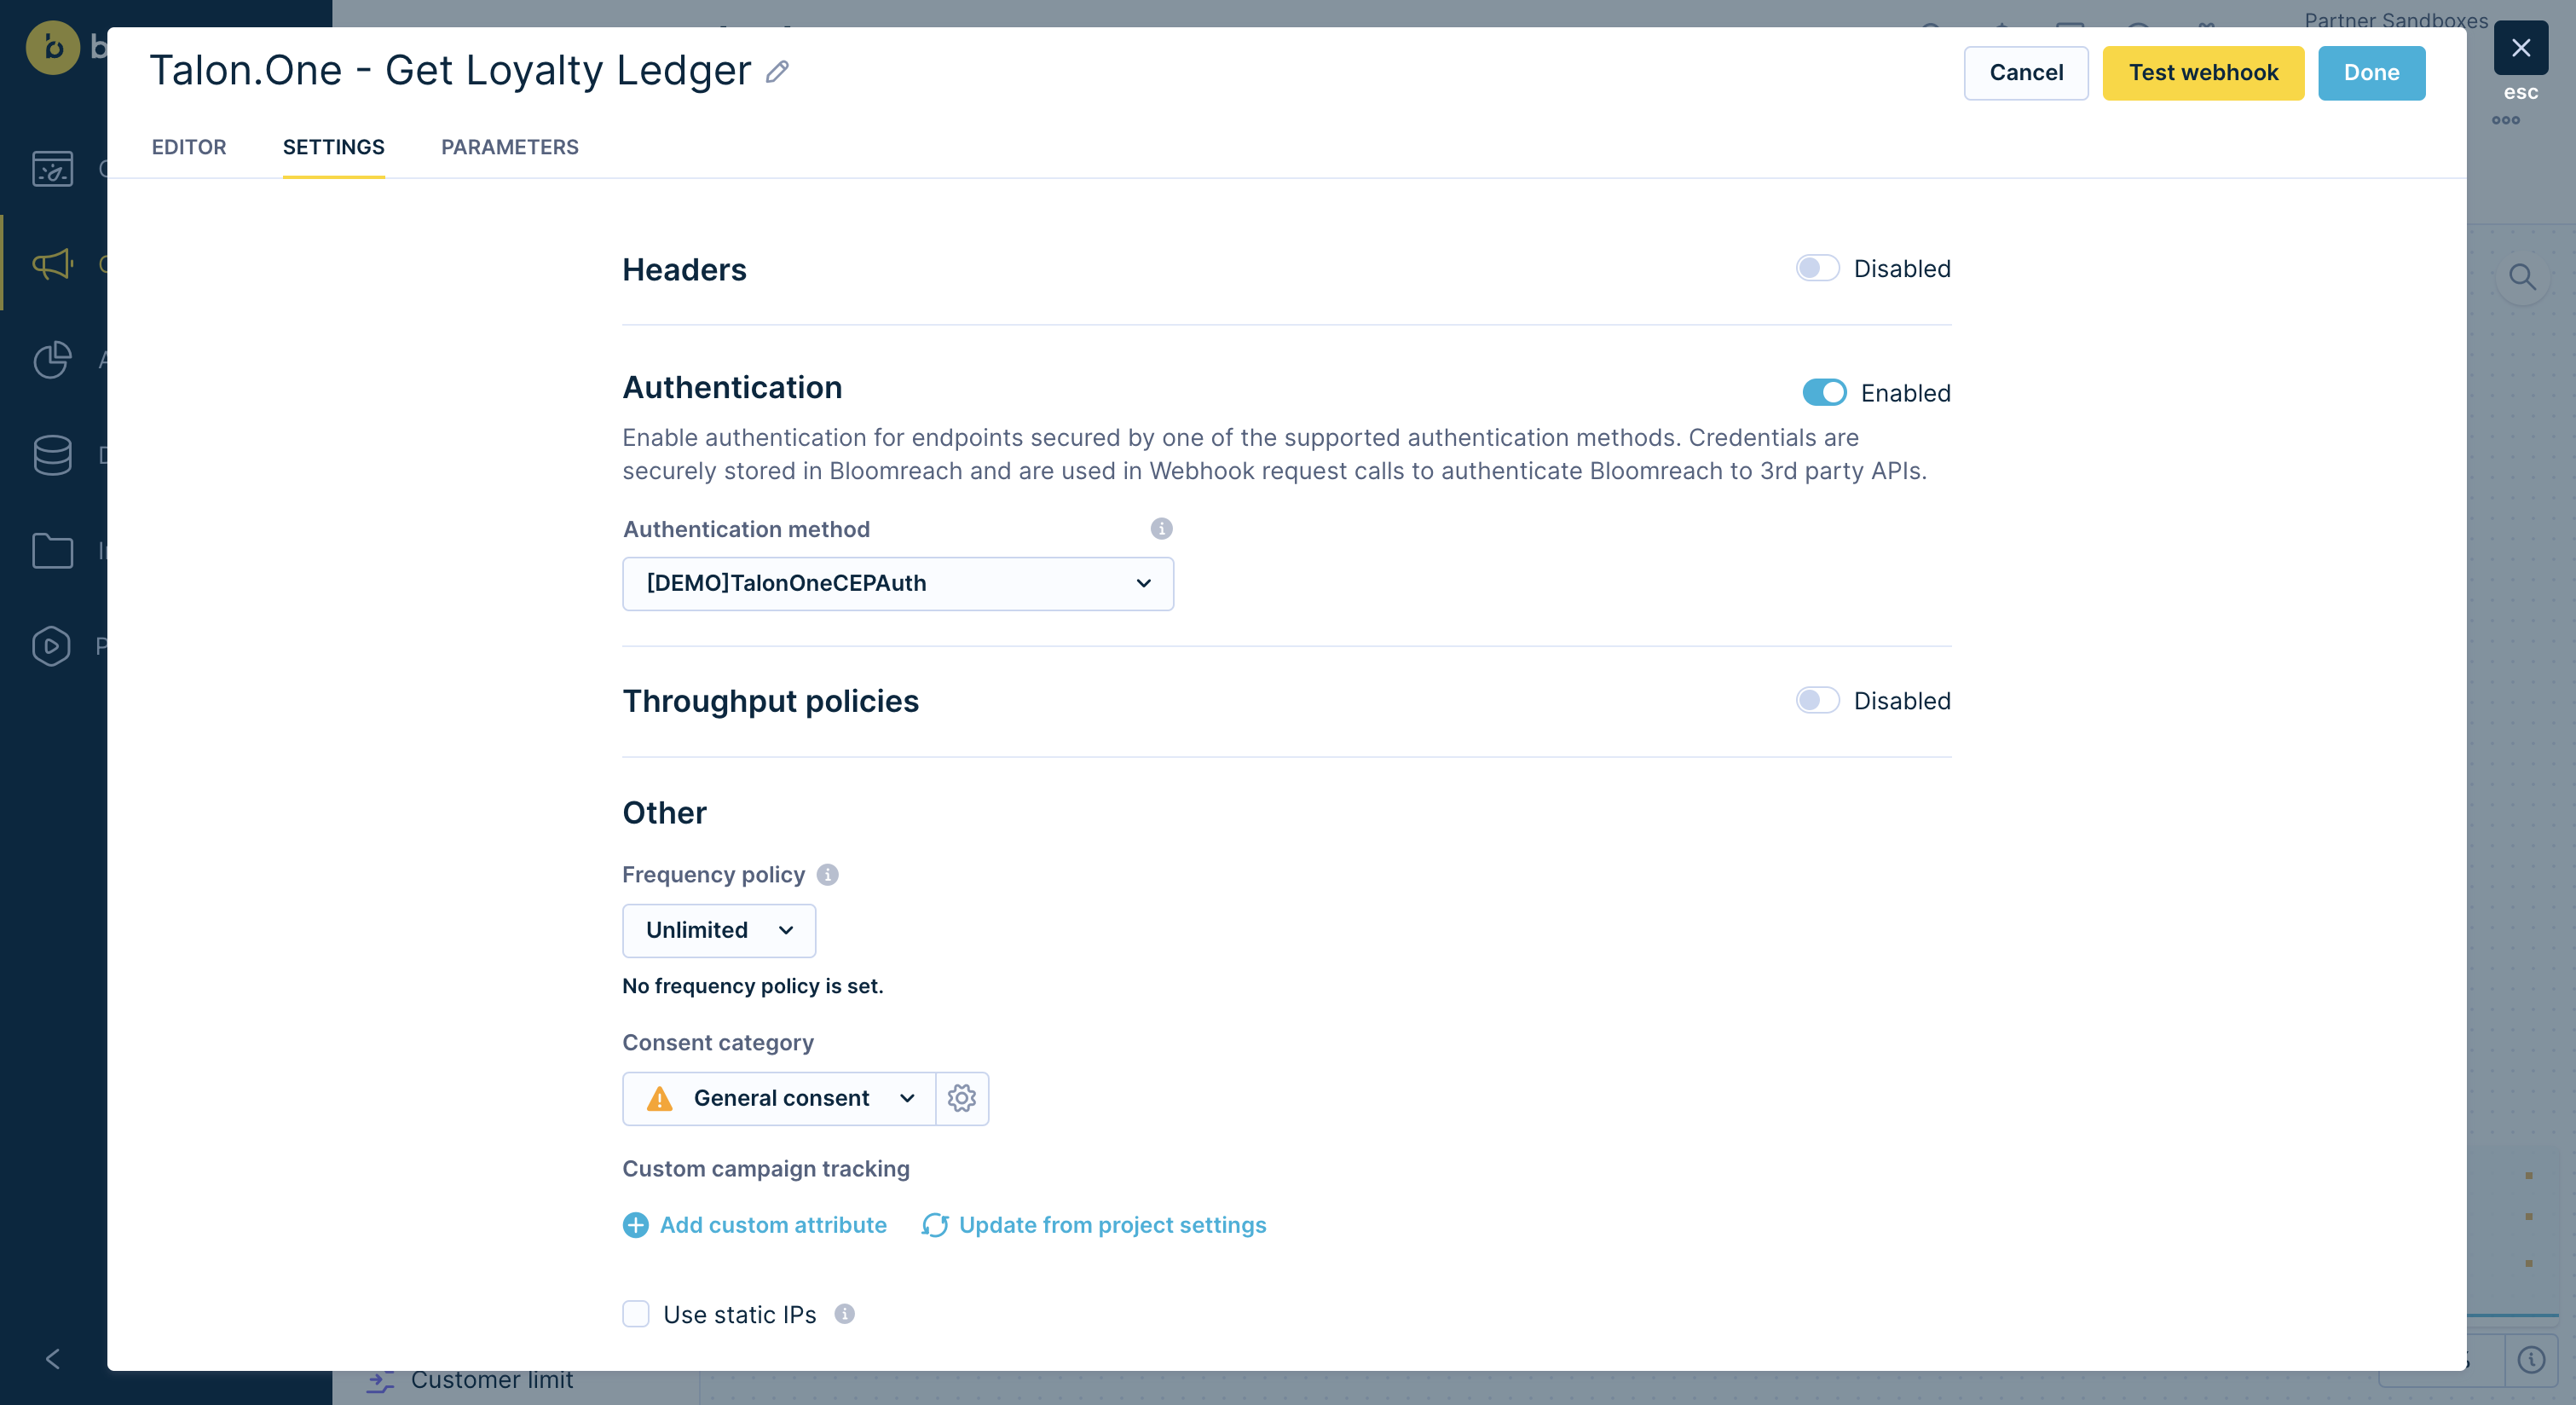
Coupon webhook preset action settings

Coupon webhook action parameters
-
Create another action to send the generated coupon code in a message to your users. For example, create an Email or SMS action.
-
In the Editor tab of the action, compose your message with the desired personalization.
-
In the message composition field, type the following placeholder value so the generated coupon code is populated dynamically when the scenario runs:
{{ webhook.ledger.pointsToNextTier }} -
In the Settings tab of the action, review your recipients and the tracking consent category.
-
Press Done.
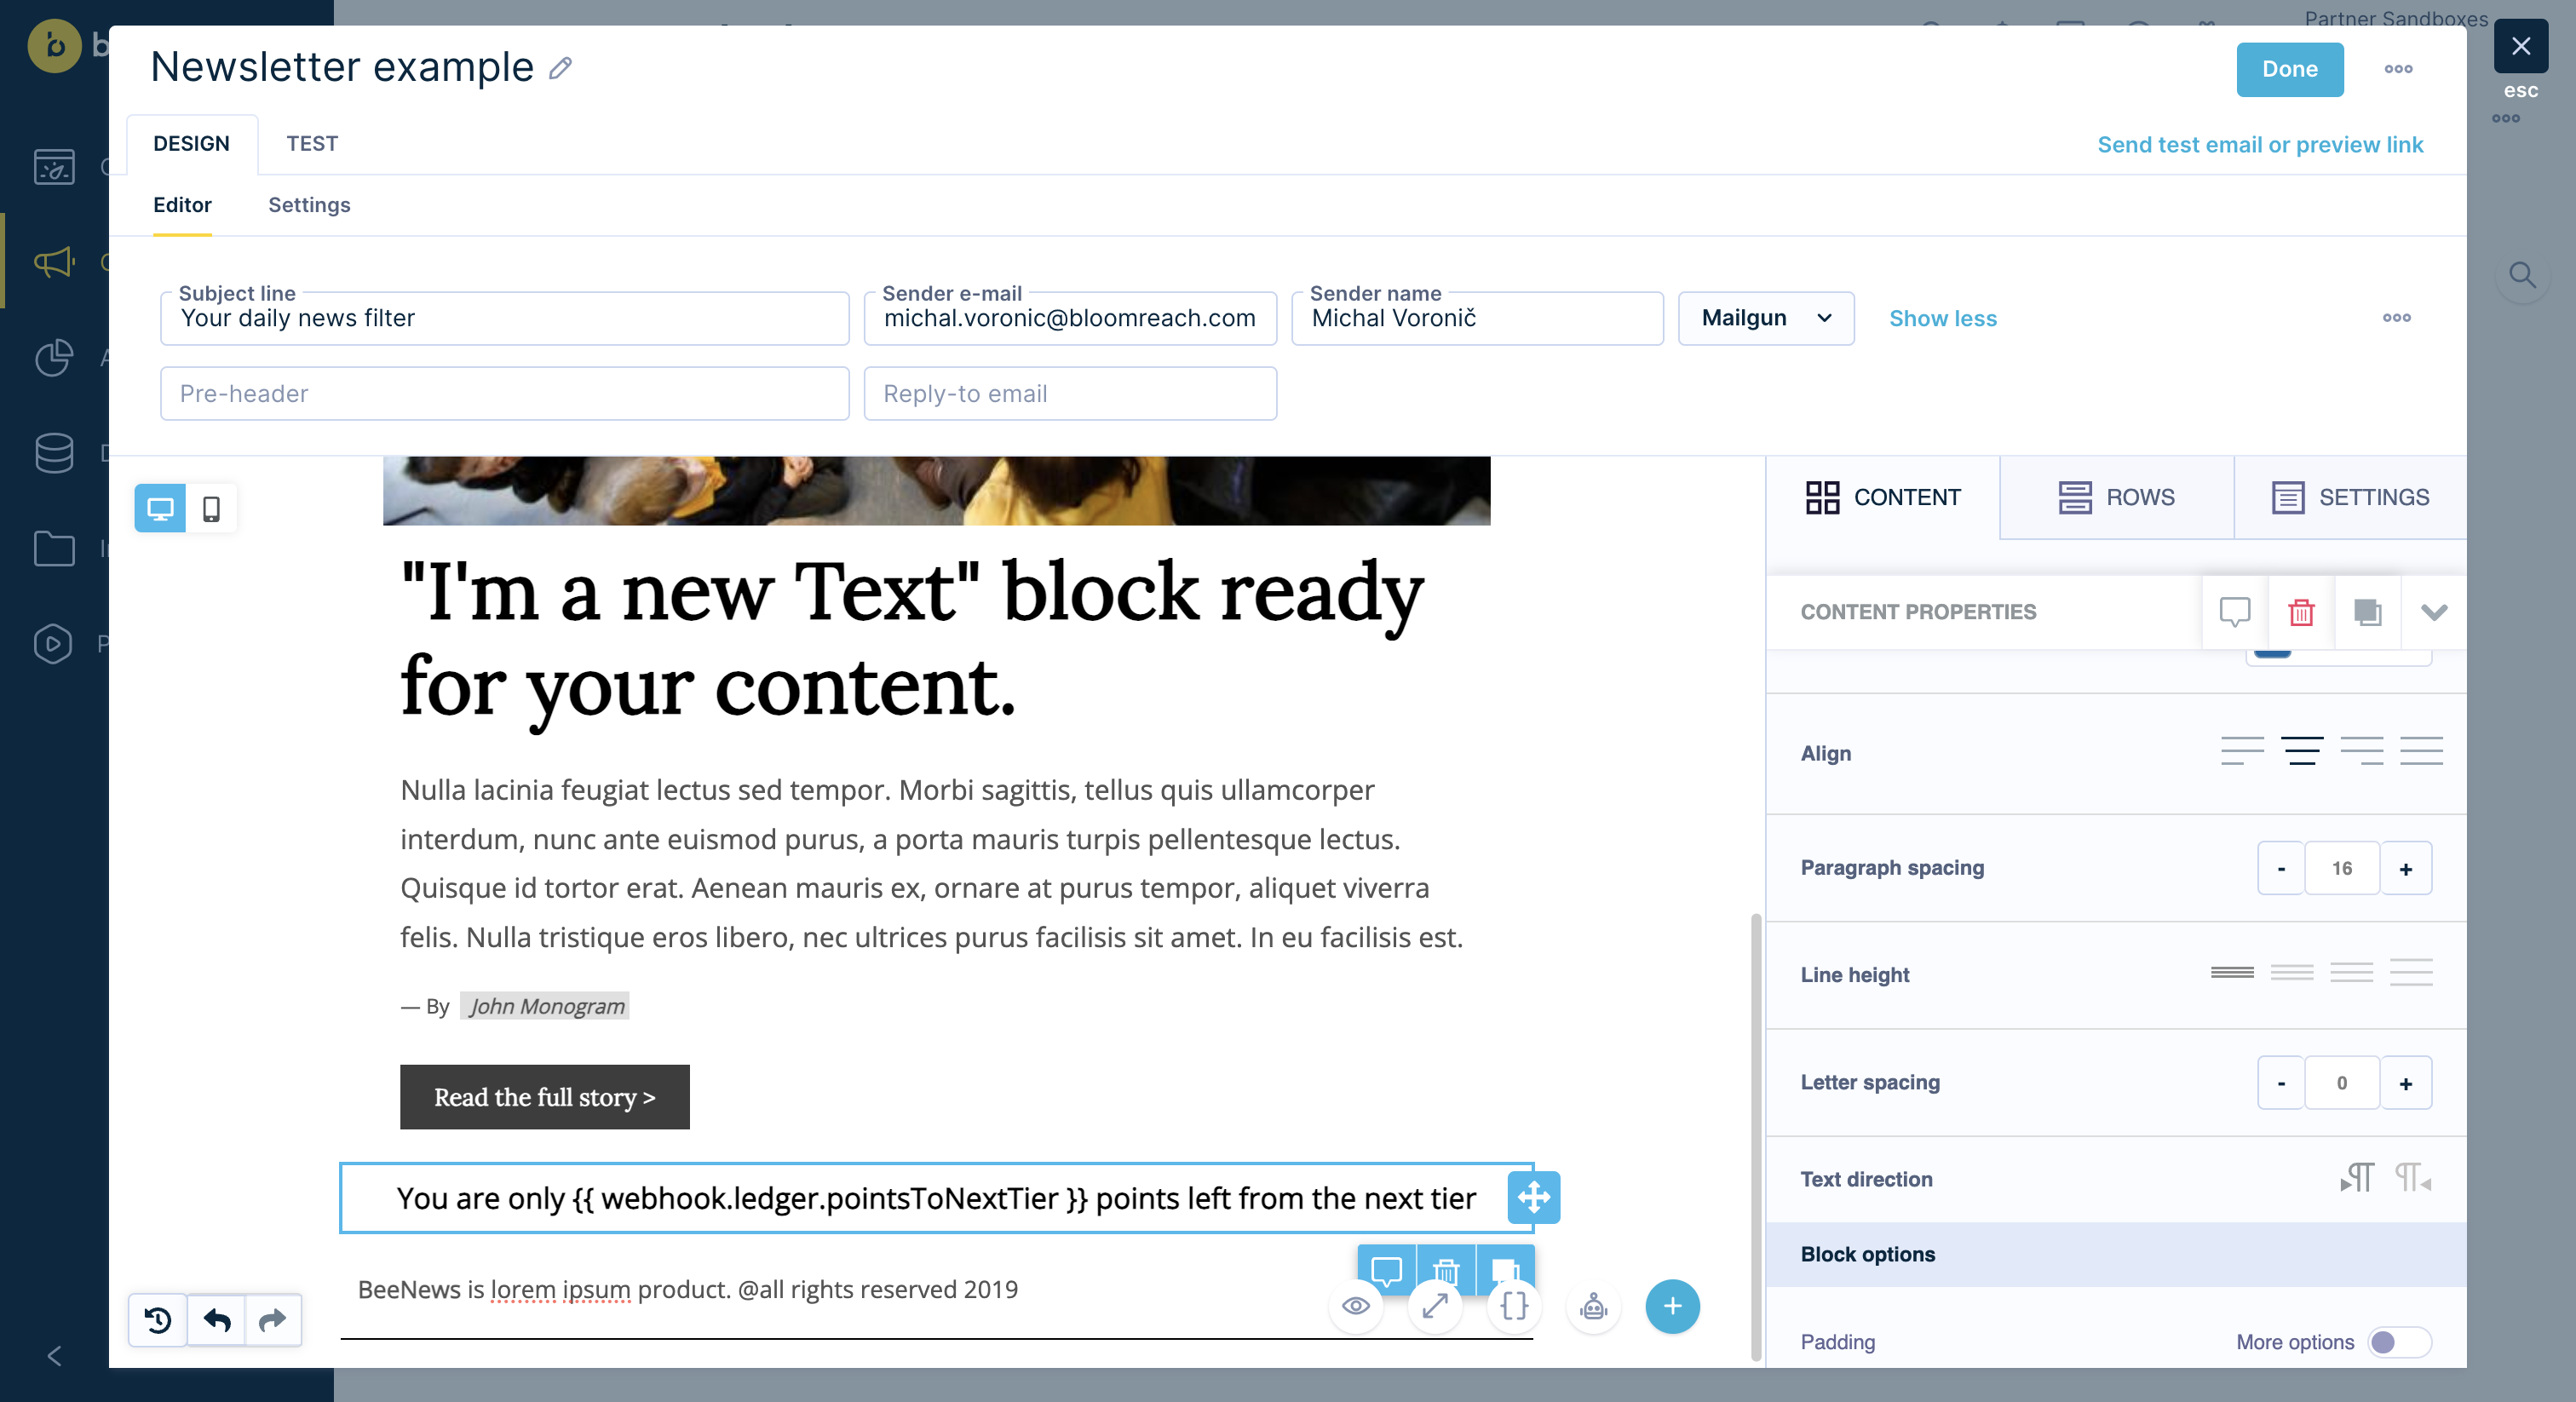
Email message composition with webhook value placeholder
- Press Save.
Update customer profile using Talon.One
To make the most of the integration with Talon.One, you can update customer profile directly from Bloomreach Engagement using Talon.One's generic CDP endpoints and use them in your customer engagement efforts.
In your scenario, you can use a combination of operators and actions to update profiles of relevant customers in Talon.One. For example, let's update a customer's gender.
Prerequisites
- Talon.One
- You understand the parameters required by the Update customer profile endpoint, for example, a valid Profile Integration ID.
- Bloomreach Engagement
- You created the relevant events and properties in the Data Manager.
Create a scenario
Create a scenario to automate the communication with your users based on custom conditions.
NoteYour scenario path may vary from the following steps depending on the actions you decide to implement and the dynamic data you choose to include in your user communication. See Personalization Using Jinja.
-
Create a Scenario.
-
Create and configure the triggers and operators that best suit your campaign needs.
-
Create an action with the webhook request to Talon.One.
-
In Sceario select Other > Talon.One - Update Customer Profile.
-
In the Settings tab of the action:
- Enable Authentication and select the CDP webhook authentication you created.
- In Other, select the required consent category for your users.
-
In the Parameters tab of the action fill in the parameters. In this example, the Customer Profile Id is
{{ customer_ids.email_id | urlencode }}. The parameter is required. For more information you can read tooltips by hovering with a cursor over the i symbol or refer to the Talon.One documentation.
-
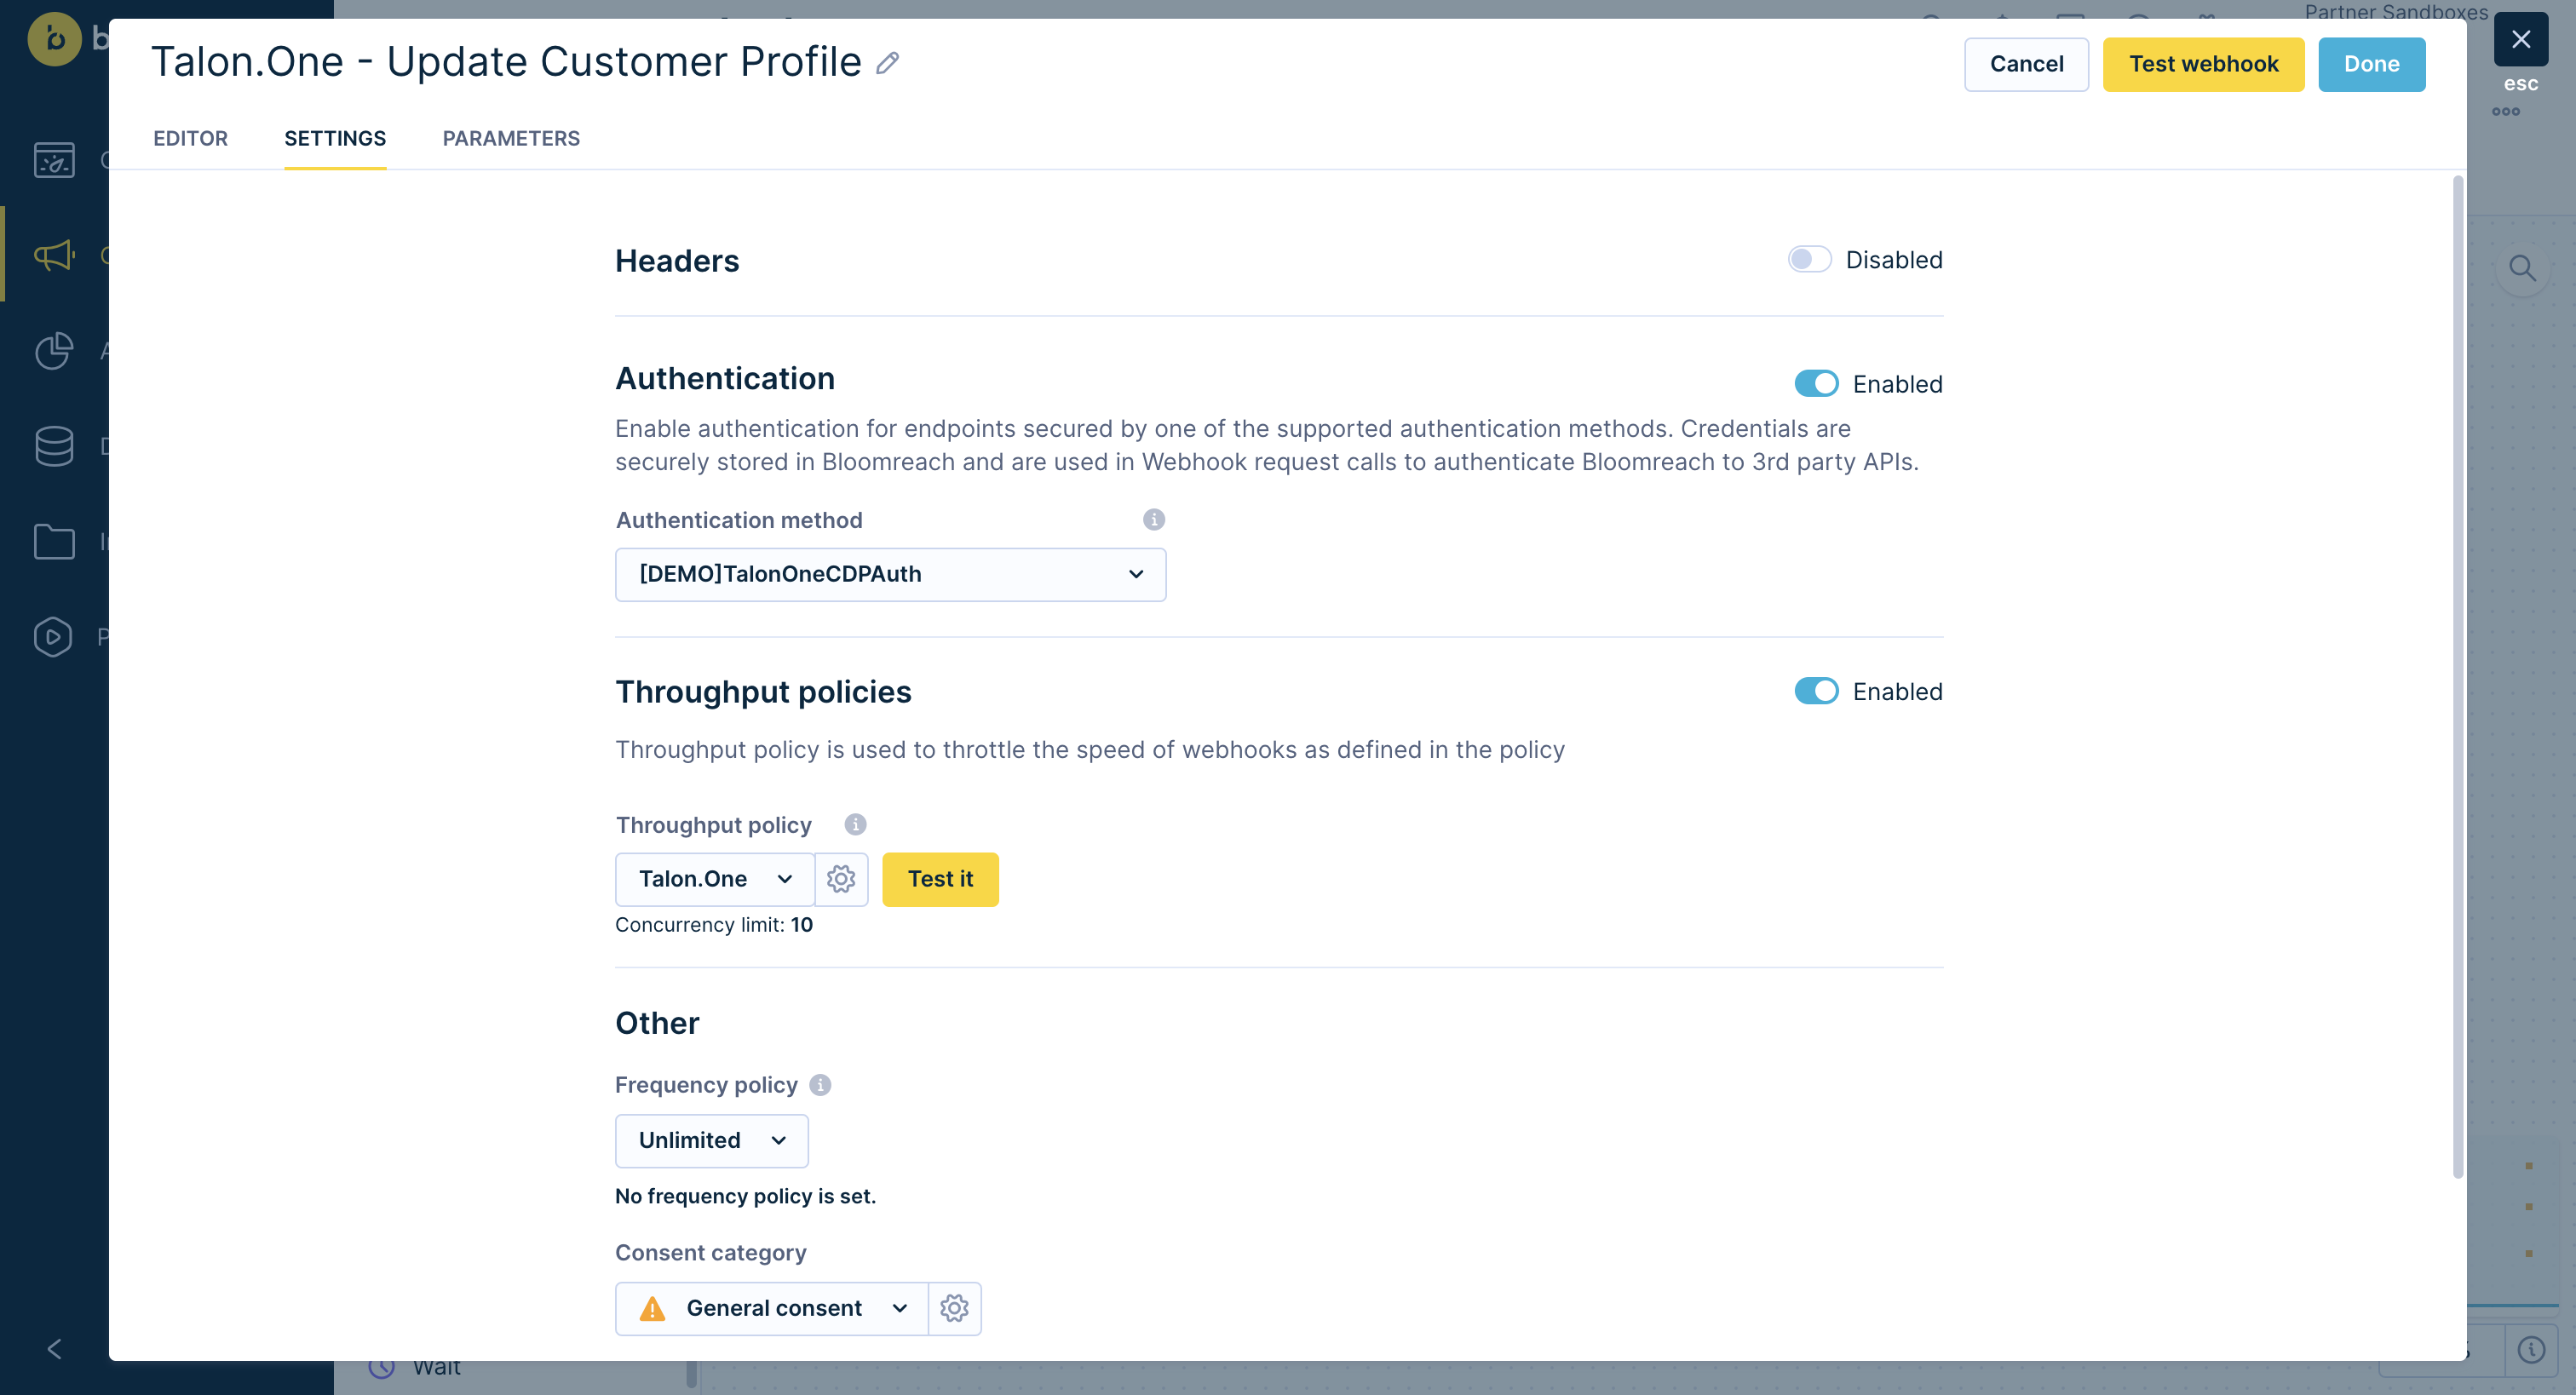
Coupon webhook preset action settings
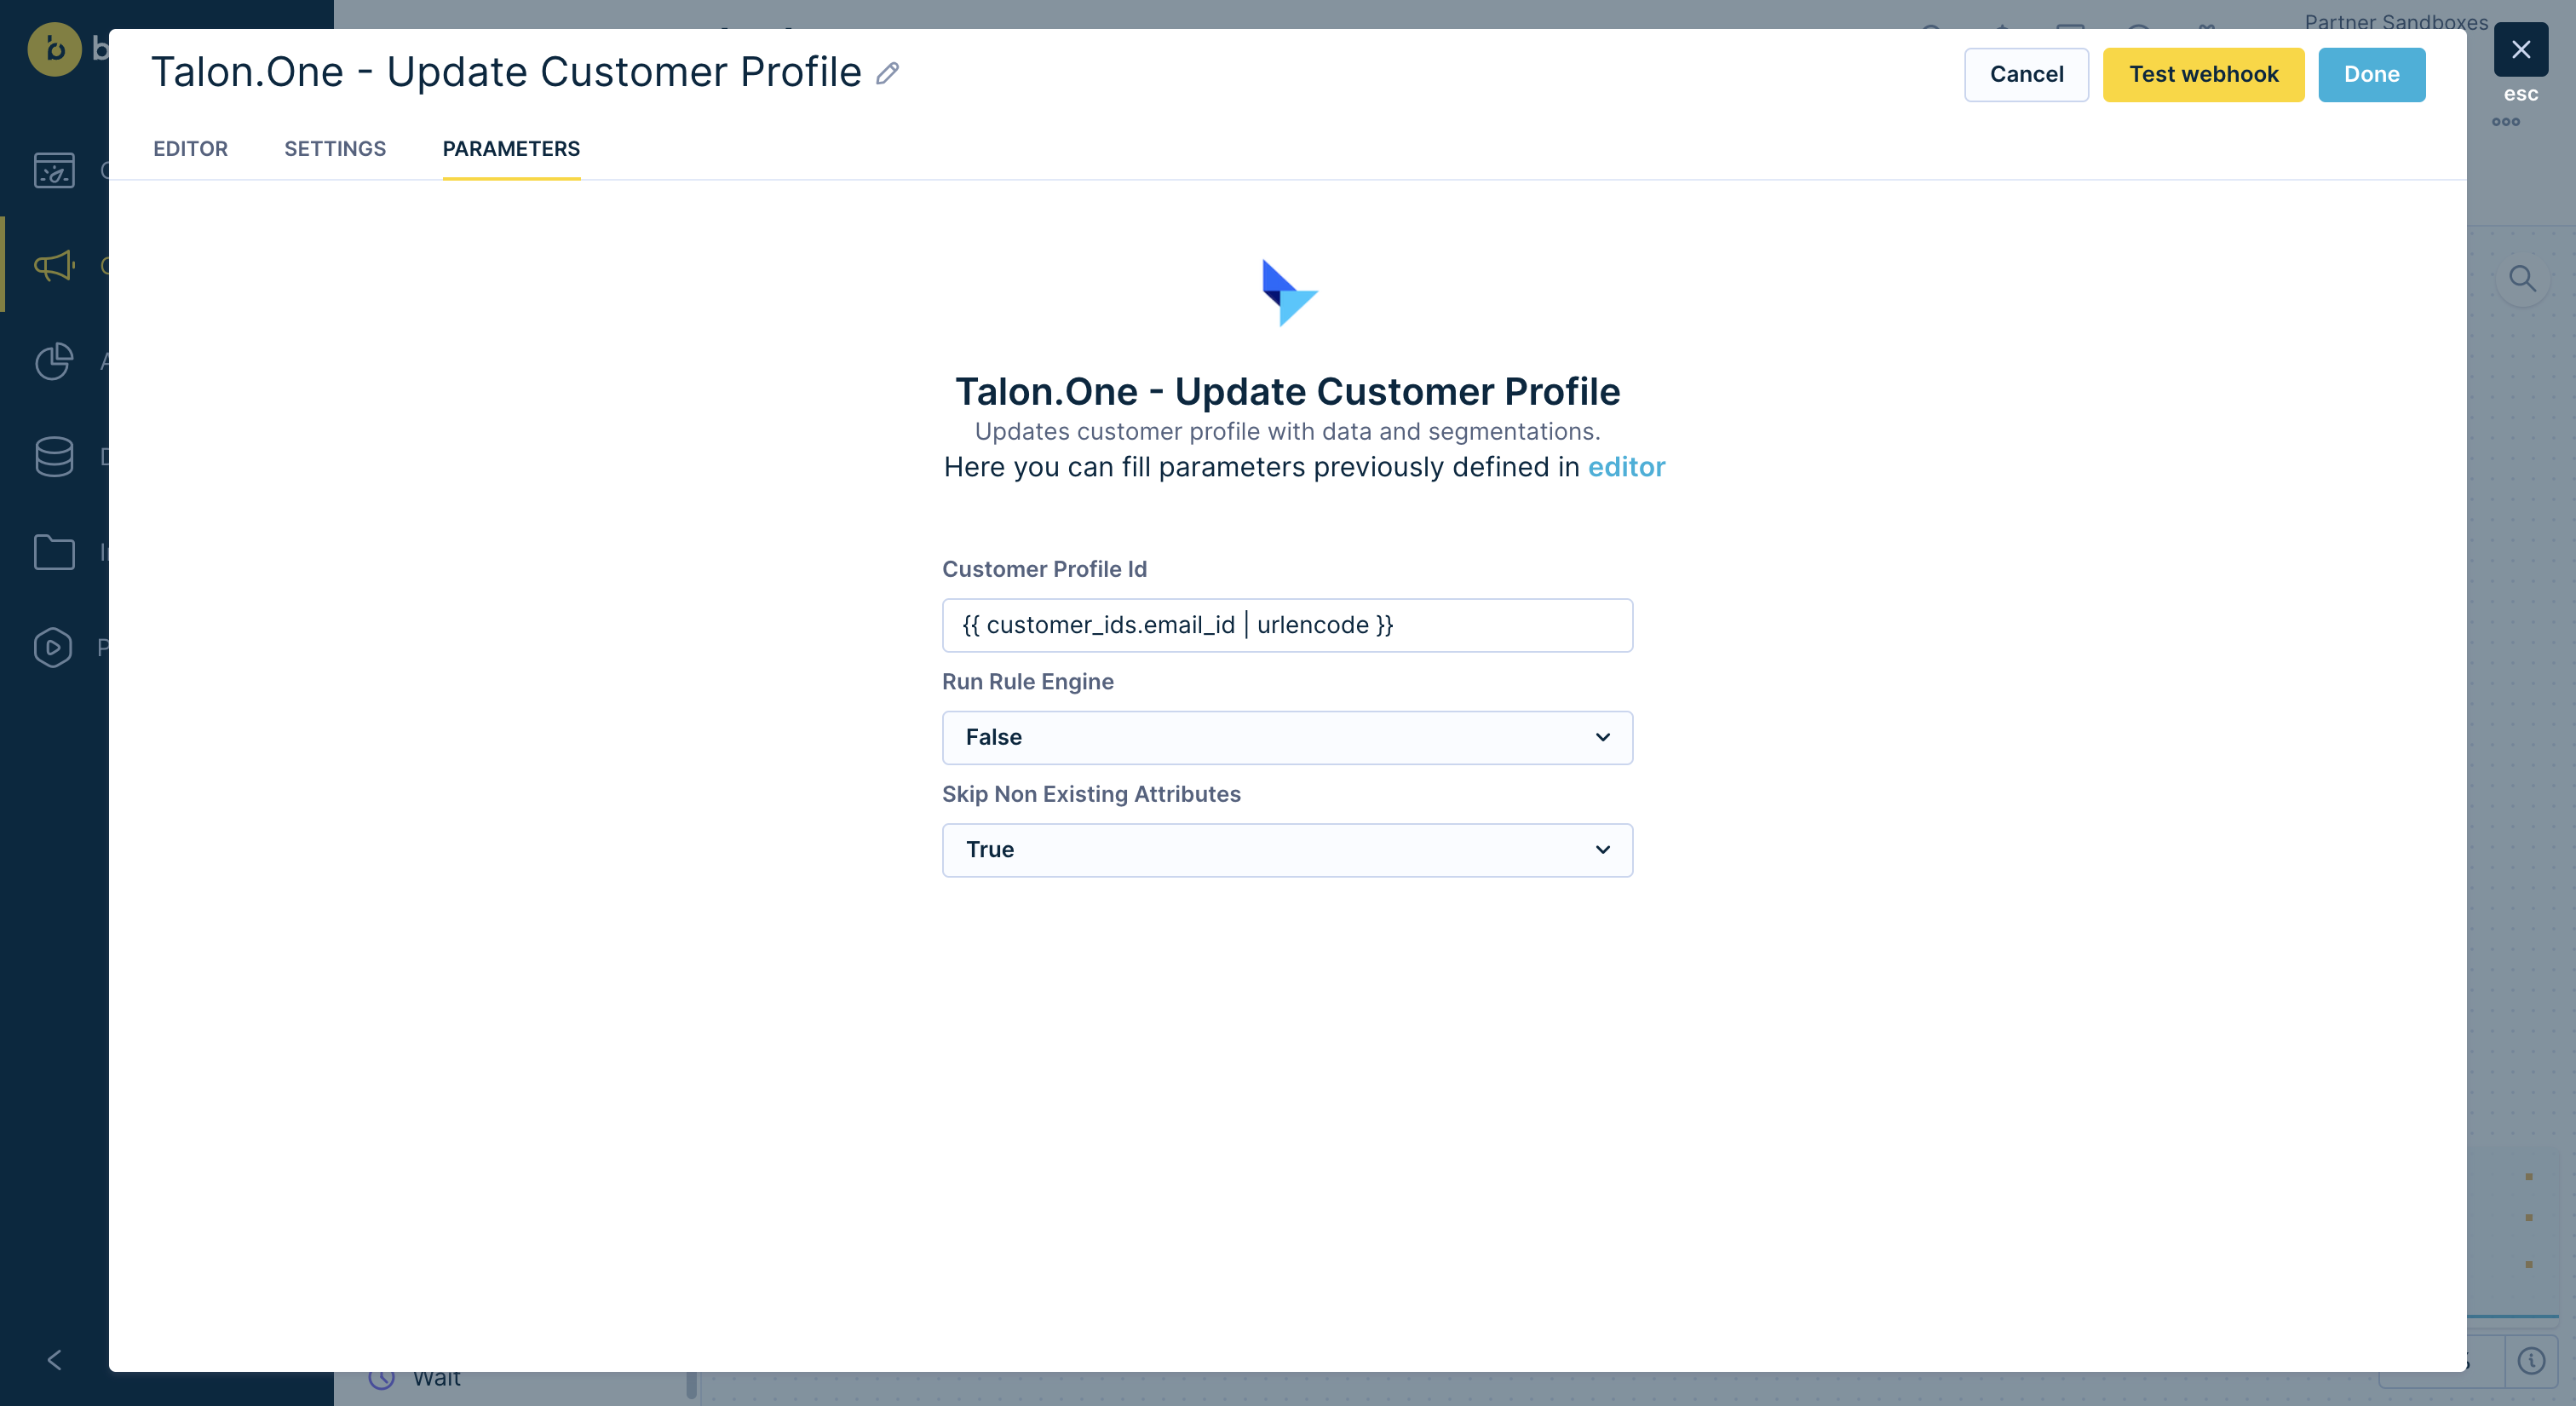
Coupon webhook preset action parameters
- In the Editor tab of the action fill the body of the request. In this example, the placeholder for "gender" is
{{ customer.gender | json }}. - Press Done.
- Press Save.
Test the scenario
Before you launch your scenario, you can test and preview the complete workflow in the Test tab.
When you press Start, you will see a confirmation window indicating how many customers will be affected by the scenario run.
Updated 4 months ago