Ads best practices
Ads audiences help you to target the right customers to show your advertisement through various integrations such as Google Ads or Facebook Ads. By using ads correctly, you can achieve your marketing goals in an easier and more efficient way possible. That is why we have created the Best Ads Practices Guide to help you improve your workflow so you can start building your Ads scenarios better now!
What are the benefits of using Bloomreach Engagement and Ads audiences platforms?
You can use your stored data within Bloomreach Engagement together with Ads retargeting in different use cases:
- Create an audience that you might want to retarget through Facebook/Google Ads. For example, the customers that are not responding to emails could be targeted via Facebook/Google and thus we can take the advantage of the omnichannel approach.
- Create retargeting audiences that you would like to exclude from your active ads. The reason for it might be that customers are actively engaged with your emails so there is no need to target them via other channels.
- Create lookalike audiences based on the most valuable customers. Those customers might be the ones with high lifetime value and recent purchases.
Watch the below video from the Mini Masterclass series by Bloomreach Academy to better understand the use cases you can do with ad retargeting in Bloomreach Engagement.
The possibilities of using retargeting to your advantage are endless and you can create a perfect scenario to reach your marketing goals. To achieve that let´s make sure that you are pushing the correct customers to the correct audiences and you are not generating unnecessary events. To help you with creating the Ads retargeting scenarios in the best possible way, we have prepared a set of recommendations that you should follow when building it up yourself.
Start the scenario right
There is one good piece of advice that you can use when starting building the scenario and that is the correct expiration period for your campaigns. It is crucial to set the correct time as you want to use only valid and up-to-date data. The recommended expiration time for the campaign events for ads is a minimum of 90 days. Also, take into consideration the expiration of your data set within the Facebook/Google platform, e.g. delete all data older than 90 days on Facebook, when thinking about your expiration policy.
In the picture below, you can see how the campaign events for ads look like and what is tracked there, as we might reference those events further in the article.
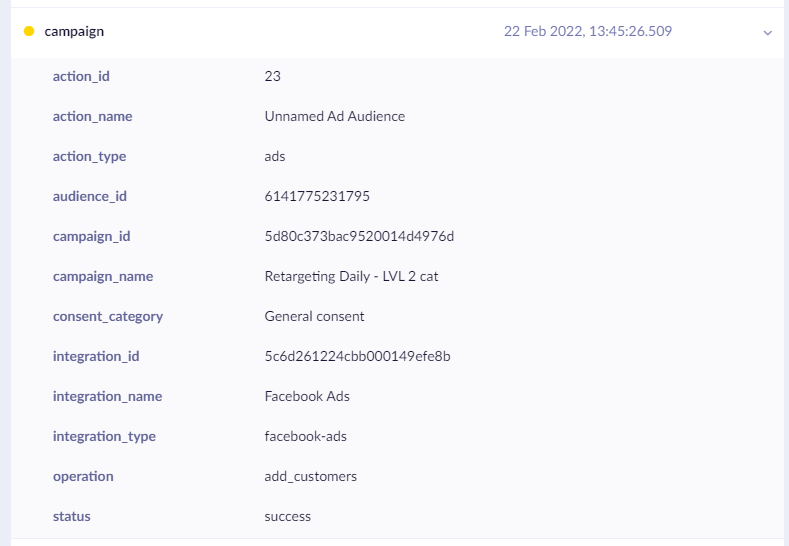
Example of tracked campaign events for ads
![ADS add_remove best practices [retargeting] _ Plug.png 1060](https://files.readme.io/a8653e1-ADS_add_remove_best_practices_retargeting___Plug.png)
Example of the scenario with the correct trigger and condition nodes.
Watch the below video on the Best Practices regarding building your ad tech scenarios.
Sign up for the Mini Masterclass
Check more bite-sized videos about Adtech in the Engagement Mini Masterclass! You will learn how to avoid common mistakes in retargeting, watch an adtech demo and discover other helpful content.
Correct triggers
After setting up the correct time period, you should ensure the passing of valid data through your scenario by using the right trigger. We recommend using only the daily triggers as you want to check data that has been changed after a reasonable time. Those data are compared to your last run of the scenario and only customers with changed behavior should pass through. The recommended triggers are Repeat daily or On event and make sure that you set their delay to at least 30 seconds to allow correct data tracking before checking them in conditions. Avoid Repeat weekly/monthly as those triggers don't secure the up-to-date, valid data and they cause unnecessary events.
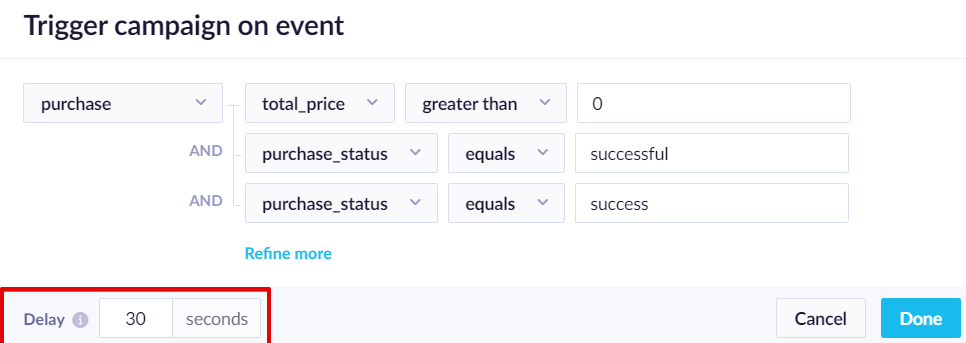
Setting up the delay for trigger nodes
Set right consent for retargeting
Only customers with valid consent can be used for retargeting as they represent your actual audience. That is why you should either use your explicit consent for ads or consider using legitimate interest. We want to eliminate the customers without consent early in the scenario to make sure that there are no failed campaign ads events generated if a customer without consent would get to the Ads node. The consent condition node is advised to be placed right after the trigger node in the scenario.
Filter your customers
Another great way to push only useful data is to filter your customer by their active identifier. You want to target customers that can be targeted. In other words, those customers should either have an email or phone set in their profile. This filtering will prevent generating campaign ads events with errors. To set this condition node properly, make sure that the email address uses contains @ operator as it prevents null values. The phone can use has value as a filtering operator.
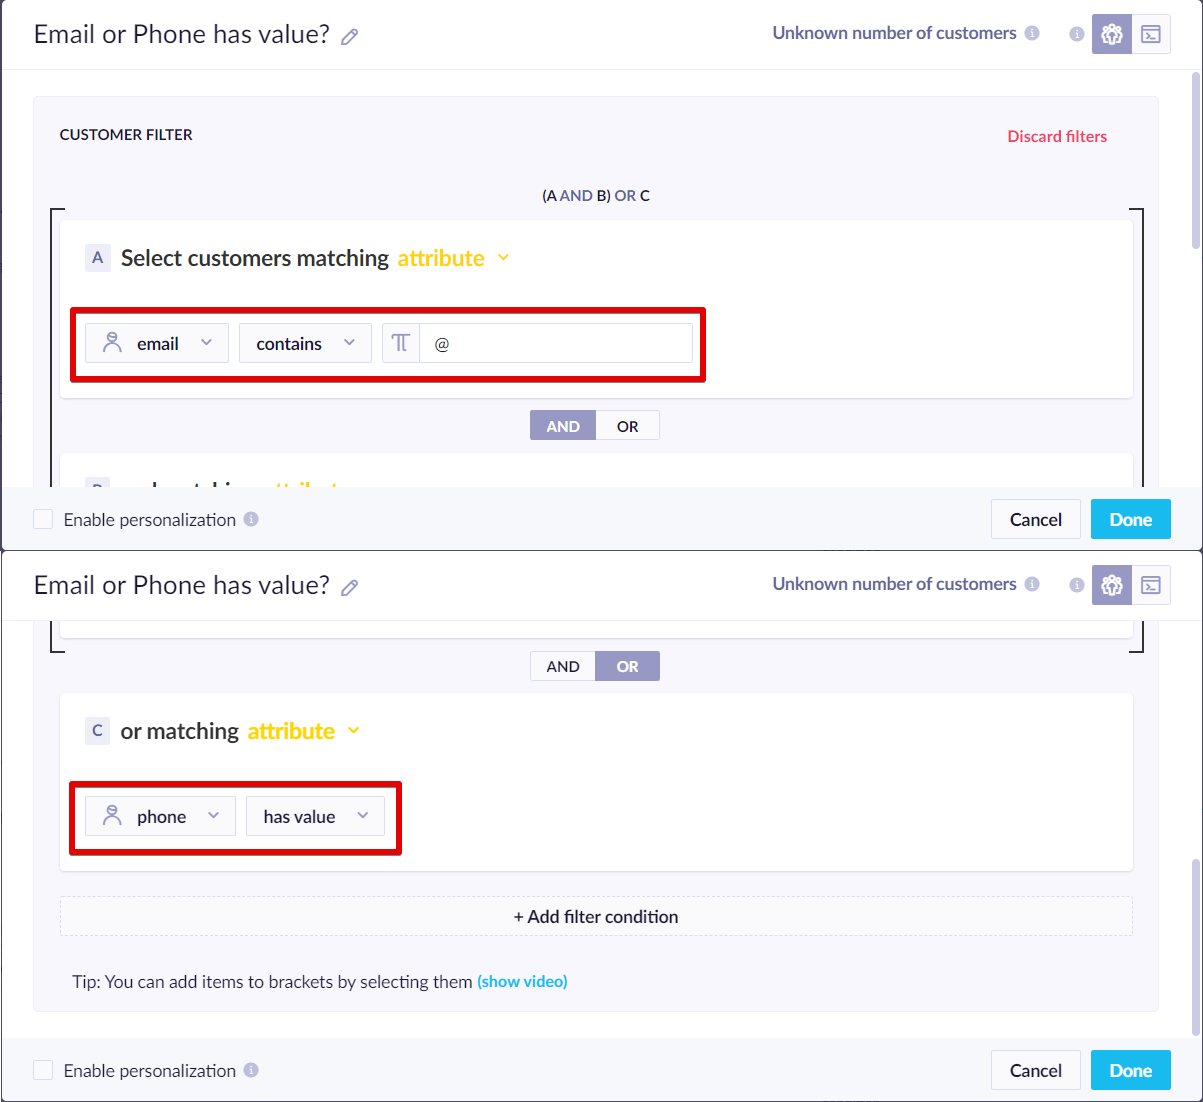
Correct operators for phone and email filtering condition node
Adform Platform
If you use Adform as an ads platform for audiences, replace those conditions for email/phone with the uuid condition.
How to specify your customers further
In your scenarios, you should specify further what customers you want to target for your advertisements. After the initial starting setup mentioned in the tips above, you can add other specific condition nodes to better fit your marketing needs and to allow valid customers for your business. It is a good practice to add specific conditions before you send them to the final targeting node.
You should check whether the customers are eligible for the scenario. Here, you can use two different approaches how to filter your customers further. You can either use condition nodes or segmentation of your customers. It does not matter which approach you take, you will get the same result. Choose the way that fits your needs better.
Use segmentation
To make sure that you push only eligible customers to the final retargeting node, you should always check if:
- customers are part of the segmentation and they do belong to one of the segments.
- customers have not been in the scenario in the last 90 days, e.g. they did not change segments. If they have been in the scenario during the specified expiration period (see the Tip #1), the customers should be deleted then. This can happen when a customer changes the segment. They should be deleted from the scenario and then later added again to the scenario but under a different segment.
When using segmentation, make sure that the names of the segments in the segmentation are identical to the name of the ads audience tracked under action_name. This will help you to build the scenario with more clarity.
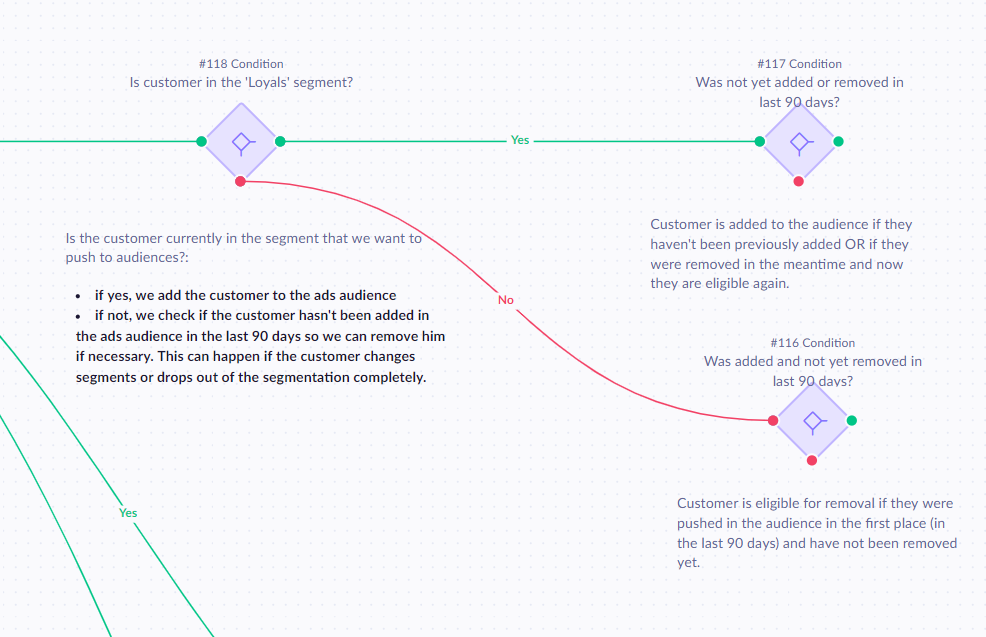
Example of using segmentation - checking if the customer belongs to the Loyals segment. If they do not, they will be removed from the scenario.
Using condition nodes
To make sure that you push only eligible customers to the final retargeting node, you should always check if:
- the data passing through the condition node reflect only the incremental change since the last scenario run. Some examples of incremental changes are customers that purchased yesterday or new customers that have not been added to the scenario yet
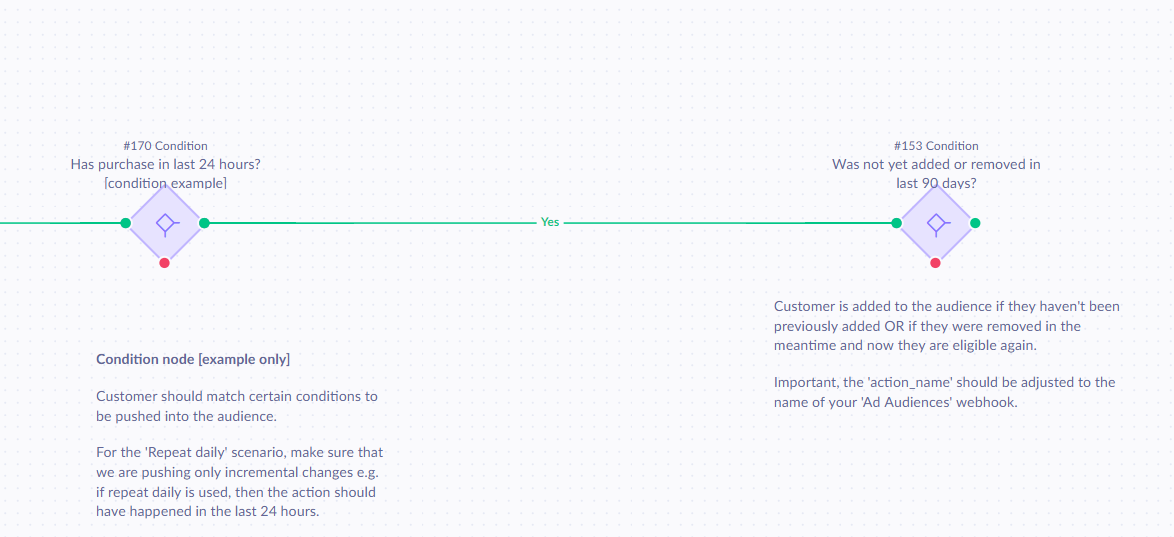
Example of condition nodes for checking whether the customer has been in the scenario before.
Remove customers from your scenario
You should not only add customers but also remove them from your scenarios. Think about removing the customers that are no longer valuable to your audiences. There might be various reasons why the customers aren't worth passing through the scenario:
- The time period has expired and they have to be deleted. The data expiration is set directly within the Ads platform.
- Customers changed the segment, for example, remove them from the original segment and add them to the new segment audience.
- Customers passed a certain business condition, for example, were not active for the last 180 days.
To remove them, use Ads node with remove.
Audience size
Removing users from audiences with less than 100 users will result in an error 'Insufficient permissions for integration to work properly.' Due to a restriction on Meta (Facebook) side, you cannot remove users from this audience because you will get a low audience size.
Note
Custom Audiences must have a certain minimum size, approximately 100 unique users. If you need to remove users and you are going under this limit, it is recommended to delete the custom audience entirely.
Set up the Ads audience webhook node
Once you have the conditions set up correctly, it is time to connect them to Ads audience webhook node.
- To be able to connect to your Ads platform, add
Ads webhooknode at the end of the route. - Choose Facebook or Google Ads.
- Select
add to audiencein the node. - The name of the Ad webhook should have the same name as the name used for the segments (e.g. Loyals) when referring to retargeting based on segmentation or the name should be the same as action_type in the last node when referring to retargeting based on condition nodes.
- Lastly, you should choose the right consent. The consent should match the one used in the previous condition node.
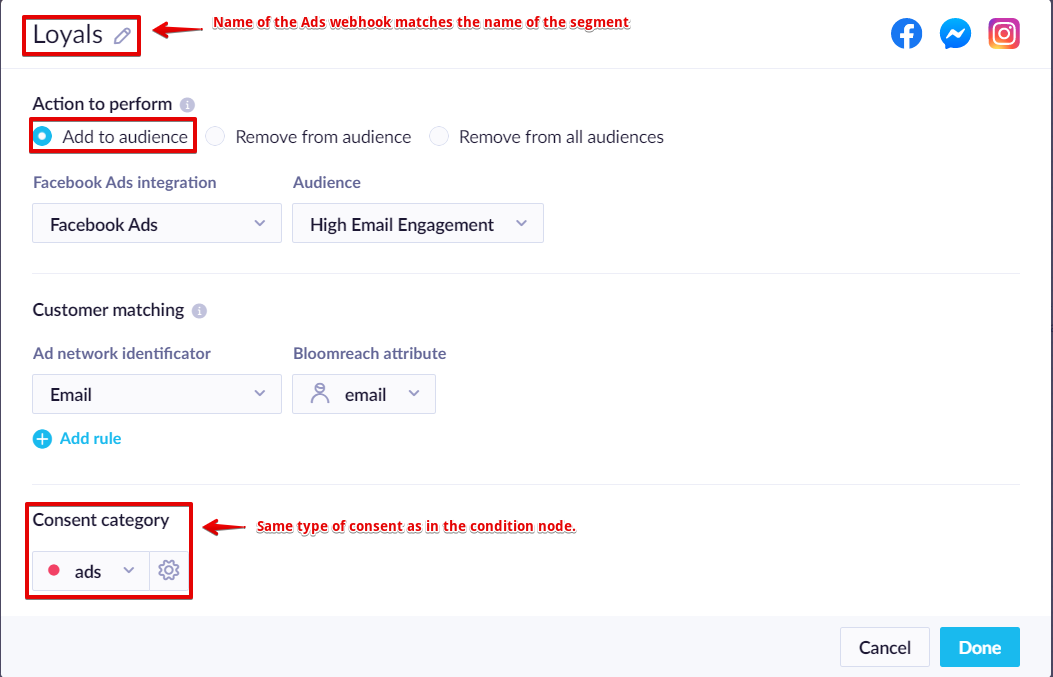
Note:
To remove a customer from an audience, do the same setup but choose "remove from audience".
Remove customers from all audiences
We recommend setting up a servicing scenario that would remove customers from all audiences based on a certain action. This might be useful when customers change their retargeting consent they gave you and are no longer eligible for ads. The prerequisite is to track consent reject for ads.

The scenario follow the same best practices as mentioned above.´On event´ is used as a trigger when only consent is being tracked. The delay should be kept to 30 seconds as it allows data to flow through the platform (see the picture below).

´Wait´ node is also essential because it will allow some extra time for data to flow within the Bloomreach platform (2 minutes is recommended).
Only the customers that have a valid id and were pushed to any audience in the last 90 days will go through.
The Ad audience set up – Opt for ´remove from all audiences´ and set General consent as the specific consent for ads was already rejected.
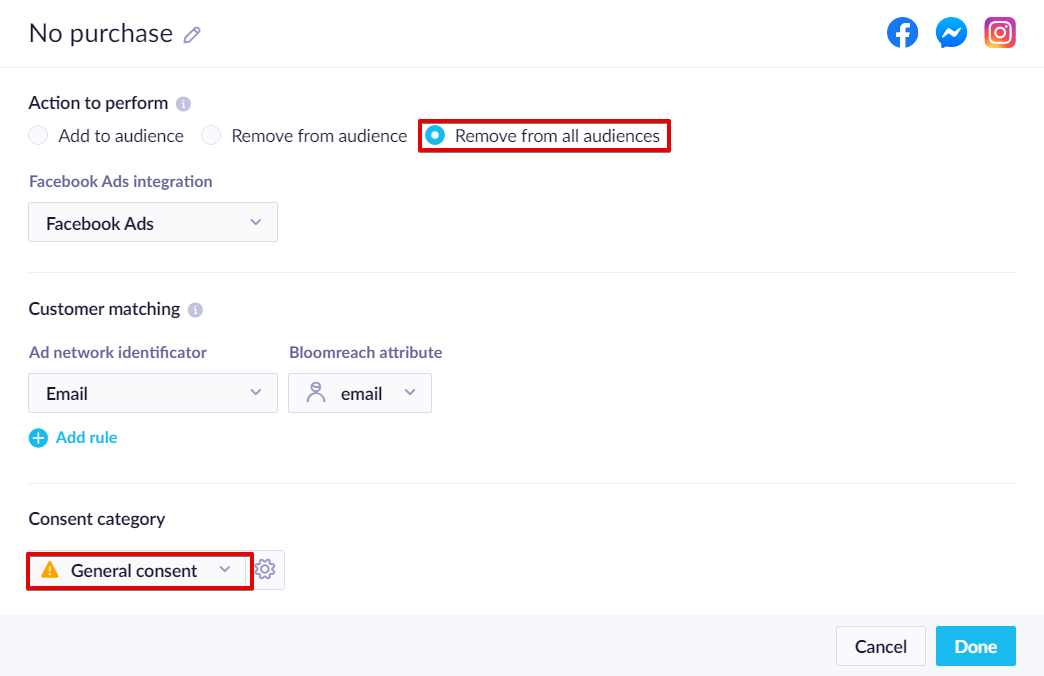
You can remove customers from all audiences for Google integration the same way as for Facebook integration - using a webhook with the "remove from all audiences" option.
Updated 3 months ago
