

Firebase Cloud Messaging for Android SDK
Integrate Firebase Cloud Messaging in your app to support Engagement push notifications on Android devices
To be able to send Push notifications for Android SDK from the Engagement platform and receive them in your app on Android devices, you must set up a Firebase project, implement Firebase messaging in your app, and configure the Firebase Cloud Messaging integration in the Engagement web app.
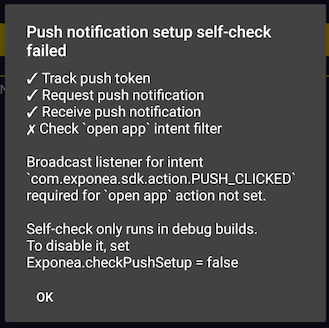
The SDK provides a push setup self-check feature to help developers successfully set up push notifications. The self-check will try to track the push token, request the Engagement backend to send a silent push to the device, and check if the app is ready to open push notifications.
To enable the setup check, set
Exponea.checkPushSetup = truebefore initializing the SDK.We suggest you turn the self-check feature on while implementing the push notifications for the first time or if you need to do some troubleshooting.
Set up Firebase
First, you must set up a Firebase project. For step-by-step instructions, please refer to Add Firebase to your Android project in the official Firebase documentation.
To summarize, you'll create a project using the Firebase console, download a generated google-services.json configuration file and add it to your app, and update the Gradle build scripts in your app.
Checklist
- The
google-services.jsonfile downloaded from the Firebase console is in your application folder, for example, my-project/app/google-services.json. - Your application Gradle build file (for example, my-project/app/build.gradle) contains
apply plugin: 'com.google.gms.google-services'. - Your top level Gradle build file (for example, my-project/build.gradle) has
classpath 'com.google.gms:google-services:X.X.X'listed in build script dependencies.
Implement Firebase messaging in your app
Next, you must create and register a service that extends FirebaseMessagingService. The SDK's automatic tracking relies on your app providing this implementation.
This implementation isn't included in the SDK to avoid adding non-essential libraries. Copy the example code below and use it in your app.
- Create the service:
import android.app.NotificationManager import android.content.Context import com.exponea.sdk.Exponea import com.google.firebase.messaging.FirebaseMessagingService import com.google.firebase.messaging.RemoteMessage class MyFirebaseMessagingService: FirebaseMessagingService() { private val notificationManager by lazy { getSystemService(Context.NOTIFICATION_SERVICE) as NotificationManager } override fun onMessageReceived(message: RemoteMessage) { super.onMessageReceived(message) if (!Exponea.handleRemoteMessage(applicationContext, message.data, notificationManager)) { // push notification is from another push provider } } override fun onNewToken(token: String) { super.onNewToken(token) Exponea.handleNewToken(applicationContext, token) } } - Register the service in
AndroidManifest.xml:<service android:name="MyFirebaseMessagingService" android:exported="false" > <intent-filter> <action android:name="com.google.firebase.MESSAGING_EVENT" /> </intent-filter> </service>
The SDK will only handle push notification messages sent from the Engagement platform. A helper method Exponea.isExponeaPushNotification() is also provided.
After running your application, the SDK tracks the push token to the Engagement platform. If you enabled the self-check feature, it will confirm successful tracking.
You can also verify token tracking manually by locating the customer in the Bloomreach Engagement web application:
- SDK versions below 4.6.0: Check the customer property
google_push_notification_id - SDK versions 4.6.0 and higher: Check the
notification_stateevent with propertypush_notification_token
❗️Important
SDK versions 4.6.0 and higher use event-based token tracking to support multiple mobile applications per project. Learn more about Token tracking via notification_state event.
A push token is typically generated at the first application start, but it has its own lifecycle. Your FirebaseMessagingService implementation is triggered only if a token is created or its value has changed. Please validate your expectations against the defined token update triggers.
As of Android 13 (API level 33), a runtime notification permission must be registered in your
AndroidManifest.xmland must also be granted by the user for your application to be able to show push notifications. The SDK takes care of registering the permission. However, your app must ask for notification permission from the user by invokingExponea.requestPushAuthorization(context). Refer to Request notification permission for details.
If you are integrating a new Firebase project in an existing project, or if you are changing Firebase project completely, you can face an issue that your
FirebaseMessagingServiceisn't called automatically.To retrieve a fresh FCM token, consider requesting a token manually as soon as possible after Firebase initialization:
import android.app.Application
import com.exponea.sdk.Exponea
import com.google.firebase.installations.FirebaseMessaging

class ExponeaApp : Application() {
    override fun onCreate() {
       super.onCreate()
       FirebaseMessaging.getInstance().token.addOnSuccessListener {
           Exponea.handleNewToken(applicationContext, it)
       }
    }
}
The methods
Exponea.handleNewTokenandExponea.handleRemoteMessagecan be used before SDK initialization if a previous initialization was done. In such a case, each method will track events with the configuration of the last initialization. Consider initializing the SDK inApplication::onCreateto make sure a fresh configuration is applied in case of an application update.
If your app re-initializes the SDK by calling
init()after a previousstopIntegration(), the push token stored by the SDK is cleared onstopIntegration()and the SDK cannot recover it. After each re-initialization, callExponea.trackPushToken(token)again with the token your app already holds. Refer to Re-tracking the push token after stopIntegration for details.
Configure the Firebase Cloud Messaging integration in Engagement
Finally, you must configure the Firebase Cloud Messaging integration in Engagement so the platform can use it to send push notifications.
The setup requires you to use a private key from a Service Account that you create in Google Cloud and then copy-paste that key into the integration authentication in Bloomreach Engagement.
Follow the steps below:
-
Create a service account. To create a new service account in Google Cloud, navigate to
Service Accountsand choose your project. On the Service Accounts page, selectCreate Service Account. It is possible to use roles to define more granular access. -
Generate a new private key. Locate the FCM service account you created in the previous step, then select
Actions>Manage Keys. SelectAdd Key>Create new key. Download the JSON key file. -
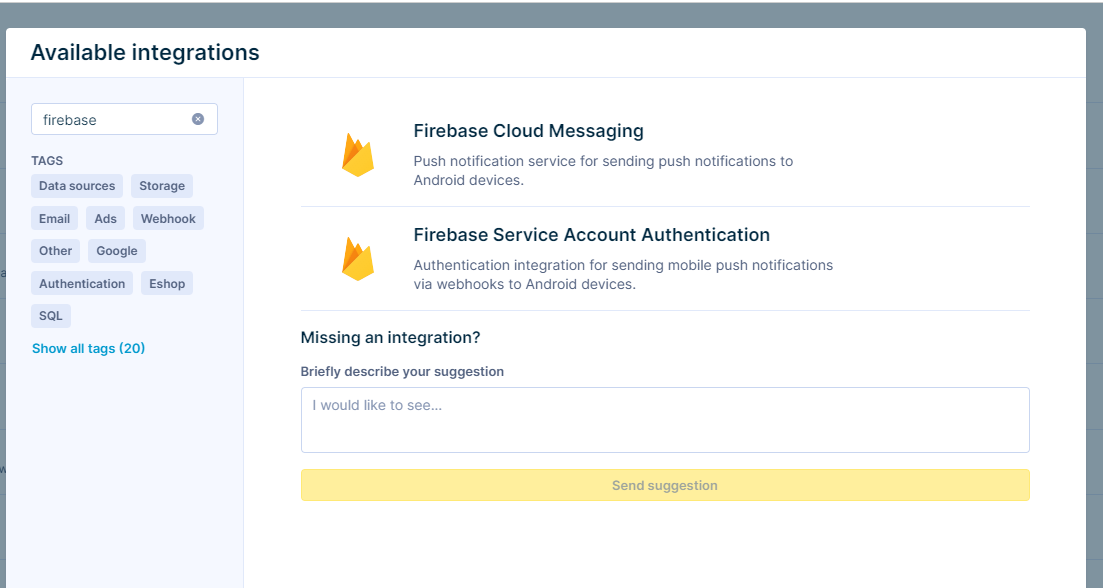
Add the Firebase Cloud Messaging integration to your Engagement project. In Engagement, navigate to
Data & Assets>Integration. Click onAdd new integrationand selectFirebase Cloud Messagingfor sending push notifications via the push notification node. Please note that if you’d like to send push notifications via webhooks, you must selectFirebase Service Account Authenticationinstead.
-
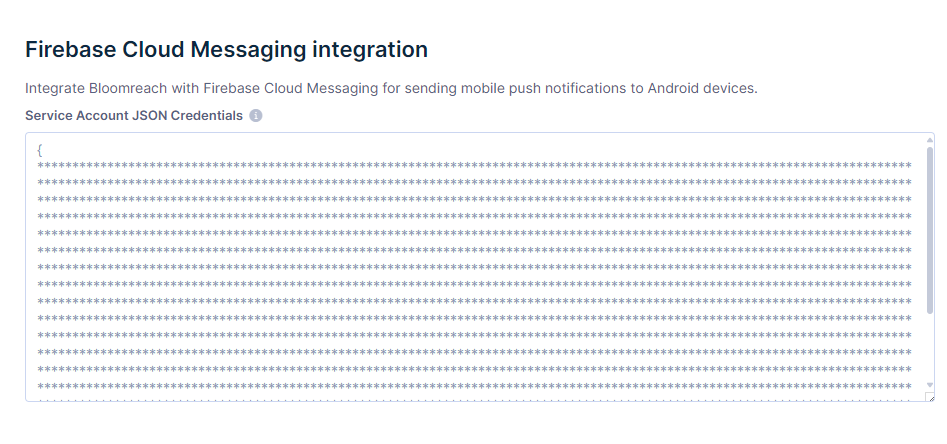
Insert the key from step 2 into the Firebase Cloud Messaging integration settings page in the
Service Account JSON Credentialsfield. Click onSave integration.
-
Select the Firebase Cloud Messaging integration in
Project Settings>Channels>Push notifications>Firebase Cloud Messaging integration. Click onSave changes.
The Engagement platform should now be able to send push notifications to Android devices via the push notification node.
Checklist
- If you run the app, the self-check should be able to send and receive a silent push notification.
- You should now be able to send push notifications using the Engagement web app and receive them in your app. Refer to Mobile push notifications to learn how to create push notifications in the Engagement web app.
- Send a test push notification from Engagement to the device and tap on it. Your broadcast receiver should be called.
The Engagement service for sending push notifications and the Firebase connection may take a minute to wake up properly. If sending a push notification fails, try restarting the app. If the issue persists after 2-3 retries, review your setup.
You should now be able to use Engagement push notifications. You may disable the self-check or leave it on to check your push setup in every debug build run.
Updated about 1 month ago