

Tag manager
Tag manager gives your team full control over tracking, personalization, and integrations without waiting for developer support. This guide explains how to add and manage custom HTML and JavaScript snippets on any web page without editing the source code directly. Control tag load order, targeting, and consent from a single interface.
Prerequisites
To use Tag manager, the Bloomreach JS SDK must be integrated into your website. The SDK retrieves active tags and executes them on the website after the page loads.
Tag manager presets
Tag manager includes presets covering the most common use cases. Each preset is a ready-to-use tag template for commonly used trackers that you can configure without writing code.
These presets cover the most frequently used tracking, personalization, and integration scenarios:
- Change color: Change the color of a button or other element in an A/B test.
- Button click: Track clicks on buttons or other HTML elements as custom events.
- Customer update: Update or create a new customer attribute.
- Facebook Pixel: Track page views on your website using Facebook Pixel.
- Google Ads: Retarget audiences on specific pages using Google Ads.
- Google Analytics: Track Google Analytics IDs for each customer as a customer attribute.
- Identification: Identify customers on the web page using a validated email as a customer ID.
- Page element auto-track: Automatically track all defined clickable elements on a web page.
- Product visit tracking: Create
view_itemevents and track product visits on the web page. - Recommendations: Implement recommendations on your web page.
- dataLayer Helper: Track events from your dataLayer directly into your project without additional frontend tracking.
Custom tags
To use a custom tag instead, you can import one or build your own using JavaScript or HTML.
Create a tag
Tag manager is located under Data & Assets. To create a new tag, go to Data & Assets > Tag manager > + Create new.
When you create a tag, you move through three sections in order: Preset, Definition, and Settings.
Preset
Select a preset from the library or skip this step to build a custom tag. If you choose a preset, it pre-populates the Definition section with the relevant variables and code.
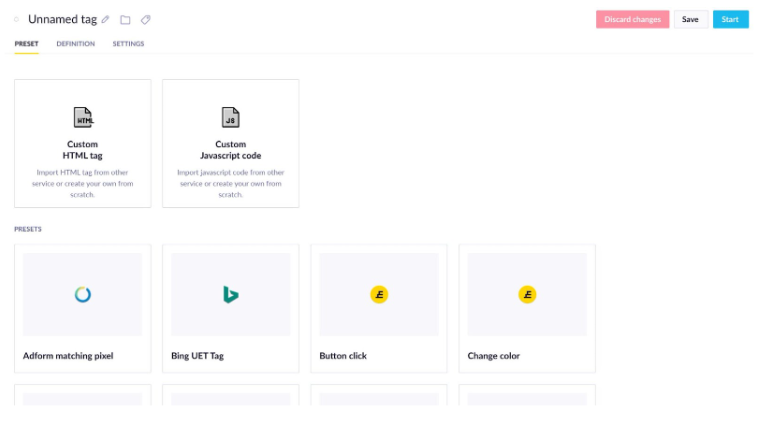
The preset selection screen in Tag manager.
Definition
How you work in the Definition section depends on whether you're using a preset or a custom tag:
- If you selected a preset, fill in the variables using the visual editor. To view or edit the underlying code — for example, to add Jinja personalization — select Edit source code in the top right corner.
- If you're building a custom tag, work directly in the code editor.
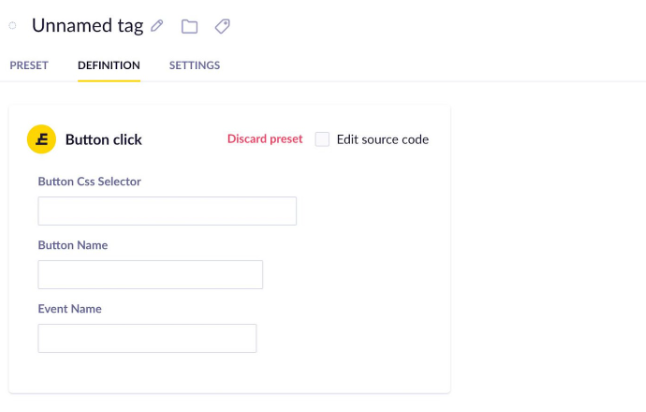
Definition section showing the Button click preset variables and the Edit source code option.
Settings
The Settings section controls how, when, and where your tag loads.
- Fire on: Define which pages the tag should load on. Options include any page, a specific URL, a regular expression, or a URL containing specific text.
- Add exception: Define pages where the tag should not fire, even if they match the firing rules.
- Priority: Set the load order when multiple tags run on the same page. Tags with a higher priority number load first. Within the same priority level, tags without personalization or audience filters load before those with filters.
- Audience: Limit the tag to a specific group of customers.
- Consent category: Ensure the tag only loads for customers with the relevant consent.
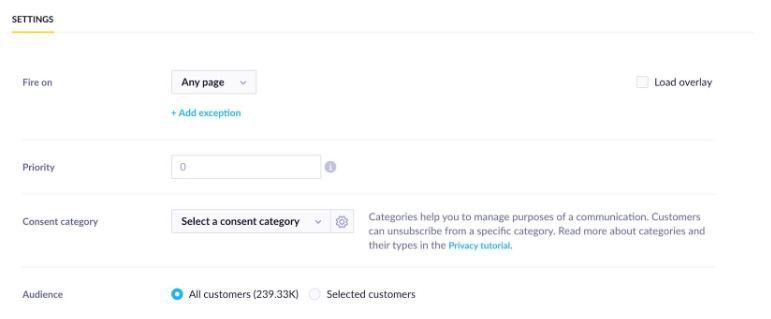
Settings section showing Fire on, Priority, Consent category, and Audience configuration options.
Limitations
Tag manager has two main limitations: jQuery dependencies and a project-wide size limit.
jQuery tags
Some presets, such as Button click, use jQuery. These tags won't work until you configure jQuery on your website.
Size limit
The maximum total size of all active tags in a project is 700 KB. If your project exceeds this limit, you won't be able to save or edit managed tags. You'll see the error: "Fail to save configuration".
To stay within the limit:
- Avoid maintaining a large number of active managed tags.
- Remove spaces and comments from your tag code to reduce file size.
If you've already reached the limit, a warning appears in the list of managed tags. To get back under the limit, stop your largest active managed tags.
Updated 3 months ago