Abandoned cart campaign
Send automated emails to customers who leave items in their shopping carts. This guide shows you how to build the scenario, personalize the email template, and measure results with A/B testing.
Time to complete: 30-45 minutes
Watch this short introductory video about this feature:
What you'll learn
An abandoned cart campaign sends an email to customers who leave without ordering items they added to their cart.
These customers already added products to their basket, so they were far along in the buying decision. Send them a reminder after a few hours or days about the items they left in their cart. This helps you recover the sale.
By the end of this guide, you'll have created this scenario, including the email template:

Before you start
Skills you need
Intermediate: This guide explains each step, but it assumes you're comfortable navigating and working with basic components in Bloomreach Engagement. If you get stuck, review these articles:
Data and tracking requirements
Track the cart_update event
Required attributes:
- action = add/remove: Track this for every change to the shopping cart contents.
- product_list: Contains the current list of items in the cart plus other required values to personalize the email. This attribute needs to contain all products in the cart after the last action (add or remove).
Review an example snippet for this attribute.
Track the purchase event
Review an example snippet for this attribute.
Import your product catalog
You need a catalog of your products with an ID for each one. This ID must match the ID collected in your cart_update event. Read more about catalogs.
Integrate your email domain
Review the integrations guide.
Build the scenario
Step 1: Add the event trigger
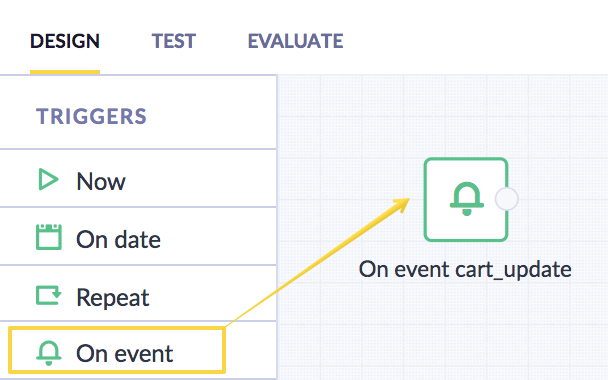
Create a new scenario and add the "On event" trigger node. This trigger lets customers enter the scenario every time the event is tracked.

Configure the trigger
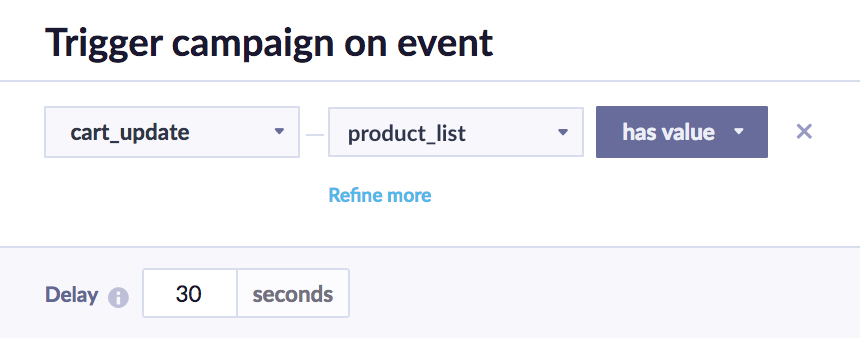
Set the event trigger to cart_update with the attribute that contains all the information about items in the cart. This prevents the campaign from sending when the cart is empty.

Step 2: Add conditions before the A/B split
Add all the following conditions before the A/B split node.

-
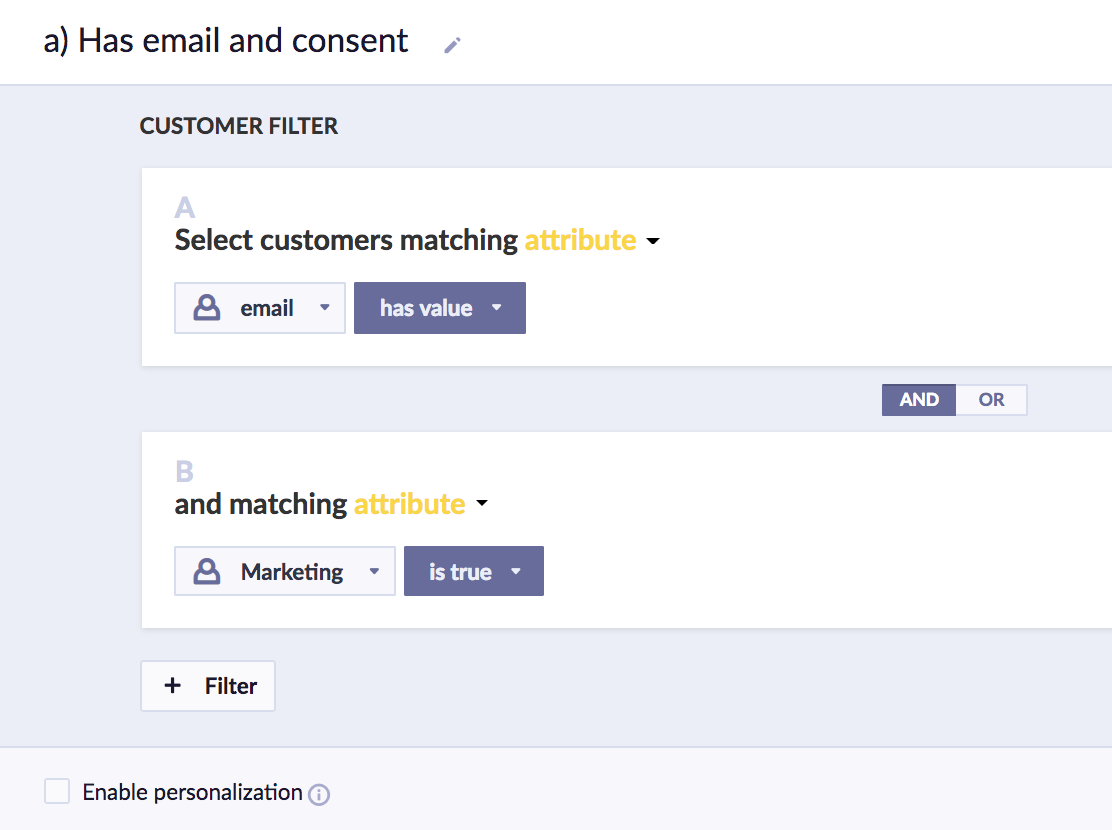
Has email and consent: Only customers with an email and corresponding consent should enter the scenario. Otherwise, your evaluation includes people who aren't even eligible to receive emails. Note that the consent logic is specific to your project.

-
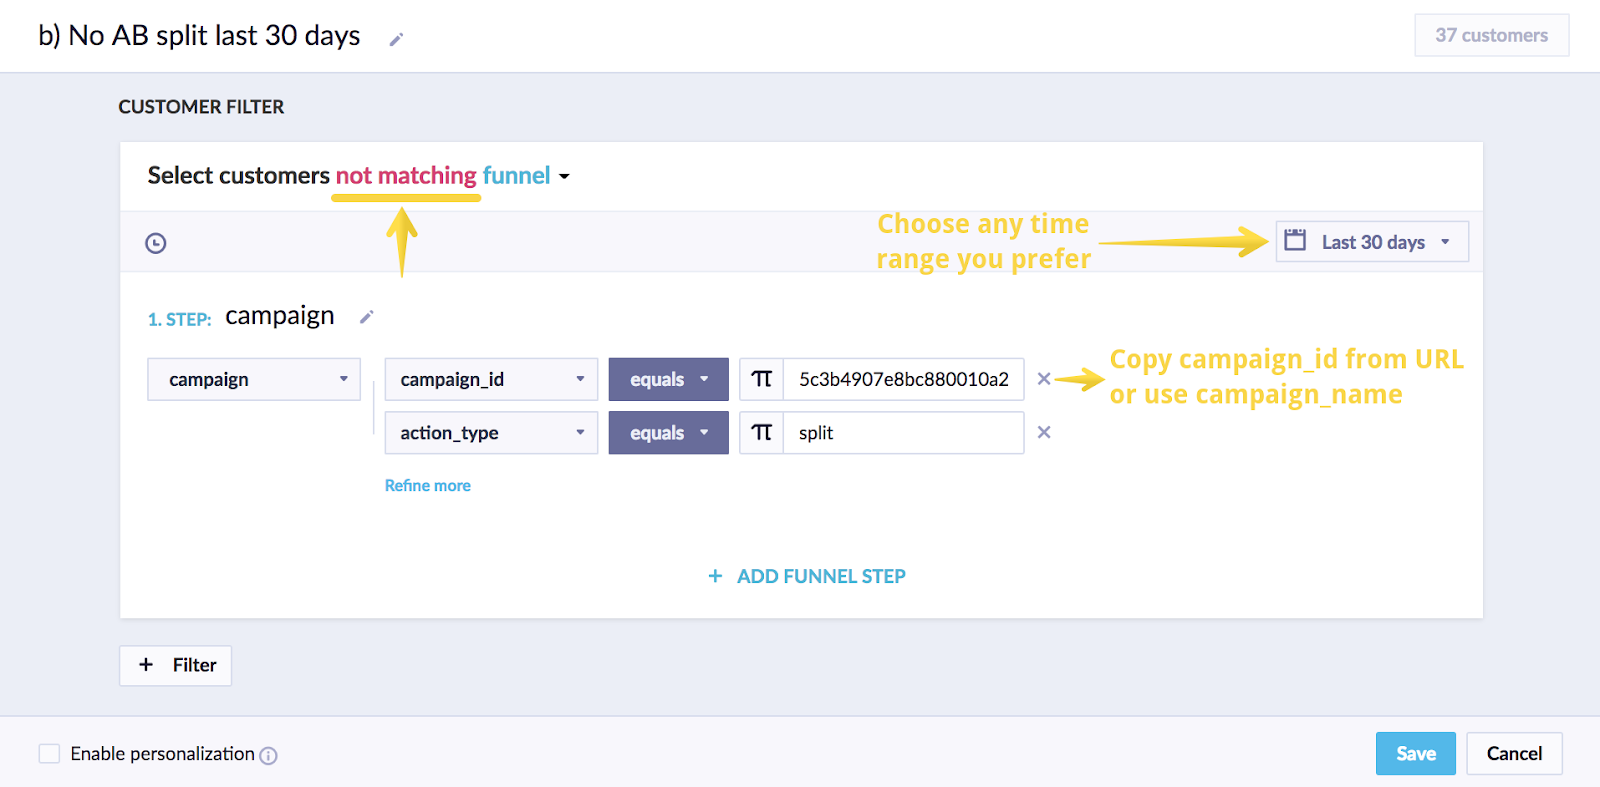
No A/B split last X days: You most probably don't want to send an abandoned cart email to a customer every time this happens. This condition specifies the time range after which a customer can receive another abandoned cart email. The
campaign_idis located in the URL when you have the scenario open.

Pro tip
Check the A/B split instead of whether an email was delivered to keep the same rules for both the variant and control group for evaluation purposes. If you only look at delivered emails, the control group isn't affected (because they don't receive any email). We recommend using a period of at least 7 days.
- Wait node: Define when to send the email after the customer abandons their cart using the wait node.
- Still has consent: Double-check that the customer didn't unsubscribe while in the wait node. Use the same consent condition as in step 2a.
- Products in cart and no purchase and very last cart_update: This is a more complex condition that consists of three sub-conditions. A AND NOT B AND C sub-conditions should apply.
Explanations of the 3 conditions:
Products in the cart
This is an aggregate that checks whether some products remain in the cart after the last cart_update. If not, it means the cart is empty and you don't want to target that customer. The attribute might be called product_list or products. Follow the aggregate documentation for info on how to create an aggregate.
Important
Save this aggregate to your project as you might need it to display certain information (which is contained in the
product_listattribute) in the emails.
No purchase after the last cart_update
Target only customers who haven't finished the order process. You need to include only those without a purchase after the last cart_update. As in the previous step, you need to create the same aggregate, but instead of last cart_update.product_list, select last cart_update.timestamp. In this case, however, you need to create the aggregate in the
Data Manager first and then come back here to select it from the drop-down list.
Very last cart_update
Remember that every cart_update event launches this scenario. If the customer makes any changes to their cart later, you want to stop this scenario and only consider the most recent version of their cart.
Important
Don't use
floorlast cart_update.timestampfor this condition. Flooring the timestamp strips the decimal values, which causes issues when multiple cart updates happen within the same second. This can result in multiple campaigns being enqueued for the same customer.
For this condition, use this expression instead: last cart_update.timestamp == event.timestamp.
This ensures that only the most recent cart update triggers the campaign, even if multiple cart updates happen within the same second. The expression uses the full timestamp including decimals, which maintains uniqueness for events occurring in rapid succession.

Step 3: Add the A/B test node
Add the A/B test node to evaluate the uplift in revenues the campaign brings you.
Step 4: Add the email node
Attach the email node and insert the email template. Learn how to create an abandoned cart email template showing the products in the cart.
Recommended data for personalization
To display attributes of the items left in the cart in your email (such as image, link, title, price), you need this information stored somewhere.
Using Jinja, you can fetch it from either:
- Your product catalog imported in Bloomreach Engagement.
- The
cart_updateevent and its attribute (calledproduct_list)
| Value | Use case |
|---|---|
| title | Show the name of the product. |
| image | Fetch the product image in the email. |
| url | Hyperlink each product in the email. |
| total_price_local_currency | Show total cart price in local currency. This makes it easier to tell customers they qualify for free shipping or show how much more they need to spend to qualify. |
| total_price | Show total cart price in reference currency. If you operate with multiple currencies, also track prices and values in your reference currency. This makes it easy to calculate revenue and cart values in a single currency. |
| price | Show the price of each product. |
| quantity | Show number of units of a product in the cart. |
Advanced options
Custom wait time
Explore different wait times for different customers. You can enter this Jinja into a custom wait node to send an email at the time the customer last purchased and is most likely to be active.
{{ (((aggregates['592213934d539b19a436c1c2'] / 3600 + 2) % 24) - ((event.timestamp / 3600 + 2) % 24)) if ((((aggregates['592213934d539b19a436c1c2'] / 3600 + 2) % 24) - ((event.timestamp / 3600 + 2) % 24) -3)>0) else (((aggregates['592213934d539b19a436c1c2'] / 3600 + 2) % 24) - ((event.timestamp / 3600 + 2) % 24) +21) }}
The referenced aggregate looks at the last purchase timestamp aggregate, which looks like this:

Remember to change the aggregate ID to the aggregate you create in your project.
Add product recommendations
A common strategy to enhance follow-up emails is to include personalized recommended products. To set up email recommendations, follow this guide.
What products should you include? Based on your industry, region, and customer segment, different options make sense. Here are several:
- Reminding items that the customer already viewed: Use Customer recent interactions template
- Add similar items to items in the basket that the customer hasn't seen yet: Use Textual Similarity template
- Add other items that might interest the customer: Use Customers who viewed this item also viewed template
- Add complementary products to the added product: Use Customers who bought this item also bought template
Updated 4 months ago
