

MMS in Scenarios
MMS campaigns allow you to create even more personalized campaigns through multimedia messages. If you add images or videos to your campaigns, it can increase user engagement and brand awareness. This guide will show you how to build an MMS campaign in a Scenario.
Refer to our main MMS Campaigns article to documentation which explains what you can do within the MMS Project Settings, and guide you through the integration process of MMS. Moreover, it elaborates on the SMS fallback and illustrates how the messages are tracked.
MMS are handled by the third-party providers Sinch and Infobip. Both provide support only in the US and Canada. Note that due to regulatory requirements, service to Canada is limited.
MMS setup in scenarios
Create a scenario
You need to create a scenario to build an MMS campaign.
Add the SMS action node
Add the SMS action node to your scenario.
Choose a template
You can either build your MMS campaign from scratch or use our Predefined templates or Project templates.
- Predefined templates are part of the built-in library of templates that can be easily reused during the campaign creation process.
- Project templates are templates you build within the Asset Manager. These templates can be re-used during the campaign creation process.
Access to a list of predefined or project templates is visible when you click on the SMS node in your scenario.

SMS/MMS template settings are disabled by default. If you enable its settings, it includes:
- Link shortener
- Transfer identity to URL links
- Link transformation
- Custom campaign tracking
Working with templatesWhen you create a new SMS/MMS campaign using a template, the campaign settings will be prefilled if the template Settings are enabled.
You don't have to configure the settings every time for the same template. When you change a template in an existing campaign, you will have the option to apply the settings from the template or to not apply them, and keep the existing campaign settings unchanged.
Create sender profile
To use the integration, set it up as a sender profile in Project settings > Campaigns > SMS / MMS / RCS. For details, read the SMS or MMS campaign documentation. The process is the same for MMS and SMS.
Customize the message
The message and media to be sent can be typed within a user-friendly editor with an option to include Jinja personalization. The editor also displays a ‘characters counter’ and automatic highlighting of special characters, as well as the option to define fallback SMS with limited automatic message splitting.
- Enter the Sender of the MMS. It can be short-coded (in the US), a toll-free number (in the US and Canada), a 10DLC number (in the US and Canada), or a long number (in Canada and Australia).
- Fill out the Subjectof the SMS.
- Write your SMS text.
- You can insert the media URL. There are 3 supported media types:
- Image (GIF/JPG/PNG)
- Video (MP4)
- vCard (VCF).
- Configure SMS fallback where you enter the fallback message and enable automatic message splitting.

Configure the settings
You can access MMS campaign settings through SMS action node in Settings. In this tab, you can configure various parameters:
| Function | Description |
|---|---|
| Frequency Policy | It defines the number of SMS messages that a customer can receive within a specified timeframe. |
| Consent category | Choose which consent is required for a customer to have to receive this campaign. |
| Tracking consent category | Ensure that you only track those customers who have given you specific permission to do so. Opens and clicks in email/SMS/MMS/push campaigns will not be tracked without selected consent. |
| Link shortener | When enabled, it automatically shortens all hyperlinks in SMS/MMS. |
| Transfer identity to URL links | - It can be managed only if the Link shortener is enabled. - Using URL links for customer identification. - Options:
|
| Link transformation | Auto: default UTM settings Manual: modify the UTM tags utm_campaign, utm_medium, and utm_source |
| Custom campaign tracking | It allows you to add custom event attributes to be tracked in the campaign events for all statuses of the campaigns. |
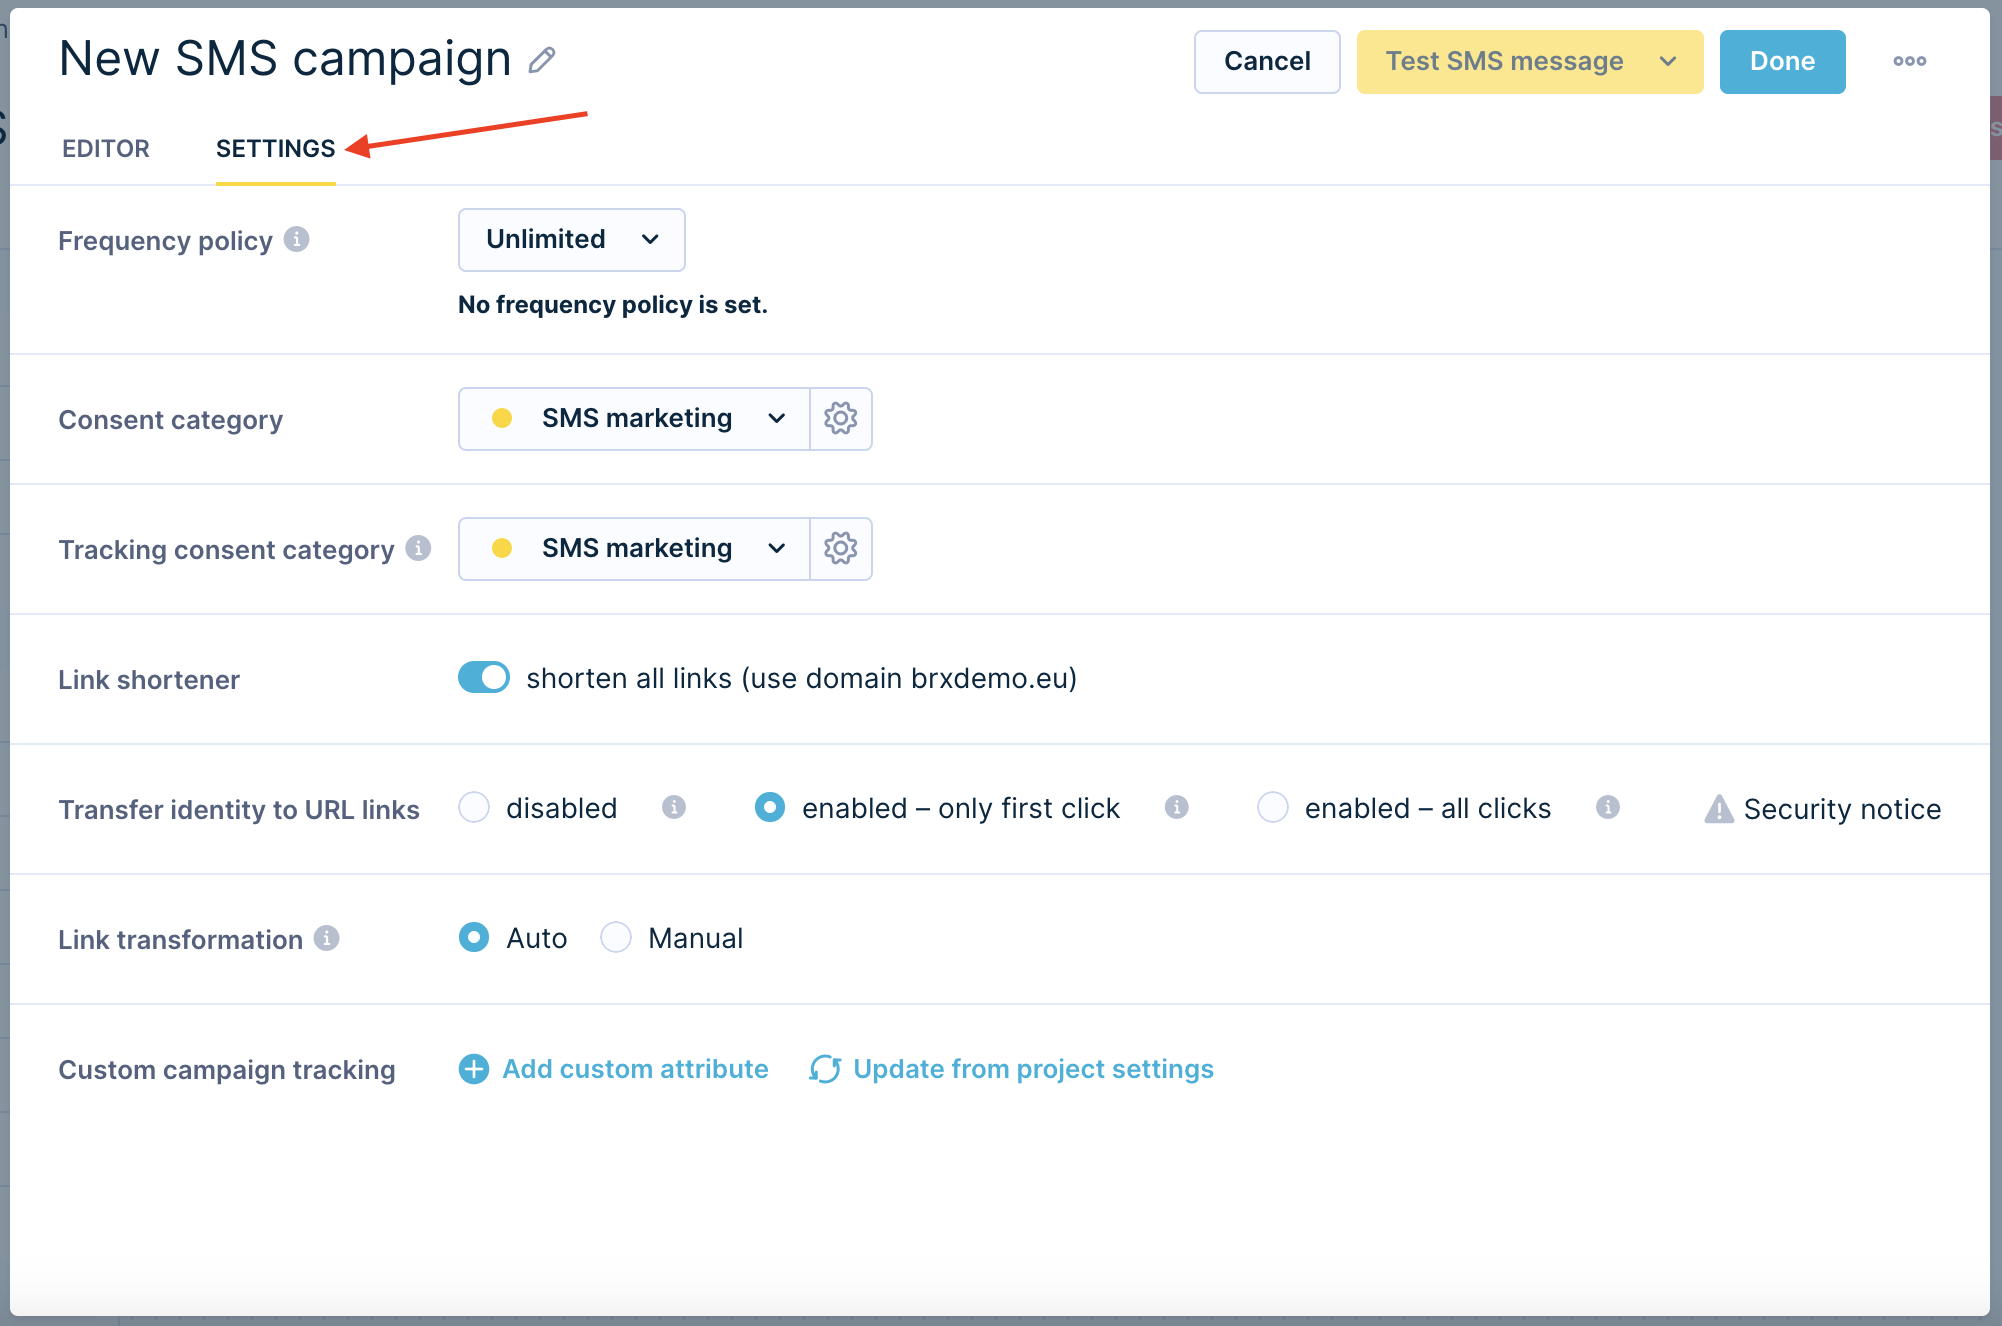
Consent policyRemember to set the right Consent category to comply with the applicable regulations.
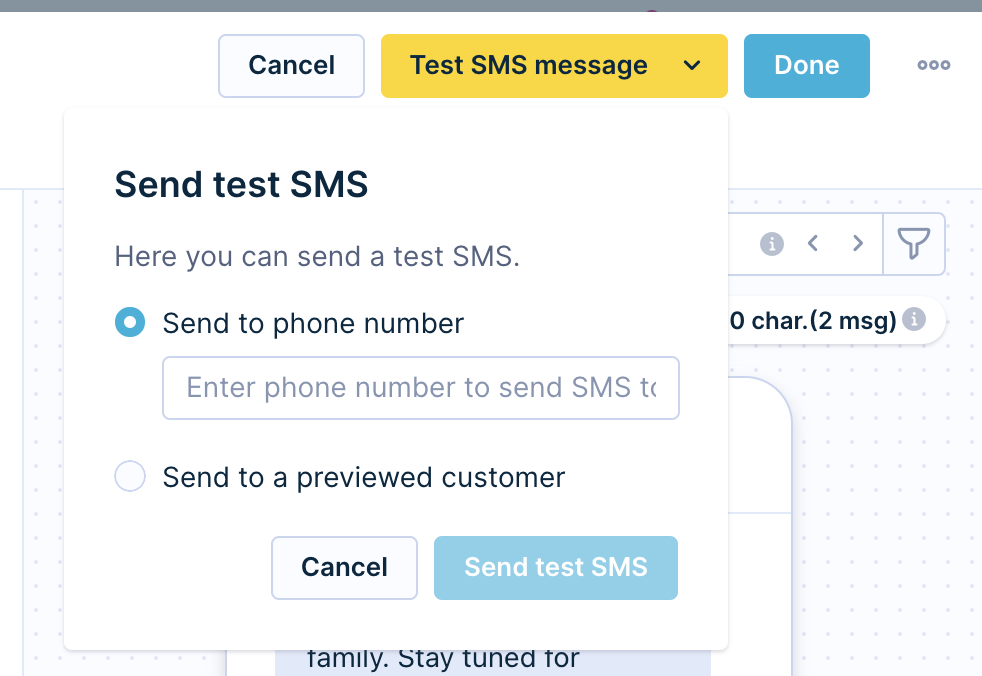
Test the message
You can preview your final MMS message or fallback SMS before you actually send it or test it for the selected group of your customers.
You can test your MMS message through the editor when you click on the Send test SMS. Here, you have two options:
- You can send it to a specific provided phone number (e.g., you can send it to yourself).
- You can send it to the previewed customer.
Run the campaign
Once you created your Scenario and made all the adaptations needed, you are ready to run the campaign.
Important limitations
- Subject can have up to 80 characters and should not contain emojis or Unicode characters.
- Maximum allowed size of the message text is 1600 characters per message.
- The maximum recommended size of the media is 1MB.
- In the case of the fallback message, the single message can consist of 160 characters, and longer messages will be split into multiple messages.
- MMS messages are sent using the customer attribute phone. It is required to have the customer attribute phone set to a phone number in an international format (either starting with "00" or with "+").
- Maximum number of predefined senders is 100 per one single project.
MMS best practices for media files
There are several recommended practices regarding sizes, files, and design considerations of media:
- Recommended file formats are .jpg for images, .gif for animations, and .mp4 for videos.
- Regarding various media sizes and other recommendations, read this Sinch article or this Infobip article.
- It isn't recommended to use any transparency in your designs as the actual colors of images would be unpredictable.
- It is recommended to test your MMS to ensure the images, animations, videos, contact cards are displayed correctly.
- The supported media type for contact cards is
text/vcard, read more about the standards of this format. Other media types such astext/directory,text/directory; profile=vcardandtext/x-vcardare deprecated in favor of thetext/vcardformat.
Updated 4 months ago