

Notification extensions for iOS SDK
Configure application extensions required for certain push notification features in the iOS SDK.
To enable certain notification features supported by the iOS SDK, you must add either one or both of the following extensions to your application:
- A notification service extension — this type of extension lets you customize the content of a push notification before it's displayed to the user.
- A notification content extension - this type of extension lets you customize the way a push notification is presented to the user.
Both extension types require the Exponea Notification Service included in the SDK.
This page describes the steps to create an extension of either type. Make sure to follow the steps for each extension.
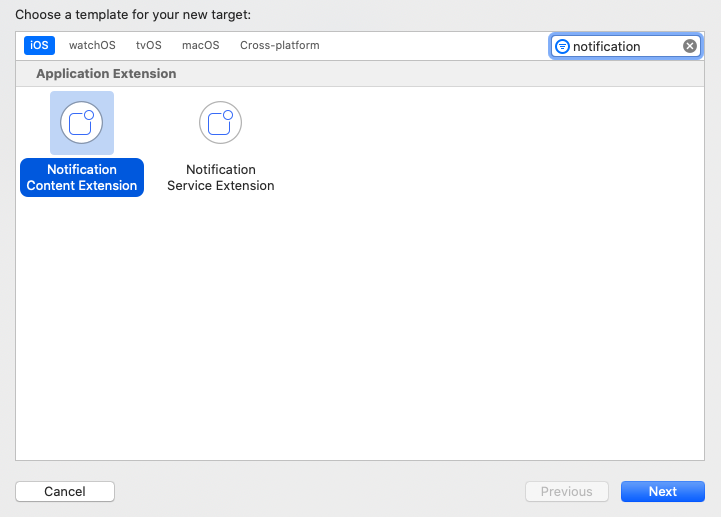
Step 1: Create the extension
Navigate to File > New > Target in Xcode and select the extension type (Notification Service Extension or Notification Content Extension).
Make sure that the
iOS Deployment Targetof your extension is the same as for your main app.
Step 2: Configure ExponeaSDK-Notifications dependency
Both extension types require a dependency on ExponeaSDK-Notification so they can import ExponeaNotificationService.
Follow the instructions in the relevant section for the dependency manager you use.
CocoaPods
- Add the following to the
Podfilein the root folder of your Xcode project:
(Replacetarget 'YourAppExtensionTarget' do pod 'ExponeaSDK-Notifications' endYourAppExtensionTargetwith your app extension target's name) - In a terminal window, navigate to your Xcode project folder and run the following command:
pod install - Reopen the file
HelloWorld.xcworkspace, located in your project folder, in XCode.
Optionally, you can specify the ExponeaSDK version as follows to let pod automatically any smaller than minor version updates:
pod "ExponeaSDK-Notifications", "~> 4.2.0"Swift Package Manager
- In your Xcode project, navigate to your app extension target's settings.
- On the
Generaltab, in theFrameworks, Libraries, and Embedded Contentsection, click on+and addExponeaSDK-Notifications.
Step 3: Implement the extension
Notification service extension
This type of extension lets you customize the content of a push notification before it's displayed to the user.
Navigate to the extension's target, and on the Signing & Capabilities tab, add the App Groups capability, selecting the same group you used for your main app.
Open NotificationService.swift and replace its contents with the code below to call the ExponeaNotificationService's methods for processing notifications and handling timeouts.
import UserNotifications
import ExponeaSDKNotifications

class NotificationService: UNNotificationServiceExtension {
    let exponeaService = ExponeaNotificationService(
        appGroup: "YOUR_APP_GROUP"
    )

    override func didReceive(
        _ request: UNNotificationRequest,
        withContentHandler contentHandler: @escaping (UNNotificationContent) -> Void
    ) {
        exponeaService.process(request: request, contentHandler: contentHandler)
    }

    override func serviceExtensionTimeWillExpire() {
        exponeaService.serviceExtensionTimeWillExpire()
    }
}If you manage dependencies with CocoaPods or Swift Package Manager, you must use
import ExponeaSDK_Notificationsinstead ofimport ExponeaSDKNotificationsin the code above.
Refer to ExampleNotificationService in the Example app for iOS SDK for a reference implementation.
Notification content extension
This type of extension lets you customize the way a push notification is presented to the user.
A default storyboard file, MainInterface.storyboard, will be created. Delete it, you won't need it.
You'll now modify the default view controller implementation.
The service extension you created in the previous step will change the notification categoryIdentifier to EXPONEA_ACTIONABLE. You must configure the content extension to display push notifications with that category.
Open Info.plist in the content extension group.
- Under
NSExtension>NSExtensionAttributes:- Set
UNNotificationExtensionCategorytoEXPONEA_ACTIONABLE.
- Set
- Under
NSExtension:- Remove
NSExtensionMainStoryboard. - Add
NSExtensionPrincipalClassand set its value to your view controller class, for example,TestingPushContentExtension.NotificationViewController.
- Remove
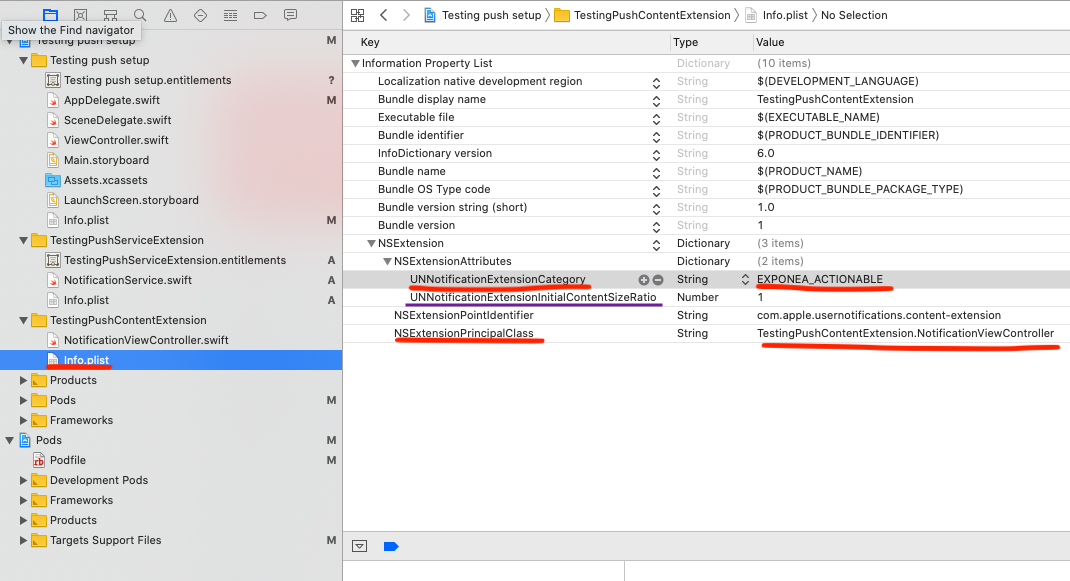
Notice the parameter UNNotificationExtensionInitialContentSizeRatio (with the default value 1). It specifies the ratio between the width and height of the content in the push notification. By default, the content is as high as it is wide. This setting is not part of the SDK but can cause unwanted blank space when no image is present. Change this value to 0 if you want the height to be dynamic (it will scale to the correct height if an image is present, but there will be no blank space if there is not).
Open NotificationViewController.swift and replace its contents with the code below so it forwards the notification to ExponeaNotificationContentService, which will render the rich notification.
import UIKit
import UserNotifications
import UserNotificationsUI
import ExponeaSDKNotifications

class NotificationViewController: UIViewController, UNNotificationContentExtension {
    let exponeaService = ExponeaNotificationContentService()

    func didReceive(_ notification: UNNotification) {
        exponeaService.didReceive(notification, context: extensionContext, viewController: self)
    }
}If you manage dependencies with CocoaPods or Swift Package Manager, you must use
import ExponeaSDK_Notificationsinstead ofimport ExponeaSDKNotificationsin the code above.
Refer to ExampleNotificationContent in the Example app for iOS SDK for a reference implementation.
Updated about 1 month ago