HTML blocks
HTML blocks are custom HTML code snippets stored as templates in the Asset Manager. You can insert them into email templates and weblayers.
When creating email templates or weblayers, you often need to reuse parts of the HTML, like headers and footers. Bloomreach Engagement lets you create custom HTML blocks (also called dynamic blocks or dynamic content) that you can create once and reuse across your email campaigns and weblayers.
You can write the block's content (the HTML code) using the classic code editor and parameters visual editor. These tools let you insert a parameter value into the block, which you can specify each time you use the block in an email template or a weblayer
How to create an HTML block
There are several options to create HTML block:
1. In asset manager, via blocks
Go to Data and Assets > Asset manager, select Blocks, and click New block.
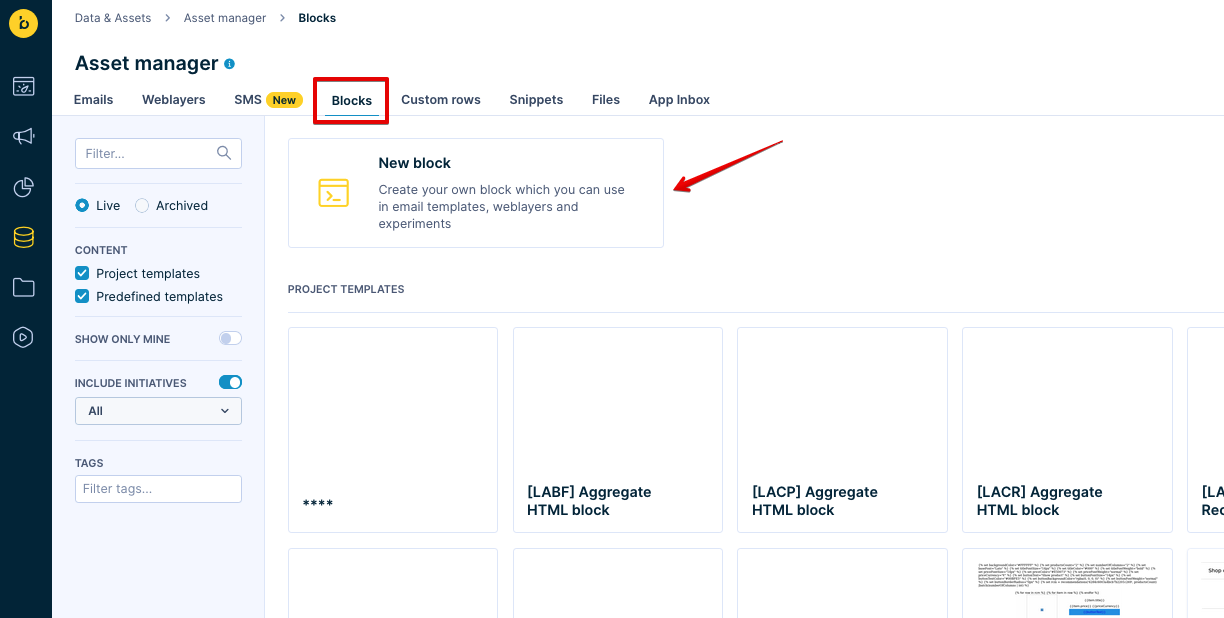
When you create an HTML block, a separate HTML builder window opens where you can make, preview, and test the block.
2. In asset manager, via emails or via weblayers
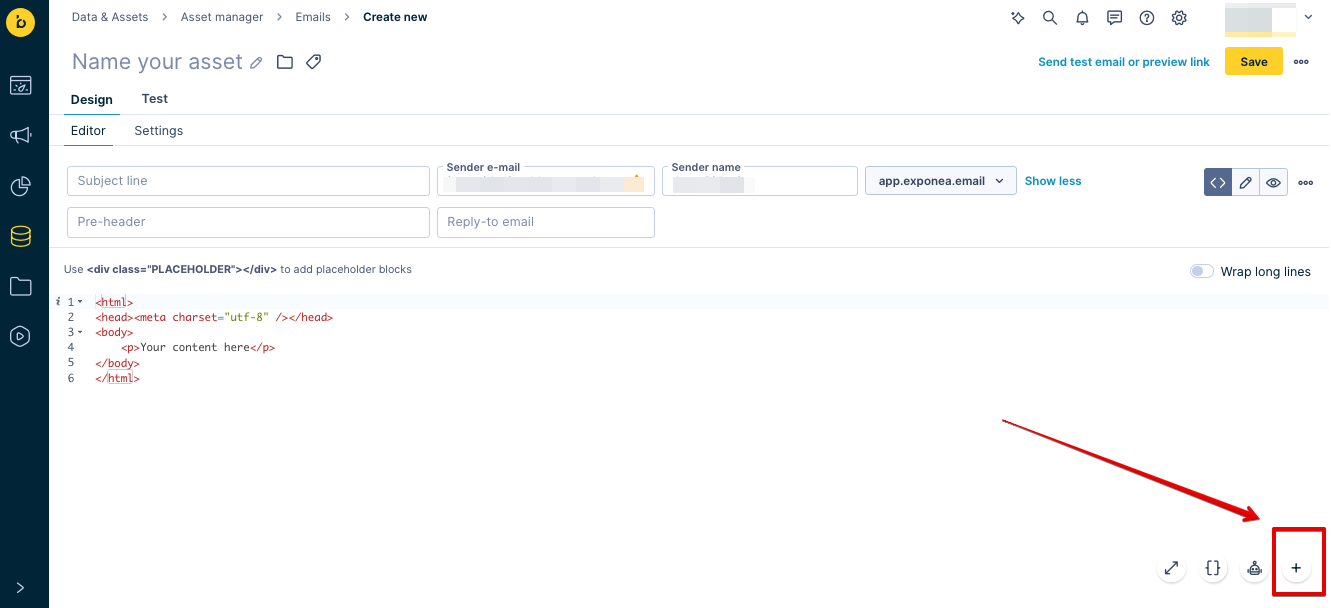
- For emails, go to Data and Assets > Asset manager, select Emails, and choose Visual builder or HTML builder. Click "+" button at the bottom right corner of the editor. In the pop-up window, select New block.
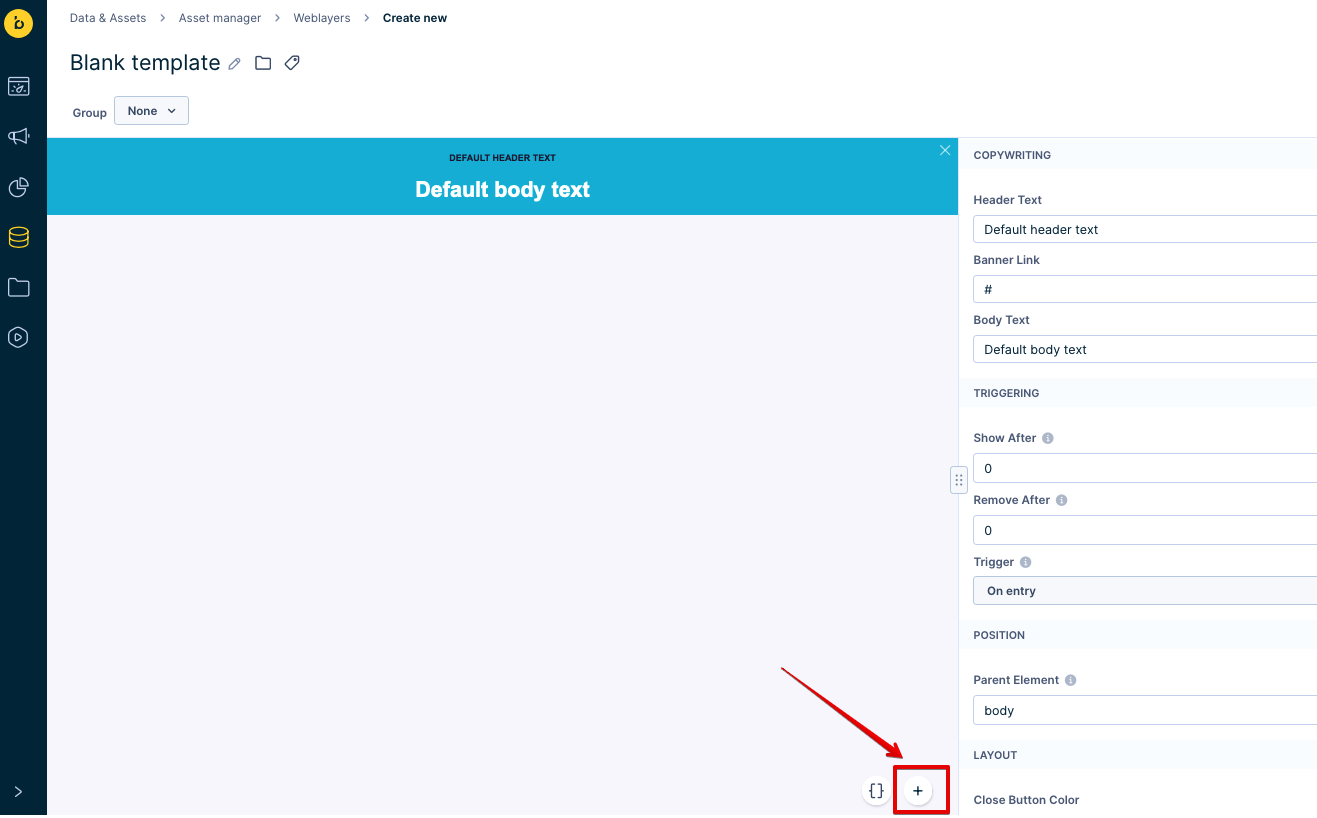
- For weblayers, go to Data and Assets > Asset manager, and choose Weblayers. Select a new template, click "+" button at the bottom right corner of the editor. In the pop-up window, select New block.
3. Via email or weblayer editor
Access an HTML block directly in your email or weblayer editor.
- For emails, go to Campaigns > Email campaigns. Access your existing email campaign, or create a new one by clicking "+ New email campaign". In the visual or HTML builder, click "+" button at the bottom right corner of the editor. In the pop-up window, select New block.
You can also access your email editor via the email node in your scenario.
- For weblayers, go to Campaigns > Weblayers. Choose an existing weblayer, or create a new one by clicking "+ New weblayer". In the weblayer template, click "+" button at the bottom right corner of the editor. In the pop-up window, select New block.
Types of Blocks templates
Bloomreach Engagement uses two main types of HTML block templates:
Project templates
Project templates are custom blocks you create or obtain by copying and changing predefined templates.
Predefined templates
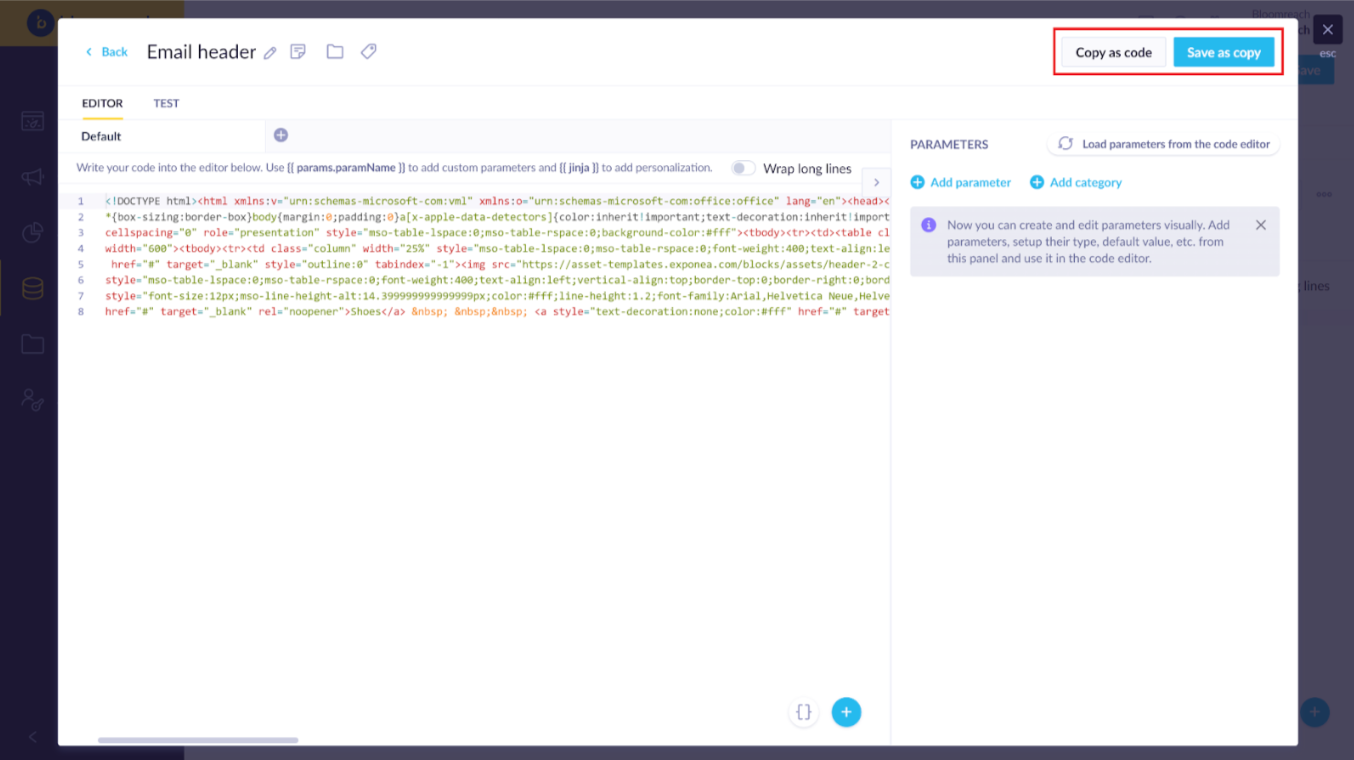
Predefined templates in Bloomreach Engagement serve various use cases. They are not stored in your project, so you cannot edit them directly. However, you can save them as copies into your project templates and continue editing.
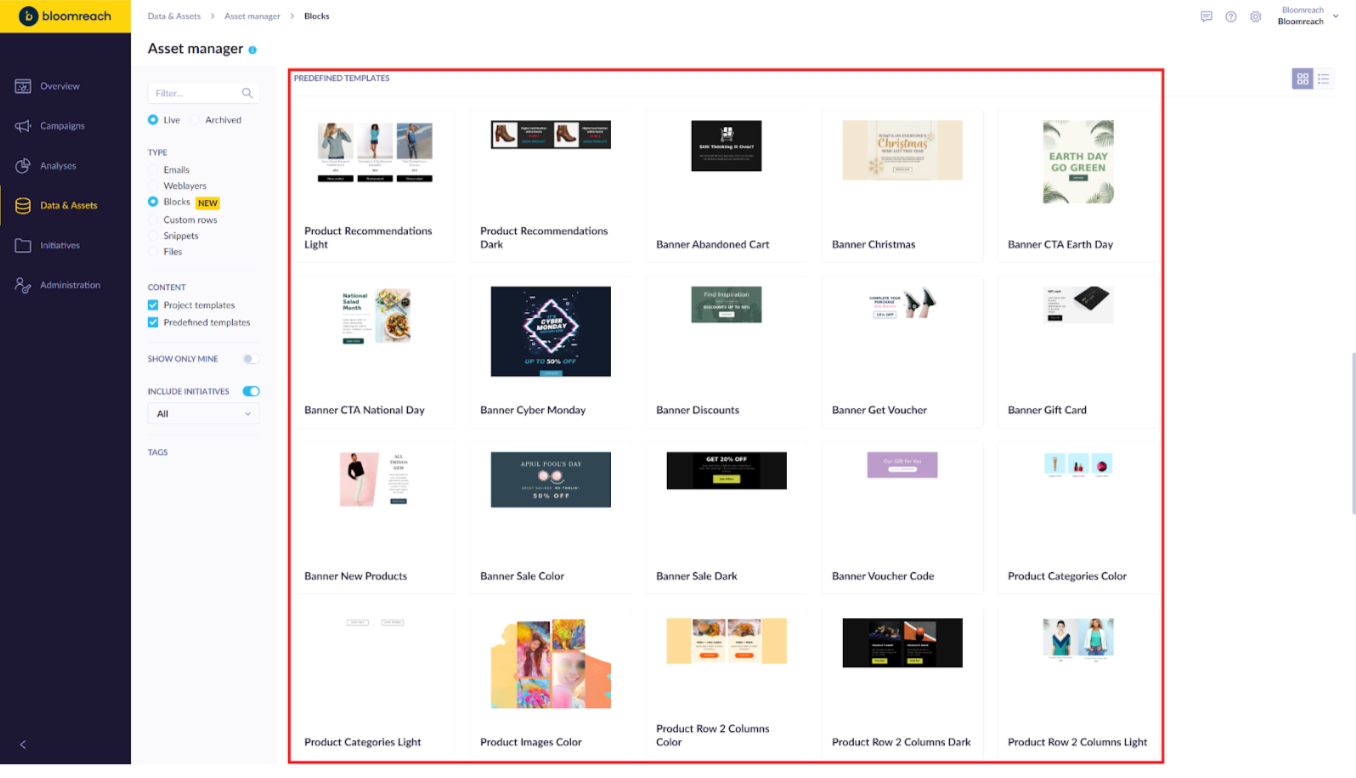
There are two types of predefined templates:
1. Templates containing parameters
If the template contains parameters, you must first save the block into the project templates via “Save as copy” and then select the project copy for use in the campaign (to reference a block in a campaign, it must have a project copy).
2. Templates without parameters
In case the template does not contain parameters, you have two options:
- Click “Save as copy” and then use the project template copy.
- Select “Copy as code” which will copy the code of the predefined template into the clipboard.
HTML Editor
When creating a new block, write the HTML code you want to reuse later.
The content of the block (i.e., the HTML code) can be then written using the classic code editor and parameters visual editor. These allow the client to insert a parameter value into the block that can be specified with each usage of the block in an email template or a weblayer.
The functions available are similar to the normal email HTML builder, including multilingual support.
Using parameters
It is possible to create parameters to be used in the block. Parameters are like variable values that make it possible to insert a custom value within, e.g. each email separately. This will prompt the option to choose the value of the parameter when the block is selected within a campaign.
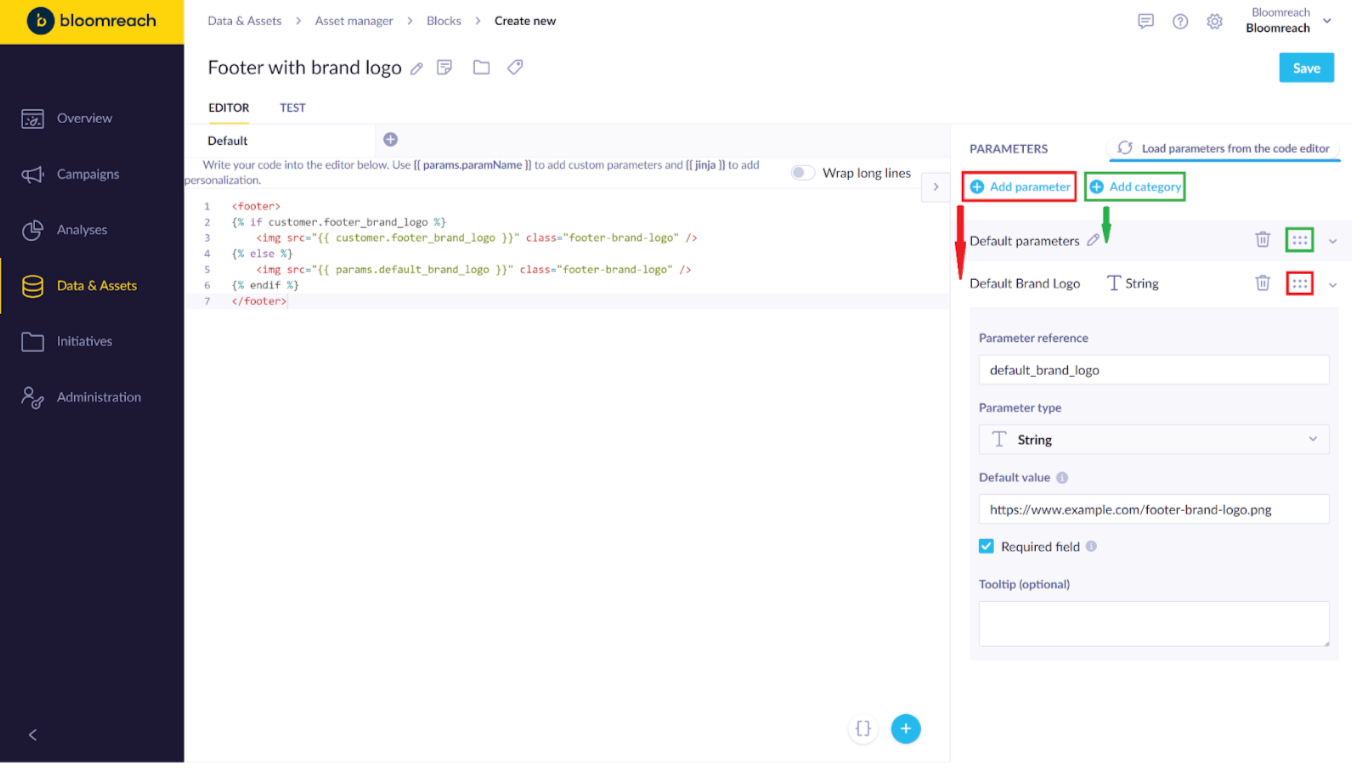
Parameters can be created using the parameters editor by clicking on the + Add parameter _button, or can be defined directly in the code and created using the button “Load parameters from the code editor”_
Each parameter can be also assigned to a category. Categories should help to better organize the parameters within the block. Categories can be created using the parameters editor by clicking on the + Add category button. Both parameters and categories also support the drag & drop functionality.
Parameter attributes
1. Parameter reference-> name of the reference of the parameter to be used in the code, The parameters display name is derived from it (similar to template parameters)
- The derived parameter name will automatically split words if the camel-back notation is used or the word is connected with an underscore _
- reference paramName -> Param Name
- reference param_name -> Param Name
2. Parameter type -> data type of the parameter
- Available data types:
- string (default) – a simple one-line text, the type returned is a string
- text – multi-line text, the type returned is a string
- number - type returned is integer or float
- boolean - type returned is True/False
- list - type accepted/returned is jinja list type e.g [1,2,3]
- object - type accepted/returned is jinja dict type e.g {"key": value}
- datetime – datetime picker, the value returned is timestamp as number
- date – date picker, the value returned is timestamp as a number with default hours set to 23:59:59 currently FE seems to create a timestamp at 23:59:59 (CET)
- time – time picker, the value returned is a string with the time “12:00”
- color – color picker, accepts color values in HEX, RGB, or rgba format, the type returned is a string
- enum - selector for defined string values
- image - image picker from the Bloomreach file management, the value returned is a string that represents the URL of the image
- recommendation - recommendation picker, the value returned is an ID of the selected recommendation model
- metric - metric picker, the value returned is an ID of the selected metric
- For most of the data types except (datetime, date, time, and boolean) it is possible to use either constant values or Jinja variables such as {{ customer.first_name }}.
- Parameter types are validated for constant values; if a Jinja variable is used as a parameter, the parameter type is not validated.
3. Default value -> default parameter value. The default value will be used in case no specific parameter value is provided upon block usage in a campaign (calling the block) and to prepopulate the parameters input.
- For most of the data types except (datetime, date, time, and boolean) it is possible to use either constant default values or jinja variables such as {{ customer.first_name }}
- If no default value is provided, and the parameter is not filled, the jinja undefined value will be used
4. Required field -> define whether the parameter must be filled in when using the block. Parameters marked as required must be filled in unless the default value is also used.
5. Tooltip -> Tooltip will be displayed by the parameter name when inputting the values of the parameters in a campaign
Parameters can be used within the code as standard Jinja variables, using the keyword parameters and the defined reference name e.g:
{{ params.parameterName }} or {{ params["parameter name"] }}
{% set otherVariable = params.parameterName %}
{% if param.paramName = "something" %}
…
{% endif %}
Multi words param references can only be used with the params[""] notation.
Since params are of type dictionary, be aware that parameter names are, essentially, keys to lookup in a dictionary. Parameter names might conflict with Python built-in dictionary methods and in that case, the params[""] notation should be used. For example, a parameter with the name "items" should be accessed using the notation params["items"].
Calling blocks with parameters:
{{ block('<block id>', {'parameterName': 'value'}) }}
Using Jinja variables as parameters
It is allowed to use simple Jinja variables/expressions as parameters of blocks.
Parameters can’t contain complicated jinja expressions within {%... %} or strings containing jinja within {%... %} such as set, if, for loop, etc.
Contextual variables, such as event, webhook, or email.view, are not available directly in the block but can be used as parameters in campaigns where those variables are available.
Notation
There are two types of notation of variables as parameters depending on their usage.
1. When using blocks as the Jinja reference, the variables must be used directly (without {{ }})
For example:
{{ block('<block id>', {'purchasePrice': event.total_price }) }}

{{ block('<block id>', {'finishDate': ((time + 604800) | from_timestamp('%d-%m-%y')) }) }}

{{ block('<block id>', {'products': [1,2,3] }) }}
Strings containing Jinja personalization use "~". Otherwise, they will not be rendered.
{{ block('<block id>', {'mainText': 'Hello ' ~ customer.first_name ~ ', welcome!' }) }}
2. When filling in the parameters via the inputs in the asset picker, you need to use the {{}} notation, so we can recognize it's a variable and generate the reference correctly, e.g without “”
In the parameters inputs, it is also possible to input a string containing jinja and it will be automatically translated into the ~ notation.
For example:
The following parameters inputs:
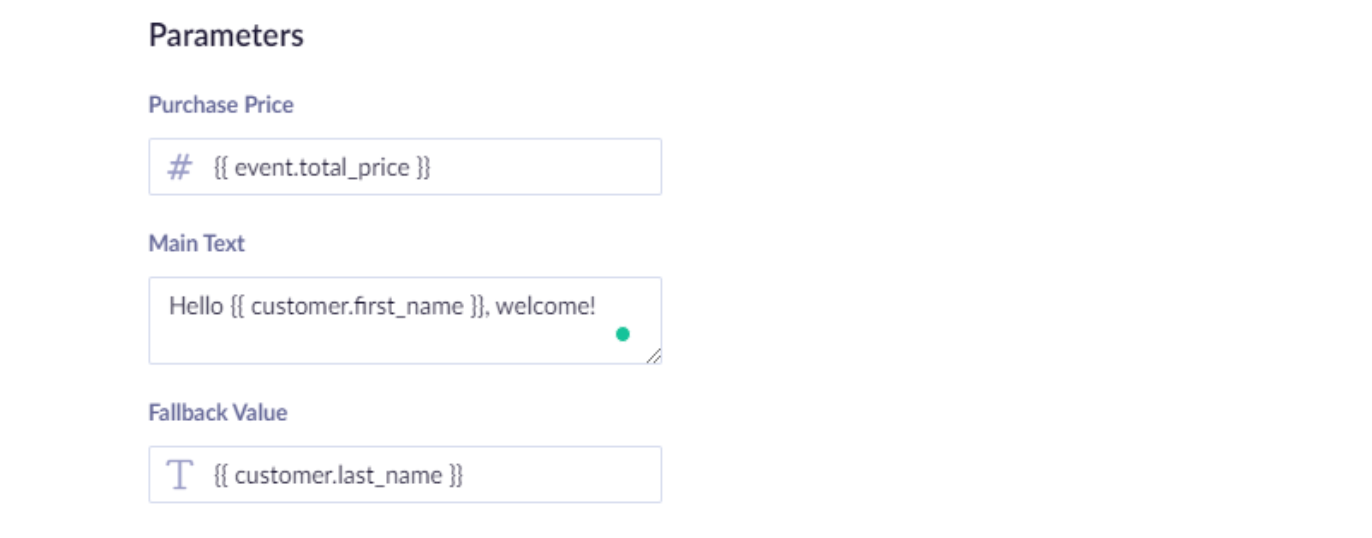
translate into this reference:
{{ block('606321bfe04f9d2be61e0812', {'purchasePrice': event.total_price, 'mainText': 'Hello '~ (customer.first_name) ~', welcome!', 'fallbackValue': customer.last_name}) }}
Using blocks in campaigns
Upon usage in a campaign, blocks can be copied as a reference with the visual editor for the parameters' values and preview, or if it does not contain any parameters, they can also be copy pasted. If the reference is used, any time the block is updated, the change is immediately reflected in the email that uses it.
A finished HTML block can be inserted into an email campaign in 2 ways:
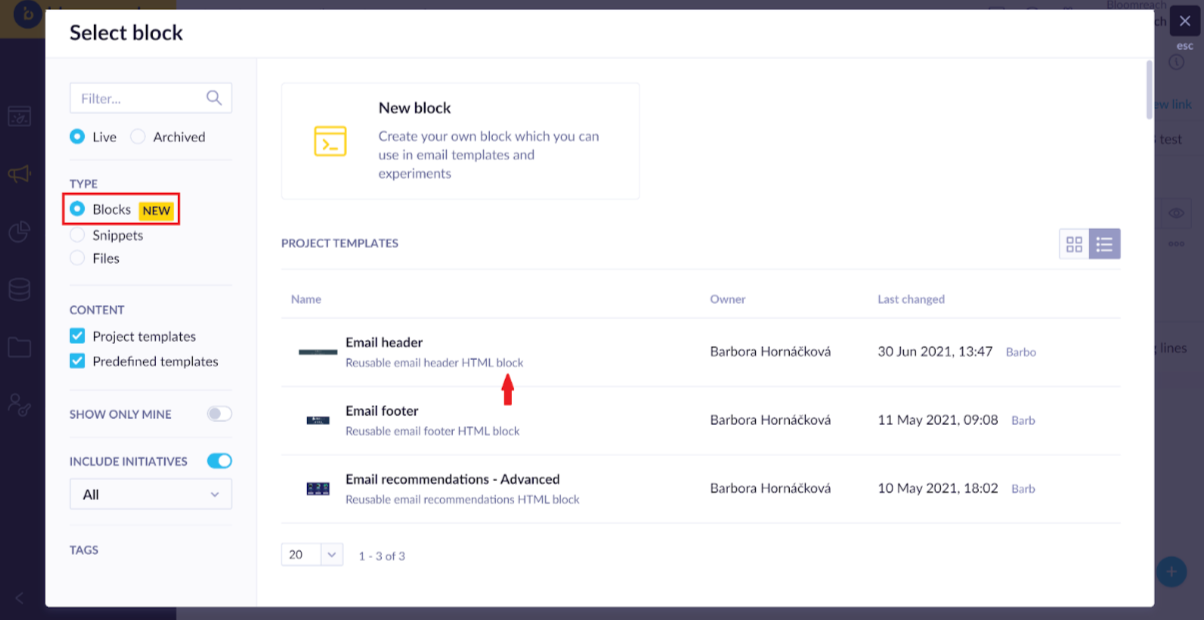
1. Via the asset picker by clicking a (+) button on the right bottom of the HTML or visual editor by choosing the desired block.
- Blocks can be copied as either direct code (in this case HTML) or as a reference
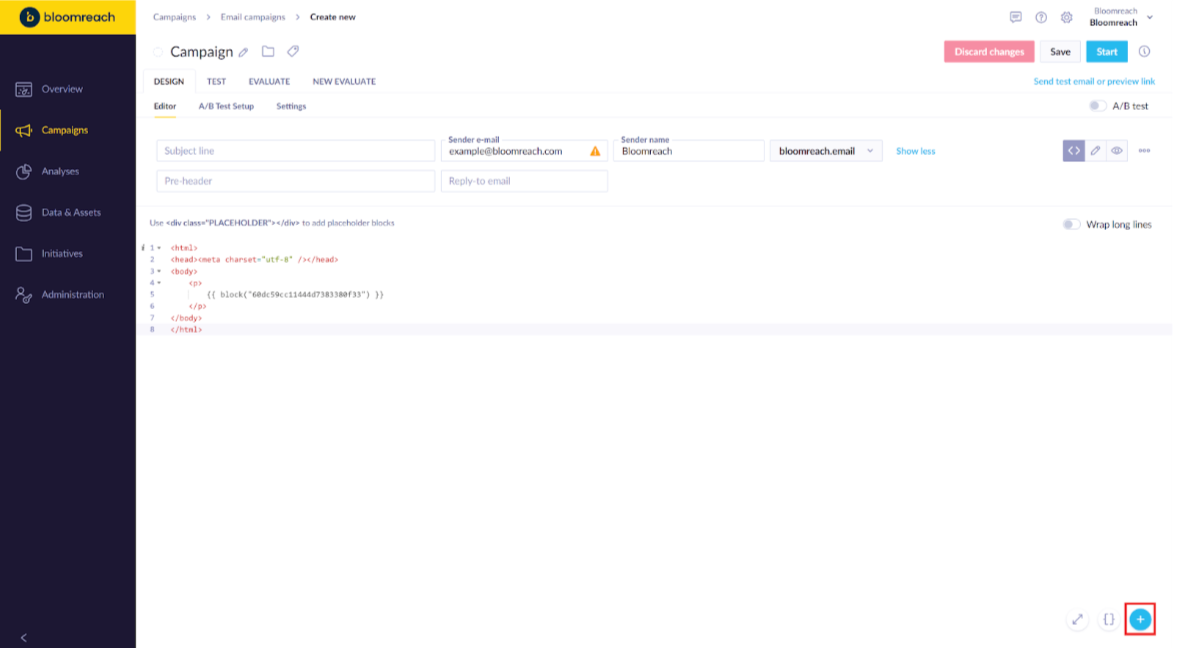
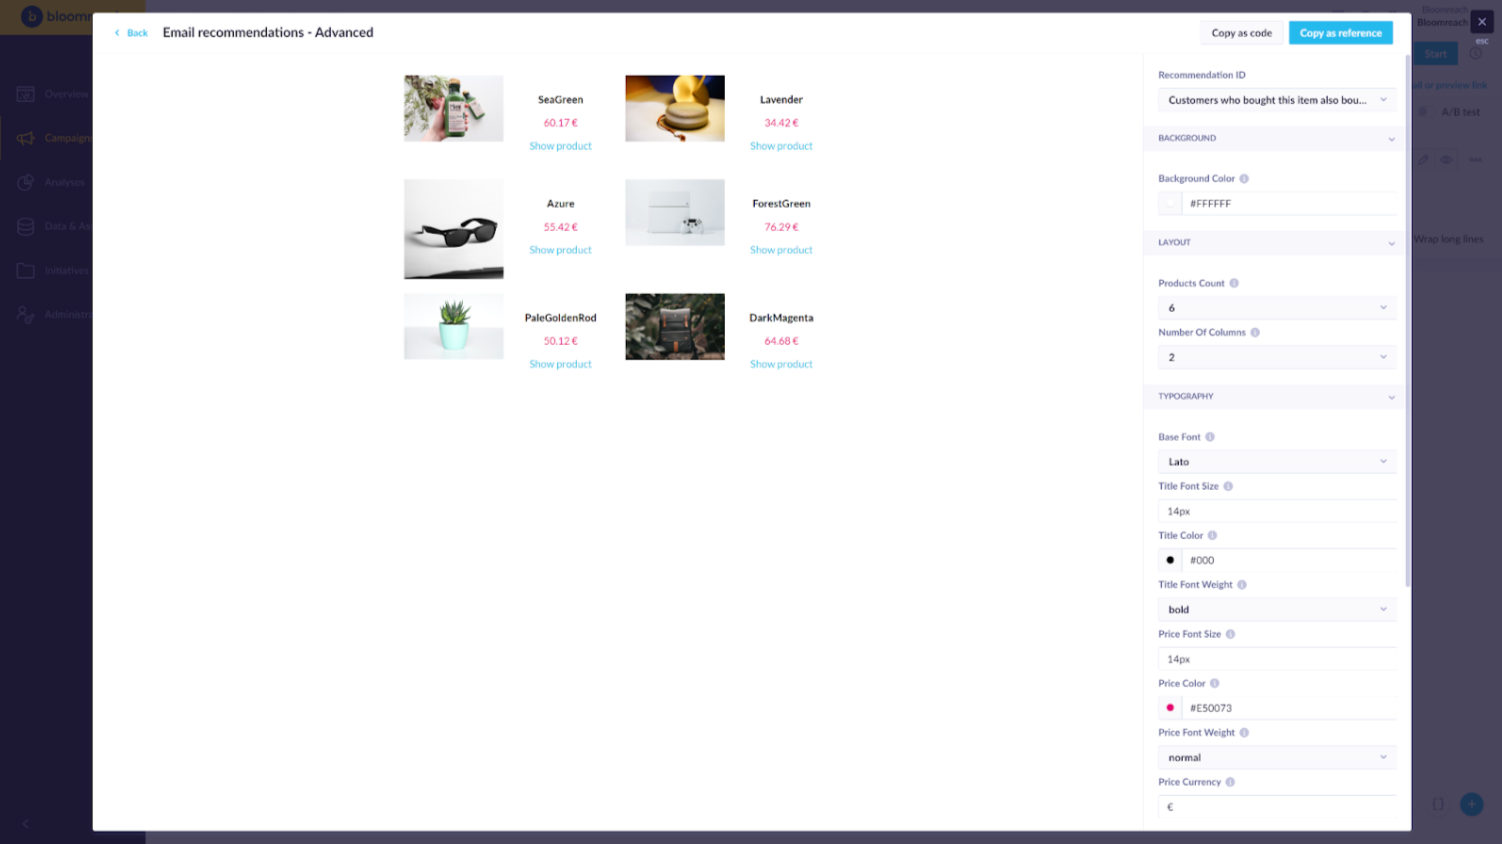
Choosing a block will open the block preview with the customer selector, block description, and parameter inputs. When entering the parameters, the preview will be regenerated once you lose focus from the input (click outside).
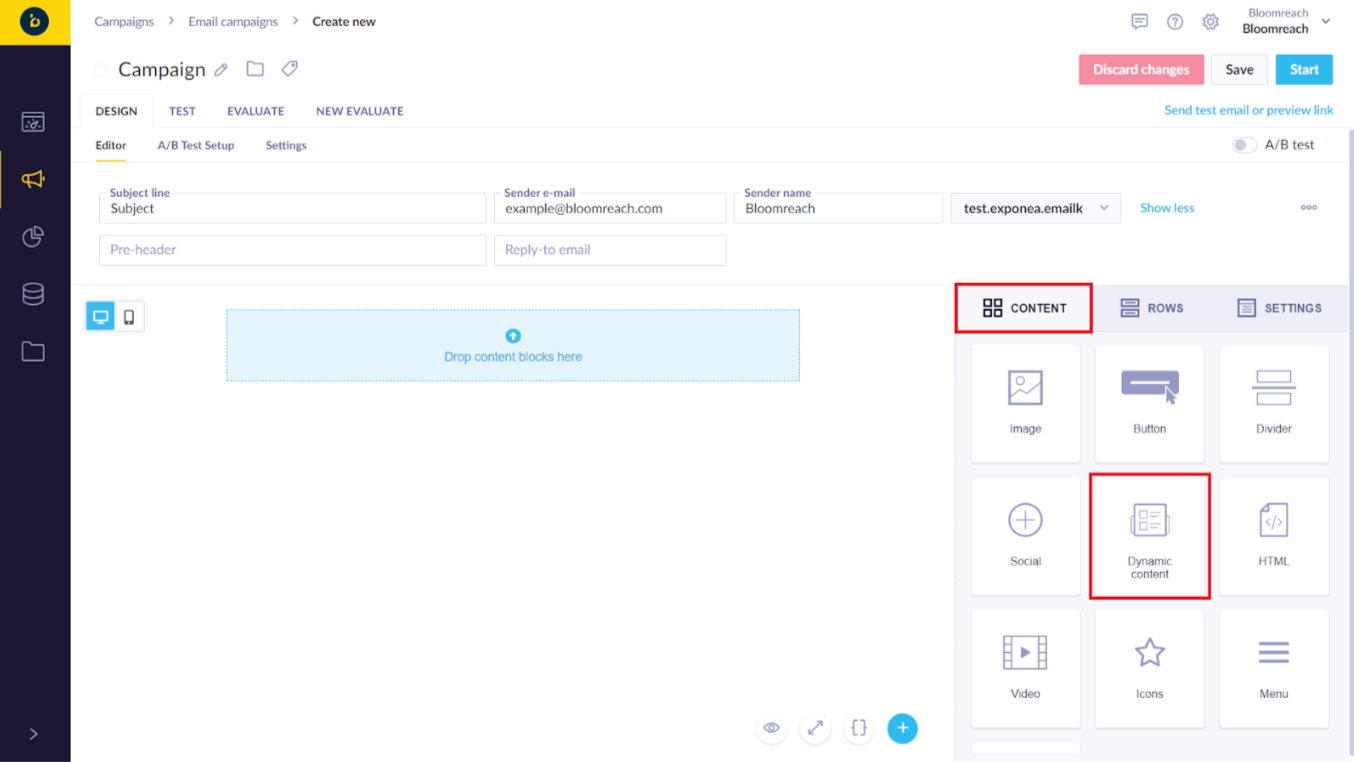
2. Via the Visual editor by simply dragging the “Dynamic content” node from the Contents tab into the
canvas and then choosing the desired HTML block.
Language variants behavior
The language variant of the block will be selected based on the selected main campaign template language version. To illustrate, here is how the following situations would be solved:
Case 1:
We have 2 assets: a campaign template with Slovak (sk) variant, a block with no language variant, and a customer with Slovak (sk) language:
- template (sk) -> using block (default)
Case 2:
We have 2 assets: a campaign template with no language variant, a block with no language variant, and a customer with Slovak (sk) language:
- template (default) -> block (default)
Insert options
1. Copy as reference
This will copy the reference to the block in jinja tags, which can be pasted into code. This will not allow changes to the block directly in the campaign and WILL be updated when the block is changed.
Referencing a block using jinja:
- Without parameters:
{{ block('<block id>') }}
- With parameters:
{{ block('<block id>', {'<param name>': <param value>, '<param name>': <param value> }) }}
2. Copy as code
This will take the full block content from the default language template and copy it to the clipboard. The client can simply paste the code into the desired campaign part. This code can be changed as desired, and will NOT be updated when the block is changed, nor will it consider language variants.
This option is only available for blocks without parameters.
Limitations
- HTML Blocks currently cannot be used within Webhooks. Referencing a block via its ID within Webhook results in a '
blockfunction not defined' error. Instead, use snippets in webhooks for your objetives. - Blocks cannot reference other blocks within themselves using
{{ block('ID') }}.
Updated about 1 year ago
