

Playable
Integration
The following is a guide on how to integrate Playable with Bloomreach Engagement.
Playable is a gamification platform that enhances your marketing with interactive video capabilities. This integration allows you to create personalized customer journeys, boost email campaign engagement, and increase conversion rates with dynamic, interactive content.
Prerequisites
Before you start, make sure that you have:
- A valid Bloomreach Engagement account.
- API credentials and project token from your Bloomreach Engagement project.
- Administrator or user with integration access in Playable.
1. Set up the Bloomreach integration in Playable
Add the integration
In Playable:
- Go to the Integrations tab and press Add integration.
- Choose Email provider > Bloomreach and press Configure now.
- Paste your Bloomreach API key in the required field.
- Press Save to establish the connection.
NoteIf you have set up a Bloomreach integration in another campaign, you can re-use the configuration.
Authenticate the integration
To connect Bloomreach with Playable, you need to authenticate it with your project token, private key, public key, and API endpoint.
After you successfully authenticate, you can continue to set triggers and conditions and map data fields.
TipEnsure that Bloomreach API permissions have sufficient group permissions. Check out the groups management documentation for more info.
2. Set Triggers and Conditions
Triggers determine when data is sent from Playable to Bloomreach. You can configure triggers with Form fields or Advanced options
Form fields
This option sends data based on specific form field submissions. Example fields include:
- Name
- Terms and Conditions
Advanced
This option allows for a more complex trigger configuration with the following conditions:
Group
- All: Includes all participants.
- Winners: Includes only participants who won.
- Losers: Includes only participants who didn't win.
Date Range
Specify a start and end date for when the trigger is active.
Time Range
Specify a time range for when the trigger is active.
Metric Rata
To trigger the integration, use game metrics such as game scores, correct answers, or time used.
Form Field(s)
Define which specific form fields must be completed for the trigger to activate.
GET Parameters
Include the URL-based GET parameters as a part of the trigger condition.
3. Map the data fields
The next step will specify to which data fields the data will be transferred in Bloomreach.
Map form fields
Map the form fields submitted by users (for example, name or email) to the data fields in Bloomreach. This is required to manage subscriber information effectively.
Dropdown list
If the ESP provides data fields that can be fetched dynamically, these fields will appear as selectable options in the dropdown menu for each form field.
Manually define
Use this option to map custom fields that aren't available in the dropdown. You can define the field name or tag manually.
Make sure it matches the data field in Bloomreach.
Common form fields to map
- Name: Map the subscriber's first or full name data field in Bloomreach.
- Email: This is the primary identifier, so make sure this is mapped correctly.
- Phone: Map the subscriber's phone number data field in Bloomreach.
- Terms and Conditions: If your registration form includes a checkbox for terms and conditions, map this to a corresponding custom field, tag, or data field in Bloomreach.
TipFor custom form fields, use "Manually Define" and verify the data field names in Bloomreach.
Map campaign information
Campaign information includes metadata about the user interaction, campaign performance, and system-generated data. Map these fields to track campaign effectiveness in Bloomreach.
Dropdown list
The campaign information fields supported by Bloomreach will appear as options in the dropdown menu. Select the appropriate field to map.
Manually define
If the required campaign information isn't pre-configured in the dropdown, use this option to define custom field names.
Standard campaign fields to map
| Field name | Data type |
|---|---|
| Registration ID | Integer |
| Campaign name | String |
| Campaign ID | Integer |
| Created on | Date |
| Device | String |
| IP address | String field for geo-targeting or security checks |
| Created from URL | String |
| Campaign URL | String |
4. Custom fields and static values
Custom fields
Custom fields in Bloomreach allow you to store and manage additional information about contacts. These fields can be used to enrich the data you collect and customize your campaigns.
When you add a custom field in Playable, the data is transferred as part of the JSON payload. For example:
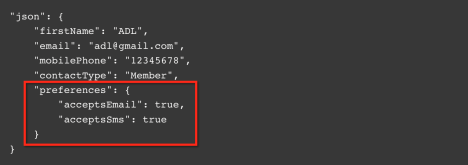
Example JSON payload.
How to set up custom fields
- In Playable, go to the integration settings and scroll down to Custom fields.
- Add a new field with
NameandValuespecified.Name: Corresponds to the field group in the JSON (for example,preferences)Value: Matches the subfield within the group (for example,acceptsEmailoracceptsSms)
- If applicable, mark the fields as required.
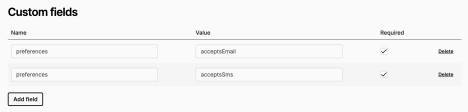
Custom fields setup panel in Playable with name and value inputs.
Static values
Static values allow you to send consistent, predefined data as part of the JSON payload, regardless of user input. These values can be mapped to fields and used for fixed parameters in your campaigns.
How to set up static values
- In Playable, scroll down to Integration setup and click on Static information.
- Add the value in the Static value field.
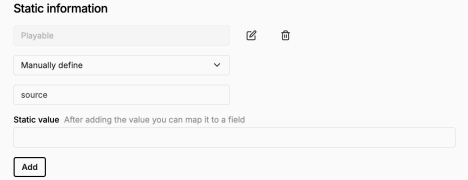
The Static information panel in Playable.
Data formats and typecasting
- On the integration settings page, go to General Integration Settings
- Enable Typecast Data Values. This will display an Edit button.
- Press Edit to configure the desired data format for the selected field.
- Save your changes to apply the new data format.
NoteTypecasting ensures that the data format matches the field requirements in Bloomreach. This reduces the risk of data rejection or errors during transmission.
6. Test the integration
- Go to the Demo URL.
- Go through the campaign as one of your users would, including the registration form and completing the game.
- Verify that the data is sent to Bloomreach.
If you encounter any errors, refer to the Troubleshooting section.
TipIf your trigger is set to "Prize won" or "Bulk prize win", you can create a temporary prize to have a 100% win chance. This is useful for testing.
Troubleshooting
If you encounter any issues during the integration process, refer to the following section.
Authentication errors
Ensure your project token, public key, private key, and API endpoint are correct.
Verify that your Bloomreach API user has sufficient permissions (read/write access). You can test the credentials with a tool like Postman to confirm connectivity.
Field mapping issues
Check that mapped fields in Playable match Bloomreach's names exactly, as they are case sensitive. Use the Bloomreach dashboard to confirm data is being received correctly.
Data transmission errors
Review triggers and conditions to ensure they are configured properly. Use the Watchdog to check HTTP status codes:
- 4xx: Verify authentication and request parameters.
- 5xx: Contact Bloomreach Support for server-side issues.
Test failures
Ensure that the integration setup is complete and all required fields are mapped. Perform a test and review the Watchdog for any errors. Adjust mappings or triggers as needed to resolve issues.
Watchdog
You can use Watchdog to check for errors. To locate the Watchdog:
- Go to Activity > Registrations.
- Choose the registration you want for logs and click on Watchdog.
If you can't locate the Watchdog button, then the integration is paused or wasn't triggered. Check the trigger and conditions in the Bloomreach integration, and make sure the trigger and conditions are true.
Possible error messages
No lists were found
Make sure the API key and Bloomreach account have read/write access to your list(s).
Authentication failure
Double-check the authentication credentials. Verify that the API key and account have correct permissions and scopes enabled.
No registration form found
The registration form is missing from your campaign. Go to Build campaign > Registration form to add a registration form.
Updated 3 months ago