

Email templates
This guide covers how to build email templates for abandoned cart campaigns, including code for displaying cart items, calculating totals, building responsive layouts with MJML, adding product recommendations, and inserting vouchers. All code samples include inline comments to guide your implementation.
Abandoned cart email
Create a new email directly in the email node in a scenario, or in the Asset Manager. You can use either the visual or HTML builder.
Use the code below to display the items left in the cart in the email. Read the inline comments carefully — they explain how the code works and what you need to change. You also need to decide which item attributes to display. You can display any attribute available as a column in your catalog by calling item.column_name. You can also display any value tracked in the product_list attribute of the cart_update event by calling product.value_name.
<table cellpadding="0" cellspacing="0" width="100%" style="max-width: 1000px; text-align:left; font-size:14px;">

<!-- load the list of products in cart from the aggregate that you created in the scenario in the step 2d part A (last cart_update.product_list). -->
{% set products = aggregates['59cb9e784d539b3094f331ed'] %}

<!-- loop through each product to display each product customer has left in their cart -->
{% for product in products %}

    <!-- load the product data from catalog into the item variable. It matches the product_id from tracking (product.product_id) with the information from the catalog. -->
    <!-- change "cart_products" with the name of the catalog you want to use to match products from tracking. -->
    {% set item = catalogs.cart_products.item_by_id(product.product_id) %}

    <!-- if product was found in the catalog -->
    {% if item %}

        <!-- display the product -->
        <tr>
            <td style="padding-bottom: 20px;">
                <table width="100%">
                    <tr>
                        <td width="30%">
                            <a href="{{ item.url }}">
                                <img src="{{ item.image }}" alt="{{ item.title }}" width="100" style="width:auto; max-width:100%; max-height:150px;" />
                            </a>
                        </td>
                        <td width="70%" style="padding:0 10;">
                            <p><a href="{{ item.url }}" style="font-size:20px; text-decoration: none; color:#1c1733">{{ item.title }}</a></p>
                            <p><b>Quantity:</b> {{ product.quantity }}</p>
                            <p><b>Price:</b> {{ (item.price * product.quantity)}} €</p>
                        </td>
                    </tr>
                </table>
            </td>
        </tr>
    {% endif %}

{% endfor %}

</table>
The code below calculates the total price of the cart. If this information is available in your tracking (which is recommended), you can use the simpler Jinja expression {{event.total_price}} instead.
{% for product in products %}
    {% set item = catalogs.cart_products.item_by_id(product.product_id) %}
    {% set total_price = (total_price + (item.price * product.quantity)) %}
    {% if loop.index == (products | length) %}
        Total price: <b>{{ total_price }} €</b>
    {% endif %}
{% endfor %}
Responsive email templates with MJML
MJML is a framework for building responsive email templates that render correctly across a wide range of email providers, web browsers, and operating systems. You can use MJML locally via Node Package Manager or in the provided online editor with a live visual preview.
NoteRead more about MJML usage here: Editor, Documentation, Sample templates.
Walk-through use case
MJML uses a grid system. The mj-section tag puts content into a row, and the mj-column tag displays content side by side in columns within a row. Column widths are shared evenly by default — with 2 columns, each occupies 50% of the space. The default row width is 600px.
To insert custom HTML elements, use the mj-text tag. Within this tag, you can add your own HTML. The example below displays a product image with a URL, a product description, and a product price side by side.
<mj-sectuon padding="0px">
  <mj-column width="200">
    <mj-text align="center">
      <div style="text-align: center;">
        <a style="text-align: center;" href="{{item.url}}>
          <img width="130" src="{{item.image}}>
        </a>
      </div>
    </mj-text>
  </mj-column>
  <mj-column width="250">
    <mj-text align="center" font-size="20px" color="#000000">
      <a style="color:black; text-decoration:none; font-family; 'Lato', sans-serif;" href="{{item.url}}">{{item.image}}
      </a>
    </mj-text>
  </mj-column>
  <mj-column width="150">
    <mj-text align="center" font-size=20px" color="#000000">
      <span style="font-family: 'Lato', sans-serif;">£{{item.price}}
      </span>
    </mj-text>
  </mj-column>
</mj-section>
This creates a row using mj-section, then 3 columns using mj-column. The description column is allocated more space than the price column using the width attribute.
The example below shows how to display a product image inside an mj-text tag. MJML handles cross-browser and cross-client compatibility so you don't have to.
<mj-text align="center">
	<div style="text-align: center;">
  	<a style="text-align: center;" href="{{item.url}}">
    	<img width="130" src={{item.image}}">
    </a>
  </div>
</mj-text>
You can also write CSS in the head section instead of inline:
<mj-head>
	<mj-style inline="inline">
  	body{font-family: 'Lato', sans-serif;"}
    a{font-family: 'Lato', sans-serif;"}
    p{font-family: 'Lato', sans-serif;"}
  </mj-style>
</mj-head>
NoteCSS applies only to HTML elements and has no impact on MJML tags. To style MJML tags, use their supported attributes. You can embed Jinja directly into the code, but Jinja used outside of MJML elements (for example, in loops) will be discarded.
To export the template to Bloomreach, convert it to HTML in the online editor by clicking View HTML. Paste the resulting HTML code into the HTML builder in Bloomreach. You can then insert additional Jinja for further customization.
Recommendations
The code below lets you insert product recommendations into an email as a dynamic block. Add the code into a new predefined HTML block by going to Data and Assets > Asset manager > Blocks > New block.
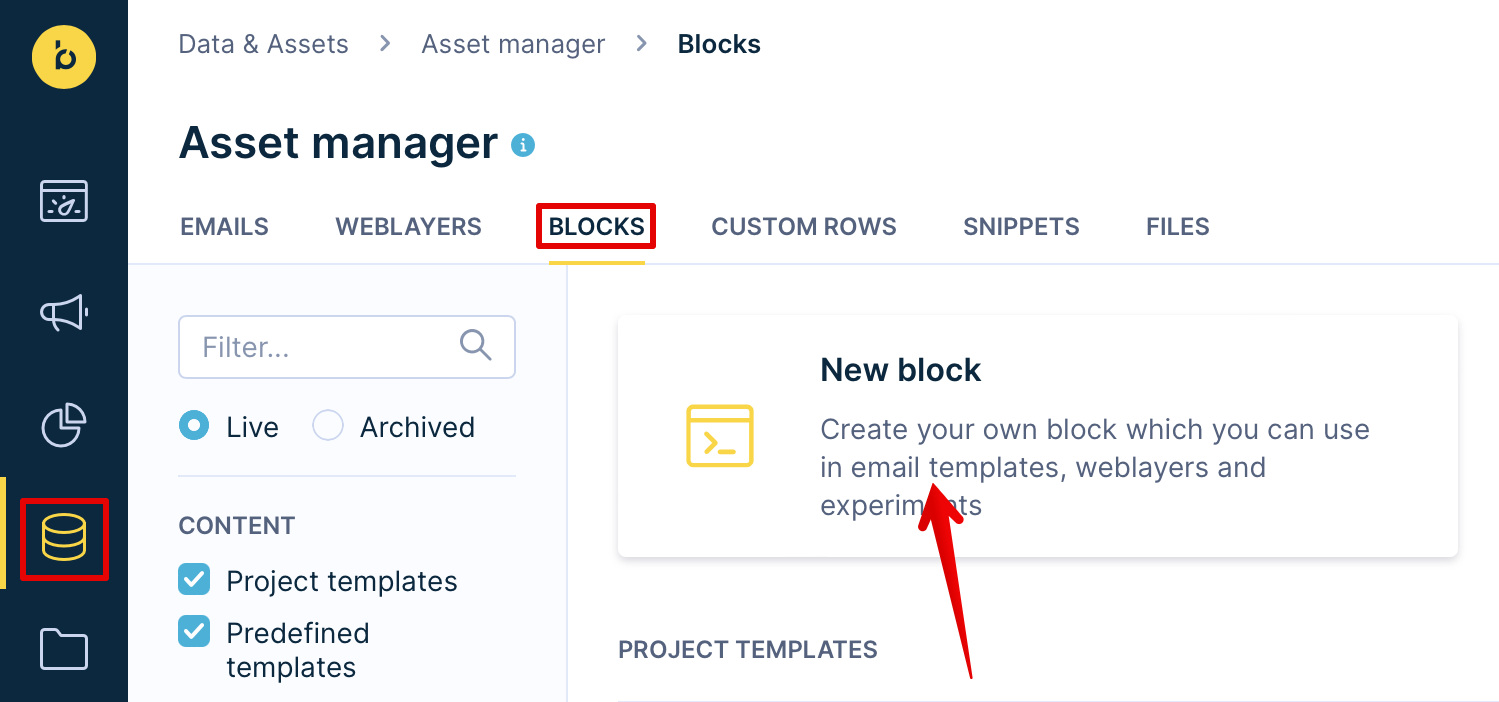
Creating a new HTML block in Asset Manager.
Once the dynamic recommendations block is added to an email, you can customize its look and feel without editing HTML. Predefined templates are also available to help you get started.

Predefined template options in the email block editor.
The block uses title, price, image, and url properties from the catalog. If you use different names for these properties, update them in the code. Make sure to test the block and adjust it for your needs and email client requirements. Remember to replace the recommendations ID in the HTML code with the actual recommendation model ID from your project.
{% set rcm = recommendations('[[recommendationID]]','[[products count : number | 4]]', fill_with_random = "true") %}

<table cellpadding="0" cellspacing="0" width="100%" style="max-width: 1000px; text-align: center;">

{% for item in rcm %}
    <tr>
        <td style="padding-bottom: 20px;">
            <table width="100%">
                <tr>
                    <td width="50%">
                        <a href="{{ item.url }}">
                            <img src="{{ item.image }}" alt="{{ item.title }}" width="200" style="width:auto; max-width:100%; max-height:150px;" />
                        </a>
                    </td>
                    <td width="50%" style="padding:0 10px; font-size:14px;">
                        <p>
                            <a href="{{ item.url }}" style="font-size:16px; text-decoration: none; color:#1c1733">
                                {{ item.title }}
                            </a>
                        </p>
                        <p>Price: {{ item.price }}  €</p>
                        <p style="margin-top: 20px;">
                            <a href="{{item.url}}" style="background-color: #ffd500; padding:10px 20px; color:#1c1733;">
                                Show product
                            </a>
                        </p>
                    </td>
                </tr>
            </table>
        </td>
    </tr>
{% endfor %}

</table>
<table cellpadding="0" cellspacing="0" width="100%" style="max-width: 1000px; text-align: center;">
<!-- change the recommendations id for desired model id -->
<!-- lood 4 recommended products, change the number of products as desired -->
{% set rcm = recommendations('59cf98d54d539b618b307585', 4) %}
{% for item in rcm %}
<tr>
<td style="padding-bottom: 20px;">
<table width="100%">
<tr>
<td width="50%">
<a href="{{ item.url }}">
<img src="{{ item.image }}" alt="{{ item.title }}" width="200" style="width:auto; max-width:100%; max-height:150px;" />
</a>
</td>
<td width="50%" style="padding:0 10px; font-size:14px;">
<p>
<a href="{{ item.url }}" style="font-size:16px; text-decoration: none; color:#1c1733">
{{ item.title }}
</a>
</p>
<p>Price: {{ item.price }} €</p>
<p style="margin-top: 20px;">
<a href="{{item.url}}" style="background-color: #ffd500; padding:10px 20px; color:#1c1733;">
Show product
</a>
</p>
</td>
</tr>
</table>
</td>
</tr>
{% endfor %}
</table>When you finish editing and styling your email, save it to use in your abandoned cart scenario.
Vouchers
You can use Bloomreach's vouchers feature to send a personalized one-time voucher. To include a voucher in the email, use the following code:
Use the discount code {{ vouchers['10%'].assign_available() }} to get a 10% discount and pay only {{ total_price* 0.9 }}
Replace the voucher pool name ("10%") with your own, and make sure the total_price variable is defined in the Jinja code of your email.
Updated 3 months ago