

API trigger for scenarios
API triggers let you send personalized messages to the right customers the moment something relevant happens in the world — a flight gets canceled, a storm warning is issued, a match kicks off, or an offer goes live at a hotel.
Instead of launching campaigns manually, you connect an external signal to a pre-built scenario in Bloomreach. The scenario identifies the relevant customers and sends them a message automatically, through whichever channel you've configured.
NoteAPI triggers are available to all accounts. To enable this feature, contact your Customer Success Manager.
How API triggers work
When a real-world event occurs, an external system sends a signal to Bloomreach. That signal fires one or more of your scenarios, which identify the relevant customers and send them a personalized message.
You define the logic once. After that, the whole process runs automatically.
Use cases
API triggers work across any industry where real-world events drive customer communications:
- A goal is scored in a football match.
- Betting odds change.
- Weather changes from hot to cold.
- A weather alert is issued.
- A flight or train is canceled.
- A train platform changes.
- An unforeseen event happens, such as a restaurant closure or a delayed bus.
- A sporting event is about to start and customers have tickets.
- An offer becomes available to hotel guests.
Set up an API trigger
Setting up an API trigger is a one-time process. Once it's done, anyone on your team can build scenarios that respond to real-world events without any additional configuration.
Authenticate your API key
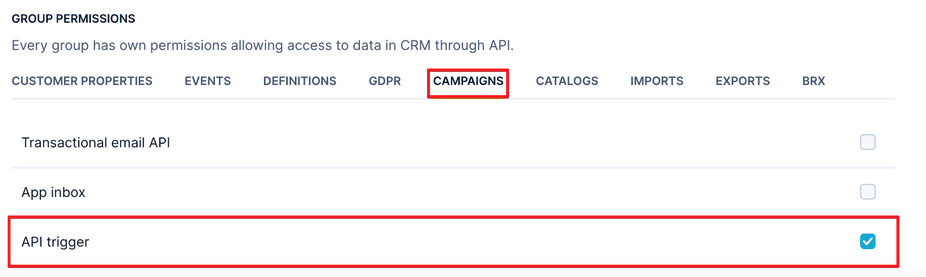
Before you can use the API trigger, you need to enable the right permission on your API key.
- Go to Project Settings > Access Management > API.
- Select Private API.
- Under the Campaigns tab, check API trigger.
- Click Save changes.
Create an API trigger
- Go to Data & Assets > API trigger and click Add API trigger.
- Define the parameters your external system will send with each signal. Parameters are the pieces of information that travel with the trigger — you'll use them later to filter your audience and personalize your messages. For example:
- A weather alert trigger might include
postcodeandalert_type. - A flight disruption trigger might include
flight_numberanddeparture_airport. - A match trigger might include
match_id,match_type, andodds.
- A weather alert trigger might include
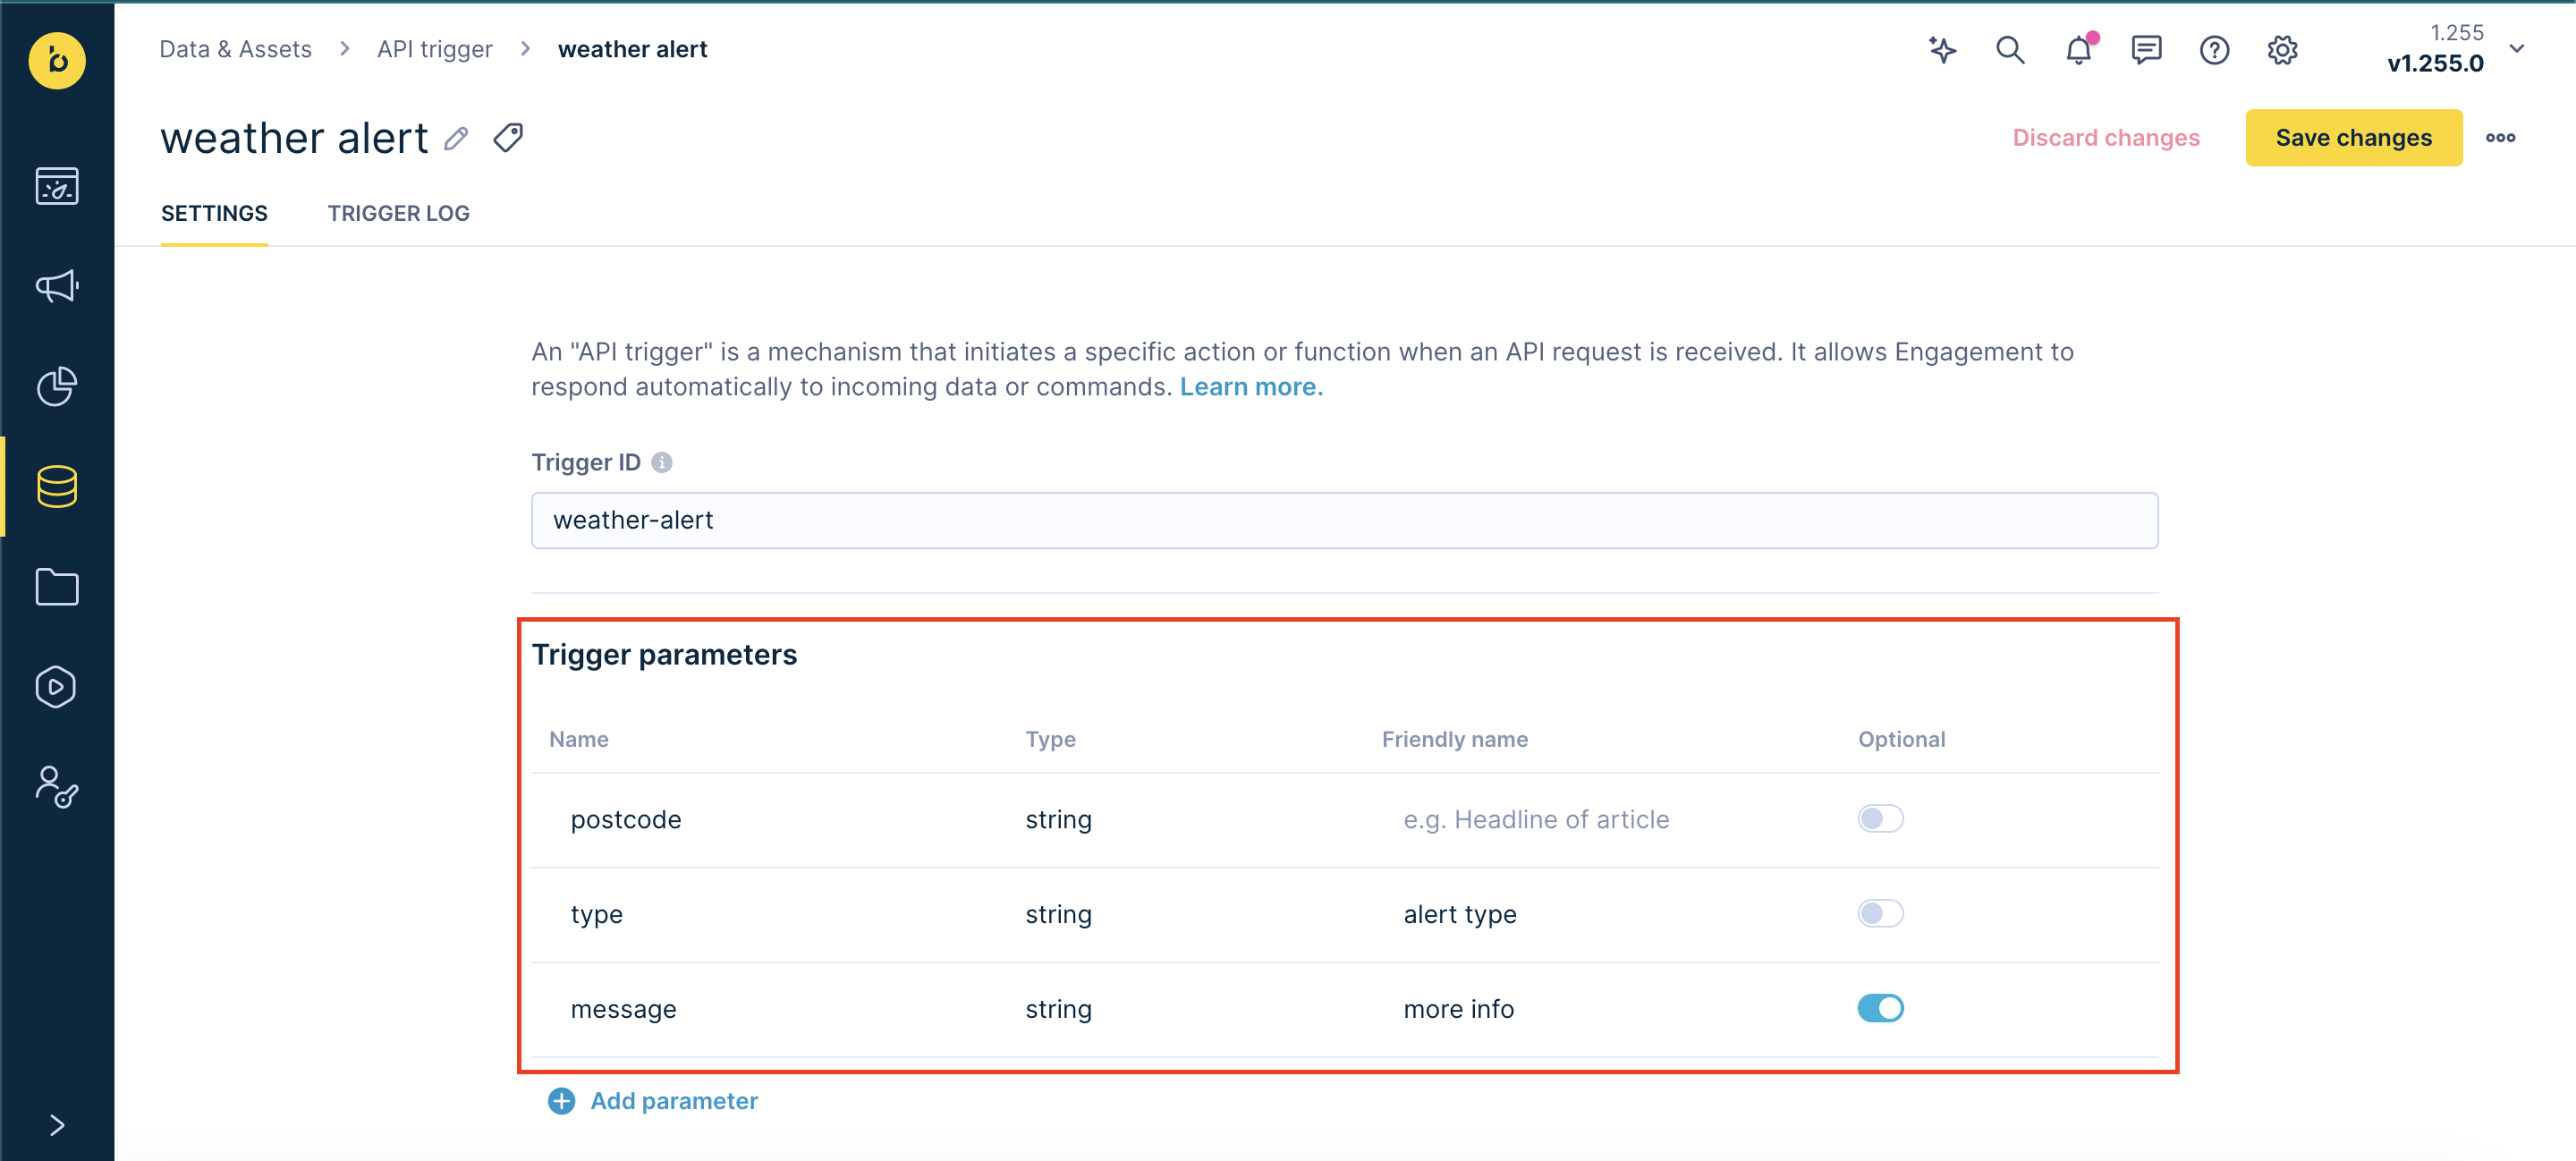
- Click Save changes.
After saving, Bloomreach generates a trigger URL and an example payload.
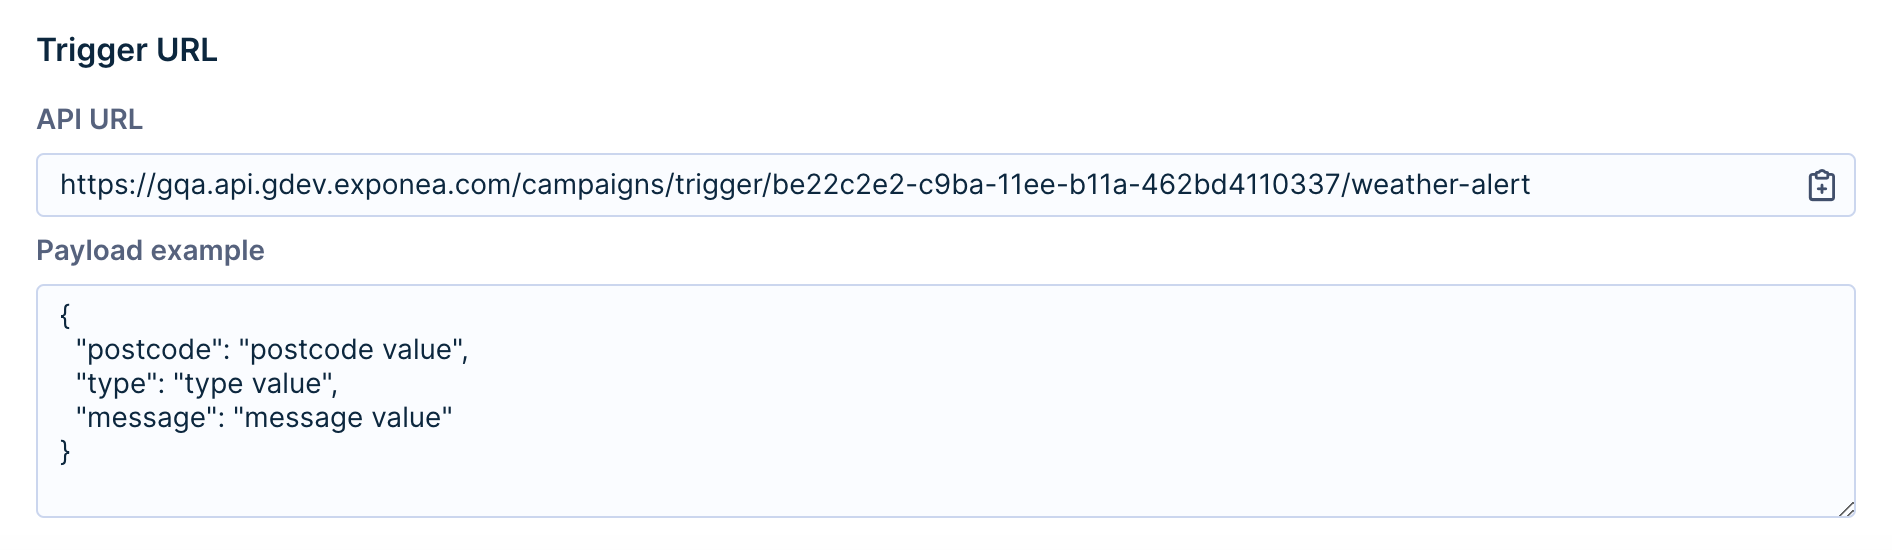
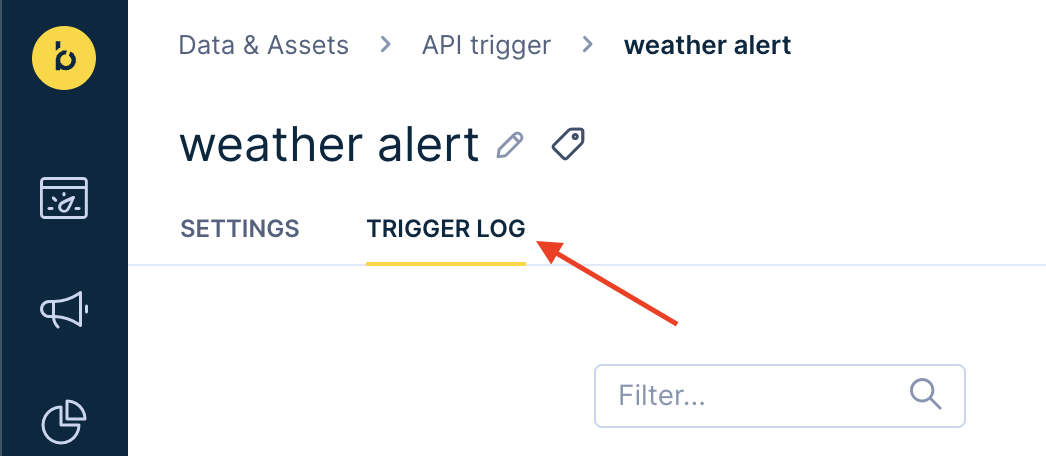
Share the URL with your external system provider — they'll use it to send signals to Bloomreach whenever the relevant event occurs. You can monitor incoming signals in the Trigger log.
Rate limits
The number of requests you can send per second depends on your project size. If you exceed the limit, you'll receive a 429 Too Many Requests error:
{
  "success": false,
  "errors": [
    "You are allowed to send 1 request per 10 seconds. Try again later"
  ]
}
Connect your trigger to a scenario
Once your API trigger is set up, you connect it to a scenario that defines what happens when it fires — which customers get a message, what the message says, and which channel it's sent through.
There are two ways to connect a trigger, depending on how many customers you're targeting and how time-sensitive your campaign is.
| Standard API trigger | Customer event filtered API trigger | |
|---|---|---|
| How it identifies customers | Evaluates your entire customer base when the trigger fires | Pre-filters customers based on a matching event in their history before the scenario runs |
| Best for | Smaller audiences, complex conditions, less time-sensitive campaigns | Large audiences, time-sensitive campaigns with a clearly defined relevant group |
| Speed | Slower at scale | Up to 100 requests per second |
Standard API trigger
Use this mode when your campaign logic relies on customer attributes — such as location, loyalty tier, or past behavior — and speed isn't the primary concern.
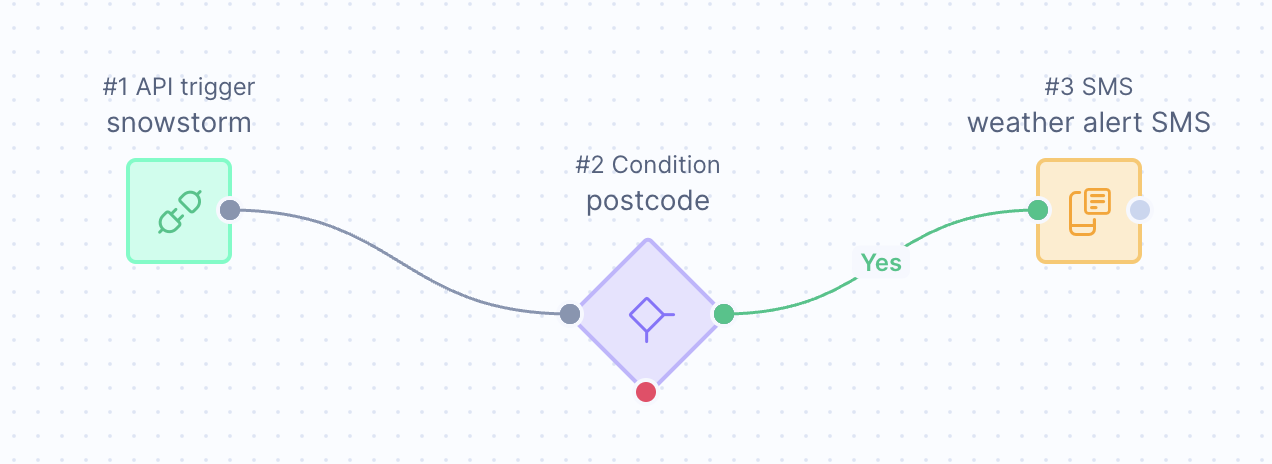
- Go to Campaigns > Scenarios and click + New Scenario.
- Select the API trigger node and choose the trigger you created.
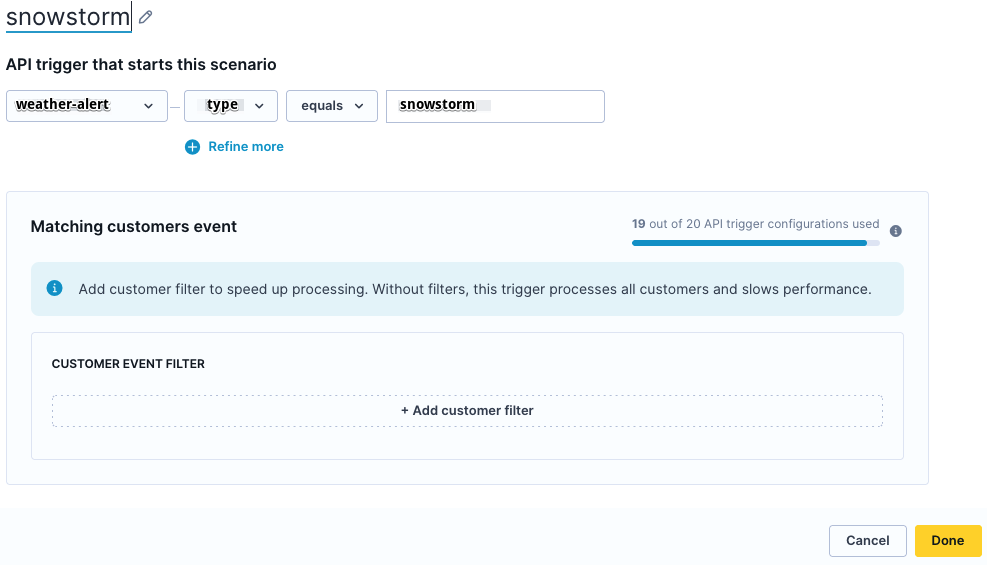
- To filter the trigger to specific signals only, use the API trigger parameters. For example, you could set the trigger to fire only when
alert_typeequalssnowstorm. - Leave the Matching customer event section blank for standard mode.
- To filter the trigger to specific signals only, use the API trigger parameters. For example, you could set the trigger to fire only when
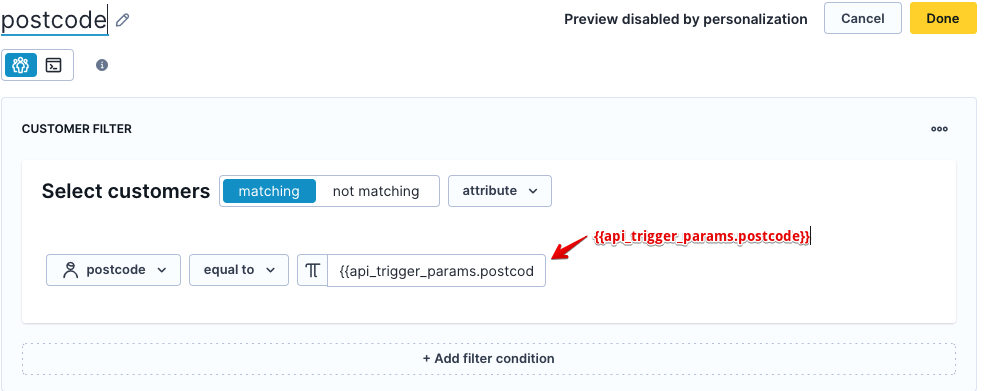
- Add a Condition node to filter your audience. Use customer attributes or the parameters sent in your payload. For example, filter to customers whose
postcodematches the value{{api_trigger_params.postcode}}passed in the trigger.
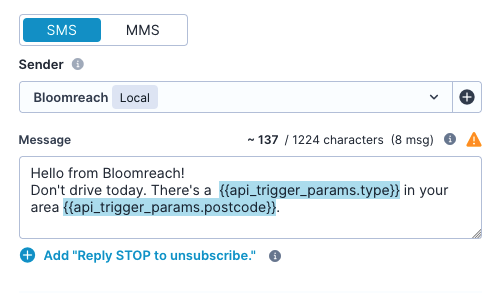
- Add a communication node and write your message. Use
{{api_trigger_params.parameter_name}}to pull in values from the payload anywhere in your message or conditions.
- Save and Start the scenario.
Constraints
The standard API trigger evaluates your entire customer base each time it fires. The larger the base, the less frequently you can fire the trigger. For example, a project with 1 million customers allows one request per second, while a project with 10 million customers allows one request per 10 seconds.
Customer event filtered API trigger
Use this mode when you want to reach only customers who have a specific event in their history that can be linked to the real-world event triggering the scenario — such as a booking for the flight that was just canceled, or a bet placed on the match that's about to kick off. Bloomreach pre-filters the audience before the scenario runs, which makes this mode significantly faster.
| Real-world event | Recommended event filter |
|---|---|
| Dangerous weather alert | Customers with an active policy in the affected area |
| Flight or train canceled | Customers with a booking for that service |
| Goal scored or match kick-off | Customers who placed a bet on that match |
| New offer available | Customers who have previously purchased in that category |
-
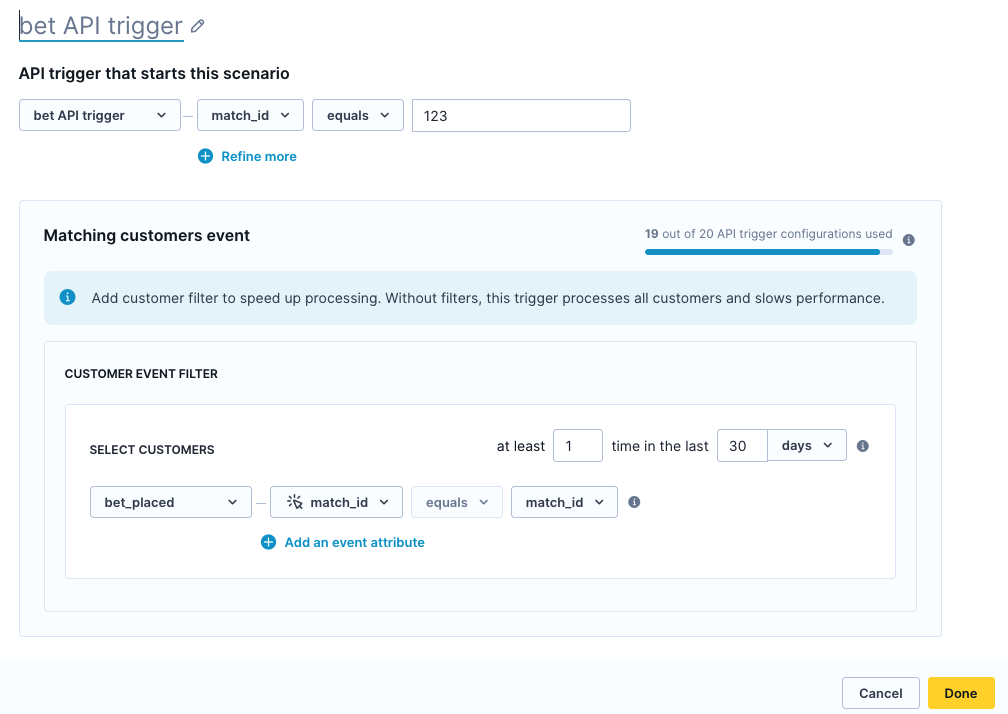
Go to Campaigns > Scenarios and click + New Scenario.
-
Select the API trigger node and choose the trigger you created.
- To filter the trigger to specific signals only, use the API trigger parameters.
-
Still within the API trigger node, click + Add customer event filter.
-
Select the customer event you want to match against, then choose which event property should match a value from the trigger payload. For example:
- Filter customers with a
weather_alert_subscriptionevent wherepostcodematches thepostcodevalue in the trigger. - Filter customers with a
bet_placedevent wherematch_idmatches thematch_idvalue in the trigger.
- Filter customers with a
-
Optionally, set a minimum number of matching events and a lookback window. For example, target only customers with at least 2
bet_placedevents on that match within the last 30 days. -
Add a communication node and write your message. Use
{{api_trigger_params.parameter_name}}to pull in values from the payload. See point 4 in the standard Api trigger section for visual. -
Save and Start the scenario.
Capabilities
- Supports up to 100 requests per second.
- Up to 10 conditions per filter configuration.
- Maximum lookback window: 2 years.
Constraints
- Conditions can only filter against fixed values — not aggregates or other calculated data.
- The filter only considers events that occur after the scenario goes live. For example, if your scenario has been running for 15 days and your lookback window is 30 days, events from before the scenario started won't be included. If you're reusing an existing filter configuration that's already been running longer than the lookback window, all relevant events within that window are included.
- Bloomreach starts tracking qualifying customers as soon as the scenario goes live and keeps tracking as long as at least one scenario using that filter configuration is active. If you archive all scenarios using the configuration, tracking stops and the data is deleted.
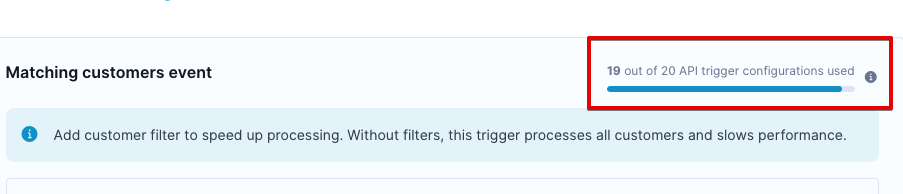
- Up to 1 million distinct values can be tracked per filter — for example, unique postcodes or match IDs. A warning appears in the UI when you're approaching the limit.
- Up to 20 distinct filter configurations are supported per project. Reusing the same filter across campaigns counts as one — but only if the conditions are identical and in the same order.
- Once a scenario is live, you can't edit the filter conditions. You can still update the pairing parameter and lookback window settings.
- Reverting a scenario to a previous version doesn't restore the original filter configuration. If you need to change the filters, delete the API trigger node and set it up again.
Personalize messages with parametrized aggregates
By default, aggregates calculate values based on a customer's overall history — for example, their total number of purchases. In Customer event filtered API trigger scenarios, you can go further and calculate a value based on the specific event that triggered the message.
For example, if a match kicks off and you want to show a customer their total stake on that specific match — not their overall betting history — you'd use a parametrized aggregate.
ImportantParametrized aggregates slow down delivery, because Bloomreach calculates a personalized value for each customer individually before sending. Avoid them for large, time-sensitive campaigns.
Setup
- Go to Data & Assets > Data manager > Definitions and click + New definition.
- Create an aggregate for the event you want to use. For example: Sum >
bet_placed>stake_amount. Add the property you want to filter by — such asmatch_id— and set its value as a dynamic parameter, for example[match_id].

- In your scenario, open the communication node and launch the personalization wizard.
- Select the aggregate you created, then set the parameter value. You can use a constant or select an API trigger parameter. If the parameter value is missing — for example, if the parameter wasn't included in the payload — the message won't send.
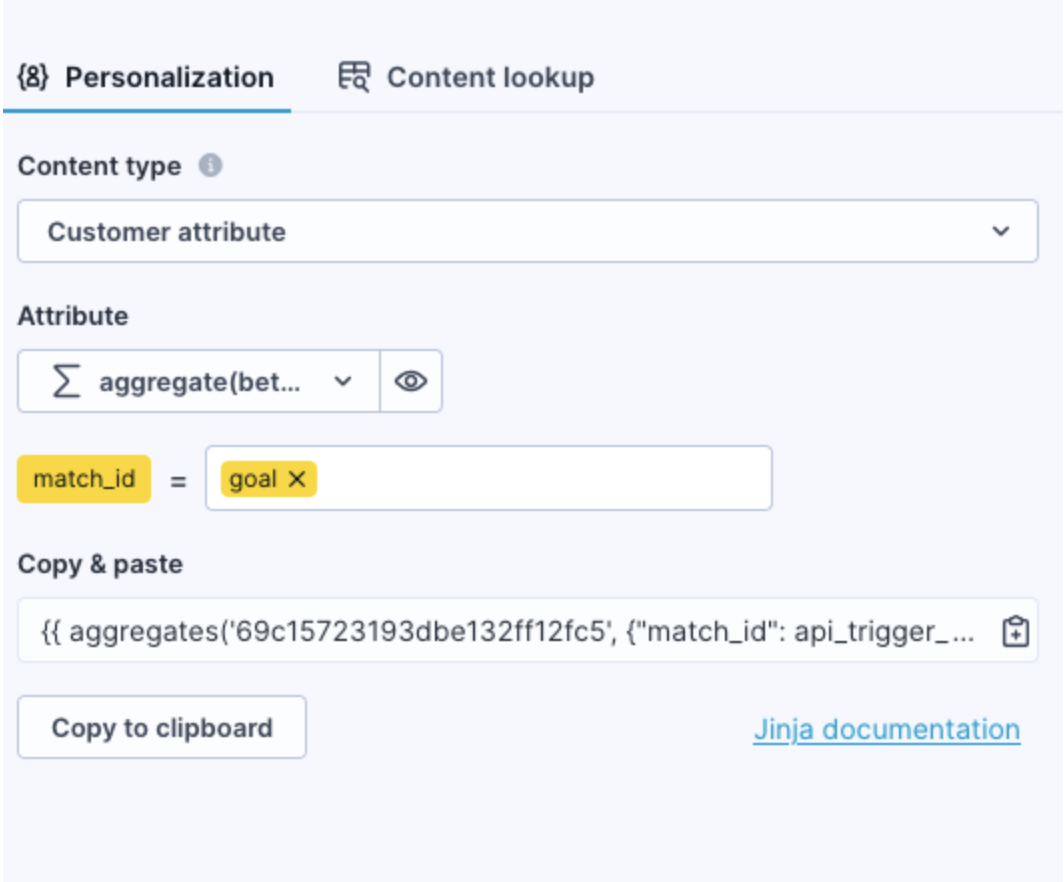
- Insert the generated Jinja code into your message.
Jinja code reference
If you prefer to write the code manually, use these formats.
Using constant values:
Limitations
Standard API trigger
- Request frequency decreases as your customer base grows — one request per second per 1 million customers, or one request per 10 seconds per 10 million customers.
Customer event filtered API trigger
- Filters support fixed values only — aggregates and computed data aren't supported.
- Up to 20 filter configurations per project.
- Up to 1 million distinct pairing parameter values tracked per filter.
- Up to 10 conditions per filter configuration.
- Maximum lookback window: 2 years.
- Filter conditions can't be edited once a scenario is live.
- Reverting a scenario to a previous version doesn't restore the original filter configuration.
Both API trigger types
- Cloning a scenario to a different project doesn't preserve the API trigger definition.
Updated 3 months ago