

iOS push notifications for React Native SDK
Enable push notifications on iOS using the React Native SDK
The React Native SDK relies on the native iOS SDK to handle push notifications on iOS. This guide provides shortened instructions for iOS within the context of the React Native SDK and refers to the push notifications documentation for the iOS SDK for details.
The SDK provides a push setup self-check feature to help developers successfully set up push notifications. The self-check will try to track the push token, request the Engagement backend to send a silent push to the device, and check if the app is ready to open push notifications.
To enable the setup check, call
Exponea.checkPushSetup()before Initial setup for React Native SDK:
❗️Important
SDK versions 2.5.0 and higher use event-based token tracking to support multiple mobile applications per project. Learn more about Push notifications for React Native SDK.
The behaviour of push notification delivery and click tracking may be affected by the tracking consent feature, which, if enabled, requires explicit consent for tracking. Refer to the Tracking consent for React Native SDK for details.
Prerequisites
To be able to send push notifications to iOS devices from Engagement, you must:
- Obtain an Apple Push Notification service (APNs) authentication token signing key
- Add and configure the Apple Push Notification Service integration in the Engagement web app
Follow the instructions in Configure Apple Push Notification Service in the native iOS SDK documentation if you haven't set this up yet.
Please note that the integration instructions assume your app uses "bare workflow". For Expo-based apps using "managed workflow", refer to Initial setup for React Native SDK for iOS push notifications integration.
Integration
This section describes the steps to add the minimum push notification functionality (receive alert notifications) to your app.
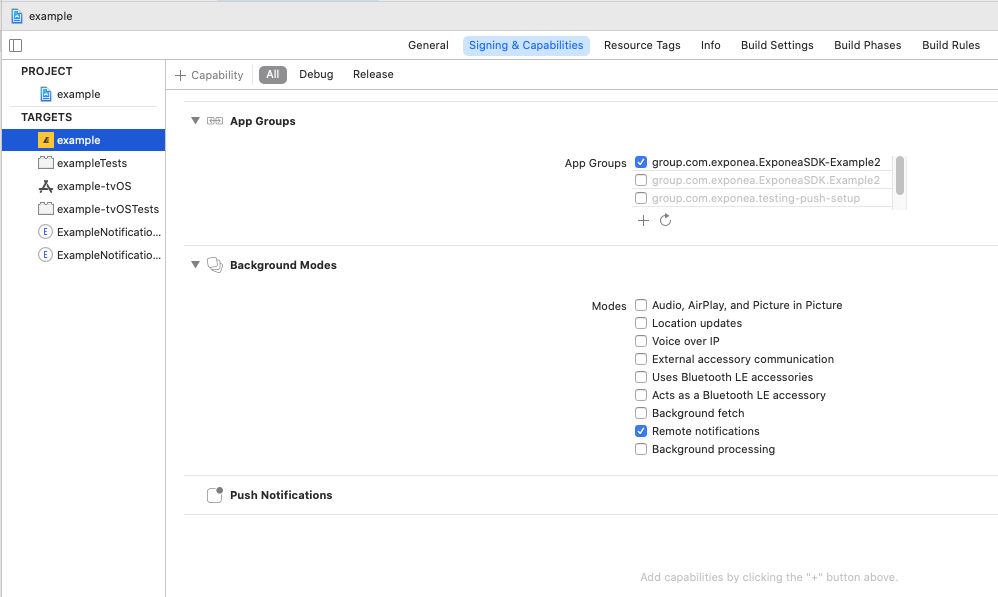
Step 1: Enable push capabilities
Open the Xcode project located in the ios folder in your React Native project.
In Xcode, select your application target, and on the Signing & Capabilities tab, add the following capabilities:
Push Notifications
Required for alert push notifications.Background Modes(selectRemote notifications)
Required for silent push notifications.App Groups(create a new app group for your app)
Required for application extensions that handle push notification delivery and rich content.
An Apple developer account with a paid membership is required to add the
Push Notificationscapability.
Step 2: Implement application delegate methods
For your application to be able to respond to push notification-related events, its AppDelegate must implement several methods (see the native iOS SDK documentation for details).
ExponeaRNAppDelegate.m in the React Native SDK provides default implementations of these methods. We recommend that you extend ExponeaRNAppDelegate in your AppDelegate.
-
Open
AppDelegate.hand replace the contents with the following:#import <React/RCTBridgeDelegate.h> #import <UIKit/UIKit.h> #import <ExponeaRNAppDelegate.h> @interface AppDelegate : ExponeaRNAppDelegate<RCTBridgeDelegate> @end -
Open
AppDelegate.mand add a super call todidFinishLaunchingWithOptions:- (BOOL)application:(UIApplication *)application didFinishLaunchingWithOptions:(NSDictionary *)launchOptions { ... [super application:application didFinishLaunchingWithOptions:launchOptions]; return YES; }
If, for some reason, you don't want to or are not able to extend ExponeaRNAppDelegate, for example because you are using RCTAppDelegate introduced in React Native 0.71, import ExponeaRNAppDelegate.h in AppDelegate.m and copy over the methods and add calls to Exponea to the existing methods. You must set the UNUserNotificationCenter delegate and code for processing notifications to didFinishLaunchingWithOptions. Your implementation of AppDelegate should look like this:
#import <ExponeaRNAppDelegate.h>

@implementation AppDelegate

- (BOOL)application:(UIApplication *)application didFinishLaunchingWithOptions:(NSDictionary *)launchOptions
{
...
// Set UNUserNotificationCenter delegate
[UNUserNotificationCenter currentNotificationCenter].delegate = self;
...
}

- (BOOL)application:(UIApplication *)application continueUserActivity:(nonnull NSUserActivity *)userActivity
restorationHandler:(nonnull void (^)(NSArray<id<UIUserActivityRestoring>> * _Nullable))restorationHandler
{
// call Exponea continueUserActivity method
[Exponea continueUserActivity: userActivity];
...
}

...

// Methods copied from ExponeaRNAppDelegate
- (void)application:(UIApplication *)application didRegisterForRemoteNotificationsWithDeviceToken:(NSData *)deviceToken
{
  [Exponea handlePushNotificationToken: deviceToken];
}

- (void)application:(UIApplication *)application
      didReceiveRemoteNotification:(NSDictionary *)userInfo
      fetchCompletionHandler:(void (^)(UIBackgroundFetchResult))completionHandler
{
  [Exponea handlePushNotificationOpenedWithUserInfo:userInfo];
  completionHandler(UIBackgroundFetchResultNewData);
}

- (void)userNotificationCenter:(UNUserNotificationCenter *)center
      didReceiveNotificationResponse:(UNNotificationResponse *)response
      withCompletionHandler:(void (^)(void))completionHandler
{
  [Exponea handlePushNotificationOpenedWithResponse: response];
  completionHandler();
}

@end
Step 3: Configure app group
When you initialize the SDK, you must set the appGroup property to the app group you created in step 1:
Exponea.configure({
  ...
  ios: {
    appGroup: 'your app group'
  }
})
Step 4: Request notification permission
Your app requires explicit permission from the user to receive "alert" notifications that are visible to the user.
You can request authorization by calling Exponea.requestPushAuthorization():
Exponea.requestPushAuthorization()
  .then((accepted) => {
    console.log(
      `User has ${accepted ? 'accepted' : 'rejected'} push notifications.`
    );
  })
  .catch((error) => console.log(error.message));
Note
notification_stateevents reflect push notification permission status in thevalidanddescriptionproperties. For more details, see Token tracking via notification_state event.
Checklist:
- Engagement should now be able to send push notifications to iOS devices. Refer to the Creating a new notification guide for instructions.
- At this point, your app doesn't show images or actions in push notifications. Follow the instructions to implement rich push notifications if you want to support this.
Customization
This section describes the customizations you can implement once you have integrated the minimum push notification functionality.
Rich push notifications
Rich push notifications can contain images and buttons. To enable this functionality, you must add two application extensions: a Notification Service Extension and a Notification Content Extension.
For each extension, follow the instructions in Notification extensions in the native iOS SDK documentation to set it up correctly to use the Exponea Notification Service included in the iOS SDK.
Calling the ExponeaNotificationContentService.didReceive() method will enhance the notification body with the image and actions delivered within the UNNotification payload. Notification actions shown by ExponeaNotificationContentService are registered with configurations to open your application with required information and handle campaign clicks automatically.
ImportantThe
ExponeaSDK-Notificationspod version must match the core iOS SDK version used byreact-native-exponea-sdk. A mismatch won't break notification display but will silently preventdeliveredstatus from being tracked in Bloomreach. Check the current core SDK version in the React Native SDK changelog.
Checklist:
- Check that push notifications with images and buttons sent from Engagement are correctly displayed on your device. Push delivery tracking should work.
- If you don't see buttons in the expanded push notification, the content extension is not running. Double check
UNNotificationExtensionCategoryinInfo.plist- notice the placement insideNSExtensionAttributes. Check that theiOS Deployment Targetis the same for the extensions and the main app.
Rich push notifications for Expo managed apps
The example below demonstrates how to implement support for rich push notifications using an Expo config plugin that makes the required modifications at native level.
Create config plugin script
Create a new index.js file for a new config plugin and copy the script below as a template. Edit this template script with the parameters for your project. Place the plugin file in your project (for example, at plugins/exponea/extensions/index.js) and add it to the plugins section of your project app config app.json.
/* eslint-disable @typescript-eslint/no-var-requires */
const {
  withPlugins,
  withDangerousMod,
  withXcodeProject,
} = require('@expo/config-plugins');
const { existsSync, mkdirSync, writeFileSync, readFileSync } = require('fs');
const path = require('path');

const TEAM_ID = '<your-apple-team-id>';
const IPHONEOS_DEPLOYMENT_TARGET = '15.1';
const TARGETED_DEVICE_FAMILY = `"1,2"`;

/**
 * Mirrors a file from this plugin folder to the ios/android project folder
 *
 * @param pathSegments any number of segments for the file name and its path.
 */
function copyFile(...pathSegments) {
  const src = path.resolve(__dirname, ...pathSegments);
  const dst = path.resolve(...pathSegments);
  writeFileSync(dst, readFileSync(src, 'utf-8'));
}

// Creates the 'ExponeaNotificationContent' folder
function withExponeaNotificationContentFolder(config, params) {
  return withDangerousMod(config, [
    'ios',
    (cfg) => {
      //create a new folder
      const srcPath = path.resolve(
        cfg.modRequest.projectRoot,
        cfg.modRequest.platformProjectRoot
      );
      const newFolderPath = path.resolve(srcPath, 'ExponeaNotificationContent');
      if (!existsSync(newFolderPath)) {
        mkdirSync(newFolderPath);
      }

      // Entitlement file
      let entitlementFileContent = readFileSync(
        path.resolve(
          __dirname,
          'ios',
          'ExponeaNotificationContent',
          'ExponeaNotificationContent.entitlements'
        ),
        'utf-8'
      );
      entitlementFileContent = entitlementFileContent.replace(
        '{{APP_GROUP_ID}}',
        `group.${params.bundleIdentifier}`
      );
      const entitlementFileDestination = path.resolve(
        'ios',
        'ExponeaNotificationContent',
        'ExponeaNotificationContent.entitlements'
      );
      writeFileSync(entitlementFileDestination, entitlementFileContent);

      // PList file
      let pListFileContent = readFileSync(
        path.resolve(
          __dirname,
          'ios',
          'ExponeaNotificationContent',
          'ExponeaNotificationContent-Info.plist'
        ),
        'utf-8'
      );
      pListFileContent = pListFileContent.replace(
        '{{APP_BUNDLE_ID}}',
        params.bundleIdentifier
      );
      pListFileContent = pListFileContent.replace(
        '{{APP_VERSION}}',
        params.appVersion
      );
      pListFileContent = pListFileContent.replace(
        '{{IOS_BUILD_NUMBER}}',
        params.iosBuildNumber
      );
      const pListFileDestination = path.resolve(
        'ios',
        'ExponeaNotificationContent',
        'ExponeaNotificationContent-Info.plist'
      );
      writeFileSync(pListFileDestination, pListFileContent);

      // Swift file
      copyFile(
        'ios',
        'ExponeaNotificationContent',
        'NotificationViewController.swift'
      );

      return cfg;
    },
  ]);
}

// Creates the 'ExponeaNotificationService' folder
function withExponeaNotificationServiceFolder(config, params) {
  return withDangerousMod(config, [
    'ios',
    (cfg) => {
      // Creates the folder
      const srcPath = path.resolve(
        cfg.modRequest.projectRoot,
        cfg.modRequest.platformProjectRoot
      );
      const newFolderPath = path.resolve(srcPath, 'ExponeaNotificationService');
      if (!existsSync(newFolderPath)) {
        mkdirSync(newFolderPath);
      }

      // Entitlement file
      let entitlementFileContent = readFileSync(
        path.resolve(
          __dirname,
          'ios',
          'ExponeaNotificationService',
          'ExponeaNotificationService.entitlements'
        ),
        'utf-8'
      );
      entitlementFileContent = entitlementFileContent.replace(
        '{{APP_GROUP_ID}}',
        `group.${params.bundleIdentifier}`
      );
      const entitlementFileDestination = path.resolve(
        'ios',
        'ExponeaNotificationService',
        'ExponeaNotificationService.entitlements'
      );
      writeFileSync(entitlementFileDestination, entitlementFileContent);

      // PList File
      let pListFileContent = readFileSync(
        path.resolve(
          __dirname,
          'ios',
          'ExponeaNotificationService',
          'ExponeaNotificationService-Info.plist'
        ),
        'utf-8'
      );
      pListFileContent = pListFileContent.replace(
        '{{APP_BUNDLE_ID}}',
        params.bundleIdentifier
      );
      pListFileContent = pListFileContent.replace(
        '{{APP_VERSION}}',
        params.appVersion
      );
      pListFileContent = pListFileContent.replace(
        '{{IOS_BUILD_NUMBER}}',
        params.iosBuildNumber
      );
      const pListFileDestination = path.resolve(
        'ios',
        'ExponeaNotificationService',
        'ExponeaNotificationService-Info.plist'
      );
      writeFileSync(pListFileDestination, pListFileContent);

      // Swift file
      let swiftFileContent = readFileSync(
        path.resolve(
          __dirname,
          'ios',
          'ExponeaNotificationService',
          'NotificationService.swift'
        ),
        'utf-8'
      );
      swiftFileContent = swiftFileContent.replace(
        '{{APP_GROUP_ID}}',
        `group.${params.bundleIdentifier}`
      );
      const swiftFileDestination = path.resolve(
        'ios',
        'ExponeaNotificationService',
        'NotificationService.swift'
      );
      writeFileSync(swiftFileDestination, swiftFileContent);

      return cfg;
    },
  ]);
}

// Updates the podfile to add exponea dependency
function withExponeaPod(config) {
  return withDangerousMod(config, [
    'ios',
    (cfg) => {
      const { platformProjectRoot } = cfg.modRequest;
      const podfilePath = path.resolve(platformProjectRoot, 'Podfile');
      const contents = readFileSync(podfilePath, 'utf-8');
      writeFileSync(
        podfilePath,
        contents +
          `
target 'ExponeaNotificationService' do
  pod "ExponeaSDK-Notifications", "4.2.0"
end

target 'ExponeaNotificationContent' do
  pod "ExponeaSDK-Notifications", "4.2.0"
end`,
      )
      return cfg
    },
  ]);
}

// Update the xcode project to add the new targets.
// This is mostly copied from https://github.com/nikwebr/expo-notification-service-extension-plugin/blob/main/plugin/withServiceExtensionIos.ts
const withExponeaNotificationContentXcodeTarget = (config, params) => {
  return withXcodeProject(config, async (cfg) => {
    const NSE_TARGET_NAME = 'ExponeaNotificationContent';
    const xcodeProject = cfg.modResults;
    // Create new PBXGroup for the extension
    const extGroup = xcodeProject.addPbxGroup(
      [
        `ExponeaNotificationContent.entitlements`,
        `ExponeaNotificationContent-Info.plist`,
        'NotificationViewController.swift',
      ],
      NSE_TARGET_NAME,
      NSE_TARGET_NAME
    );

    // Add the new PBXGroup to the top level group. This makes the
    // files / folder appear in the file explorer in Xcode.
    const groups = xcodeProject.hash.project.objects['PBXGroup'];
    Object.keys(groups).forEach(function (key) {
      if (
        typeof groups[key] === 'object' &&
        groups[key].name === undefined &&
        groups[key].path === undefined
      ) {
        xcodeProject.addToPbxGroup(extGroup.uuid, key);
      }
    });

    // WORK AROUND for codeProject.addTarget BUG
    // Xcode projects don't contain these if there is only one target
    // An upstream fix should be made to the code referenced in this link:
    //   - https://github.com/apache/cordova-node-xcode/blob/8b98cabc5978359db88dc9ff2d4c015cba40f150/lib/pbxProject.js#L860
    const projObjects = xcodeProject.hash.project.objects;
    projObjects['PBXTargetDependency'] =
      projObjects['PBXTargetDependency'] || {};
    projObjects['PBXContainerItemProxy'] =
      projObjects['PBXTargetDependency'] || {};

    // Add the NSE target
    // This adds PBXTargetDependency and PBXContainerItemProxy for you
    const nseTarget = xcodeProject.addTarget(
      NSE_TARGET_NAME,
      'app_extension',
      NSE_TARGET_NAME,
      `${params.bundleIdentifier}.ExponeaNotificationContent`
    );

    // Add build phases to the new target
    xcodeProject.addBuildPhase(
      ['NotificationViewController.swift'],
      'PBXSourcesBuildPhase',
      'Sources',
      nseTarget.uuid
    );
    xcodeProject.addBuildPhase(
      [],
      'PBXResourcesBuildPhase',
      'Resources',
      nseTarget.uuid
    );

    xcodeProject.addBuildPhase(
      [],
      'PBXFrameworksBuildPhase',
      'Frameworks',
      nseTarget.uuid
    );

    // Edit the Deployment info of the new Target, only IphoneOS and Targeted Device Family
    // However, can be more
    const configurations = xcodeProject.pbxXCBuildConfigurationSection();
    for (const key in configurations) {
      if (
        typeof configurations[key].buildSettings !== 'undefined' &&
        configurations[key].buildSettings.PRODUCT_NAME == `"${NSE_TARGET_NAME}"`
      ) {
        const buildSettingsObj = configurations[key].buildSettings;
        buildSettingsObj.DEVELOPMENT_TEAM = TEAM_ID;
        buildSettingsObj.IPHONEOS_DEPLOYMENT_TARGET =
          IPHONEOS_DEPLOYMENT_TARGET;
        buildSettingsObj.TARGETED_DEVICE_FAMILY = TARGETED_DEVICE_FAMILY;
        buildSettingsObj.CODE_SIGN_ENTITLEMENTS = `${NSE_TARGET_NAME}/${NSE_TARGET_NAME}.entitlements`;
        buildSettingsObj.CODE_SIGN_STYLE = 'Automatic';
        buildSettingsObj.SWIFT_VERSION = '5.0';
      }
    }

    xcodeProject.addFramework('UserNotificationsUI.framework', {
      target: nseTarget.uuid,
    });

    xcodeProject.addTargetAttribute('DevelopmentTeam', TEAM_ID, nseTarget);
    xcodeProject.addTargetAttribute('DevelopmentTeam', TEAM_ID);
    return cfg;
  });
};

const withExponeaNotificationServiceXcodeTarget = (config, params) => {
  return withXcodeProject(config, async (cfg) => {
    const NSE_TARGET_NAME = 'ExponeaNotificationService';
    const xcodeProject = cfg.modResults;
    // Create new PBXGroup for the extension
    const extGroup = xcodeProject.addPbxGroup(
      [
        `ExponeaNotificationService.entitlements`,
        `ExponeaNotificationService-Info.plist`,
        'NotificationService.swift',
      ],
      NSE_TARGET_NAME,
      NSE_TARGET_NAME
    );

    // Add the new PBXGroup to the top level group. This makes the
    // files / folder appear in the file explorer in Xcode.
    const groups = xcodeProject.hash.project.objects['PBXGroup'];

    Object.keys(groups).forEach(function (key) {
      if (
        typeof groups[key] === 'object' &&
        groups[key].name === undefined &&
        groups[key].path === undefined
      ) {
        xcodeProject.addToPbxGroup(extGroup.uuid, key);
      }
    });

    // WORK AROUND for codeProject.addTarget BUG
    // Xcode projects don't contain these if there is only one target
    // An upstream fix should be made to the code referenced in this link:
    //   - https://github.com/apache/cordova-node-xcode/blob/8b98cabc5978359db88dc9ff2d4c015cba40f150/lib/pbxProject.js#L860
    const projObjects = xcodeProject.hash.project.objects;
    projObjects['PBXTargetDependency'] =
      projObjects['PBXTargetDependency'] || {};
    projObjects['PBXContainerItemProxy'] =
      projObjects['PBXTargetDependency'] || {};

    // Add the NSE target
    // This adds PBXTargetDependency and PBXContainerItemProxy for you
    const nseTarget = xcodeProject.addTarget(
      NSE_TARGET_NAME,
      'app_extension',
      NSE_TARGET_NAME,
      `${params.bundleIdentifier}.ExponeaNotificationService`
    );

    // Add build phases to the new target
    xcodeProject.addBuildPhase(
      ['NotificationService.swift'],
      'PBXSourcesBuildPhase',
      'Sources',
      nseTarget.uuid
    );
    xcodeProject.addBuildPhase(
      [],
      'PBXResourcesBuildPhase',
      'Resources',
      nseTarget.uuid
    );

    xcodeProject.addBuildPhase(
      [],
      'PBXFrameworksBuildPhase',
      'Frameworks',
      nseTarget.uuid
    );

    // Edit the Deployment info of the new Target, only IphoneOS and Targeted Device Family
    // However, can be more
    const configurations = xcodeProject.pbxXCBuildConfigurationSection();
    for (const key in configurations) {
      if (
        typeof configurations[key].buildSettings !== 'undefined' &&
        configurations[key].buildSettings.PRODUCT_NAME == `"${NSE_TARGET_NAME}"`
      ) {
        const buildSettingsObj = configurations[key].buildSettings;
        buildSettingsObj.DEVELOPMENT_TEAM = TEAM_ID;
        buildSettingsObj.IPHONEOS_DEPLOYMENT_TARGET =
          IPHONEOS_DEPLOYMENT_TARGET;
        buildSettingsObj.TARGETED_DEVICE_FAMILY = TARGETED_DEVICE_FAMILY;
        buildSettingsObj.CODE_SIGN_ENTITLEMENTS = `${NSE_TARGET_NAME}/${NSE_TARGET_NAME}.entitlements`;
        buildSettingsObj.CODE_SIGN_STYLE = 'Automatic';
        buildSettingsObj.SWIFT_VERSION = '5.0';
      }
    }

    xcodeProject.addTargetAttribute('DevelopmentTeam', TEAM_ID, nseTarget);
    xcodeProject.addTargetAttribute('DevelopmentTeam', TEAM_ID);
    return cfg;
  });
};

/**
 * Creates iOS extensions to handle Bloomreach rich push notifications
 * @link https://documentation.bloomreach.com/engagement/docs/ios-sdk-notification-extensions
 */
function withIosRichPush(config, params) {
  return withPlugins(config, [
    [withExponeaNotificationContentFolder, params],
    [withExponeaNotificationServiceFolder, params],
    withExponeaPod,
    [withExponeaNotificationContentXcodeTarget, params],
    [withExponeaNotificationServiceXcodeTarget, params],
  ]);
}

module.exports = withIosRichPush;
Create folders for the Notification Service Extension and the Notification Content Extension
Create new folders for the Notification Service Extension and the Notification Content Extension (for example ExponeaNotificationContent and ExponeaNotificationService) and place them in the same folder as the plugin config script from the previous step. Copy the files created by Xcode in the ios folder for each extension to the newly created folder if you followed the steps in Rich push notifications, or create them from scratch. You can draw inspiration from the example app, specifically ExampleNotificationContent and ExampleNotificationService, and use them as a starting template. If the names of your files differ, please adjust their names or the config plugin script accordingly.
Checklist:
- Check that push notifications with images and buttons sent from Engagement are correctly displayed on your device. Push delivery tracking should work.
- If you don't see buttons in the expanded push notification, the content extension is not running. Double check
UNNotificationExtensionCategoryinInfo.plist- notice the placement insideNSExtensionAttributes. Check that theiOS Deployment Targetis the same for the extensions and the main app.
Retrieve push notification token manually
Sometimes, your application may need to retrieve the current push token while running. You can do this using the Exponea.shared.trackPushToken method.
A common use case is when the Exponea.shared.anonymize() method is called. Invoking anonymize removes the push notification token from local storage. Hence, it needs to be updated right after anonymize, or before or after identifyCustomer, depending on your push notifications usage.
class YourClass {
    @objc(signOutAndSignIn:resolve:reject:)
    func signOutAndSignIn(
        resolve: @escaping RCTPromiseResolveBlock,
        reject: @escaping RCTPromiseRejectBlock
    ) {
        Exponea.exponeaInstance.anonymize()
        // anonymize removed Push token, so another identifyCustomer will not be assigned to push notifications
        Exponea.exponeaInstance.identifyCustomer(...)
        Messaging.messaging().token { token, error in
          if let token = token {
            Exponea.exponeaInstance.trackPushToken(token)
            resolve(nil)
          } else {
            reject(error)
          }
        }
    }
}
Show foreground notifications
The system calls the following method if the app is in the foreground while a push notification arrives. The default implementation shows the push notification. You can override this method if you want to change the default behavior.
    override func userNotificationCenter(_ center: UNUserNotificationCenter, willPresent notification: UNNotification, withCompletionHandler completionHandler: @escaping (UNNotificationPresentationOptions) -> Void) {
        // show notification even if the app is in the foreground
        if #available(iOS 14, *) {
            completionHandler([.banner])
        } else {
            completionHandler([.alert])
        }
    }