

Antavo
Integration
The following is a guide on how to integrate Antavo with Bloomreach.
Antavo is an enterprise-grade SaaS loyalty technology provider that builds comprehensive loyalty programs to foster brand love and change customer behavior.
The Antavo and Bloomreach integration enables the use of loyalty program-related data to create personalized marketing campaigns. The integration supports the synchronization of Antavo’s customer data fields with Bloomreach fields and allows triggering events in Bloomreach based on Antavo events.
How to set it up
1. Connect Bloomreach in Antavo
In Antavo, go to Modules > Bloomreach and click Configure. When first navigating to the Bloomreach integration configuration page in Antavo, the interface will prompt you to connect the two systems.
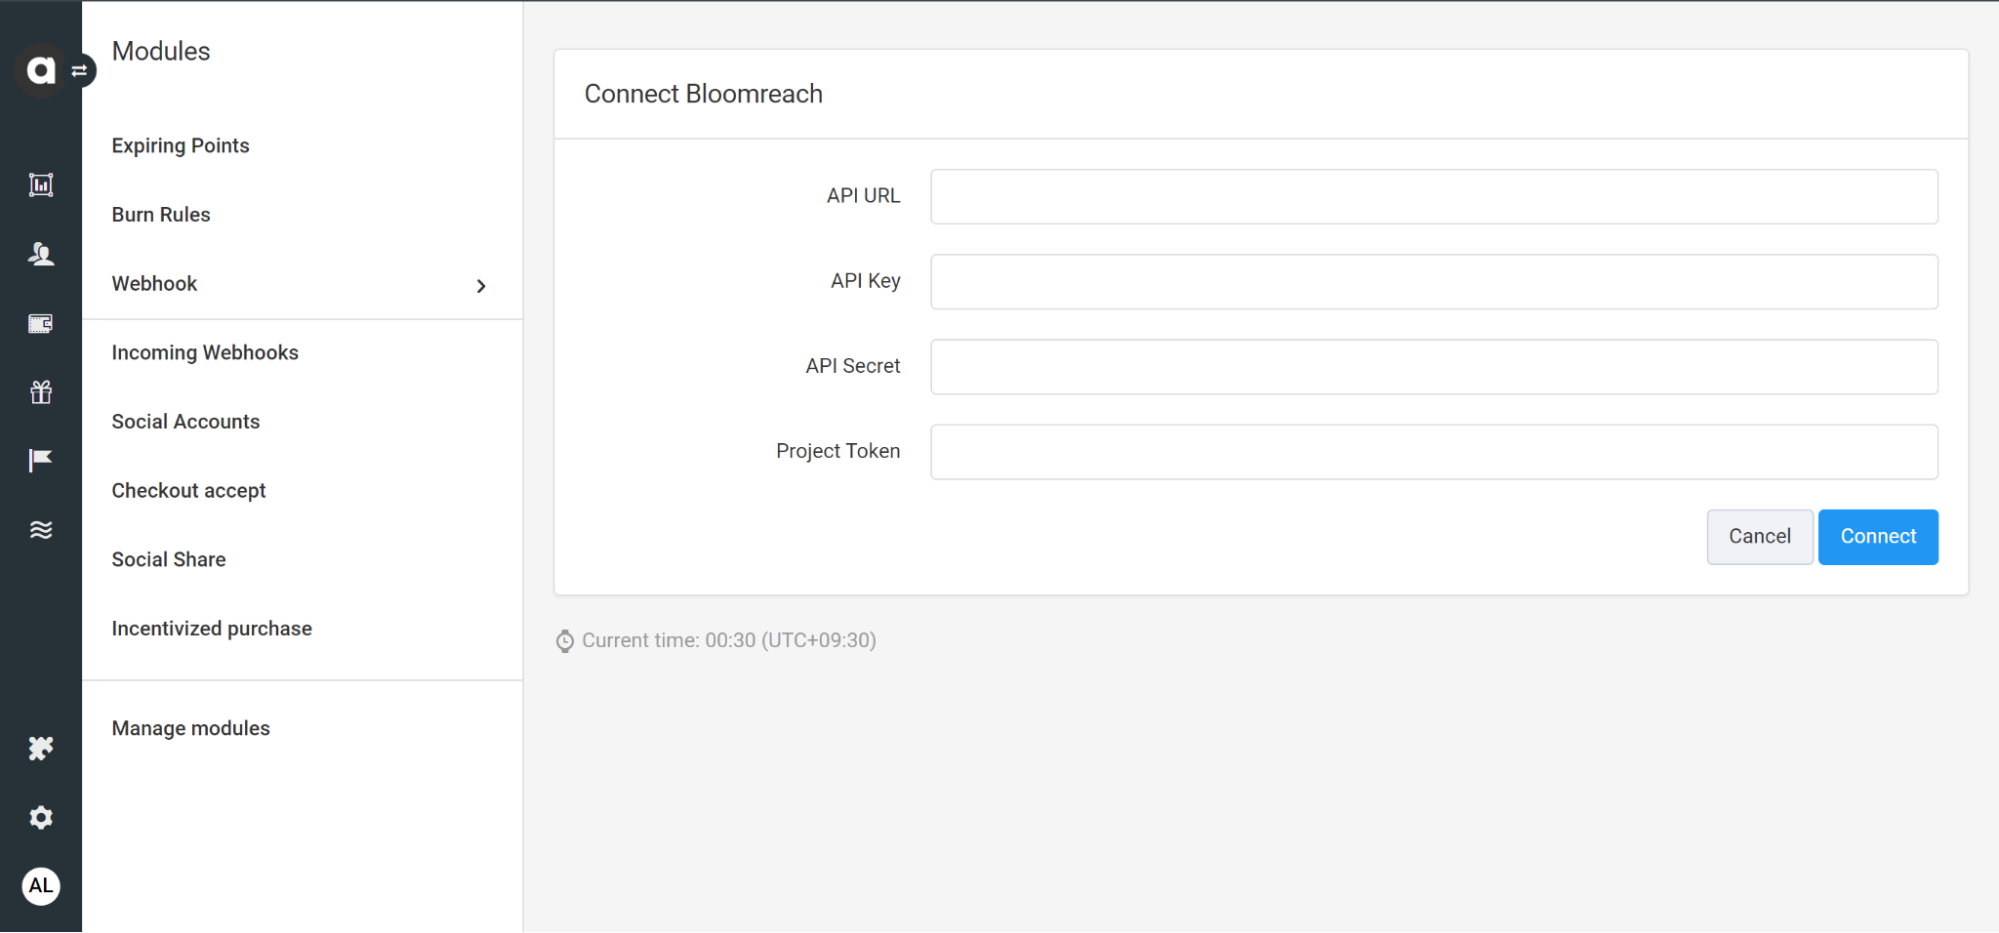
Provide the following credentials that you can find in Bloomreach under Project settings > Access management > API:
- Find the Project token and Base URL at the top of the page
- Create a new group to get an API Key and Secret pair
NoteWhen you create a new API group, make sure to add the Get and Set permission for Customer Properties and Events. These are required for synchronization.
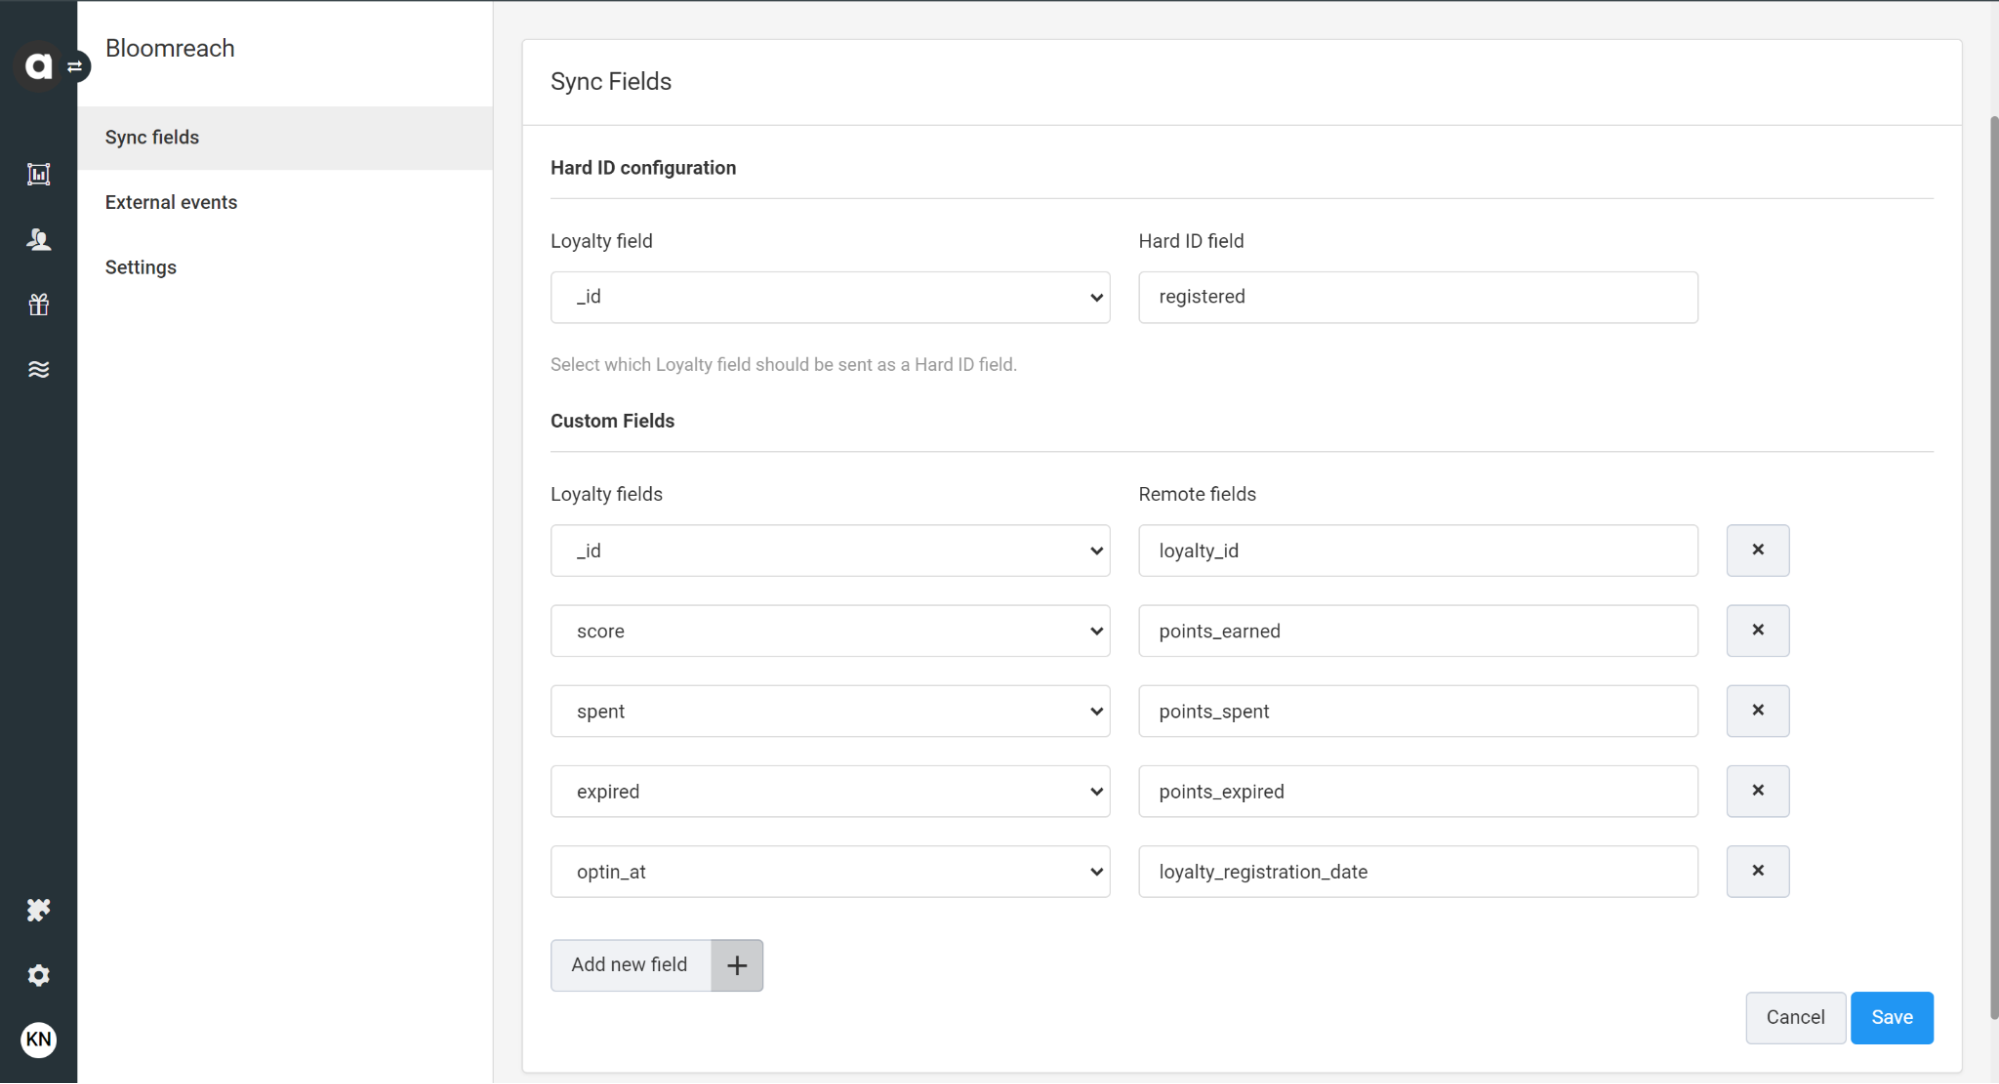
2. Configure field mapping
After the connection is established, you’ll be redirected to the Sync fields page automatically in Antavo to configure the field synchronization between the two systems. You can reach this page at any time by going to Modules > Bloomreach.
Hard ID Configuration
First, select the Loyalty field that should be synchronized with the field set as Hard ID in Bloomreach.
By default, the field is called registered; the value is the customer’s email address. The Hard ID is case-sensitive and cannot be deleted or edited once set.
Custom Fields
- Click Add new field +
- Use the dropdown field to select the Antavo Loyalty field to synchronize to Bloomreach.
- Enter the Remote field that represents the equivalent custom attribute in Bloomreach to which the data will be populated.
Note:You can find your list of customer attributes in Bloomreach under Data & Assets > Data Manager. If the field you enter is not defined in Bloomreach, a new field will automatically be generated with the first sync.
- Repeat steps 1–3 to add additional field pairings.
- Click x at the end of the row to remove a field from the list of synchronized data.
- Click Save.
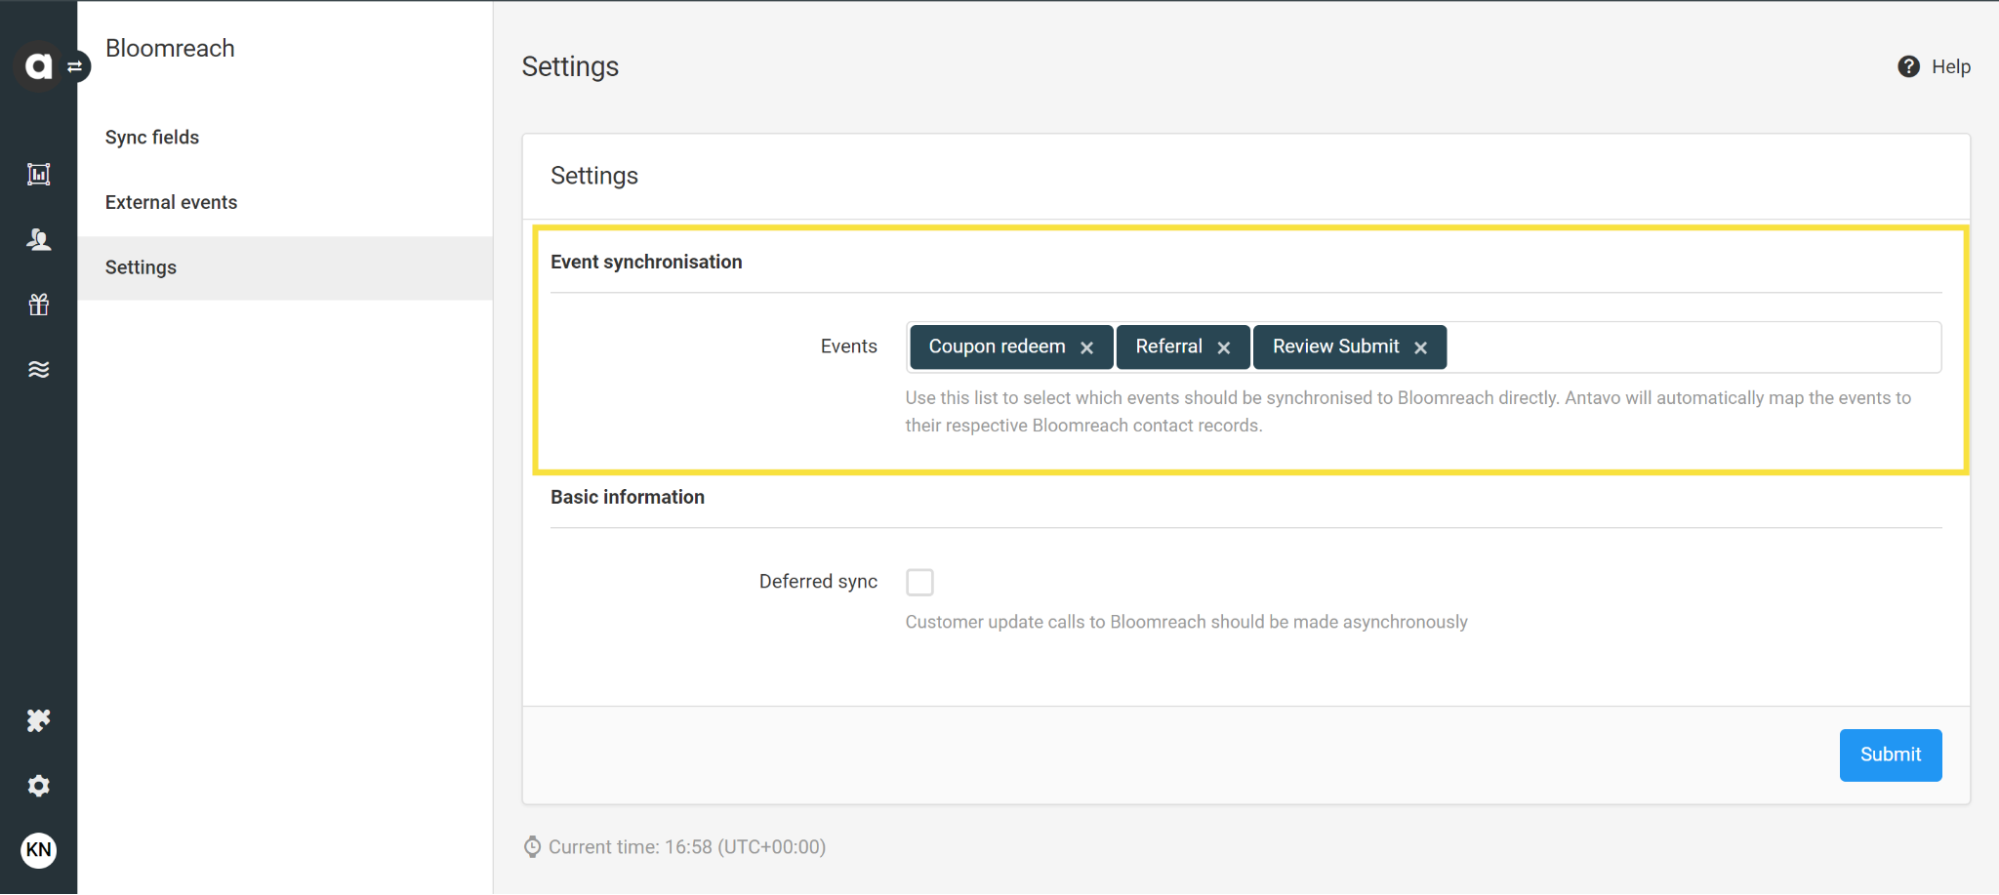
3. Configure event synchronization
The integration allows you to transmit Antavo events and their respective properties to Bloomreach effortlessly.
- Navigate to Modules > Bloomreach > Settings.
- Go to Event synchronization > Events.
- Select the event(s) that you want to synchronize with Bloomreach.
- Click Submit.
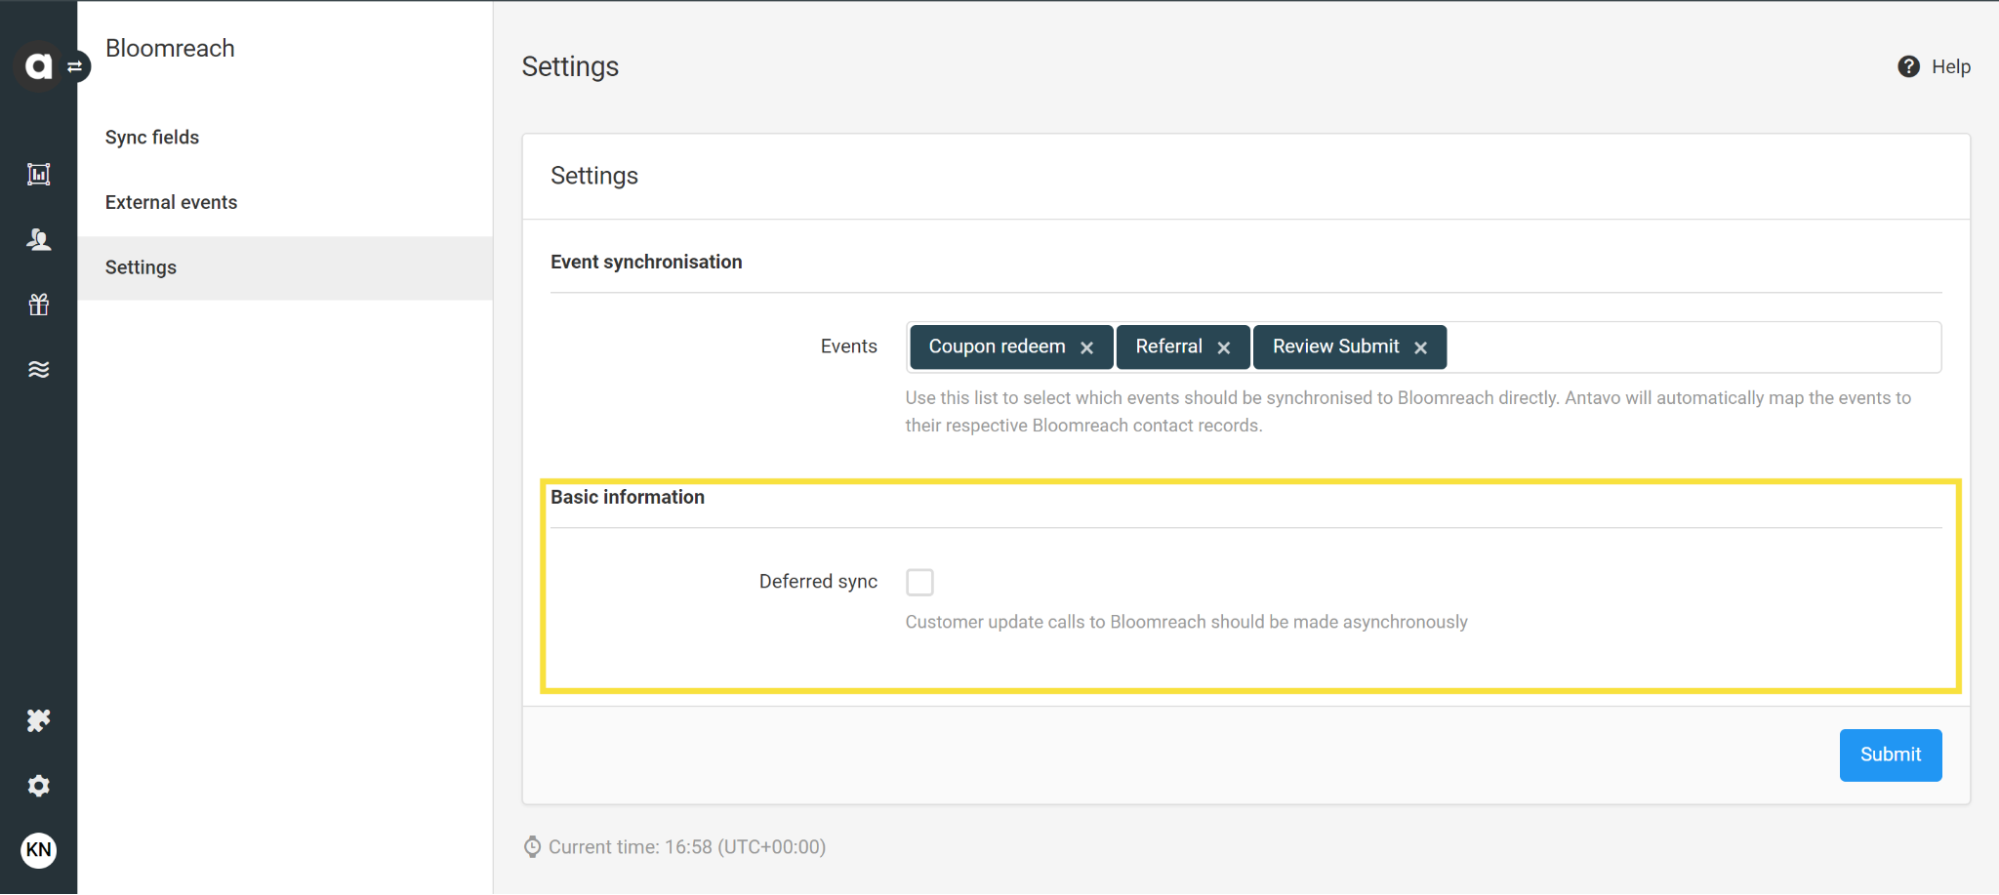
4. Configure asynchronous synchronization
You can choose to have customer update calls sent asynchronously. This option facilitates shorter API response times by adding requests to a queue when an event occurs in Antavo instead of triggering them immediately and waiting for a response.
To enable this setting:
- Go to Modules > Bloomreach.
- Press Settings.
- Check the Deferred sync checkbox under Basic informations.
- Click Submit.
Triggers
In addition to configuring field mapping and event synchronization, the integration provides further capabilities through features built into Antavo’s Workflows module.
Synchronizing Customer Data Through Workflows
Use the Sync multiple fields workflow action if the data is not stored in loyalty fields in Antavo or if the data is not added to the list of mapped fields. The synchronization of requested data is triggered when the configured workflow criteria are met.
Visit the step-by-step guide to learn how to configure the synchronization of loyalty data related to the last purchase.
Synchronizing Loyalty Program Events Through Workflows
Use the Sync Bloomreach event workflow action to synchronize events from Antavo to enter loyalty members in event-triggered Bloomreach Scenarios.
Visit the step-by-step guide to learn how to configure the synchronization of the loyalty program enrollment event and the synchronization of the loyalty program benefit earning event.
Use Cases
Fields and events can be synced using Antavo’s workflow solution. The use cases below present some common scenarios that can be performed with Antavo’s Bloomreach integration.
Welcome to the loyalty program!
Whenever someone joins the loyalty program, Bloomreach will send a welcome newsletter.
To utilize this use case:
- Go to Workflow managment located on the left sidebar.
- Click Create new general workflow. Read more about the concepts of campaigns and workflows here.
- Fill in the required fields. Follow these instructions.
- Drag and drop the Event trigger node to the empty canvas.
- Define the type of event the workflow will run on. Double-click the node and select the Opt-in event from the dropdown menu.
- Click Update.
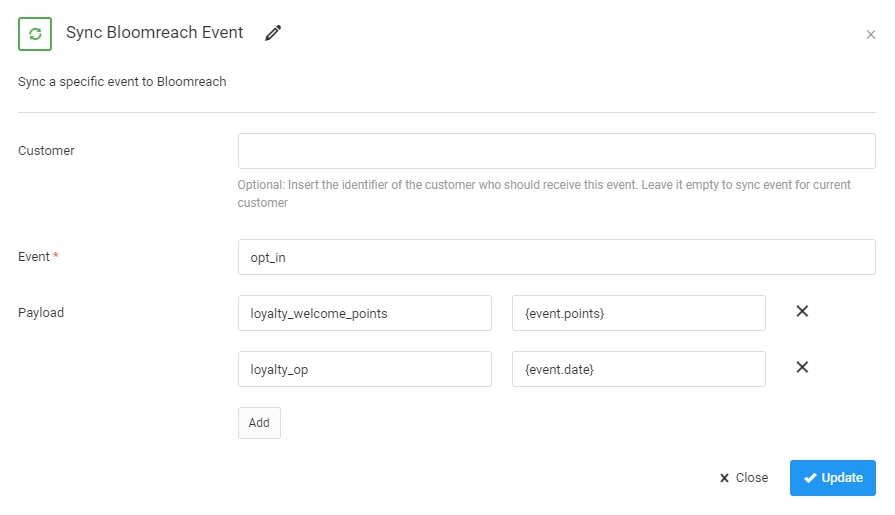
The Event trigger is connected to a Sync Bloomreach Event node.
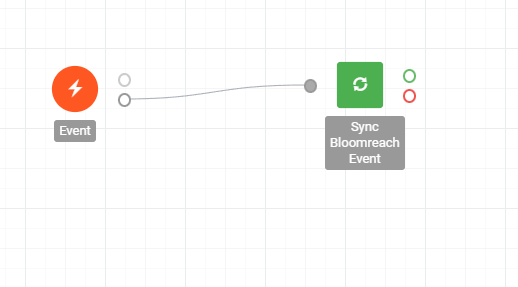
This example shows how to send the date of the opt-in and the points that have been added for enrolling.
NoteAll workflows are inactive after creation. Press Set active in the top right corner to activate it. This option appears after saving the rule first.
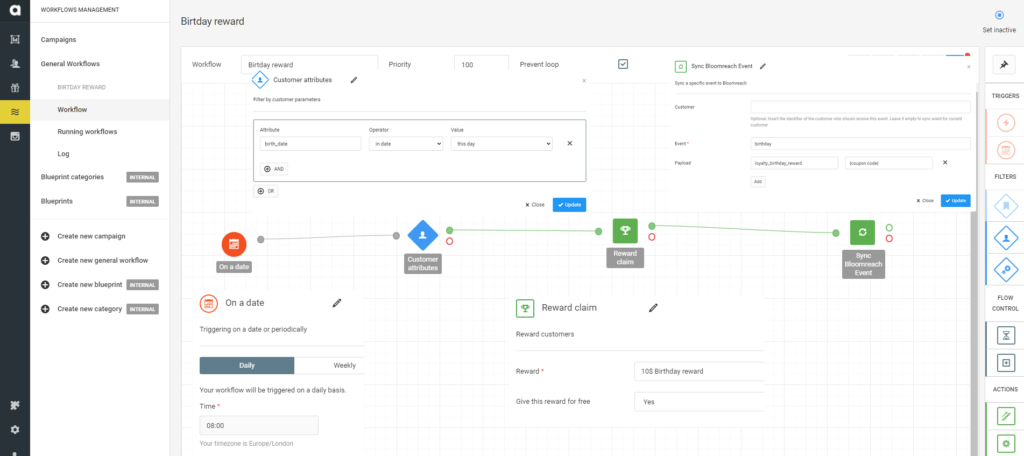
Birthday Reward
You can also gift a reward to your loyalty customers on their birthday. You need a suitable coupon-based reward first.
To utilize this use case:
- Go to Workflow managment located on the left sidebar.
- Click Create new general workflow. Read more about the concepts of campaigns and workflows here.
- Fill in the required fields. Follow these instructions.
- Drag and drop the On a date trigger node to the canvas.
- Click Update.
- Drag and drop the Customer attribute filter. This filter checks which customer has a birthday on a given day.
- The attribute for filtering is birth_date.
- The operator is in date.
- The value should be this day.
- Use the Reward claim action node to select the reward.
- Since this is a gift, set Give this reward for free to Yes.
- You can also use Sync Bloomreach Event to create an event name and sync the information.
Reward Claim
You can send data to Bloomreach whenever a customer claims a reward.
This use case utilizes a Campaign, however, the same principles apply to a General Workflow. Read more about the concepts of campaigns and workflows here.
To utilize this use case:
- Go to Workflow managment located on the left sidebar.
- Click Create new campaign.
- Fill in the required fields. Follow these instructions.
- Drag and drop the Event trigger node to the empty canvas.
- Define Reward - Claiming a reward as the event type.
- Click Update.
The Event trigger is connected to a Sync Bloomreach Event node. You can select the Bloomreach event and the payload can contain additional reward information such as:
- reward name,
- reward description,
- received coupon code,
- received coupon value,
- received coupon expiration date.
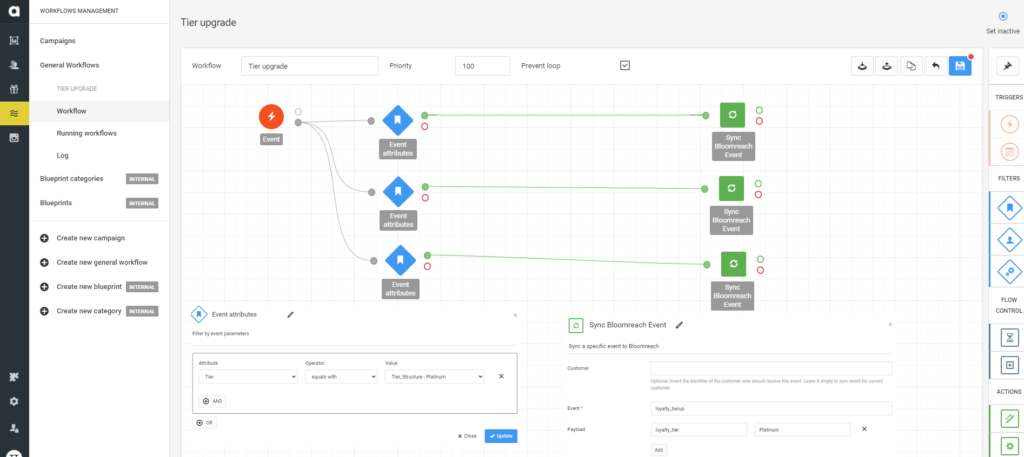
Tier Upgrade
In Antavo, you can create and assign tier structures to loyalty members based on their performance.
The following use case showcases these tiers:
- Bronze - Everyone who opts-in
- Silver - 10-50 points
- Gold - 50-100 points
- Platinum - 100+ points
To utilize this use case:
- Go to Workflow managment located on the left sidebar.
- Click Create new general workflow. Read more about the concepts of campaigns and workflows here.
- Fill in the required fields. Follow these instructions.
- Drag and drop the Event trigger node to the canvas.
- Define the type of event the workflow will run on. Double-click the node and select the Tier-up event from the dropdown menu.
- Click Update.
Since the tier upgrade event trigger occurs for every upgrade event, filtering is necessary to connect the correct NLP event to the upgrade.
You can perform this filter with the Event attribute filter with the Tier attribute.
The operator should be equal with, and the correct value from the dropdown list.
The Event trigger is connected to a Sync Bloomreach Event node.
Sync Last Purchase Data
You can configure the synchronization of information related to the customer’s last purchase to predefined Bloomreach customer fields.
- Go to Workflow managment located on the left sidebar.
- Click Create new general workflow. Read more about the concepts of campaigns and workflows here.
- Fill in the required fields. Follow these instructions.
- Drag and drop the Event trigger node to the canvas.
- Select Checkout or Checkout accept from the dropdown menu.
- Click Update.
- Drag and drop the Sync multiple fields node and connect it to the Event trigger.
- Click Add and enter the necessary information. For example:
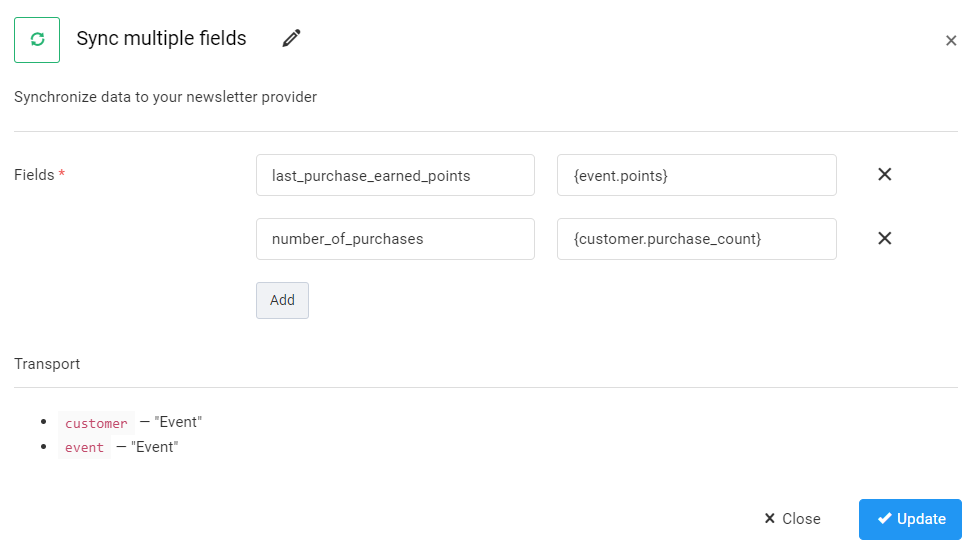
- Click Update.
- Save your workflow and click Set active.
Updated 3 months ago