

Exit popup
This guide explains how to create an exit popup weblayer. You'll add a JavaScript snippet to an existing weblayer to detect exit intent and trigger the popup at the right moment.
An exit popup — also known as an on-exit banner or exit intent banner — is a weblayer triggered when a customer shows signs of leaving your website. A JavaScript snippet embedded in the weblayer tracks the customer's mouse movements and triggers the popup the moment it detects this intent.
Customers typically leave by switching to another tab or closing the browser tab. The moment the script detects this movement, it triggers the weblayer.
Recommended uses include:
- Recently viewed items.
- Personalized product recommendations based on purchase behavior.
- Discount offers tied to an email newsletter subscription.
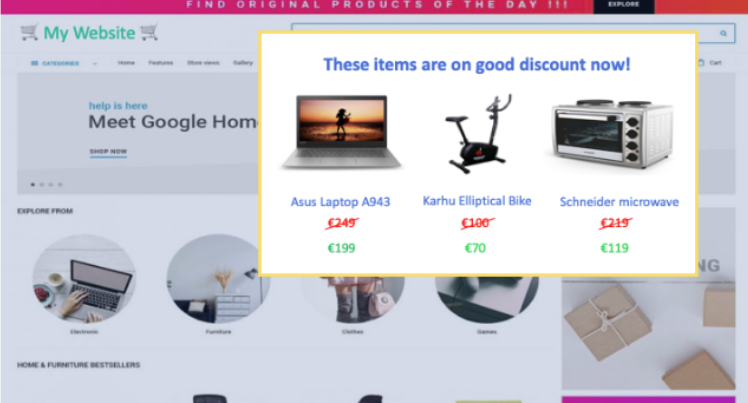
Exit popup displaying discounted product recommendations on a website.
Prerequisites
- Access to the weblayer editor.
- An existing weblayer to modify, or the ability to create a new one.
Create an exit popup
Add the JavaScript code
- Create a weblayer.
- In the weblayer editor, open the JavaScript code editor. Click the
</>button and select JS.
WarningRead the comments in the code carefully. They tell you exactly where to insert each part of your original weblayer code.
- Add the following code to the existing weblayer JavaScript code.
// Copy here everything before setTimeout() function of your original weblayer
// Usually it is definition of self and showDelay

var bannerId = Math.random().toString(36).substring(5);
window["__exp_triggered-" + bannerId] = false;
document.body.addEventListener("mouseout", (e) => {
    e = e ? e : window.event;
    const vpWidth = Math.max(document.documentElement.clientWidth, window.innerWidth || 0);
    if (e.clientX >= (vpWidth)) return;
    if (e.clientY >= 50) return;
    const from = e.relatedTarget || e.toElement;
    if(!from && !window["__exp_triggered-" + bannerId]) {
        window["__exp_triggered-" + bannerId] = true;

        // Copy here the whole setTimeout() function of your original weblayer code

    }
});

// Copy here everything after setTimeout() function.
// Usually it is getEventProperties(), removeBanner() and return
Final code example
The following example shows the complete code using the Notification weblayer template. Use this as a reference to see how the exit intent snippet integrates into your existing weblayer code.
// Copy here everything before setTimeout() function of your original weblayer
var self = this;
var showDelay = parseInt('[[ bannerShowDelayInMilliseconds ]]' || '0', 10);

var bannerId = Math.random().toString(36).substring(5);
window["__exp_triggered-" + bannerId] = false;
document.body.addEventListener("mouseout", (e) => {
    e = e ? e : window.event;
    const vpWidth = Math.max(document.documentElement.clientWidth, window.innerWidth || 0);
    if (e.clientX >= (vpWidth)) return;
    if (e.clientY >= 50) return;
    const from = e.relatedTarget || e.toElement;
    if(!from && !window["__exp_triggered-" + bannerId]) {
        window["__exp_triggered-" + bannerId] = true;

        // Copy here the whole setTimeout() function of your original weblayer code
        setTimeout(function () {
            self.sdk.track('banner', getEventProperties('show', false));
            requestAnimationFrame(function () {
                document.body.insertAdjacentHTML('beforeend', self.html);
                var banner = self.banner = document.querySelector('.exponea-notification');
                banner.insertAdjacentHTML('afterbegin', '' + self.style + '');
                var btnClose = banner.querySelector('.exponea-close');
                self.sdk.trackLink(banner, 'banner', getEventProperties('click'));
                requestAnimationFrame(function () {
                    document.querySelector('.exponea-notification').className += ' exponea-animate';
                });
                btnClose.onclick = function (e) {
                    removeBanner();
                    self.sdk.track('banner', getEventProperties('close'));
                    e.preventDefault();
                    if (e.stopPropagation) {
                        e.stopPropagation();
                    } else {
                        e.cancelBubble = true;
                    }
                    return false;
                }
            });
        }, showDelay);

    }
});

// Copy here everything after setTimeout() function.
function getEventProperties(action, interactive) {
    return {
        action: action,
        banner_id: self.data.banner_id,
        banner_name: self.data.banner_name,
        banner_type: self.data.banner_type,
        variant_id: self.data.variant_id,
        variant_name: self.data.variant_name,
        interaction: interactive !== false ? true : false,
        location: window.location.href,
        path: window.location.pathname
    };
}

function removeBanner() {
    if (self.banner) {
        self.banner.parentNode.removeChild(self.banner);
    }
}
return {
    remove: removeBanner
};
Limitations
Exit popups don't work on mobile devices. The feature relies on mouse movement tracking, which isn't available on touchscreen devices.
Updated 3 months ago