
Custom predictions
Instead of using a predefined template, choose a custom prediction to specify your parameters. To do so, go to Analyses > Predictions > + New prediction > Custom prediction.

Custom predictions availability in BETA
This feature is currently available in the BETA version, but we are working on its improvement.
Custom predictions
Setting up a custom prediction consists of 4 steps:
- Target customer filter: Define the goal you would like to predict (for example, purchase)
- Eligible customer filter: Define the customers for which the model should try to predict the target (for example, customers who opened a particular email)
- Features: Define what data should form the basis of the prediction
- Algorithm settings: Define the basic setting for the algorithm
Target customer filter
The target of the prediction is an event or customer property you want to predict.
Prediction type
The first thing you need to define for the target is the prediction type - the data type that should come as a result. You have the following options:
| Prediction type | Output value | Description | Example usage |
|---|---|---|---|
| Binomial classification | Probability | Determines whether customers will achieve a prediction goal in the future or not. | What is the probability that customers will make a purchase within a week? |
| Multinomial classification | Best segment | Determine which segment from a given set of segments is best for each customer. | Which campaign channel is the best one for a customer? |
| Regression | Absolute number | Predicts the numerical value of specific customer attributes in the future. | How much money will a customer spend this month? |
Filter condition
The second thing you need to do is define the specific target (filter condition) you want to predict. The target can be any combination of events or customers' properties. The options are limited only by the variety of data you have tracked about your customers. You choose the target by clicking on + Add filter condition. In the example below, purchase is the target event.

To achieve reasonable model accuracy, you should have at least 1,000 target customers (for multinomial classification: in each segment and ideally equally distributed).
Looking at the customers’ past behavior allows you to learn what determines it. To do this, the predictions module looks at 2 time frames:
- Feature window: The time frame out of which the prediction extracts customer behavior patterns preceding the target
- Target window: The time frame from which the prediction extracts whether a particular target has or has not been reached.
You can predict the future by combining the behavior within the feature window and its result within the target window.
There are 2 fundamental types of predictions for the future that are available. The so-called 'now' prediction, where you can predict whether something will happen now (today, in the current session), and the so-called 'window' prediction, where you can predict whether something will happen in a specified time window (next 30 days, next seven days). You can read more about how to configure these later in this article.
Eligible customer filter
You should filter customers, so only those relevant to the particular prediction remain. These would ideally be customers you had tracked the target events in the past three months. However, you might need to widen the criteria if you do not dispose of enough of such data. Eligible customer filter is used the same way as a regular customer filter.
The time frame should be set based on whether you want to predict the target happening now or in the future. Read about how to choose the correct time frame in the next Features section.
Dataset size
The dataset resulting from the filter should be of the size of at least a few thousand customers so that the model can create accurate predictions.
Features
In the Features tab, you define which events or customer properties should be considered by the model. You also choose the time frame within which these should have been tracked. This timeframe is called the feature window. You have two options when choosing what the window should be:
- If you want to predict something happening now, you should choose a feature window that overlaps the target window. This is explained in the Now prediction section.
- If not, the feature window and the target window should be separate. Read more about it in the Window prediction section.
Window prediction
If you are not predicting what will happen now but in the future, you should choose a feature window that ends before the target window begins. We call this the Window prediction.
In the picture below, the feature window is the 60 days preceding the target window, which consists of 30 days. Often, the feature window will be identical to the timeframe for eligible customers. However, it depends on your exact needs. This means that 60 days of customer behavior is analyzed to get the patterns. Afterward, it takes another 30 days to understand which patterns lead to the target and which do not.

The resulting information allows you to predict the future. The picture below shows new customers tracked in the last 60 days. When comparing their behavior with the behavior and results of the training model, you can calculate the probability that a particular customer will achieve the target in the next 30 days.

To set up this template in the app, replicate the following screenshots:

If, as a result of changes, you then need to predict whether the purchase will happen in the next 14 days instead of 30, you will need to set the target window to 14 days, adjust the feature and eligibility window to 60 days before the specified 14 days, and rerun the prediction.
Now prediction
If you are predicting what will happen now (in the current session / this hour / today), you should choose a feature window overlapping with the target window. We call this the Now prediction. The feature window is calculated for every customer based on the target timestamp.

To set up this template in the app, replicate the following screenshot:

Advanced settings
The tab includes the following advanced settings:
- Target offset allows you to define when the model should stop taking the relevant events into account before the target event (applies only to the customers who fulfill the target).
- Floating time window allows the model to take into account the relevant events even before the start of the time window if the target was tracked at the beginning of the time window (and the preceding data would not be normally available to the model)
- Dataset balancing should be activated when the data is too unbalanced (when the target rate is too high or too low).
- Data validation specifies the percentage on which we create and test the model. This means it divides the data between training and testing datasets.
Algorithm settings
Lastly, you can decide to use the default algorithm settings or customize them. The following settings are available:
- Minimum instances per node allow you to set the minimum number of data instances per decision node in a decision tree.
- Maximal depth allows us to constrain the depth of a decision tree.
- Algorithm type allows us to request a specific algorithm.
Best channel prediction use case
The purpose of the Best channel prediction is to identify the channel that is most likely to lead to the desired result (for example, click, conversion, or subscription). This will allow you to choose the right channel for each customer, maximizing the effectiveness of your campaigns.
Steps to execute:
- Create a prediction model
- Optimal send time as a prediction
- Create segmentation based on the model
- Create an A/B test to figure out what works best for every segment
- Evaluate and run
In the example for this section, we will predict whether targeting a customer with a marketing email or a browser push notification is more effective.
Create a prediction model
We need to create a new custom prediction to identify the best channel. To do so, go to Analyses > Predictions > + New prediction > Custom prediction`.

Setting up this type of prediction consists of 4 steps:
- Target customer filter
- Eligible customer filter
- Features
- Algorithm settings
Target customer filter
Prediction type
Define the prediction type of the target. When looking for the best channel, you want to categorize your customers into different segments - according to the channel through which they are most approachable. You should choose Multinomial classification as the prediction type as you are looking for the best segment.

Filter condition
Define the combination of events and even attributes that should be the target of your prediction. As you are looking for the best communication channel, you should use the filter to choose events with attributes that match your desired result for each channel.
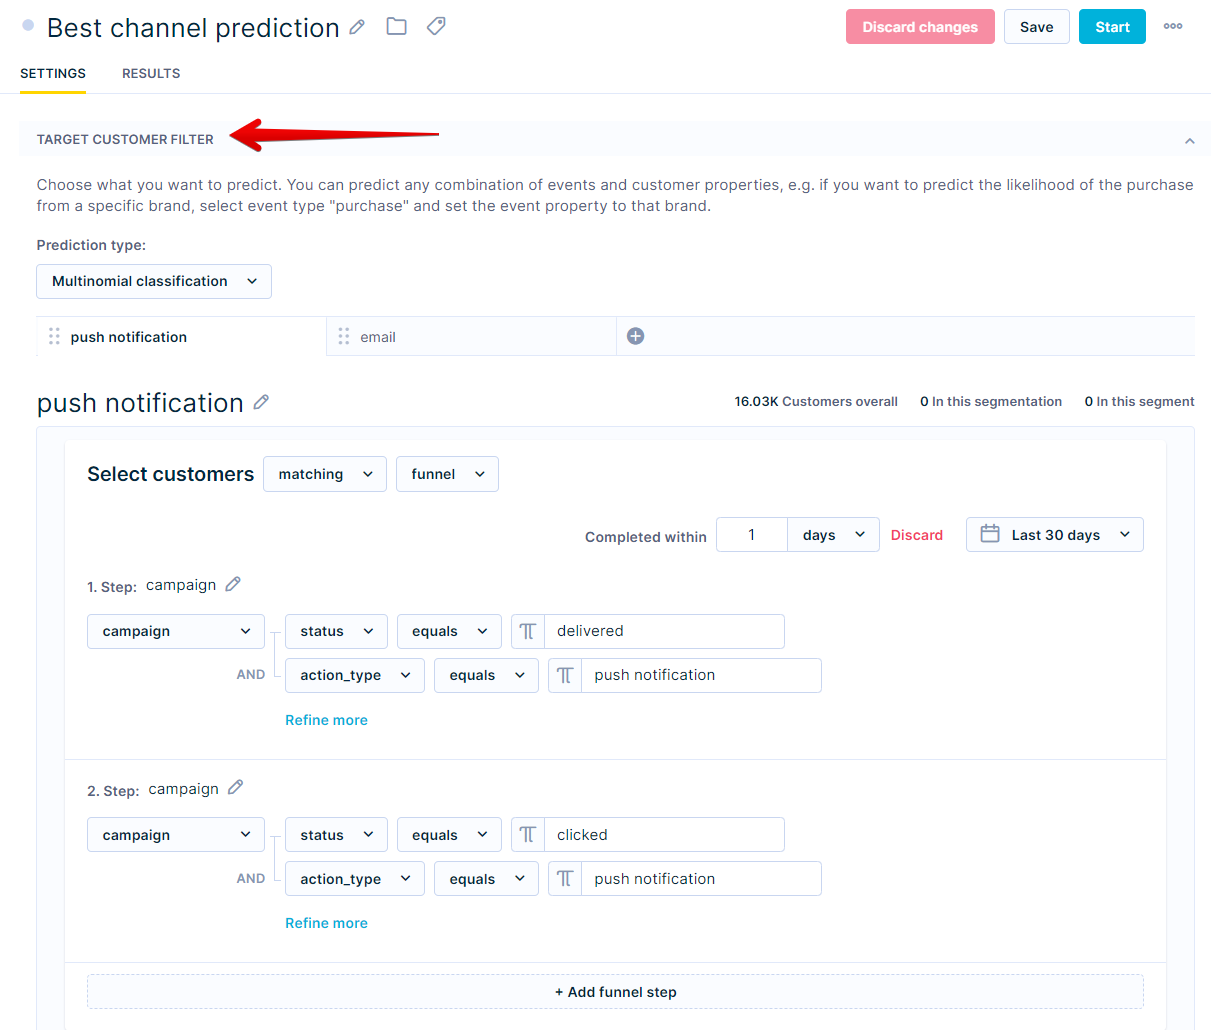
In our example, we choose the following:
- 1st step:
- campaign
- action_type > equals > push notification / email
- status > equals > delivered
- campaign
- 2nd step:
- campaign
- action_type > equals > push notification / email
- status > equals > clicked
- campaign
You should choose the channels you want to compare and make predictions about. The target in our example is a click after an email or push notification is delivered. As we had chosen Multinomial classification before, these will form the basis of the two resulting segments - customers who are more likely to click on an email and those who would rather do so after receiving a push notification.
For the model to be accurate, you should have at least a few hundred customers in each segment. Ideally, they would be equally distributed.
Naming your segments
Segment names in the Target customer filter cannot contain dot (.) or dollar ($) or be empty as they cause an error. For example: If you named the segment 2.5, consider renaming it to 2_5.
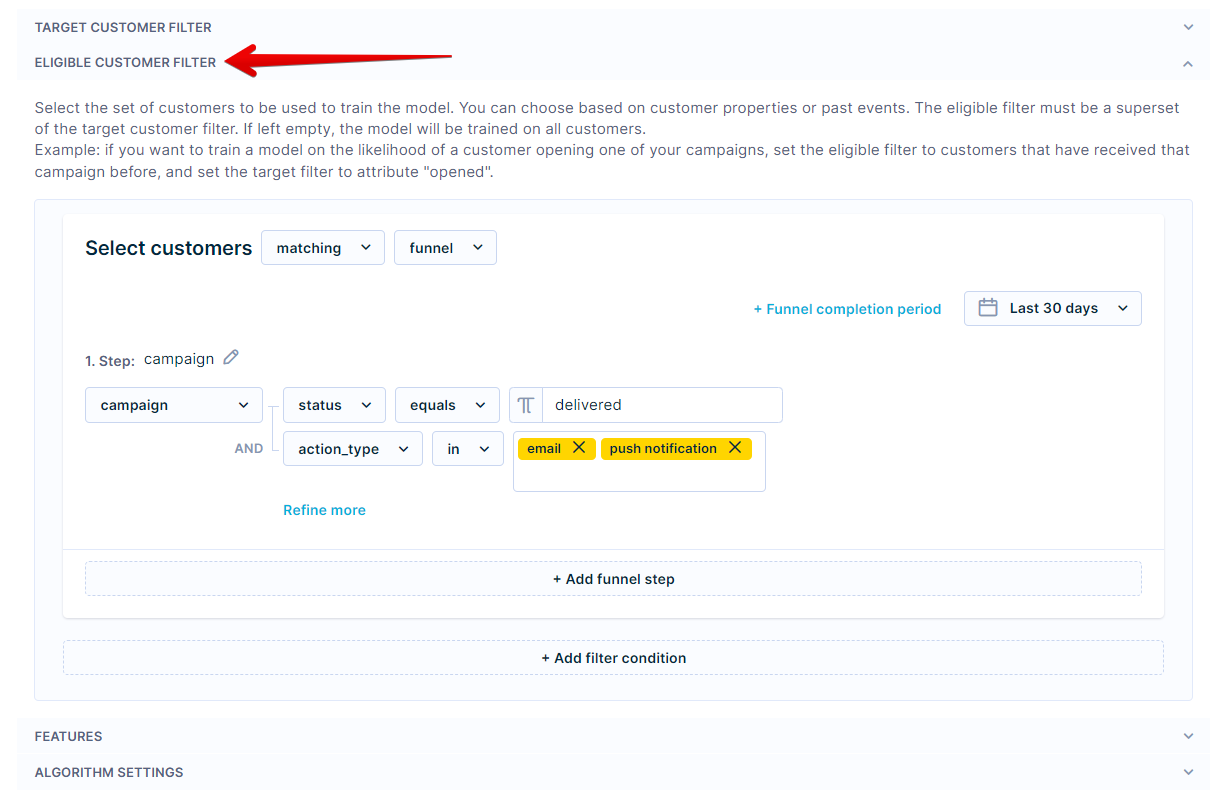
Eligible customer filter
To include only the customers relevant to the prediction, you need to choose the relevant customer filter and its timeframe. In this case, you want the prediction to consider only the delivered campaigns of the relevant action_type. The timeframe should ideally be set at 30 to 90 days.
Size of the dataset
The dataset resulting from the filter should be of the size of at least a few thousand customers so that the model can create accurate predictions.
Features
To include only the events and attributes relevant to the prediction, you need to choose the relevant events and attributes and their timeframe. In the best channel case, you would like to get the probability that a customer will click through the campaign now, not on the broader time window.
Since you want to get the probability that the customer clicks on the campaign right now, the time window for Features needs to overlap the time frame of the target.
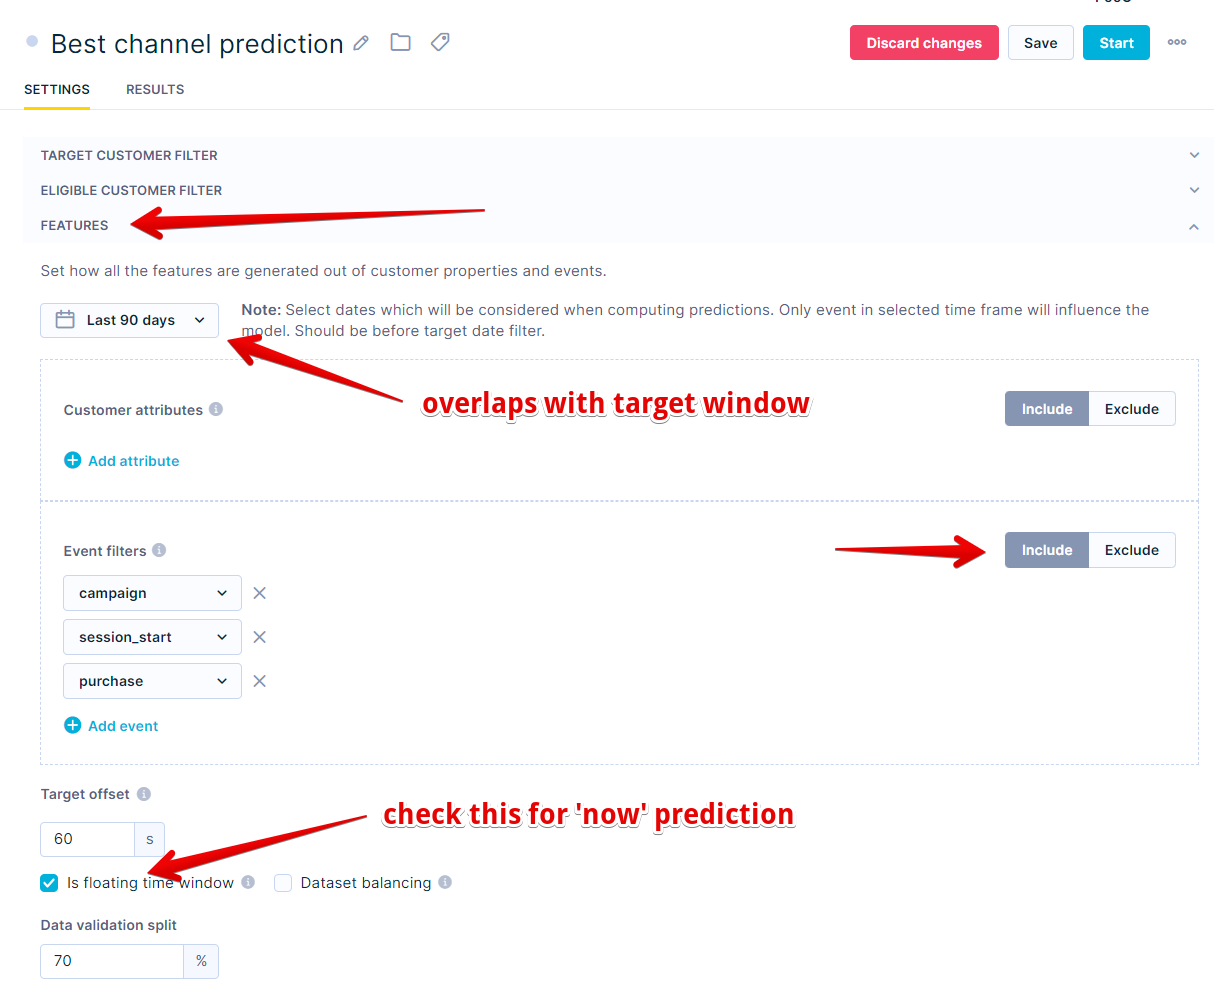
This setting means that the feature window is calculated for every customer based on their delivered campaign.

Specifying the event
If you mapped the purchase event and corresponding status in
Data Manager>Mapping, you don't have to specify the event for this prediction. It will be done automatically.
Algorithm settings
The last part is the algorithm setting. Unless you have some special preferences, you can use the default settings.
Check its performance
Before using a model, you always need to evaluate its performance. As explained in the Model quality evaluation section, you can make your evaluation based on multiple metrics. We suggest using F1 for this particular model. If the performance seems satisfactory, continue to the next step. If not, no strong predictions could be derived from the available training data. In such cases, try using a different time frame or a custom template where custom features can be chosen instead.

We also recommend you go through the decision tree and check the result of the individual nodes. This can give you business insights into probabilities of different groups of customers taking certain actions and a way of verifying your model. If a particular result seems improbable, you probably fell into the overfitting trap and need to adjust the model.
Create the A/B test to figure out what works best for every segment
After the last step, you know what the predicted best channel for each customer is, but you still need to test it in a scenario so that we can evaluate its effectiveness. You should create an A/B test, dividing customers into three groups:
- Variant - the best channel
- Control group (email)
- Control group (browser push notification)

Evaluate and run for all relevant customers
After running the scenario for several days, you can evaluate whether your best option is sending an email to everyone, sending a browser push notification to everyone, or using the personalized “best channel” derived from the prediction.

To understand whether the difference in the A/B test between the variant and the control group is statistically significant, we recommend using our bayesian calculator.
Based on the evaluation, the final adjustment of the campaign can be made so that real-time predictions will decide whether a web layer is displayed to a certain customer.
Updated about 1 year ago