

Customizable Customer Acquisition Weblayer


Use case description
The Customizable Customer Acquisition Weblayer comes with a number of different categories containing variables you can edit. Among other features, with this highly customizable weblayer, you can customize consent management, identification, or update customer attributes.
Key features
- Tailor how you manage data, including consent categories, customer identification, and attribute updates, to fit your specific needs.
- Add or remove email and phone inputs, and customize the form's appearance and layout to match your brand.
- Link different weblayers for complex, multi-step customer journeys, enhancing user engagement and data collection.
Use case items
With this use case, you’ll get a:
- Customizable Customer Acquisition Weblayer: This weblayer lets you decide how to handle data, such as consent categories, identifying, and updating properties. You can add or remove email and phone inputs as needed. It also displays voucher codes with a "copy to clipboard" feature and allows you to link weblayers for multi-step journeys.
How to deploy the use case
After downloading the use case, follow these steps.
Meet the requirements
Check if the data in your project meets the requirements. The Use Case Center lists requirements for each use case during the deployment process.
Understand the use case logic
The use case works by letting you customize a weblayer for customer acquisition. You configure data handling, set consent categories, and update customer attributes. Adjust the form to include or exclude email and phone inputs.
Adjust the use case
Now that you understand the use case logic, you can set up the use case according to your needs. This step is important to ensure your weblayer runs properly.
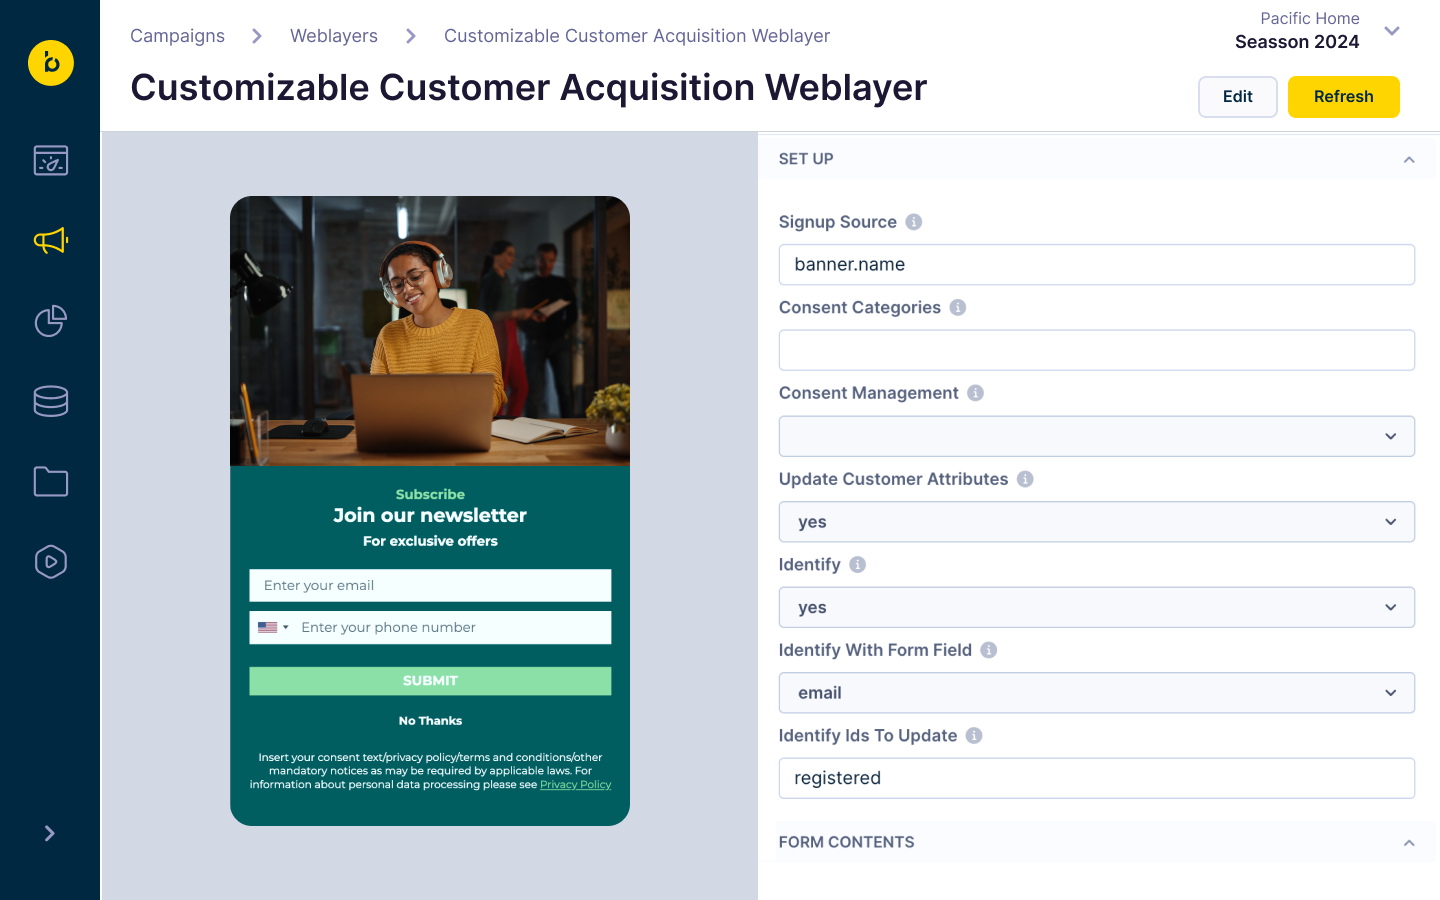
Set up
This section allows you to change how the weblayer treats the data entered into your weblayer.
Signup Source
This is present in the banner and consent events triggered by the weblayer. It should be the name of your banner or a specific competition, for example.
Consent Categories
This is a comma-separated list of consent categories you want to update on the submission of the form. If you want to set multiple consents, your email channel category should be first.
Consent Management
This allows you to choose how you set your consent events.
- Not Set or blank will assume don't want to set consents.
- Scenario Created assumes you created a scenario on your
banner, submitevent that sets the appropriate consents. - Public API assumes that you enabled the public API setting on your consent categories, and it will set these consents via our JavaScript SDK.
Update Customer Attributes
This allows you to choose to update attributes, such as email and phone when the customer submits the weblayer.
Identify
This allows you to identify the customer’s web session when submitting this weblayer.
Identify Form Input
This allows you to choose which input from the weblayer you want to use to identify the customer.
Identify Ids To Update
This allows you to choose which project IDs you want to update with the form inputs. If you selected both in the Identify Form Input section, add two comma-separated IDs that relate to the email and phone inputs. Example values include:
registeredphone_idregistered,phone_id
Form contents
This section allows you to manipulate the contents of your weblayer, such as removing the email or phone input, as well as enabling/disabling certain buttons on the weblayer.
Position
This section lets you customize where the weblayer will show, as well as whether you want the weblayer to sit inline on the page (part of the page itself, not as a pop-up) and where it should be inserted.
NoteThis section requires some knowledge of CCS selectors to choose the right element to add the weblayer before/after.
Layout
This section allows you to customize the appearance of your weblayer, from its desktop and mobile width to the offset of different sections of the form, giving you the freedom to get the layout you want.
Background
This section allows you to choose the background of your form and whether you want an overlay color.
Background Overlay Color
Choose whether you want a faded overlay on the rest of your webpage when the weblayer pops up. If this is set to a value that isn’t transparent, it will enable “click to close” when a user clicks on the background overlay.
Triggering
This section contains standard triggering behaviors used for existing predefined weblayers.
Copywriting
This section allows you to customize all of the text shown on your weblayer.
Typography
This section allows you to change even more around your font styling than ever before. Now includes:
- Font weight
- Spacing between elements
- Text alignment
Form styling
This section allows you to customize even more of your form, such as showing labels above inputs or changing button styling, and your close icon.
Advanced
This weblayer comes with a suite of advanced options. These aren’t for every use case but enable much more complex use cases to be achieved.
Voucher Code
Add a voucher code, statically or using Jinja, to be shown on the Thank You page. Voucher codes are assigned when the weblayer is shown, not on submission. Keep reading to see how you can overcome this.
Enable Voucher Code Icon?
Enable the icon to copy the voucher code to the clipboard.
Auto Hide Delay
Choose how long the weblayer should wait before it hides the Thank You page.
Bext Step Weblayer ID
Combined with the Force Show Thank You Page and Disable Show Event Tracking, this setting allows you to chain the weblayer together. Instead of showing the Thank You page, it will show the weblayer with the ID entered in this input, which allows you to ask further questions.
Force Show Thank You Page
This option allows you to force a weblayer to immediately show the Thank You page instead of the main form. This is useful for a second weblayer that shows the voucher code, which stops the weblayer from being assigned on the first banner “show”.
This is designed to be used together with the Next Step Weblayer ID setting, where your first weblayer shows the form, and the second (added as the next step ID) forces the Thank You page with the voucher code in place. This way, you only assign voucher codes when someone submits the form.
Disable Show Event Tracking
Where you use Force Show Thank You Page, to avoid duplication of events, you can disable the “Show” event for that second page.
Optional Inputs
You can add two additional inputs to the weblayer for extra data capture. These extra inputs have a number of options and are automatically captured by the weblayer on submission.
Test and run the use case
Test a use case before deploying it. Testing ensures you don't send unfinished or imperfect campaigns to your customer base.
Once the testing is over, run the use case. Open the banner and click Start to launch the campaign.
Updated 4 months ago