

Custom Domain Management
Custom Domain Management lets you add more domains to your instance through the app's user interface. By default, your instance comes with 3 domains: the app's interface (UI), Tracking API, and CDN. This guide will help you understand how to use this feature and add extra domains, including shortener types for SMS links.
Unified loginFor unified login setup, refer to the Unified domains page.
How to set up a new domain
1. Add a domain
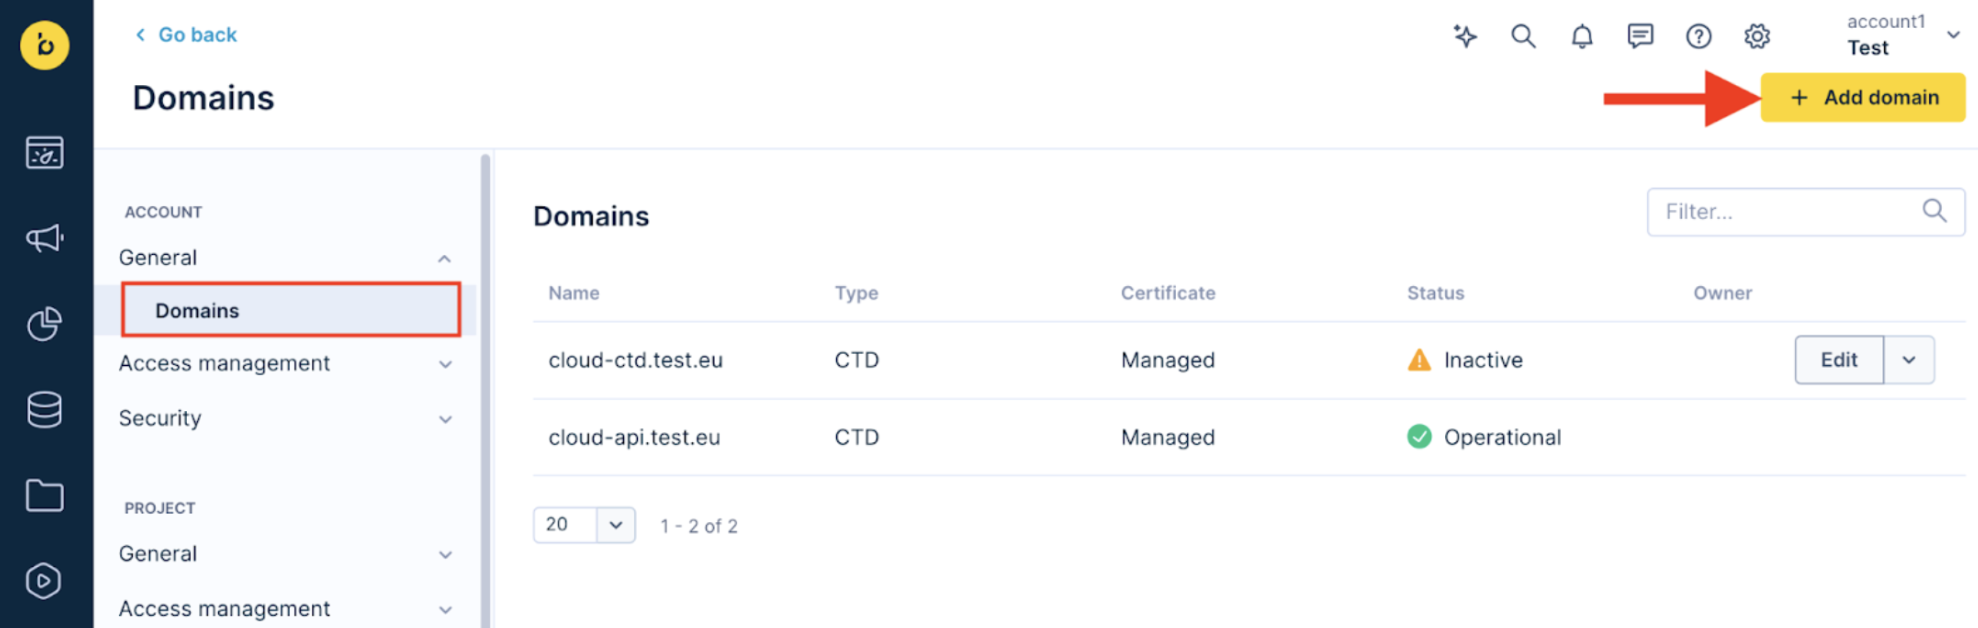
Go to the settings menu by clicking on ⚙ in the top right corner. You will find domain management under ACCOUNT > General > Domains. You need account-level permissions to access this section. To add a domain, click the + Add domain button at the top right of the Domains page.
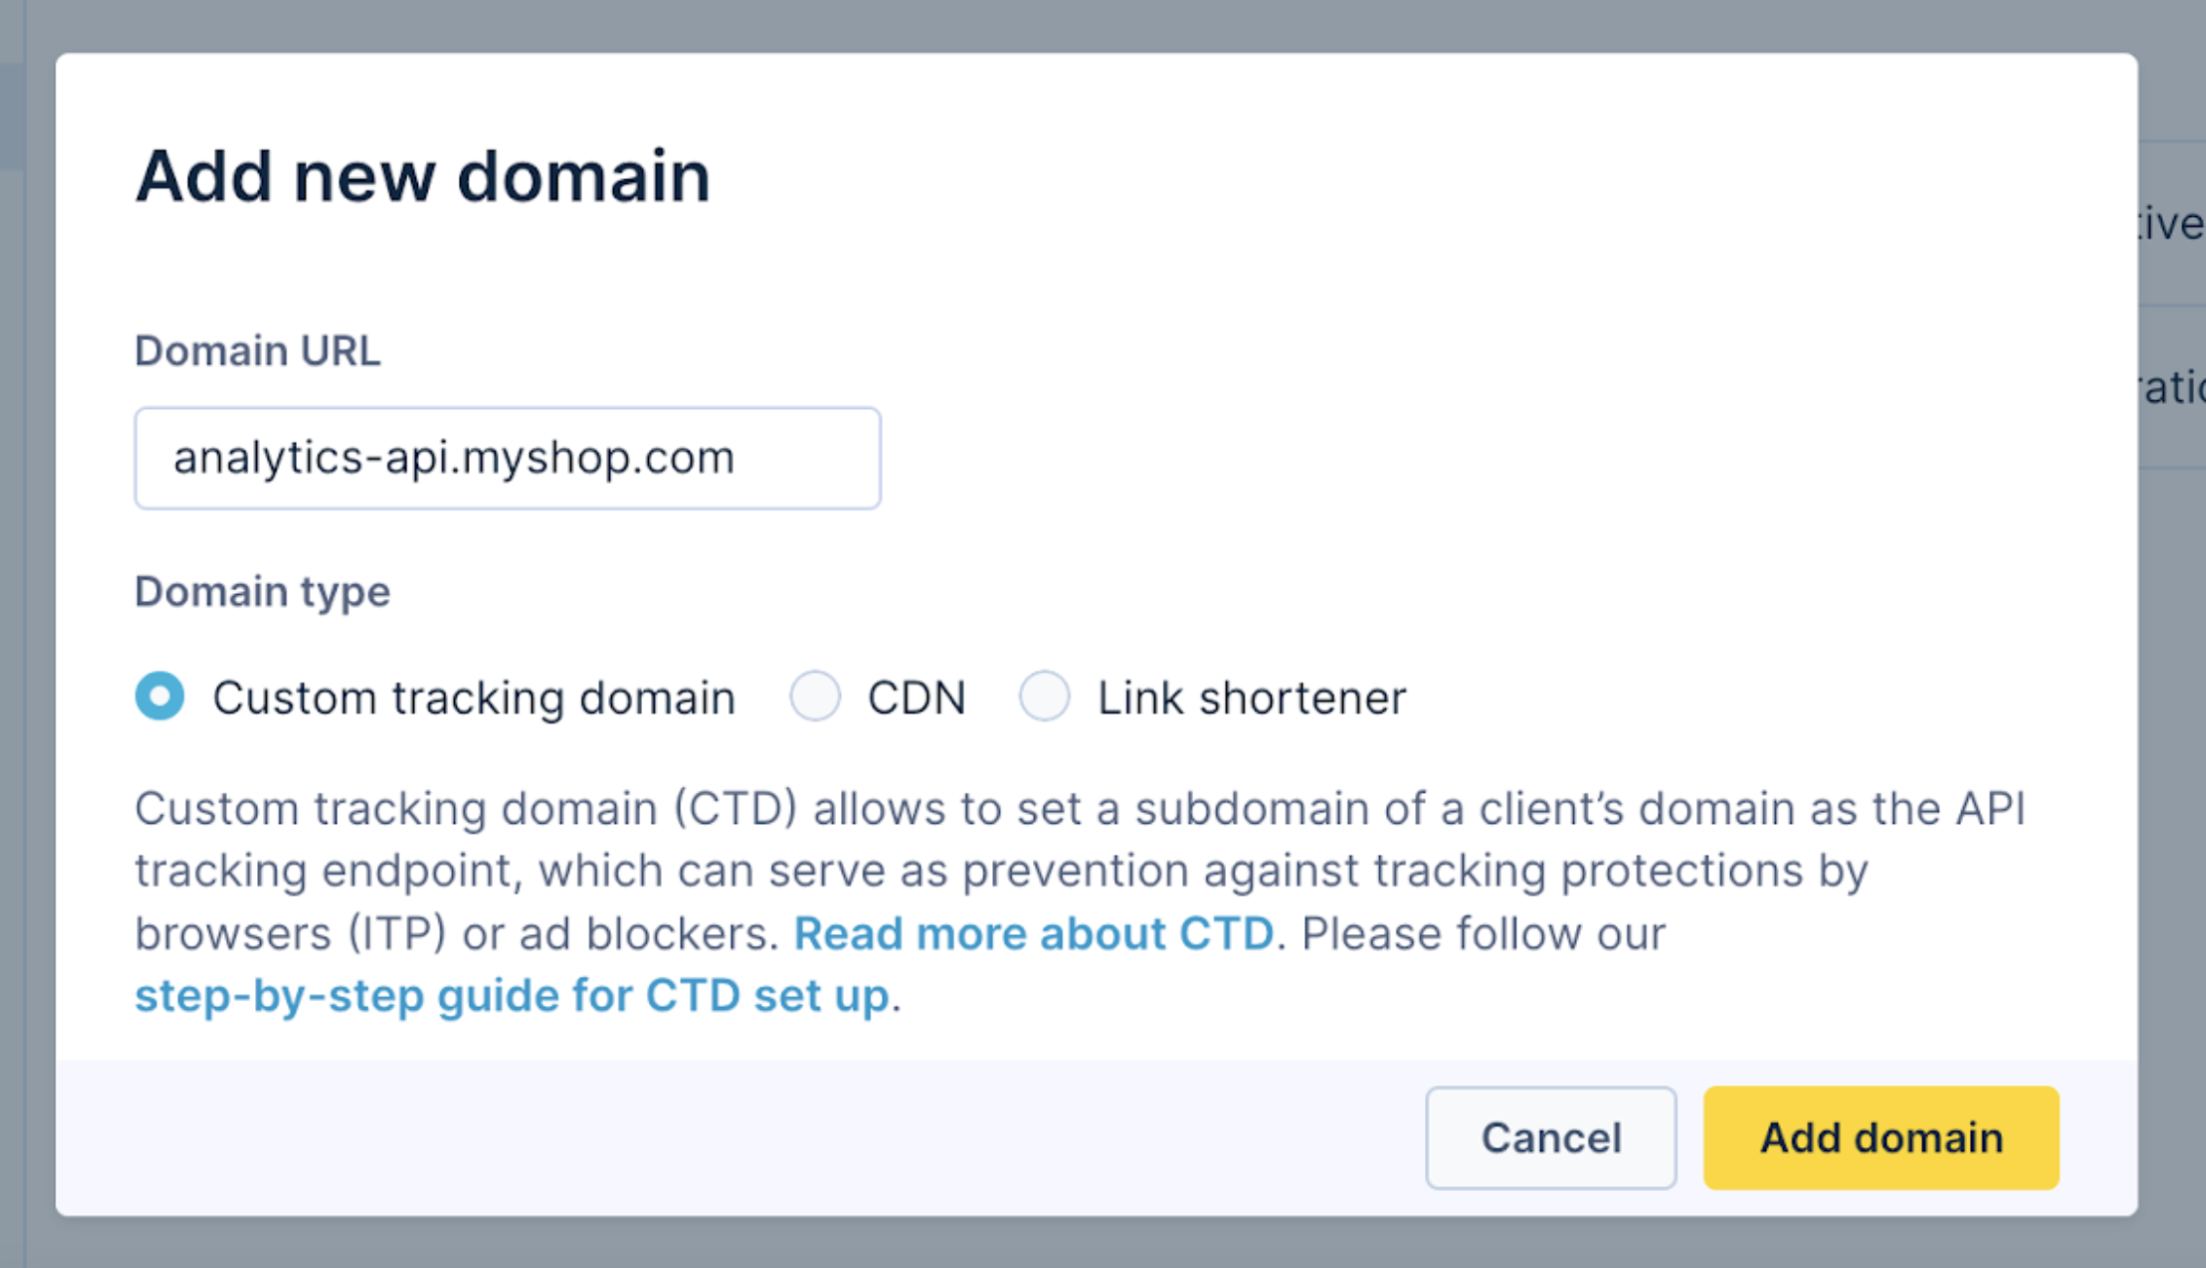
2. Fill the domain name and type
After you click on + Add domain, you will be prompted to fill in the domain name and domain type.
The following types are supported:
Custom tracking domain (CTD)
A Custom Tracking Domain (CTD) helps maintain reliable tracking and data quality even when browsers apply tracking protection. It works by switching from JavaScript cookies to HTTP cookies, making it resistant to Intelligent Tracking Prevention (ITP) measures.
Typically, you use a subdomain or third-level domain for this. For example, if you've got the tracking SDK on 'myshop.com', you could use a subdomain like 'analytics-api.myshop.com'.
To effectively resist ITP, you need to use NS type DNS records. You can use CNAME records as well, but they don't fully protect against ITP
Read more about CTDs here.
Content delivery network (CDN)
A custom CDN domain is used for Bloomreach public endpoints such as tracked email links, surveys, consent pages, and other public URLs. It doesn't change or brand image and file URLs served through File Manager, Asset Manager, BEE Editor, or other external asset hosts.
You can use a CDN domain with any level of domain, such as a subdomain or a second-level domain. Using CNAME records for CDN domains covers all use cases.
Read more about CDN domains in the Custom CDN Domains article.
Link Shortener
A Link Shortener domain is used for SMS links. Since it needs to be quite short, usually a second-level domain like 'short.co' is used. However, remember that this kind of domain can only point to Bloomreach servers via NS records. So, it should be solely used for the Link Shortener and on just one Bloomreach instance.
Read more about the shortener here.
After a domain has been added, its status will become 'Pending' until the DNS records are configured and verified.
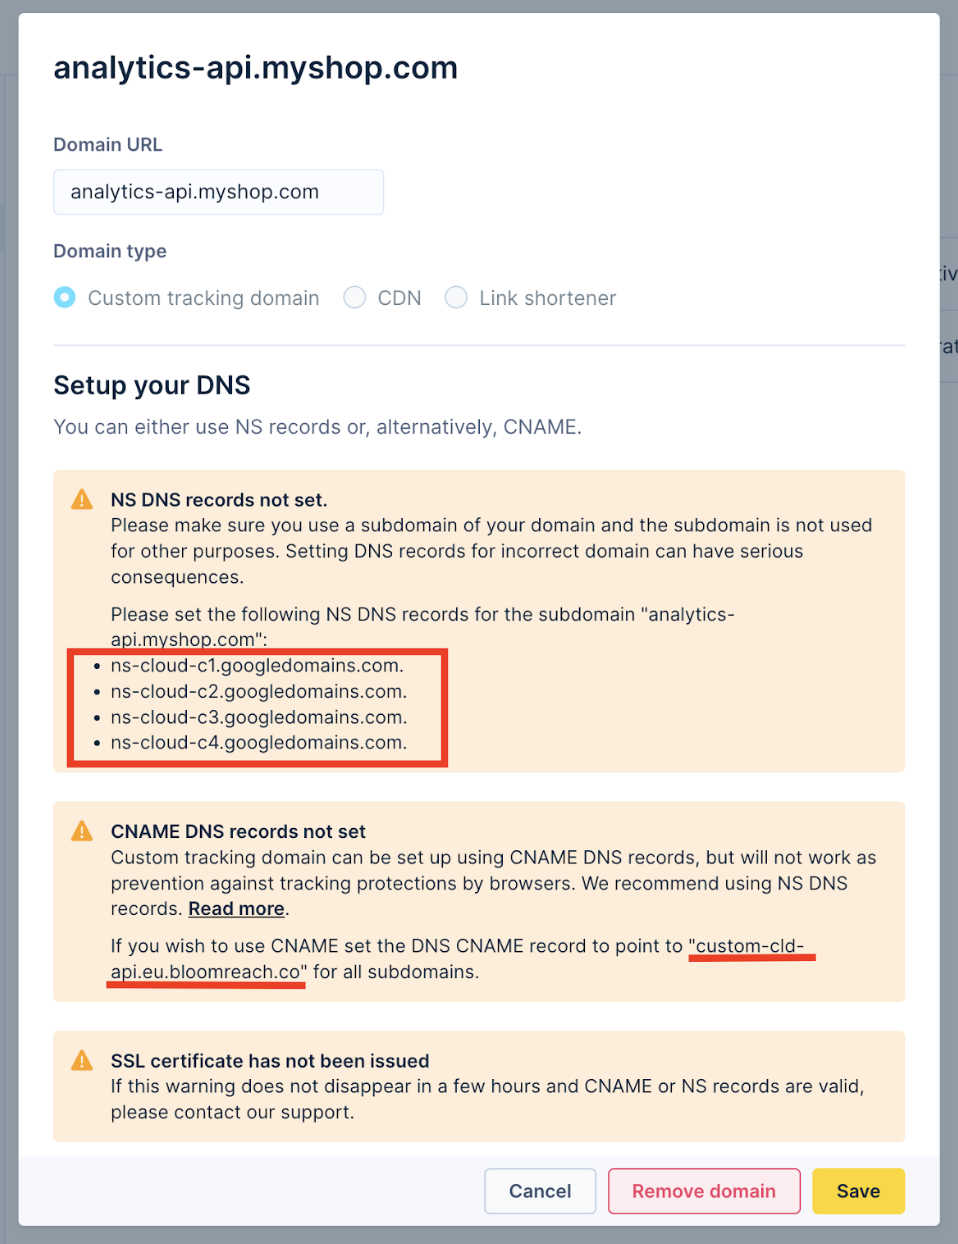
3. Configure the DNS records
The domain can be configured via two types of DNS records, NS or CNAME records, but not both.
NS records
NS (Name Server) records are the preferred way to set up CTD and Link Shortener domains. They let the DNS system know which servers manage a domain's DNS settings. When you add a new domain, Bloomreach automatically configure its DNS zone to point to the correct instance.
Editing DNS records differs for second-level domains and subdomains. For an entire domain, find the NS section and edit the existing records. For a subdomain, add new NS-type records to that specific subdomain.
Remember, set four records and make sure the domain or subdomain you're setting up is not used for anything else.
CNAME records
CNAME records are the preferred method for setting up CDN domains. CNAME (Canonical Name) records are a type of DNS record that joins one domain name to another, essentially redirecting it. CNAME records can’t conflict with other DNS records. So, ensure the chosen domain is not being used for other purposes.
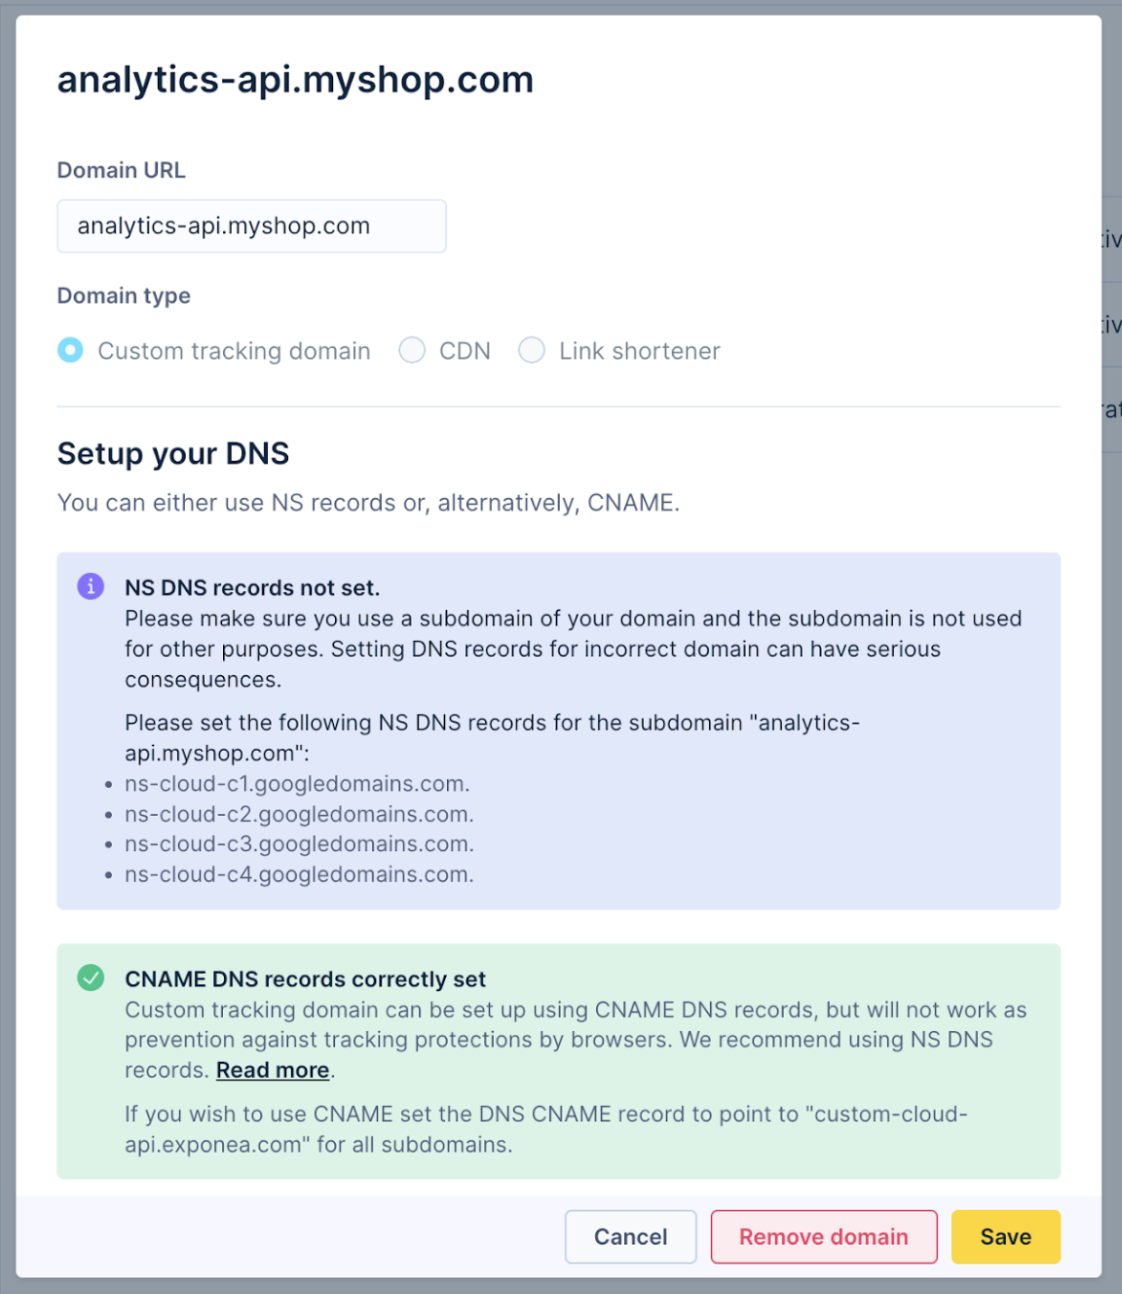
You can view records for both types on a specific screen, which you can access by clicking the Edit button in the domain list.
4. Review the domain
After setting up your DNS records, return to the domain screen around two hours later. DNS record status updates every hour at 0 minutes (UTC timezone). If you see a green checkmark, it means your setup is good to go. Please note that DNS records might take longer to propagate based on the DNS TTL. This is common for NS records, which often have a TTL set to 24 hours.
By clicking Edit or selecting a specific domain row, you can view detailed DNS record status. This is useful when switching from CNAME to NS type or vice versa.
If you can't see a green checkmark but the application confirms your DNS records as correct, the domain might still be provisioning. Once the records are marked as valid, the next step is the provisioning of SSL/TLS certificates, which typically takes only a few minutes.
Self-managed certificates
With the Self Managed Domain Certificates feature, you can upload custom certificates for any domains you've configured. Before you obtain a new certificate, make sure you request a certificate that is in line with the limitations. Go to the domain edit screen, SSL CERTIFICATE, and change the certificate type to Self-managed. Then, paste the certificate and key in PEM format into the corresponding fields. Make sure to include the full certificate chain.
The change should take effect within an hour. Switching from a self-managed to a managed certificate also follows the same time frame and won't cause any service interruptions.
WarningYou are fully responsible for creation and rotation of custom certificates. Bloomreach will send out notifications about upcoming certificate expirations one month in advance.

NoteIf you can't find the section to configure self-managed certificates, contact your Customer Success Managers (CSM) or our support team.
Limitations
- The same domain cannot be added twice, even across different accounts.
- The domain added to one account can be used by another account across the whole instance.
- You can add up to 10 domains per account. This limit can be increased after consultation with our support team.
- The maximum domain length is 200 characters.
- Domains that become unavailable when DNS no longer points to the correct records will be deactivated after 3 days. However, the domain will still be visible in the UI and will recover once the DNS is set correctly.
- The use of CDN providers like Cloudflare, Akamai, etc., is not supported. The domain will stop functioning if the DNS is switched to another provider.
- Custom certificate keys are limited to RSA keys with key size between 2048 and 4096 bits, and ECDSA keys with elliptic curves P-256 and P-384. Additionally, the private key must be in PEM format and not protected by a passphrase.
Updated 3 months ago