

Data manager
The Data Manager allows you to manage the following elements of your project:
- Add, edit, or delete customer and event properties.
- Create definitions (aggregates, running aggregates, event segmentations, and expressions).
- Set event expiration.
- Map your events and customer attributes.
You can access the Data Manager by navigating to Data & Assets > Data manager. Here you'll find the manager with five tabs for each of the key elements:
- Customer properties
- Events
- Definitions
- Mapping
- Content sources
Customer properties and events
These two tabs include all of the imported, tracked, or manually created customer attributes and events in your project.
Basic actions
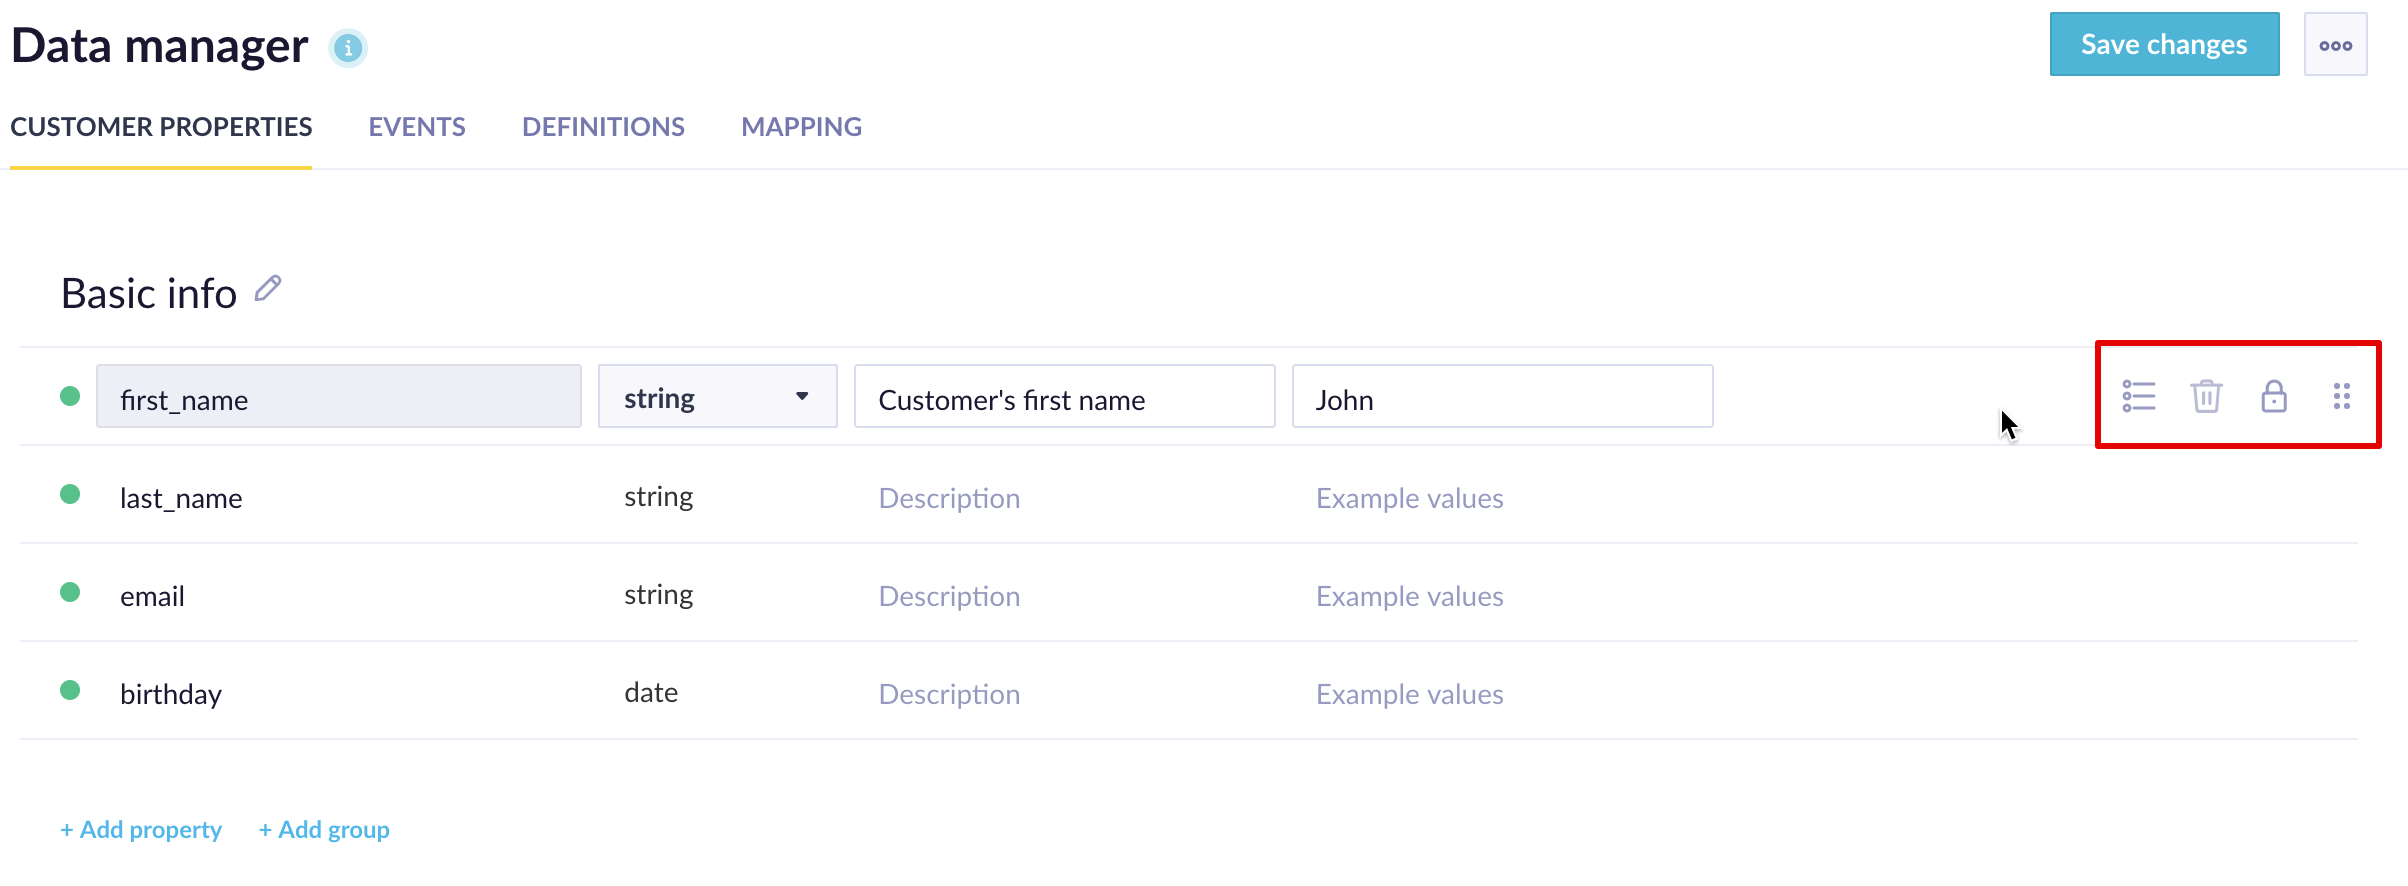
You can see a green or red dot next to each attribute. This shows whether that attribute is already tracked in your data (green) or not yet (red).
There are several actions you can do with each property:
| Action | Description |
|---|---|
| Rename a property | Click on the property's name to rename it. This isn't possible for those that are already tracked in your data. If you want to rename such a property/event, you'll need to delete all associated data from Bloomreach first. |
| Define the data type | This affects how Bloomreach treats that property. When filtering data, for example, the data type decides what type of operators are shown by default to match that type. It also affects how the values are shown in the customer profile. |
| Provide a description of the property | This is recommended as this displays as a tooltip for all users when working with the properties in Bloomreach. |
Hover over a property with your mouse to reveal the following buttons on the right side:
| Show tracked values | Opens a report with the actual values tracked for your customers. This is useful for checking whether your tracking works when setting it up. |
| Remove property | Learn how to delete a property already tracked in your data in our article. |
| Mark as personal data | Click on the 'lock' icon to mark that property as personally identifiable information (PII). |
| Move the property | You can drag and drop each property to a different place or even a different group. This is important as it also defines how properties are displayed in the drop-down lists. |
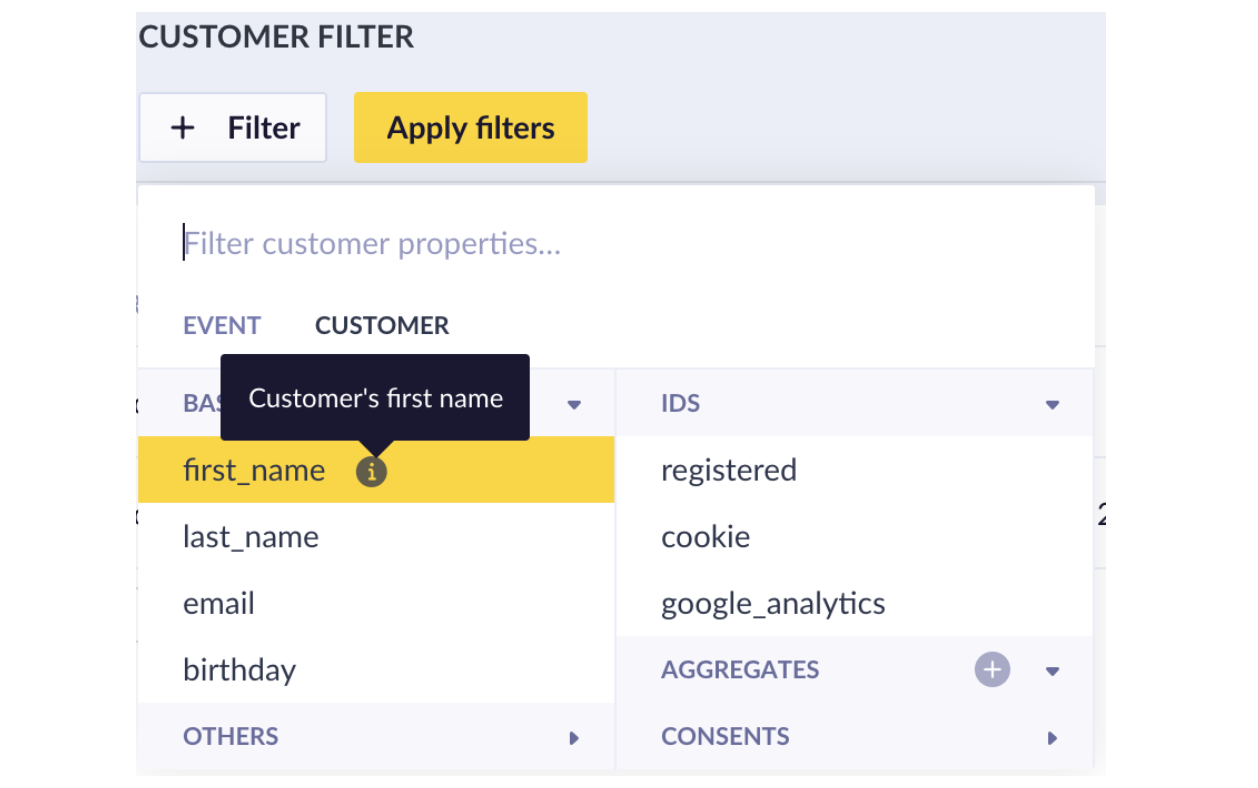
The description defined in the Data manager displays as a tooltip when working with properties. The order and grouping of properties also reflects how it's set in the Data manager.
Group and reorder properties
The order and grouping of properties in the Data manager reflect how they're displayed as shown in the screenshot above. This is very useful as it speeds up your work by showing the most important data where you want it.
There's a button + Add group at the bottom. You can then place each property into one group for easier navigation. In the screenshot above, we defined a group called "Basic info" (hidden behind the tooltip), containing the most essential data about our customers, and "Others". You can also hide each group in these views by clicking on it.
Note that some elements such as IDs, consents, aggregates, expressions are grouped automatically.
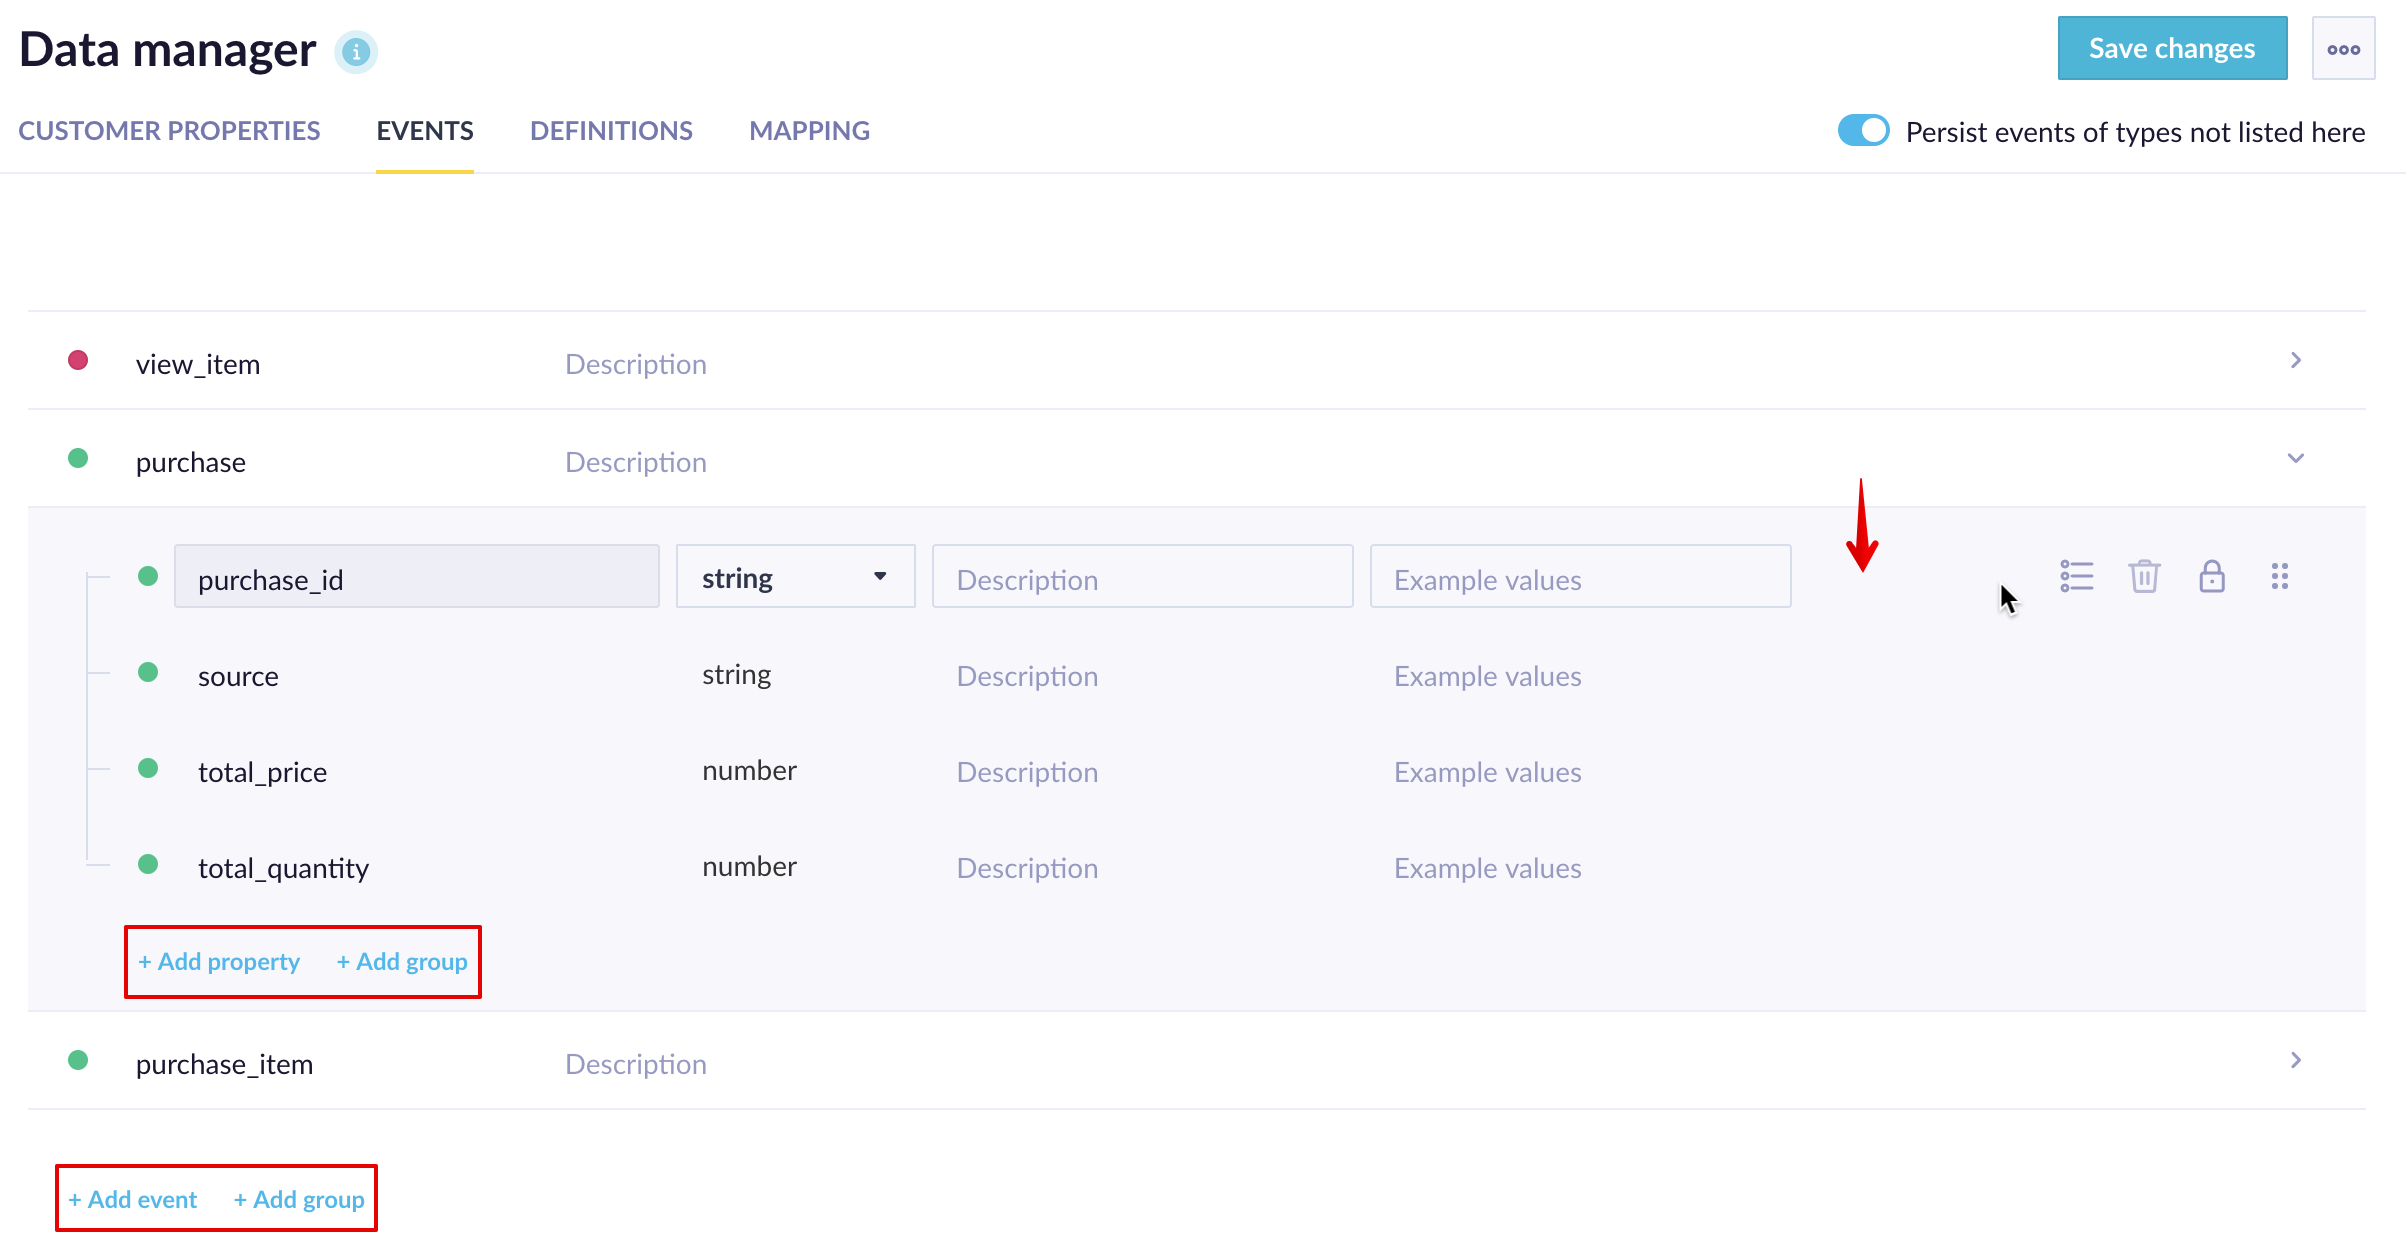
Additional event level
Events have an additional level (several events and each can have several attributes), which means you can reorder and group events as well as reorder and group their attributes within each event. Click on the event to manage its attributes.
Mark properties as PII
You can mark each customer and event property as personally identifiable information (PII) by clicking on the "lock" icon on the right side. We recommend doing so for GDPR compliance.
Delete events and properties
NoteGet access to this feature by migrating to the new pricing model that considers processed events.
To delete an event or customer property that hasn't been tracked yet, simply click on the "bin" icon next to it. If there are already values tracked for this property, you must delete those values first.
Delete events with admin access
- Click on the three-dots button in the top right corner and click Data deletion.
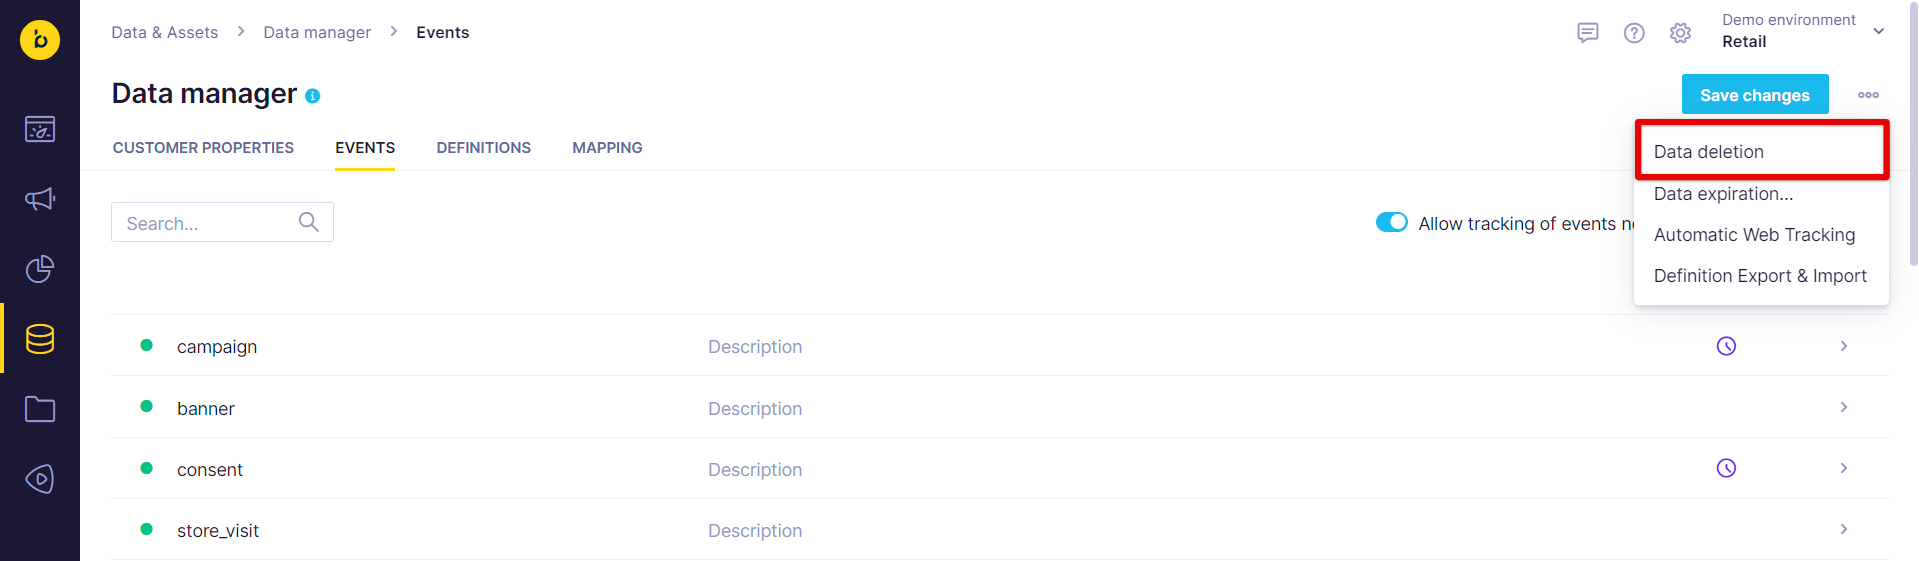
- Select what you want to delete. You can choose:
- All customers and their events
- Selected events
- Selected customer properties
- Click Delete data.
- Depending on your database size, the deletion process duration will vary. For large databases containing millions of customer profiles and events, the process might take several hours to complete. Once you confirm the deletion, the delete job starts in the background.
Advanced data expirationTo refine your deletion with specific attributes and timeframes, you need the "Advanced Data Expiration" module enabled. This free module is part of your base license but isn't automatically enabled when setting up new customer accounts. Contact your Customer Success Manager to enable this module.
If you delete a whole event (regardless of event attributes and time of tracking):
- A loading icon appears next to the property in the data manager during deletion.
- When completed, the dot on the left turns red.
- After completion, click the "bin" icon next to that property to remove it from your data structure..

If you delete events with specific attributes and within a specific timeframe:
- There's no feedback once the job is completed.
- The system won't notify you when the process finishes.
Any new events created between when the job started and finished won't be impacted. As a result, some events matching the filter might remain even after the deletion process completes.
Reimporting deleted dataIf you delete imported data, you might not be able to re-import it because the system could recognize it as duplications.
Delete event property
Event property can be deleted only after deleting all events of a given event type. For example, if you have only a few events with session_start.example_property, to delete the example_property, you have to delete all events of that type. In this case, you'd need to first delete all session_start events.
Check event property against other event properties
It's common to check if an event attribute value is present in other event attributes.
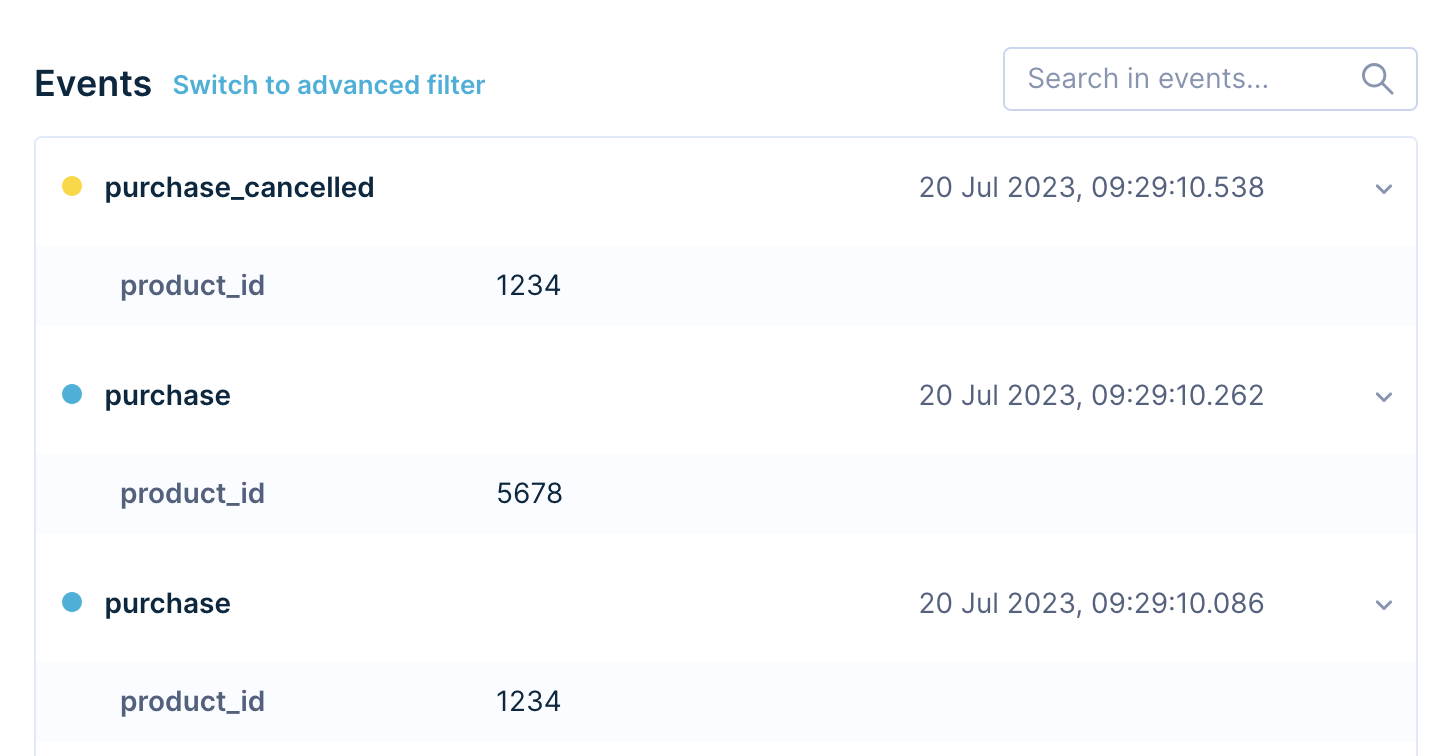
For example, if you have a purchase event with an attribute id that contains the purchase_id and a purchase_cancelled event that contains the same ID of purchases that were canceled. To check the revenue from all purchase events that weren't canceled, you need to exclude purchase_id stored in purchase_cancelled events. Here's how to exclude purchases with product_id 1234.
Another use case is to select all unused issued voucher codes. There's a way to achieve this with definitions. Let's review an example setup based on voucher events. In the example setup, the task is to select all unused voucher events. Imagine you have the following events::
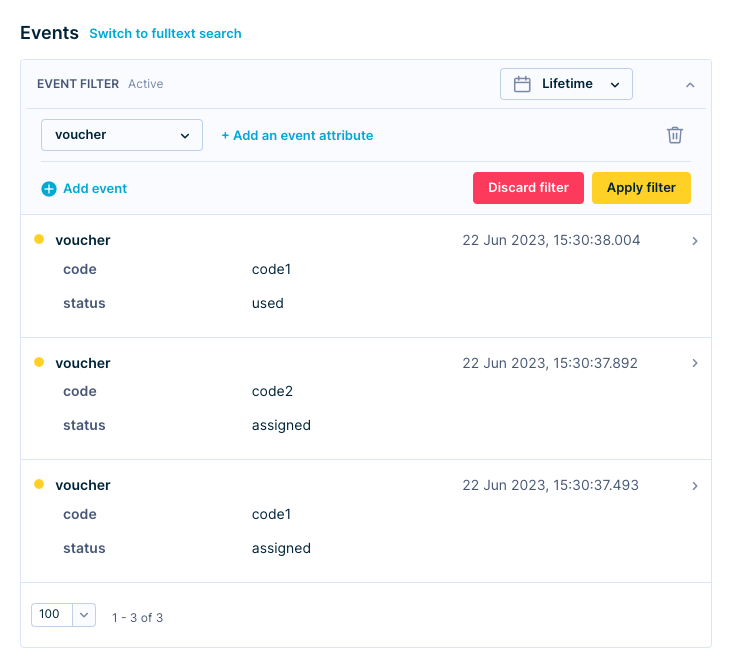
Two voucher events with different code and status equals assigned and 1 voucher event with status equals used. Since, in this example, you want to fetch those voucher codes that were assigned to the customer but not used, you need to fetch the code attribute value from the voucher event that has the "code2" value stored in its code attribute. For that, you need to create 2 definitions:
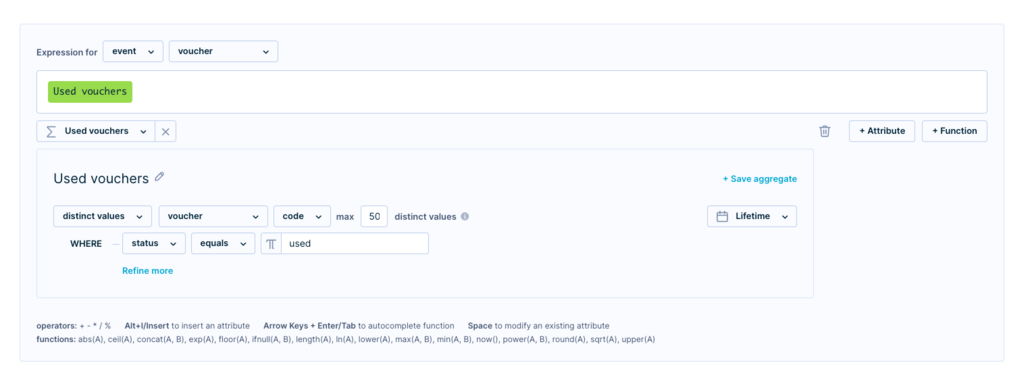
- An event expression that selects all codes from voucher events with status used. That creates a list of all used codes.
- An aggregate that selects all unused vouchers.
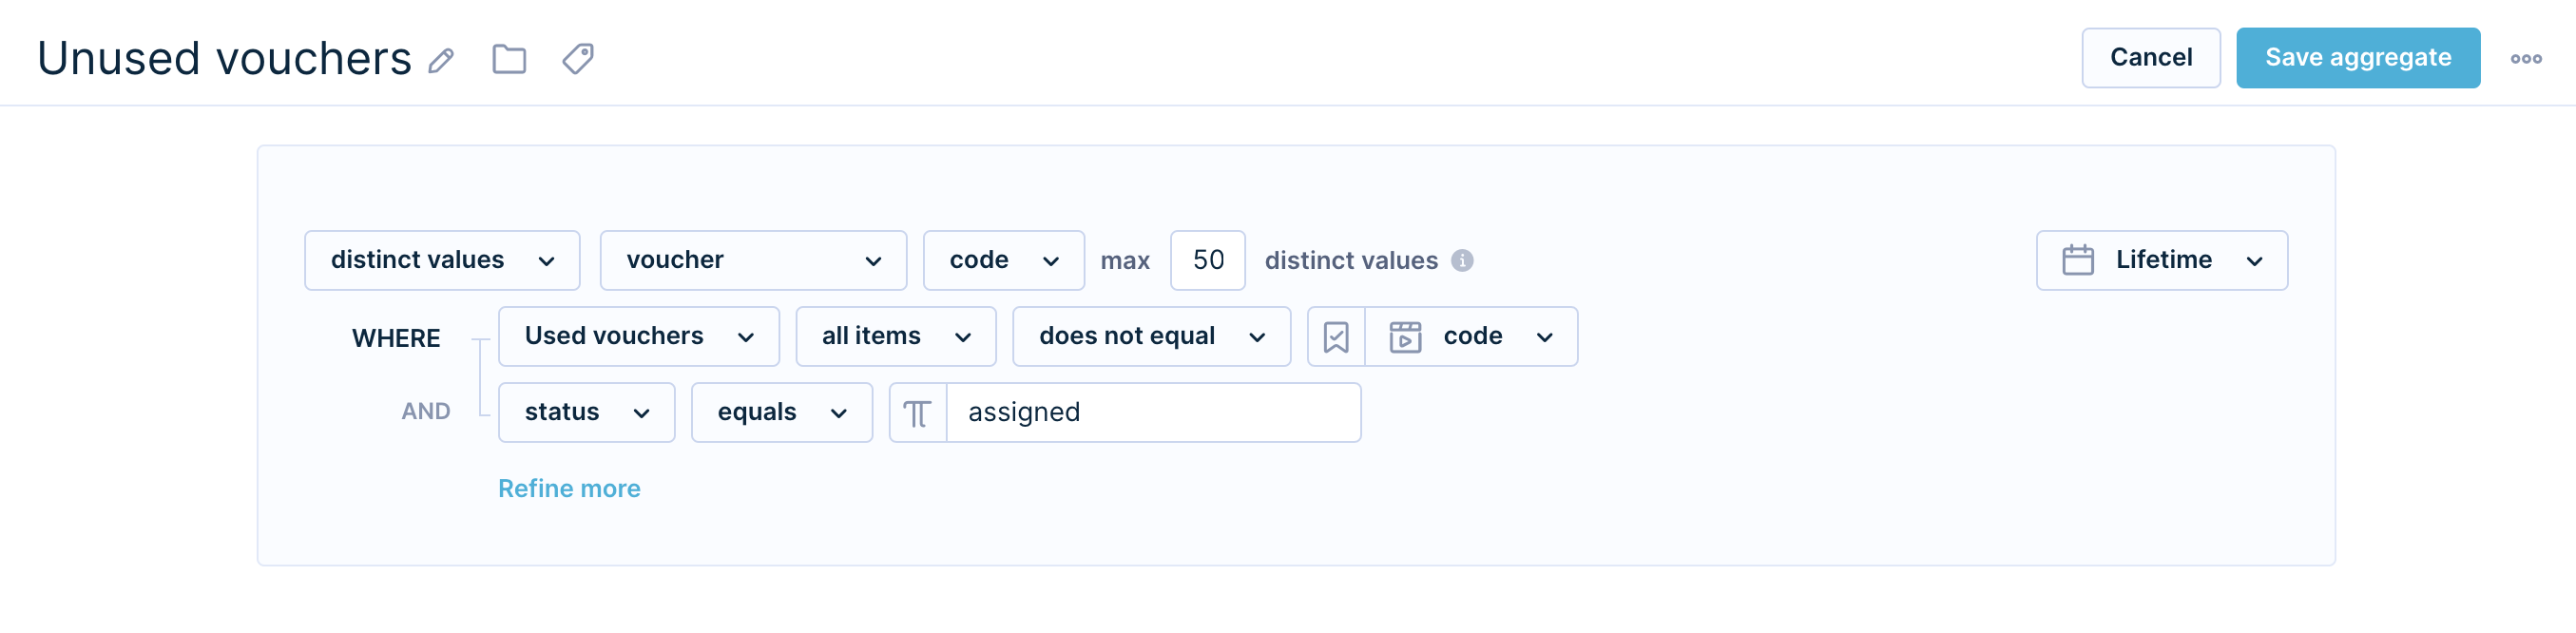
The aggregate stores all unused vouchers.

That's the last step. Only two definitions - an event expression and customer aggregate are required for this use case. You can then see all unused voucher codes in the aggregate and use them in campaign personalization.
Block tracking of undefined events

By default, any events that are tracked or imported to your project appear in your data, even if not defined in the Data manager. If you disable this toggle (allow tracking of events not defined in the Data manager), any events tracked or imported to your project that aren't defined in the Data manager will be blocked and ignored. This only applies to the event level (so if you upload an event that's defined in the Data manager, but with attributes that aren't, these will be added).
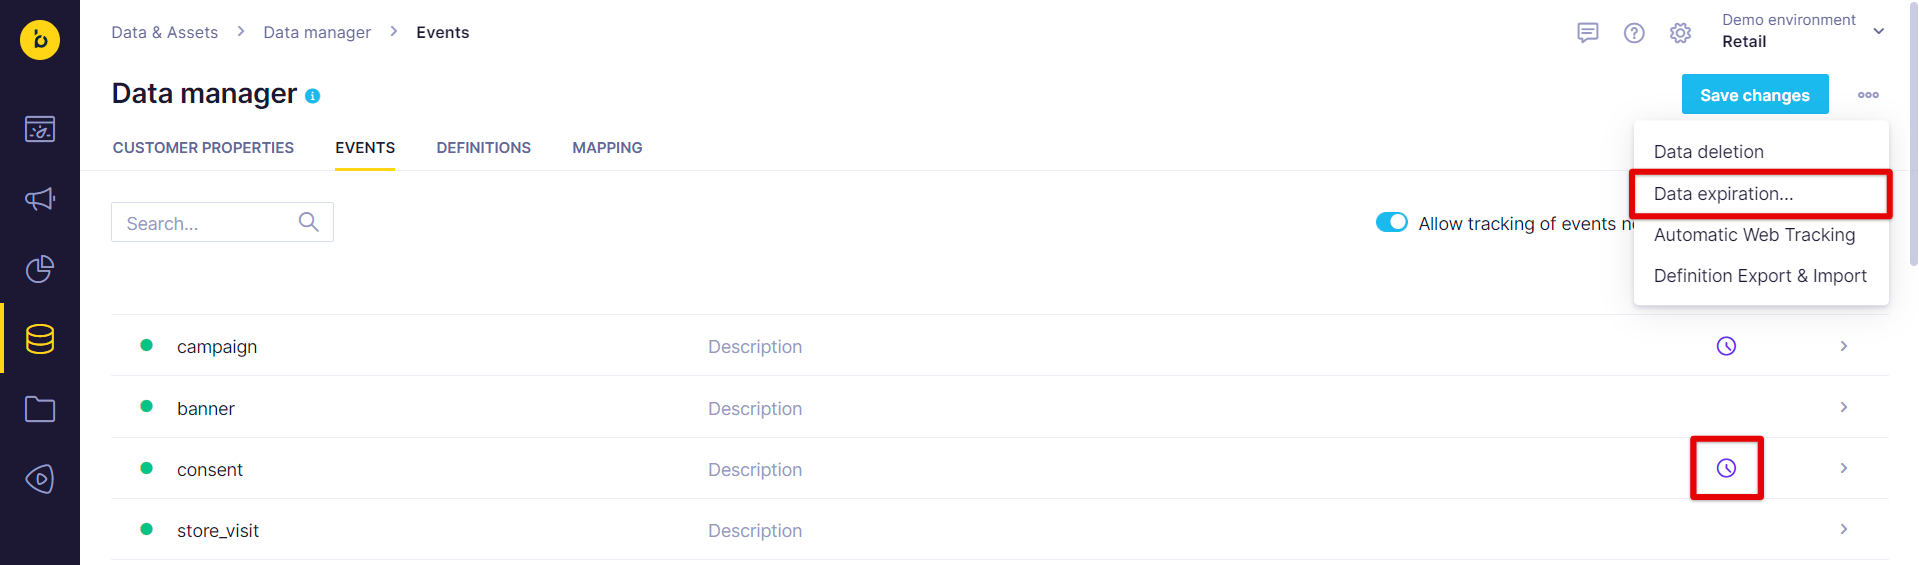
Event expiration
To access these settings, go to the Data manager, click on the three-dots button in the top right corner, and then on Expiration or on the clock icon on the right from an event name.
You need the Project Admin role to change these settings.
Data takes a lot of storage and not all types of events are necessary to keep forever. To keep your usage under control, you can set up the automatic expiration of events after a certain period of time. By default, session_start and session_end are set to expire after 3 months, and page_visit after 30 days. Other events are kept forever unless you change the setting.
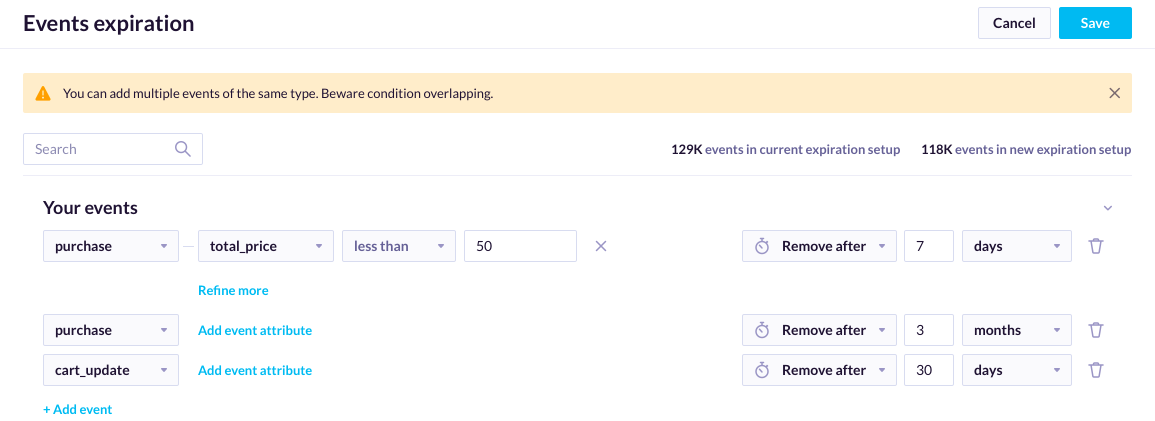
Expiration periods
Event expiration setup doesn't count months as calendar months but rather as 30-day periods. For example: If you set your event to expire after 1 month, it's the same as setting it to expire after 30 days. Similarly, if you set it to 3 months, the data expires after 90 days.
Events in the expiration setupThe top right corner shows "x events in current expiration setup." This number tells you how many events are currently in your project while the expiration policy is active. It doesn't show how many events will be deleted.
Expiration date of the same event type
If you wish to specify the expiration date of the same event type, such as page_visit, remember that the filters work similarly as in the case of segmentation, and you need to put the more precise filter before the more general one.
For example: You want to delete the data regarding when your customers visited your website after 30 days, but you want to keep the data regarding the page visits from Chrome forever. The setup should be:
page_visit>browser>equals>Chrome>keep foreverpage_visit>remove after>30 days
Read more about recommended expiration periods.
Data types
You can define the correct data type for each attribute by clicking on the data type field. The data type affects how Bloomreach treats those values. When filtering data, for example, the data type decides what type of operators are shown by default to match that type. It also affects how the values are shown in the customer profile.
The following data types are available:
| Data type | Description |
|---|---|
| String | Textual format. We usually define IDs as strings too. |
| Long text | Text data type intended for larger free‑form strings such as notes, error messages, or longer descriptions. It supports longer values than standard text, but is less efficient for heavy filtering and segmentation. |
| Number | Numeric data type used for values you want to count, sum, or compare mathematically (for example, order value, discount percentage, quantity). Use it when you need to filter or build metrics with operators like greater than, less than, sum, average, or min/max. Non‑numeric values sent to a Number field are discarded and won’t be processed. |
| Boolean | Binary value. Works with values true, false and 1 and 0. |
| Date and datetime | See below for full explanation. |
| List | List of individual items. Import list attributes in the following format: ["item 1", "item 2"]. When a comma is used as a delimiter, you need to enclose the list in double-quotes, and values within two double-quotes characters so that it's clear whether a comma is a separator of values or import columns. This can also be an array of objects in the following format: [{item_id: "1234", item_quantity:3}, {item_id: "2345", item_quantity:2}]. This is used for example as the product_list attribute of cart_update. |
| URL | Text data type intended for larger free‑form strings such as notes, error messages, or longer descriptions. It supports longer values than standard text, but is less efficient for heavy filtering and segmentation. |
| JSON | (Only available when importing data) Use this option when importing your data in the JSON format. |
| Contact | Default data type for phone customer attribute. It serves as default channel for two-way messaging communication. This type can't be changed as it's used for customer profile handling rules. |
Tracked values must match the configured data types within BloomreachWhen sending data into Bloomreach, values that don't conform to the configured data types within the defined schema under Data & Assets > Data manager will be discarded and won't be subjected to processing. Although the data types can be changed at any point (except Contact data type), be cautious with the list values as these are processed differently when imported under an incorrect data type.
Supported date and time formats
Bloomreach has 2 types of date format - one called "Date" and the other one is "Datetime". The only difference is that a "Date" attribute only displays the date in a customer profile, while an attribute defined as "Datetime" also displays hours and minutes. However, this doesn't have an impact if you filter data and also both types support all formats described below. That means that even if you import the date with hours and minutes only as "Date", Bloomreach will still store the time and you will be fully able to work with it in the filters. Moreover, you can always change the attribute type later.
Correct date format
If using the EU formatting style, use either of the following options: "Y-m-d", "Ymd", "Y/m/d", "d.m.Y", "d-m-Y", "m/d/Y", "d-b-Y", "Y-b-d".
For example: "Y-m-d" (for example 2024-05-29)
- Y: Four-digit year (for example, 2024)
- m: Two-digit month (for example, 05 for May)
- d: Two-digit day of the month (for example, 29)
Unsupported date formats
- Times with a.m. / p.m. notation
- Non-numeric months (for example Jan, February)
- The EU date-month-year format which is with
/(2024/05/29)
Numeric examples
- Y-m-d hh:mm:ss.s TZD
- 1997-07-16 19:20:30.45+01:00
- '28-02-2017 13:45:01.123', 'Europe/Bratislava'
- 28-02-2017 13:45ISO8601
- 28-02-2017 13:45-02:00
- '2017-02-28 13:45:01', 'UTC'
Those supported formats are supported only when doing imports. When you are using them in API, only UNIX formats are supported - please refer to the API documentation.
Custom HTML / CSS:
- UNIX timestamp
- 2017-02-28
- 2017-28-2
- 25-02-2017
- 2017/03/21
- 21.3.2017
- 21.03.2017
- 03/21/2017 (US MM/DD/YY)
- 21-03-2017 (EU DD/MM/YY)
All distinct formats of times (optional):
- 13:45
- 13:45:01
- 13:45:01.123 - note the fractions of seconds
All distinct formats of ISO 8601 timezone designators (optional, only when time is provided):
- Z (UTC), +02:00, -02:30, +0200, +02
- 20170103T12:13:14Z
Combination of dates, times, and timezones from above:
- YYY-MM-DD hh:mm:ss.s TZD
- 1997-07-16 19:20:30.45+01:00
- '28-02-2017 13:45:01.123', 'Europe/Bratislava'
- 28-02-2017 13:45
- 28-02-2017 13:45-02:00
- '2017-02-28 13:45:01', 'UTC'
Definitions
The Definitions tab allows you to manage and create Aggregates, Running aggregates, Event segmentations, and Expressions.
Mapping
Connect your custom event names, properties, and catalogs to Bloomreach's standard formats so features work without restructuring your data. Learn more about data mapping.
Import analyses and definitions
This function lets you import elements from other projects, such as analyses, campaigns, and definitions.
-
Go to Data manager, click on the three-dots button in the top right corner, and click Definition Import & Export.
-
Click Import in the top panel.
-
Paste your data in JSON format. The steps below explain how to format your data.
-
ClickStart import and the elements will appear in your project.
Export analyses and definitions
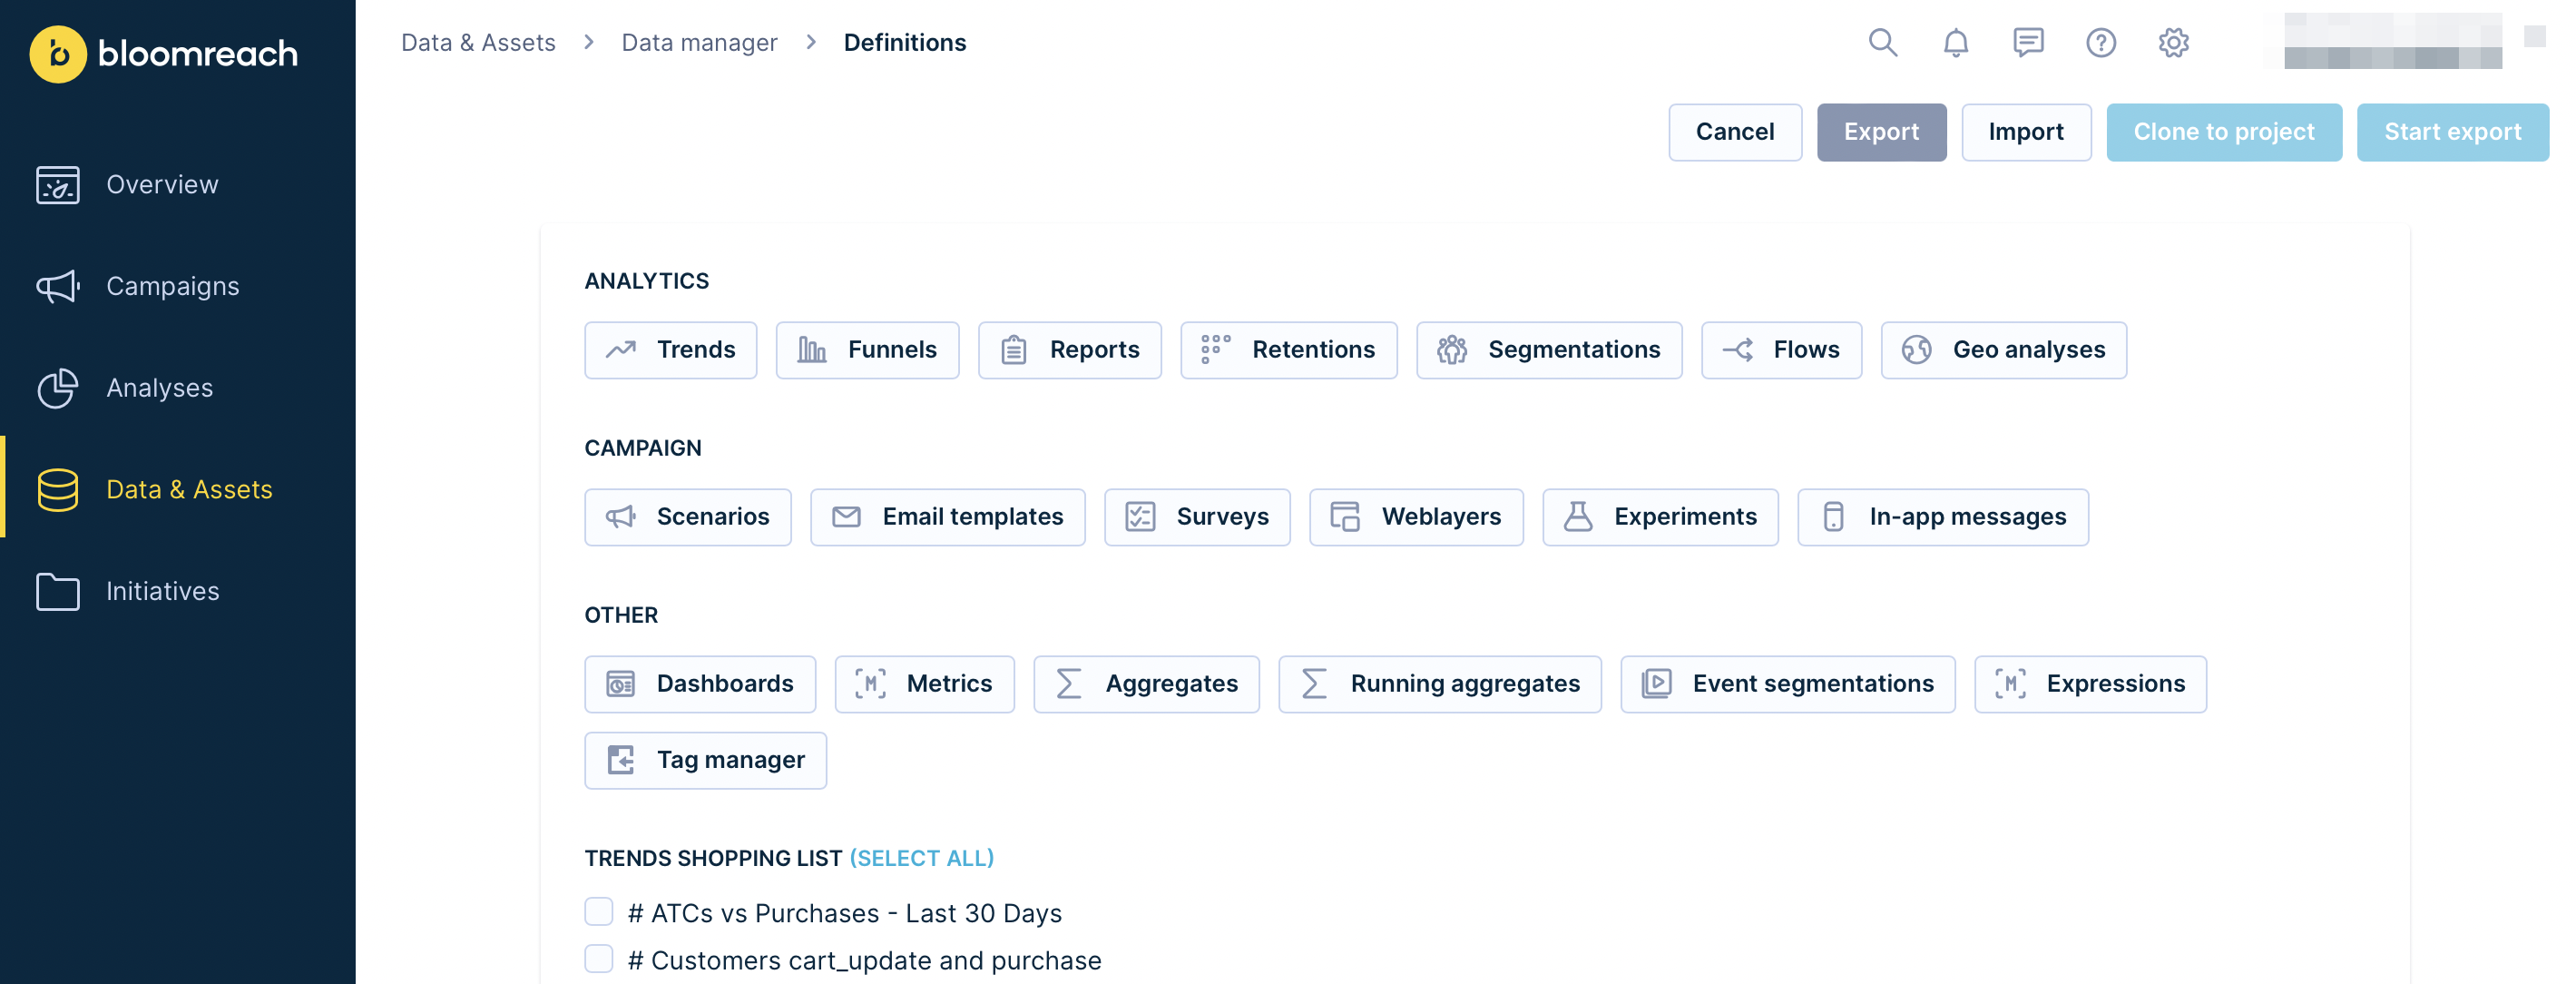
This function allows you to export elements from your project, such as analyses, campaigns, and definitions.
-
Go to Data manager, click on the three-dots button in the top right corner, and click Definition Import & Export.
-
Click Export in the top panel.
-
Select the components you'd like to export.
You can choose from 2 options:
- Clone to project: Lets you directly select a project (only for projects where you have access) to which you want to copy the elements.
- Start export: Exports the data in the JSON format, which then can be imported to other Bloomreach projects. Copy the JSON text that pops up and then follow the steps above for importing data to your destination project.
Technical details
For cloned scenario email nodes, email campaigns, or email templates, the email provider is replaced by the default provider configured in the target project. If the default provider isn't configured, the email provider is left unset.
All campaigns are reset to the status 'Draft' upon cloning. For example, cloning a running campaign won't start the campaign in the target project.
Authentication integrations (in webhooks) and Ads integrations (in ads audiences) used in scenarios are removed and must be added manually after cloning.
Encrypted parts of the webhook, such as secret headers, or usernames and passwords in the case of legacy webhooks, are removed and not imported.
Data manager size limitations
- As of April 3, 2025, the maximum number of customer attributes is 255 (128Kbits/16Kbytes per attribute) or 1024 (2KiB per attribute), depending on your contract. You will be alerted if you approach your limit.
- You can store up to 255 different event types. After reaching the storage limit any tracking containing new event types will be discarded.
- You can store up to 255 different event properties per event type. After reaching the storage limit any tracking containing new event properties will be discarded.
Are you looking to store more information?You can complement typical attributes with aggregates, running aggregates, expressions, and segmentations to store more information about your customers and events. You can also store larger volumes of data you plan to use more sparsely in a data storage solution.
Track events limitations
- We recommend using smaller events with repeated event attribute values. Try to avoid using serialized JSON as an event attribute which is in a form of a long and unique text. A good example of a repeated attribute value is an item type or a common URL.
- For each event type, try to keep the average event attribute size under 1 KB and the maximum event attribute size under 8 KB. Similarly, the total maximum event size shouldn't exceed 20 KB.
Our system is designed for fast processing and copes well with many small-sized events. To make the best use of it, limit the size of your tracked events.
Updated 4 days ago