

Google Ads Offline Conversions
The Google Ads Offline Conversions integration feature enables you to track and measure the real-world impact of your online advertising campaigns by connecting offline customer actions and conversions back to your Google Ads campaigns.
Why use Google Ads Offline Conversions
Importing offline conversion events gives you a more comprehensive look at which keywords and targeting criteria (for example, geography or time of day) drive the most cost-effective conversions. This data can help you target and optimize your campaigns for increased profit.
Prerequisites
There are 3 types of prerequisites needed for the configuration of Google Ads Offline Conversions.
1. Bloomreach prerequisites
- Bloomreach Data Export Module
- Event Tracking
- Purchase event with the following attributes:
- purchase_status (success)
- purchase_id
- total_price
- currency (can be added manually; ideally, this should be in the event attributes
- Note: It’s possible to export other conversions as well; however, the event parameters, except purchase status, should be present in the event.
- Purchase event with the following attributes:
- Customer Properties Tracking
- phone
2. Google Ads prerequisites
Make sure that auto-tagging is enabled, as it is necessary to import offline conversions.
How to check if the auto-tagging is enabled:
Auto-tagging is turned on by default for new accounts. To check the current status of auto-tagging in your account and turn it on or off, follow the steps below.
- Sign in to your Google Ads account.
- In the page menu on the left, click Settings.
- Click Account settings.
- Click the Auto-tagging section.
- To enable auto-tagging, click to check the box next to “Tag the URL that people click through from my ad.”
- Click Save.
3. Your prerequisites
You need to have access to your own SFTP server, where the conversion from Bloomreach will be exported, and from this SFTP server, the conversions will be uploaded to Google Ads.
Configuration
1. Google Ads
Create one or more import conversion actions
You will need to create a new conversion action for each offline conversion you would like to measure, such as "lead qualified," or a "deal won." You can measure as many offline conversion actions as you want.
How to create a new offline conversion action:
- Sign in to your Google Ads account.
- Click the tools icon in the upper right corner of your account.
- Under “Measurement,” click Conversions.
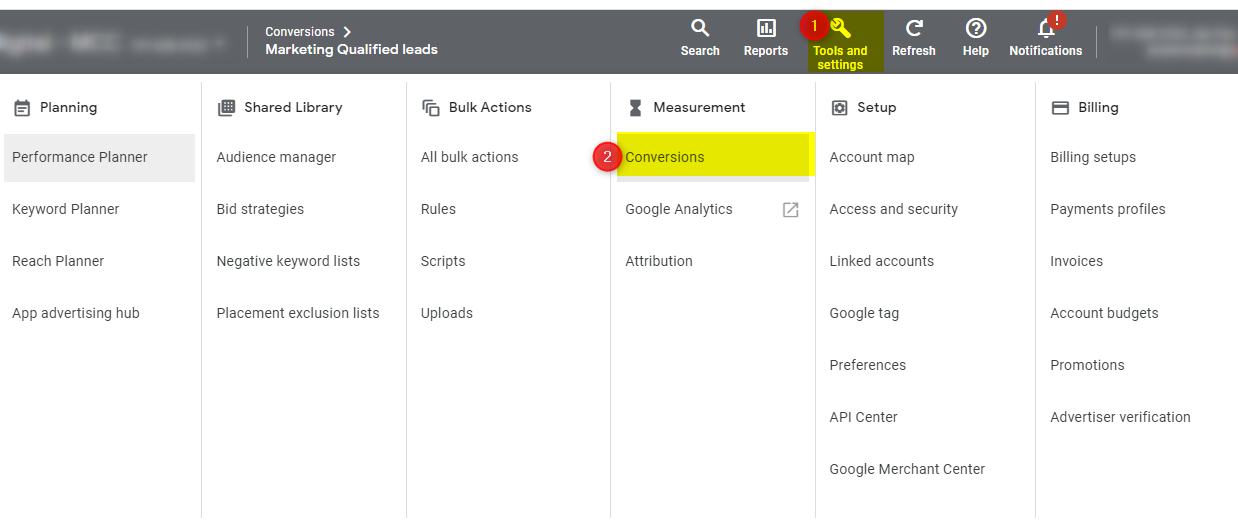
- Click the '+ New conversion action' button to create a new conversion action.
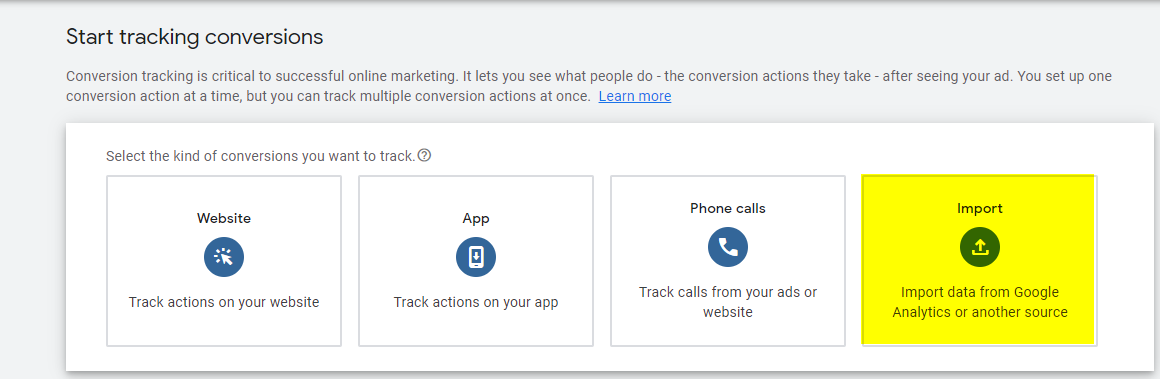
- You will now see options for the different kinds of conversion sources you can track. Click Import.
- Select Other data sources or CRMs, then select Track conversions from clicks.

- Click Continue.
- Enter a name for the conversion action you are creating (it is important that you remember the exact name and spelling because you will need to enter this name later when you upload your offline conversion information).
- Click the Category drop-down and select the category that best describes your conversions. You can use this category to segment your conversion reports. You can always change it later.
- In the "Value" section, select how to track the value of each conversion.
- In the "Count" section, select how to count your conversions.
- Click the click-through conversion window. Select how long after an ad click you want to track conversions for this conversion action. For Search, Shopping, and Display campaigns, the window can be 1 to 90 days
- (Advanced) Click Include in "Conversions." Uncheck this setting—selected by default—if you do not want to include data for this conversion action in your “Conversions” and "Conversion value" columns. If you uncheck this setting, data will still be included in the “All conversions” column.
- You may want to use this setting if you use an automated bid strategy to optimize for conversions and you do not want to include this particular conversion action in your bid strategy. Learn more about account-default conversion goals.
- Click Attribution model. This setting lets you choose how to assign credit for each conversion.
- If you would like to use a Google Ads attribution model, select Use Google Ads attribution and select a model from the dropdown. Learn more about each option and how this setting works in About attribution models.
- Click Create and continue.
- Click Done.
Wait after a new conversionAfter creating a new conversion action, wait 4-6 hours before uploading conversions for that conversion action. If you upload conversions during the first 4-6 hours, it might take 2 days for those conversions to appear on your reports.
How to upload conversions for multiple accounts from a single file
To do this, all of the relevant accounts need to be linked from a shared manager (MCC) account. This manager account is where you will upload your files. Google Ads then imports any conversions that originated from its linked accounts.
"Not authorized to upload" errorIf you upload a conversion for an account that is not linked to your manager account, you will get a "not authorized to upload" error.
- If you use cross-account conversion tracking: You will need to create your import conversion actions at the manager account level and follow the instructions in Set up cross-account conversion tracking to make sure all managed accounts use the manager as the "conversion account."
- If you do not use cross-account conversion tracking: You will need to create your import conversion actions in each individual account. Keep in mind: if you are tracking the same conversion (for example, "lead qualified") across multiple accounts, it is critical that you use the exact same spelling and capitalization for each conversion name in each of your accounts.
- If you have not used Google Ads conversion tracking before and all of the accounts under your manager account belong to the same business: You will want to use cross-account conversion tracking. It can help simplify tracking your conversions and your Attribution reports.
2. Bloomreach
-
You need to create a scenario that would generate events for Google offline conversion tracking. The flow of the complete scenario is exemplified below.
-
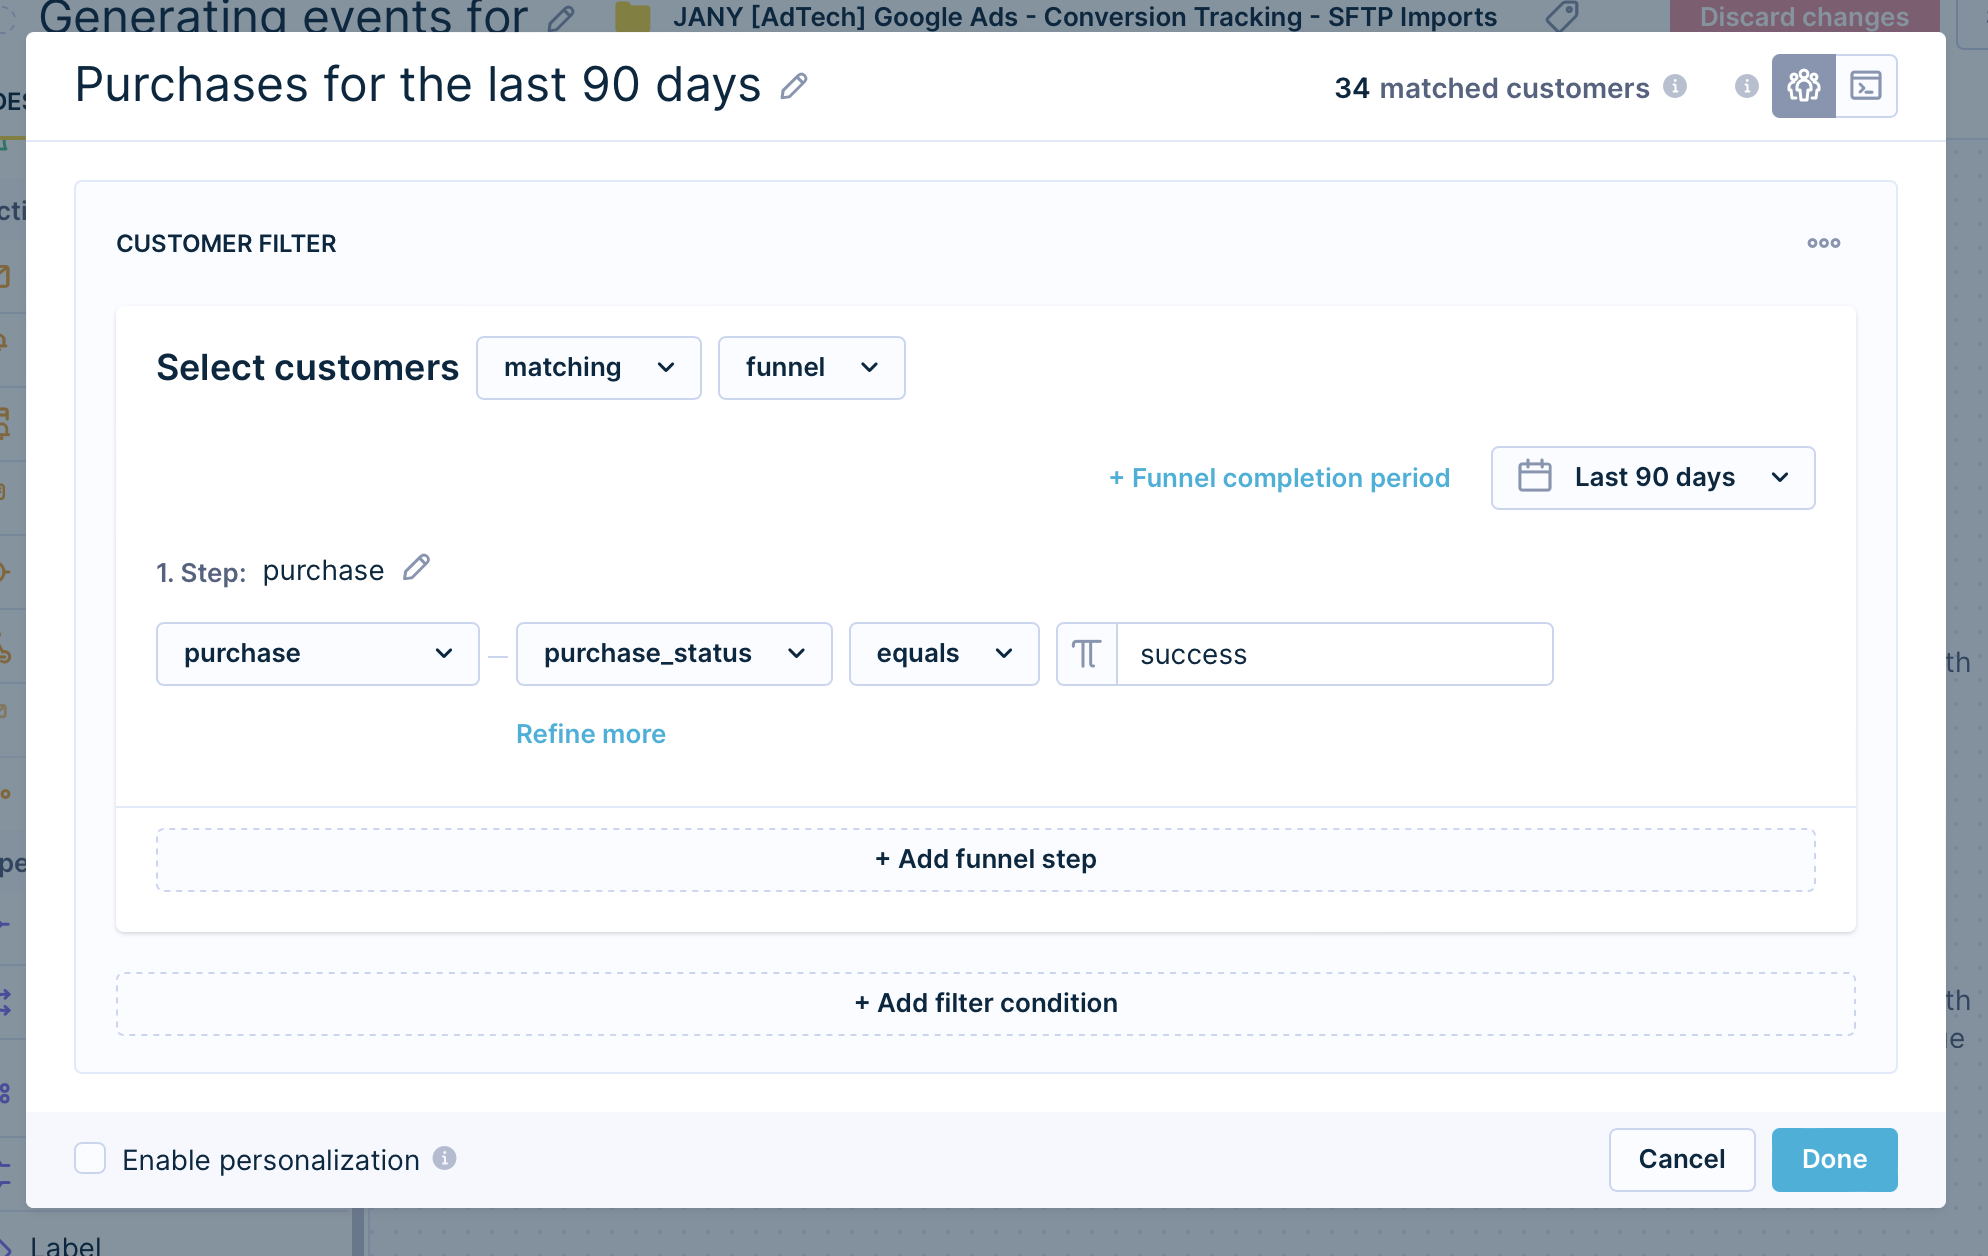
The 'Now' trigger is followed by a condition node checking whether customers have made a purchase in, say, the last 90 days.
-
-
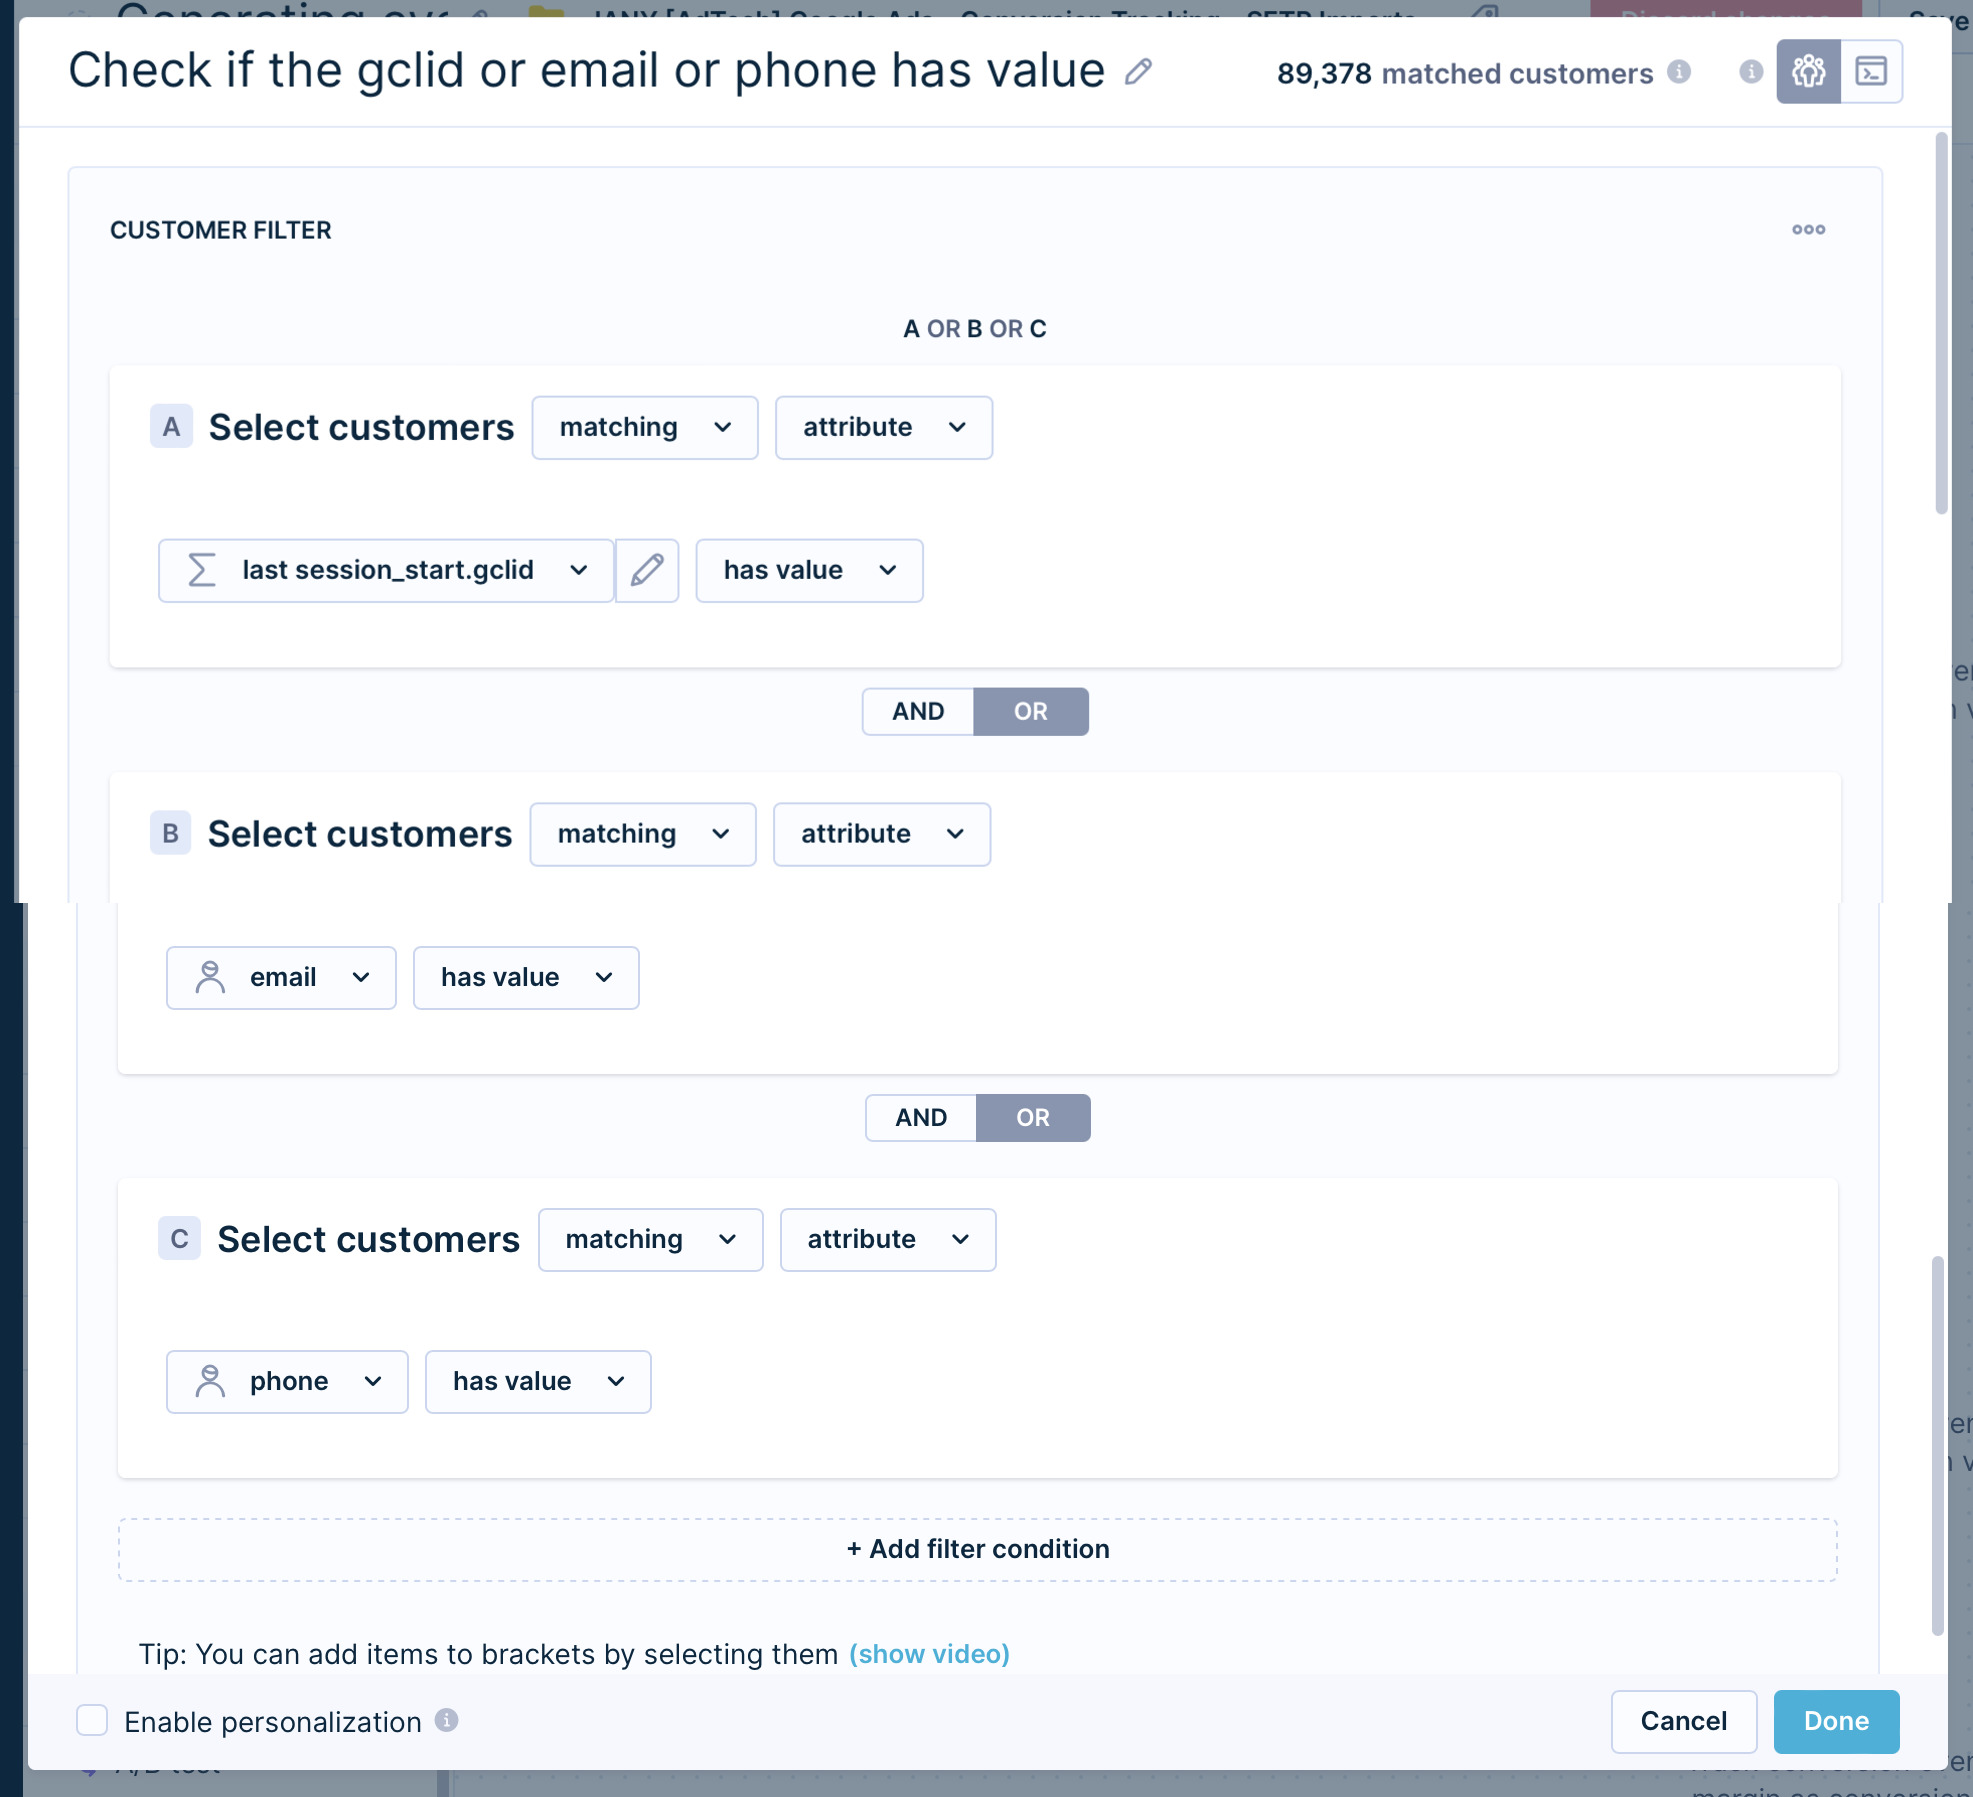
Create another condition to make sure customers have either a valid gclid, email, or phone number. This is also triggered by the event 'purchase'.
-
-
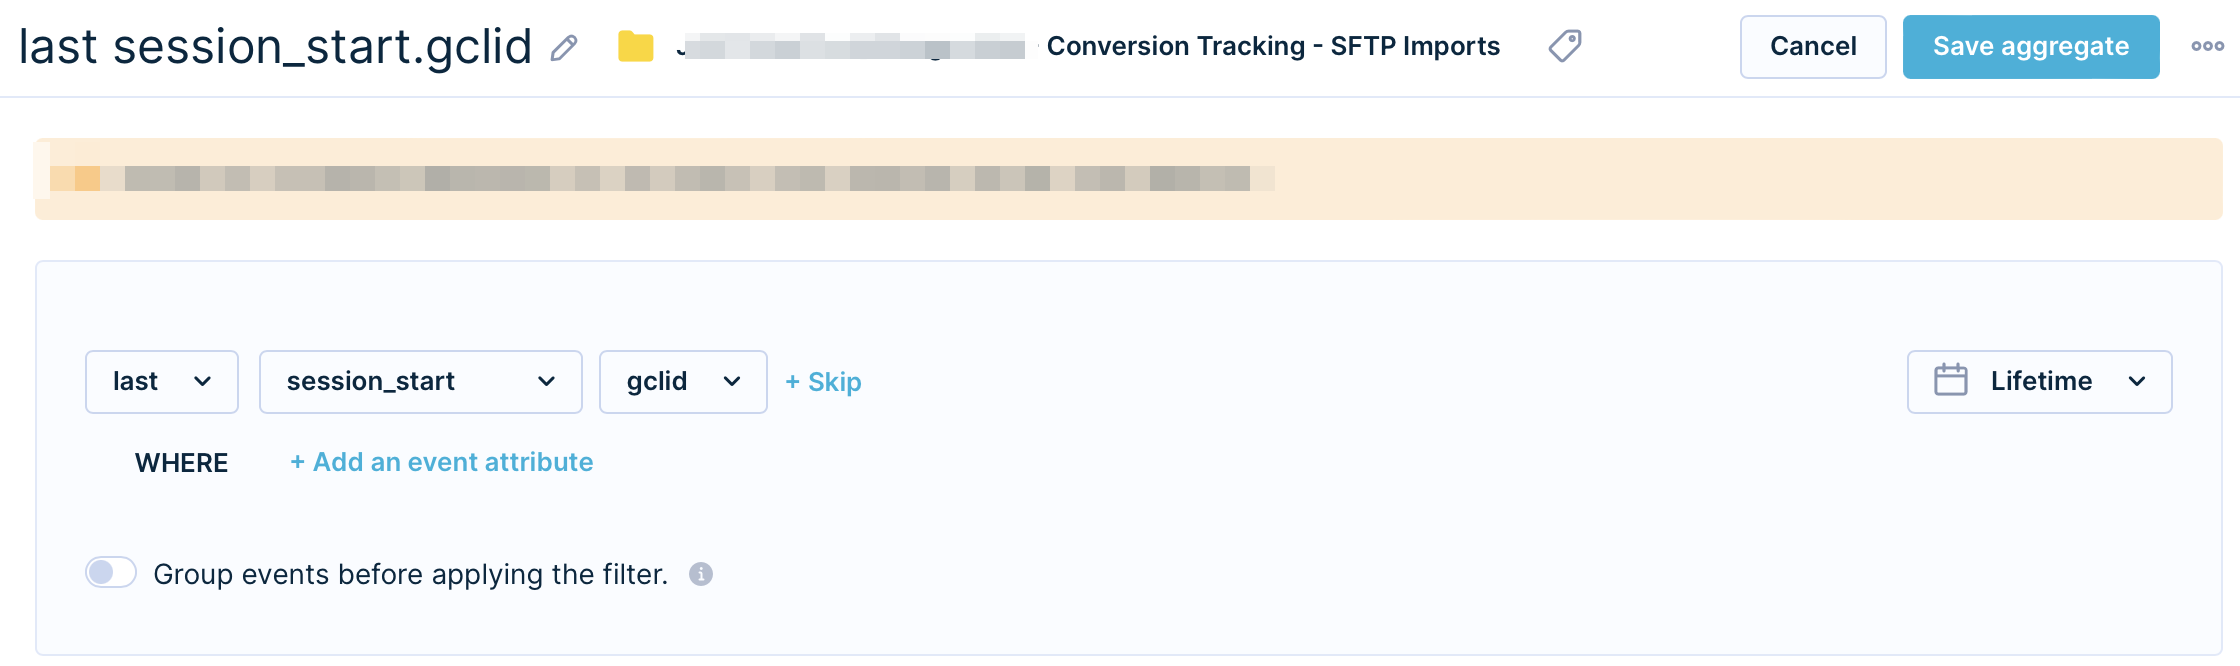
To check for the gclid, you can create a simple aggregate that looks into customers' gclid from their last session.
- Example:
-
Lastly, use the operator 'add event' to track the conversion event with the default conversion value using the example code below:
-
{%- set conversion_name = 'conversion_name' -%} {%- set gclid = aggregates['63fcd48bc0ff90bef8d686b2'] -%} {%- set conversion_value = event.total_price -%} {#- replace the with the event paraemter that hold value for conversion -#} {%- set conversion_currency = event.currency | default('EUR') -%} {%- set transaction_id = event.purchase_id -%} {#- START FORMATTNG CORRECT PHONE NUMBER -#} {%- set phone = customer.phone -%} {%- set phone_number = '' -%} {%- set country_code = '421' -%} {%- if phone.startswith("00") -%} {#- If phone starts with "00", then we assume it is already correct international -#} {%- elif phone.startswith("0") -%} {#- If phone starts with single "0", then we assume it is a local number without country code -#} {%- set phone = phone | replace("0", "00" ~ country_code, 1) -%} {%- elif phone.startswith("+") -%} {#- If phone starts with "+", then we assume it is correct international, but just swap for "00" format and remove "(0)" if present -#} {%- set phone = phone | replace("+", "00", 1) -%} {%- set phone = phone | replace("(0)", "", 1) -%} {%- endif -%} {#- Remove all non-numerics from the number. (I would love to do a regex replace, but we do not have that option, so using array mapping with number select) -#} {%- set phone = phone | map("int", "") | select("number") | join -%} {%- if phone | length and not phone.startswith("00") -%} {#- If we have a non-empty string, but still not starting with "00", then prefix with "0044" for UK number -#} {%- set phone = "00" ~ country_code ~ phone -%} {%- endif -%} {#- Final check on length of the number -#} {%- if phone | length > 9 and phone | length < 20 -%} {#- Looks OK, return the formatted phone number -#} {%- set phone_number = '+' ~ phone[2:] -%} {%- endif -%} {#- END FORMATTNG CORRECT PHONE NUMBER -#} [ { "event_type": {{- conversion_name -}}, "timestamp": {{- time -}}, "properties": { {%- if gclid -%}"Google Click ID": "{{- gclid -}}", {%- else -%}{%- endif -%} {%- if customer.email -%}"Email": "{{- customer.email | hash('sha256') -}}", {%- else -%}{%- endif -%} {%- if phone_number -%}"Phone Number": "{{- phone_number | hash('sha256') -}}", {%- else -%}{%- endif -%} "Conversion Name": "gads_offline_conversion", "Conversion Time": "{{- time | from_timestamp('%Y-%m-%d %H:%M:%S%z') -}}", "Transaction ID": "{{- transaction_id -}}", "Conversion Value": {{- conversion_value | int -}}, "Conversion Currency": "{{- conversion_currency -}}" }, "trigger_scenarios": false } ] -
Make sure to update the event_type in the track event jinja node to match the Google Ads conversion name that you created in the previous step.
-
This scenario will hash email and phone numbers to the event properties and add gclid to event properties together with conversion value, conversion currency, conversion name, and conversion time parameters that are required for upload offline conversion to Google.
-
The scenario flow looks like this:
-
- Configure Export from Bloomreach to your SFTP server. Learn more about Data Exports here.
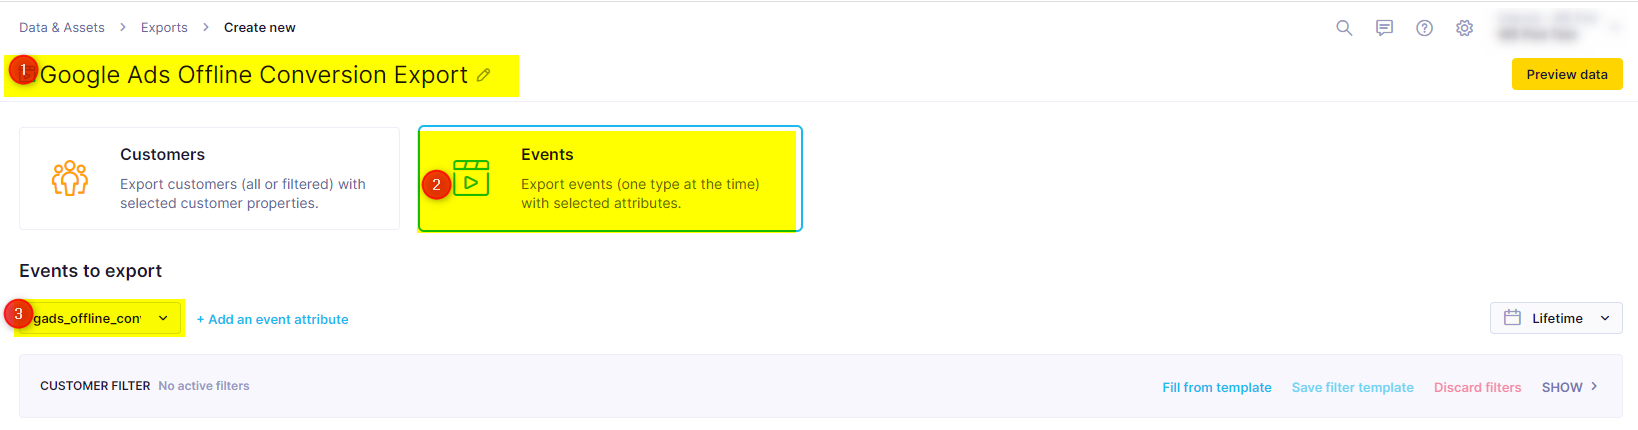
- Navigate to Data & Assets > Exports and click 'New export.
- Give a descriptive name to your export.
- Select 'Events' and specify the event that you want to export. The event name should correspond to the event_type that you specified in the add event node in the scenario Generating events for Google offline conversion tracking.
- Click on 'Next.'
- Deselect all hard and soft IDs, timestamp and keep only the following fields:
- Google Click ID
- Phone Number
- Conversion Name
- Conversion Time
- Transaction ID
- Conversion Value
- Conversion Currency
- Click on 'Next'
- Select CSV format with a Comma delimiter and UTF-8 encoding and specify the file storage in the Target.
- Click on 'Next.'
- Schedule the execution of export and use repeated one.
3. Google
Configure conversion upload from SFTP Server to Google Ads
Google Ads can automatically import your conversions on a regular schedule. You will need to create a file with your conversions in Google Sheets or store the file online with HTTPS or SFTP. If you are using enhanced conversions for leads, you must hash the data in your file before it is uploaded. To schedule file uploads, follow these steps:
- Go to the conversion uploads page to upload conversion data:
- Click the tools icon in the upper right corner of your account.
- Under “Measurement,” click Conversions.
- In the menu on the left, click Uploads.
- Click Schedules at the top of the page.
Click the '+' button.
- Click the Source drop-down menu and select the source of your file. You can upload a file from Google Sheets or transfer it over HTTPS or SFTP.
- Based on the source that you selected, choose from the options below:
- If you selected 'Google Sheets,' click Choose file to find and select the file that contains your offline conversion information.
- If you selected HTTPS or SFTP, enter the file URL and the username and password to access the file.
- Note: If you select SFTP and get a 'File not found' error, try placing a double-slash ('//') between the file path and name. For example, SFTP://sftp.mysite.com/conversions//conv.csv.
- Click the Frequency drop-down, then select how often you would like your file to be imported.
- Click the Time drop-down, then select when your file is imported.
- Click Save and Preview. The preview indicates whether the schedule saves successfully or not. A schedule might not save if Google Ads cannot reach the file source due to an incorrect username or password or if the file is not formatted properly.
- Click OK to return to the Schedules page. The Schedules page lists all of your scheduled uploads.
- Note: If there is a problem with your scheduled upload, you will see an alert in your account and receive an email. You will need to check your online file to fix the problem.
- To change your scheduled upload, click Options under the 'Actions' column and choose from the options below:
- Click Edit to change the settings for a scheduled upload.
- Click Pause to stop the scheduled uploads for a file.
- Click Resume if the scheduled uploads for a file were paused and you’d like to resume the scheduled uploads.
- Click Remove if you do not need to upload the conversions in the file anymore.
- You cannot change the scheduled upload options if your Google Ads account has read-only access.
Guidelines for importing conversions
- Time your uploads
Offline conversions uploaded more than 90 days after the associated last click will not be imported into Google Ads, and this means that it will not show up in your conversion statistics.
- Upload multiple conversions for the same click
The same conversion will not be imported more than once. So, if you try to upload a conversion with the same combination of a unique identifier (GCLID or lead form user-provided data), 'ConversionName,' date and time, or duplicate conversion adjustment, it will only be counted once, and you will see an error message for any duplicate uploads.
If you want to upload multiple conversions of the same type – several offline purchase conversions, for example – for the same click, you can. Google Ads will record them as separate conversions as long as they have different times (the unique identifiers and conversion names can be identical), provided that you have your conversion counting setting set to 'every.'
Re-upload recent conversionsIt is a good idea to re-upload any conversions that occurred shortly before your last upload, just in case some of them were too recent to be processed. Google Ads needs four to six hours after the ad clicks before a conversion can be successfully uploaded. (If you upload a conversion too soon after the click, you will see an error message that says, 'We're still processing this click's information, please try again after four to six hours.')
For example, if you upload your conversions daily, you'll want to make sure you upload all conversions from the last two days, just in case some of the conversions from two days ago have not been processed. Do not worry about double counting – Google Ads will not count the same uploaded conversion more than once. If you upload multiple conversions for the same click, you will receive an error for each duplicate conversion.
Configure your SFTP URL
'File not found. Please check that your URL, name, and/or password are correct.'
If you encounter this upload error, and you have already determined that the username and password are entered correctly, then you most likely need to modify your URL to clarify whether the file is located in your home directory.
Every user (for example, Jon) on an SFTP server< (for example, ftp.example.com) has a home directory (for example, /home/Jon/). Some SFTP servers assume that the file that you are requesting (for example, upload.csv) will always reside somewhere within your home directory. In these cases, if you include your home directory in the URL, the FTP server will look for the file in the wrong location.
Fix Upload Errors
Here are a few examples of upload errors and how to solve them.
If the file is saved to your home directory (/home/Jon/):
| Status | URL | Reason |
|---|---|---|
| Bad | ftp.example.com/home/Jon/upload.csv | This seems like the logical URL to use, but the FTP server assumes that the file is stored in your home directory. So it interprets this file path to be /home/Jon/home/Jon/. |
| Good | ftp.example.com/upload.csv | Removing the path to your home directory (/home/Jon/) will eliminate the confusion. |
| Good | ftp.example.com//home/Jon/upload.csv | Placing a '//' between the domain and the file path tells the FTP server not to assume the file is in your home directory. |
If the file is saved to a directory within your home directory(/home/Jon/data/):
| Status | URL | Reason |
|---|---|---|
| Bad | ftp.example.com/home/Jon/data/upload.csv | Again, because the FTP server assumes that the file is stored in your home directory, it interprets this file path to be /home/Jon/home/Jon/data/. |
| Good | ftp.example.com/data/upload.csv | Removing the path to your home directory (/home/Jon/) will eliminate the confusion. |
| Good | ftp.example.com//home/Jon/upload.csv | Placing a '//' between the domain and the file path tells the FTP server not to assume the file is in your home directory. |
Evaluation
The best method to check if the conversions are accurately reported to your account is to use the "All conv. (by conv. time)" column in your Campaigns report and then segment the report by conversion action.
The "All conv. (by conv. time)" column is different from most of the other columns because it reports conversions based on the time of the conversion.
Since your upload file contains the "Conversion time" column, you should be able to compare your reports with the upload results file. Make sure to use the results file since some conversions may have been rejected. The “Conversion time” column reports conversion counts based on the date of the conversion.
Common errors and resolutions in offline conversion imports:
Error: No Google Ads conversion types were defined when this GCLID click occurred. You will need to create at least one conversion type.
Fix: To use offline conversion tracking, an “Import from Clicks” or “Import from Calls” conversion action must be created. Refer to the article Set up offline conversion imports for instructions.
Error: We cannot find this conversion name in the target account.
Fix: Confirm that the click came from the account you are uploading to. If the ad click came to an account within an MCC and you are uploading to the MCC account, make sure the account within the MCC has cross-account conversion tracking enabled.
Error: Conversion date precedes click date.
Fix: The offline conversion cannot happen before the ad click. Add 1-2 days to your conversion time in your upload, or check time zone is properly set.
Error: This click is too old for its conversion to be imported.
Fix: We retain the GCLID for only 90 days. You will need to upload more frequently, or if your conversion happens after 90 days, upload an offline conversion event that happens within 90 days.
Error: We are still processing this click’s information; please re-upload this conversion in 12 hours.
Fix: Google Ads system has not processed the click yet. It is recommended that you wait 6 hours if using scheduled upload.
View your imported conversions in Google Ads
It takes about three hours for your imported conversion statistics to show up in your Google Ads account. When they do, they will appear in your conversions columns. You can learn about the conversions columns and how to add them to your reports in Understand your conversion tracking data. To see how performance varies by conversion action, you can segment the 'Conversions' column by 'Conversion action name.'
To validate whether your conversion imports are working, use the 'All conv. (by conv. time)' column. Unlike the other conversion columns, this column reports total conversions by the date of the conversion because your upload file records a conversion time.
Bear in mind that the longer the delay between your clicks and your conversions (either online or imported conversions), the longer you'll have to wait to see the most complete conversion metrics.
ExampleIf you want to see conversion statistics for Monday, your clicks take three days to convert, and you upload your conversions nightly, then you will have to wait until Friday morning before you can see Monday's accurate conversion statistics.
Use Cases
If you attract leads or buyers online, or both, you might want to record a conversion in the following cases:
- When you close a sale offline (for example, over the phone or in person) and track this sale in a customer relationship management system
- 30 days after the online sale so you can exclude transactions that resulted in a return
- Only if the sale was made to a new customer
- Only if it is a customer's second purchase
- When you close a sale online but are unable to use our standard JavaScript-based conversion tracking solution
Updated 4 months ago