

Design tab: Scenario building and editing
Build and edit scenarios using the Design tab to create automated customer journeys. This guide walks you through adding nodes, connecting them, and understanding how each component works.
Open the scenario editor by going to Campaigns > Scenarios > Create new. You'll see the Design tab of your new scenario.
Build scenarios with nodes
Every scenario is built from components called nodes. You connect these nodes to create a flow that guides customers through your campaign.
Add nodes to your scenario
- Click on the node you want to add from the sidebar.
- Drag and drop it onto the canvas with your left mouse button.
Edit existing nodes
Double-click any node to open its settings window. Click Save when you're done making changes.
Remove nodes you don't need
- Select the node by clicking it with your left mouse button.
- Click the trash icon, press backspace, or Delete on your keyboard.
Connect nodes to create flow
- Click on the output connector (right side of the first node).
- Drag the line to the input connector (left side of the second node).
- Release your mouse when connected.
Now you've created a flow. Customers will move through this flow from triggers (like On date) to operators (like Condition) and finally to actions (like Email).
Basic scenario flowEvery meaningful scenario needs at least one trigger, one action, and usually one condition node. You can have multiple flows in a single scenario.
Scenario size limits
There's a hard limit for how much data can be stored in one scenario. These recommendations help you stay within limits:
- Don't use more than 100 nodes. Keep the number below 30 to avoid lags.
- Don't use more than 25 email nodes. This includes different language versions. Shorter emails let you use more nodes or translations.
- Maximum scenario size is 7.9 MB.
Tip: If you hit these limits, break your scenario into smaller, simpler ones. You can also move parts of your email into HTML blocks - content there doesn't count toward the size limit.
Navigate the canvas
Move around and select multiple nodes
- Move your view: Click on empty space and drag your mouse.
- Select multiple nodes: Hold Shift and drag to select multiple components.
- Move selected nodes: Click and drag any selected node to reposition the entire selection at once.
- Delete selected nodes: Press backspace on your keyboard.
- Zoom: Use your mouse wheel to zoom in or out.
Use touchpad controls
- Move: Slide with 2 fingers.
- Zoom: Pinch with 2 fingers.
Use keyboard shortcuts
- Press 1 to fit the screen
- Press 2 to zoom into the selection
- Press 0 to reset zoom.
- Use the minimap: Click the minimap in the bottom right corner to navigate.
Saving and launch scenarios
- Save your work: Click "Save" in the top right corner. This saves your scenario without launching it.
- Launch your scenario: Click "Start" to begin streaming customers through your flow.
Copy and paste nodes
You can copy nodes and their connections within one scenario or between different scenarios.
- Select the nodes you want to copy (hold Shift for multiple nodes).
- Press Cmd/Ctrl + C to copy.
- Press Cmd/Ctrl + V to paste.
When copying between scenarios for the first time, your browser might ask permission to access the clipboard.

ImportantCopying scenarios between different app versions isn't allowed.
Understand how nodes work
Let's explore each type of node and how it works. Remember to double-click any node to configure its settings.
How nodes are displayed
Node names
Node names show three things:
- Action ID of the node
- Type of the node
- Your custom name for the node

Search for nodes: Use the search feature to find nodes by action ID, type, or name.

Format labels: Use standard markdown formatting like bold, italic, headings (H1-H6), lists, and links
Work with triggers
Triggers determine when a scenario streams customers. Each trigger serves a different purpose. Select the one that matches your campaign timing needs.
| Trigger name | Description |
|---|---|
| Now | Streams all customers immediately after execution. Becomes inactive after use in a live scenario. Refresh manually to reactivate. |
| On date | Streams customers at a specific date and time. Uses the time zone from Settings > User Settings > Time zone. |
| On date attribute | Launches campaigns based on customer or event dates (birthdays, anniversaries). Controls timing, recurrence, and delivery down to specific hours and time zones. |
| Repeat | Streams customers repeatedly based on time conditions. Set daily, weekly, or monthly runs. Specify when the scenario should stop repeating. |
| On event | Streams one customer every time a specific event is tracked. |
Trigger limitations
Here's a list of events and nodes with their limitations.
Campaign event statuses
Certain campaign event statuses don't trigger scenarios when used in the "On event" node. Don't use them as triggers in your scenarios. Those statuses include:
enqueuedenqueue_failedsentfailedsuppressed
Importantly, campaign events that don't have a status attribute altogether, such as A/B tests, will also not trigger a scenario.
Other events and nodes
Apart from campaign events, there are other events and nodes that don't trigger scenarios. These include:
mergeconsentevents generated by manual updates in the web UI. Such events haveCRMin the source attribute.Add eventnodes (unless you check "Allow scenario triggering")Ad audiencenodes withadd_customersandremove_customersoperations- Ad audience nodes with the
remove_customers_from_all_custom_audiencesoperation.
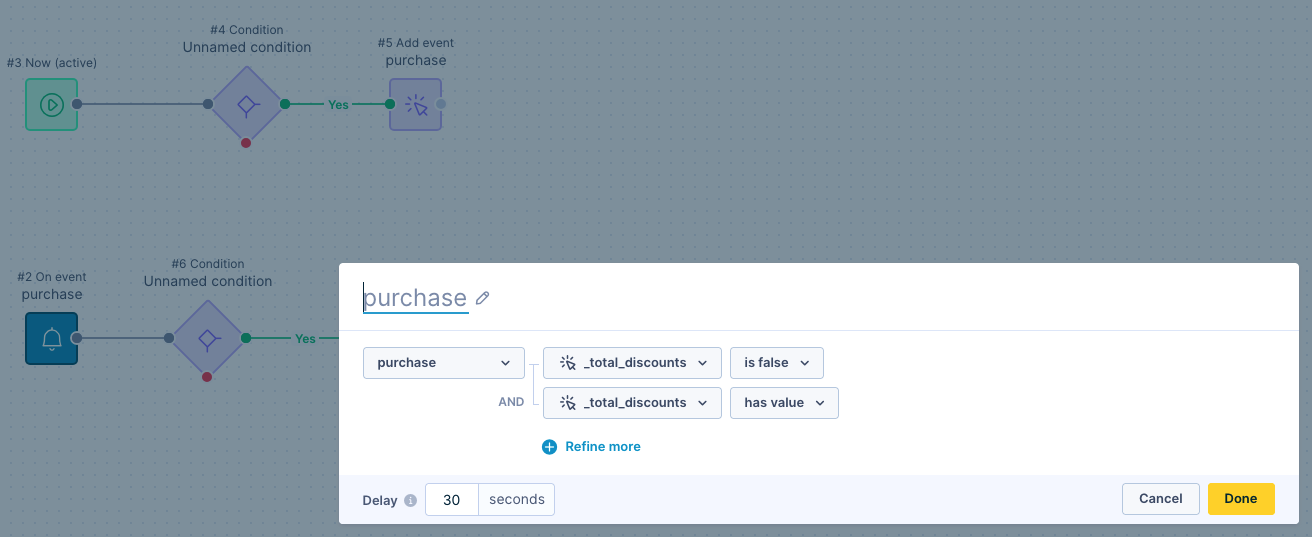
On-event trigger limitation
- If you use "event attribute is
false," also add event attributehas value. - This makes the system check if the attribute exists before evaluating it
- Without the
has valuecondition, non-existing properties are treated as false. - You can't use Jinja in an On-event trigger.
- You can’t specify events using derived attributes (running aggregates, expressions, Event Segmentations) to define the On event trigger. To use an Event segmentation, add a Condition node immediately after the on-event trigger and apply the Event segmentation there.
For example, you set up 2 scenarios. You sold your product in the first scenario. In the second scenario with an On event trigger, you want to exclude customers who bought your product with a discount. Set the event discount as false, and the discount has value to exclude these customers.
Reset triggers
Both Now and On date triggers become inactive after use. Use Reset trigger to reactivate them.

You can't specify events using derived attributes (running aggregates, expressions, event segmentations).
Parallel triggersIf you use multiple triggers in one scenario (like
On eventandOn date), they process in order. The second trigger waits for the first to finish completely. Consider using separate scenarios for parallel triggers.
Actions
Actions execute when customers reach them in the flow. Each action type has a unique action_id. Read more about this in the System events article.
| Action | Description |
|---|---|
| Sends email with your specified content. Learn how to create an email campaign. Attribute email must have value in order for a customer to receive an email campaign | |
| SMS | Sends SMS with your specified content. Learn how to create an SMS campaigns. Attribute phone must have value in order for a customer to receive an SMS campaign |
| Retargeting | Updates your Facebook or Google audience. Matches by email, phone number, or Facebook ID. Read more about retargeting integrations: Facebook Ads AdForm DMP Google Ads Google Analytics |
| Mobile push notifications | Sends push notifications to mobile phones. |
| Web push notifications | Sends push notifications to web browsers. |
| Webhook | Sends custom HTTP requests to your specified API. Learn more about webhooks. |
| HTML | Saves HTML content to show customers on connected webpages. Useful for homepage customization by customer segment. |
| Facebook message | Sends Facebook messages to customers. |
Go to the Evaluation tab and hover over any node to see its ID in the format "#(number)".
Manual recipientsIf you manually choose email recipients, the campaign ignores frequency delivery policies.
Work with operators
Operators control how customers move through your flow.
Available operators
| Operator | Description |
|---|---|
| Condition | Functions as a gate - it will stream customers who match the specified condition through the match (green) output connector and customers who don't match through the don't match (red) output connector. After allowing personalization, some Jinja tags become available to use within the condition, for example, trigger event properties or report values. This, however, reduces performance and should thus be used with caution. |
| Segmentation | Divides customers into smaller groups based on common characteristics. Functions similarly to a Condition: Condition has one green and one red output; Segmentation has as many green outputs as segments in the Segmentation. Using a Segmentation node in a Scenario to insert a Customer Segmenation is easier, faster, and cleaner than using a Condition node for segmentations. See more info about caveats and limitations. |
| AB Split | Splits customers into two or more distinct groups based on the specified ratios. Note that the A/B test with an automatic winner distribution can only be used with theNow and Scheduled triggers (A/B test with manually set distribution can be used with On event too). Read more in the A/B testing article/. |
| Customer limit | Limits the number of customers that go through a scenario flow with an absolute number. |
| Label | A simple text label that you can use to name flows and add a description. |
| Set attribute | Assigns a new value to the specified customer attribute. It works for string, number, boolean, list, or JSON attributes. The maximum number of properties that can be set in a node is 100. (Use a visual or code editor to set up the node.) |
| Wait | After entering this node, the customer will wait for the specified amount of time before they are streamed back to the flow. The wait node can be set as a fixed time period, dynamic period based on other events, or set based on the optimal send time for the specific customer when they are most likely to engage with the campaign. If you choose to set a specific time period, you can set the wait time from minutes up to years. The wait times are specified in a way that: day = 24 hours, week = 7 days. However, they take into account calendar months. Hence, if you set the waiting period to 1 month, it can take anywhere between 28 and 31 days. The goal is to achieve the same date x months later, e.g., if you set it to 1 month on the 16th of February, the wait time will pass on the 16th of March, not after 30 days. Once customers enter the wait node, they will wait the originally designated number of days, minutes, or hours. For example, if the original wait time is 7 days and you adjust it to a lower time, such as 6 days, those customers who have already entered the wait node will still wait for the full 7 days. New entries will wait for 6 days. Unfortunately, there is no way to "release" customers who are already in the wait node sooner by decreasing the wait time; the new wait policy only applies to future entries. |
| Add event | Records new event records. Events must first be defined in data management. You can use Jinja tags to include contextual information in properties, just like in email templates. One node can add a maximum of 50 events, and a maximum of 100 properties can be set per event. Note that when a custom timestamp is used in the node, the timestamp is in the past. It means that it falls under event expiration. The event will not be added and will fail. |
Read more: Flexible Operators in Advanced Features in Scenarios.
Time zones
When your time zone is set to something other than UTC + 0, you may see different results in reports and segmentations compared to your scenario results. This happens because:
- Relative time filters use UTC time zone.
- Absolute time filters use your custom time zone from Settings > User Settings > Time zone.
- Relative filters apply only to scenarios, not your whole project.
If you notice differences between your scenario results and reports or segmentations, check your time zone settings and consider how time filters might be affecting your data.
Customer limit details
ImportantYou can only have up to 1,000 distinct groups in a limit node, before it starts failing.
The customer limit allows you to set the maximum number of customers passing through the node. This can be very useful when your scenario leads your customers to a channel with a limited capacity. For example, you might have limited capacity for the number of calls your call center can handle within a day.
The customer limit node creates two outputs: a successful one for the customers within the limit and an unsuccessful one for the customers over the limit. At the moment when a particular customer arrives at the customer limit node in the scenario, it is decided which output they will go to. At first, all customers go to the successful output, but once the threshold is reached, all the rest go to the unsuccessful output. Since then, all customers will fall into the unsuccessful output even for the next campaign runs until the number of customers passing through the node is reset back to zero. You can set a period reset of this number in the Specify customer limit reset period.
You can set the limit by filling in the value of the Limit to # of customers. This value can either be an absolute number or a number referenced by Jinja (references to the following can be used: metrics, reports, report_value_by_key, catalogs). Read more on Jinja references.
You can also Allow drill-down group which lets you use Jinja to add multiple limits per node based on the group - a separate limit on each segment of customers using the scenario. You might want to do this if you send out a competition that would be decided on a 'first come, first serve' basis, but where you also want to have a specific number of winners from different segments of customers. You can use the same variables as in webhooks, like customer attributes, trigger event properties, or webhook response. If you want to use the drill-down group as a parameter in the Jinja of the limit, the parameter is called limit_group.

Example of the limit with a limit groupTo look into catalog subsidiaries and look for an item that was used as a drill-down group, and reference limit attribute from the catalog item, use:
{{ catalogs.subsidiaries.item_by_id(limit_group).limit }}
Wait node advanced features
Optimal send time
Delays each customer's message until their predicted peak engagement hour, optimizing for clicks by default. The messaging channel selector in the Wait node requires the Loomi AI Journey Orchestration package.
For full details on how OST works and how to configure it, see Optimal send time prediction.
Dynamic time
- Use Jinja to set custom wait periods.
- Reference metrics, aggregates, trigger event attributes, or any type of personalization.
- Common use: Spread or throttle the campaign execution over some time period using the random number generator. For example, to spread send within 60 minutes, you can use the
{{ range(0,60) | random }}. - Hours are rounded down (1.8 hours becomes 1 hour). If you want to round up, you can use the Jinja function round (can accept "ceil," "floor," or "common" parameter): Wait
{{ ((event.departure_time - time) / 3600) | round("ceil") }}hours. - Zero or negative values execute immediately.

Silent hours
- Pauses campaigns during times you don't want to disturb customers.
- Set specific times (daily) or silent days (whole days).
- Choose specific time zones for evaluation.
- Global settings available in Project settings > Campaigns > General Campaigns settings. This pre-fills a Silent hour
wait nodewhen it is selected in a scenario. The setting can be overridden in a specific node if needed.

Updated 3 months ago