Experiments
Make any changes to your website using a simple visual editor.
Experiments (also known as web optimization or web personalization) let you make changes to your website using a simple visual editor. You don't need to write code or deploy anything (What You See Is What You Get editor). Our editor supports changes like adding or removing whole blocks, adding recommendations, inserting weblayers, or adjusting colors and fonts. You can also personalize your website using data from Bloomreach Engagement with Jinja.
Experiments work on a similar basis as weblayers. You can create multiple variants, show them only to a specific audience, and A/B test them. Experiments track a single event called experiment when they're applied to your website, so you can make further analyses based on the data collected from these events.
You can watch this video to get an overview of the basic features.
Why use experiments
Experiments can reduce your time to value because they let you make small changes to your website without knowing how to code or relying on your IT department. You can A/B test any changes and evaluate them right away using the Bloomreach Engagement interface. You can also use the data about your customers and personalize the web for them using Jinja.
What is an experiment
An experiment is a list of modifications. This list is ordered, so the order matters. The modifications are applied to the webpage in the exact order from top to bottom. There are multiple modification types to choose from, and they're described later in the section Modification types.
Each experiment also has settings associated with it, just like any other campaign. The settings are described in the section Settings.
Create an experiment
You can create a new experiment by going to Campaigns > Experiments > New experiment
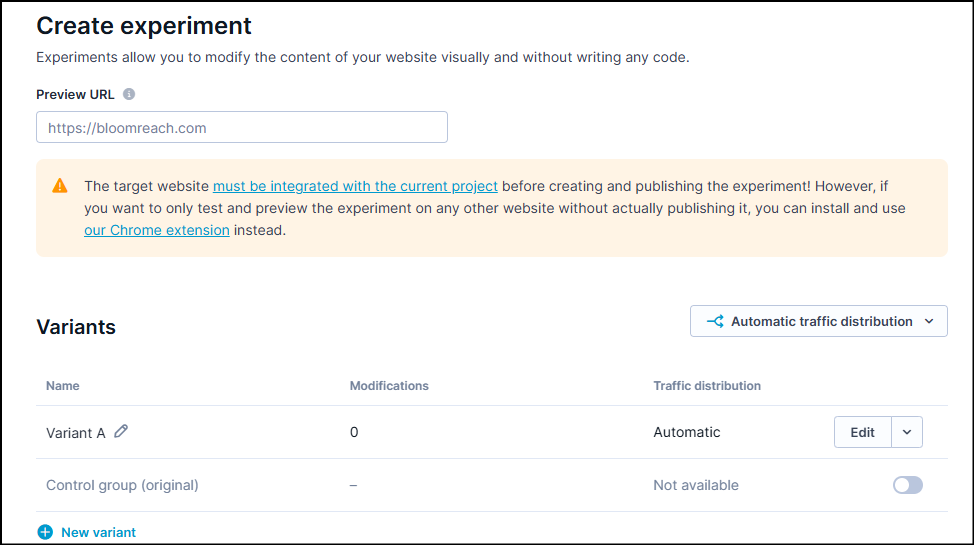
You'll be prompted to enter the URL of the website you want to modify with the experiment. This might be the homepage of your website or any other page you want to adjust. This doesn't limit the experiment to this URL. It only serves for setting up the experiment.
Important
The page on the URL you enter must be integrated with the current project before creating the experiment. Otherwise, the experiment won't work. If you want to preview experiments on websites that aren't integrated with your project, you can download our Chrome extension.
After clicking Start, you'll be taken to your website and an inline visual editor (called the Experiments editor) loads.
Use the experiments editor
Now you're in the Experiments editor with the option to select and change any element on the website. Let's look at each part of the editor now.
| Name | Description |
|---|---|
| Experiment variants | Create and switch between variants of your experiment. You can then compare their performance through an A/B test . Read more in section Experiment variants. |
| List of modifications | Expands the list of all modifications you made. Clicking on a modification takes you back to the editing menu for that element, allowing you to adjust it again. You can also delete a modification, which brings that element back to its original state. Read more in List of modifications. |
| Undo / Redo | Undo or redo your changes to the experiment. |
| Selector | CSS selector of current modification (or the currently selected element on the page). |
| Number of selected elements | Shows the number of selected elements. You can select more elements on the website by holding the SHIFT button while clicking on them. |
| Browsing mode | Switch to "browsing mode" if you need to navigate on the website and access another page. |
| Mobile preview | Mobile preview. |
| Close the editor | Close the editor and return to Bloomreach Engagement without saving your work. |
| Preview | Generates a link to your modified website that you can share with others. This is used only to preview the changes. The experiment won't be launched. The generated link is valid for 24 hours, after that it expires. |
| Save | Exit the visual editor with or without saving your changes. This doesn't launch the experiment yet. To do that, you need to exit the visual editor and click Start back in Bloomreach Engagement. |
| Modification selection | Currently selected elements on the page - when clicking on the page (or elements modified by selected modification). |
| Modifications list | This menu pops up when you click on an element on the website. Each function is explained in section Modify elements. |
| Top level modification selection | Currently selected head/body of the page - when clicking on the part of page modified by selected modification. |
| Top-level selector | Allows you to insert scripts directly into the head or body of the page, rather than inserting them into specific elements. |
Experiment variants
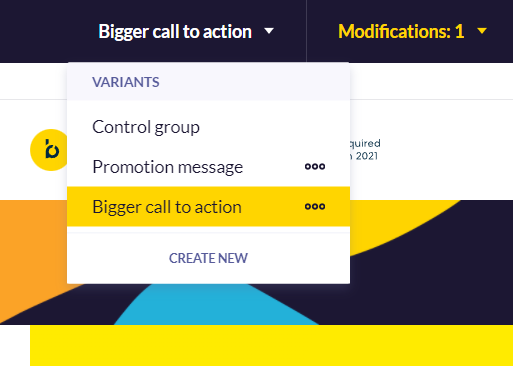
Variants serve as a tool to compare different modifications of the same text, picture, structure, functionality, and so on while comparing it to a control group.
You can modify the variants of the experiment using the variant selector. You can duplicate, rename, and delete a variant.
Note
There's always a variant called Control group. This is how your website looks without the changes in any other variant. This variant can't be changed or deleted.
List of modifications
You can access the list of modified elements and the applied modifications using the Modification list button. Each modification in the list shows the modified elements and the changes made in the modification..
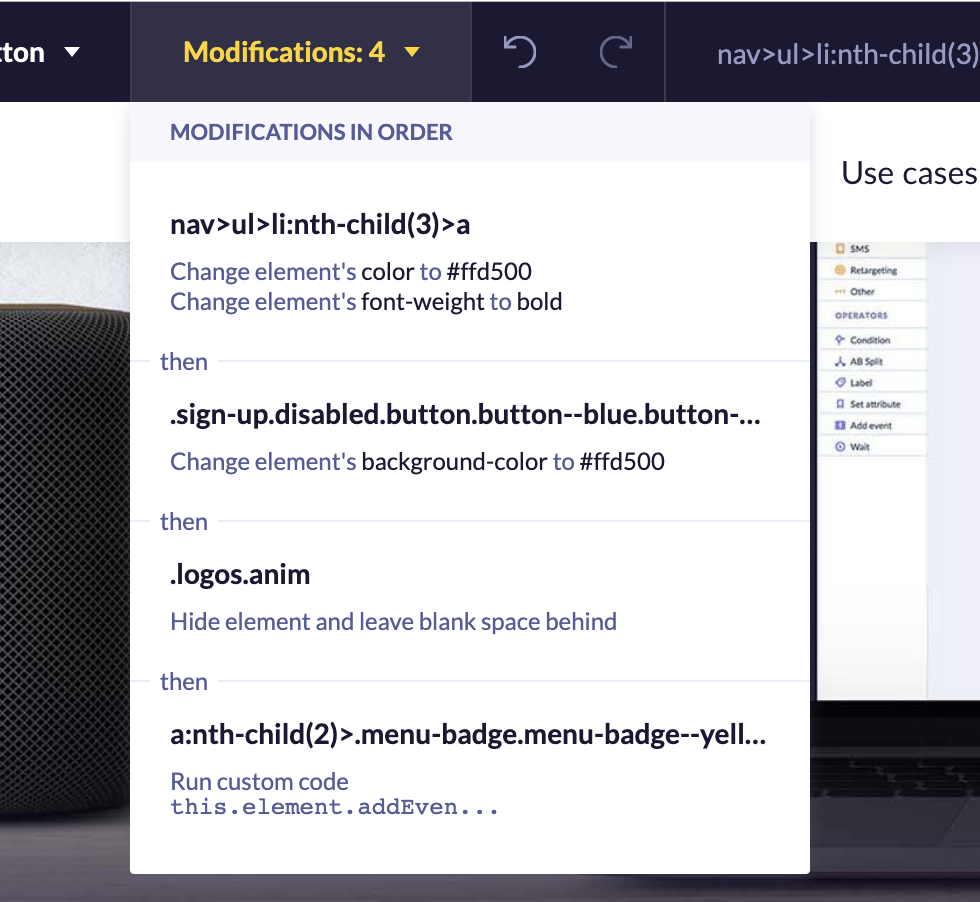
Hover over a modification to highlight the edited element. You can also click on a modification to change it.
Personalized modifications
When a modification is personalized (it contains Jinja), it's marked in the modification list.
These modifications load slower than modifications that aren't personalized. This also affects any modifications that are applied after the personalized modifications. If possible, sort your modification list so that all (or as many as possible) non-personalized modifications are placed before the personalized modifications.
Selector
"Selector" is a CSS selector of the current modification (or the currently selected elements on the page).
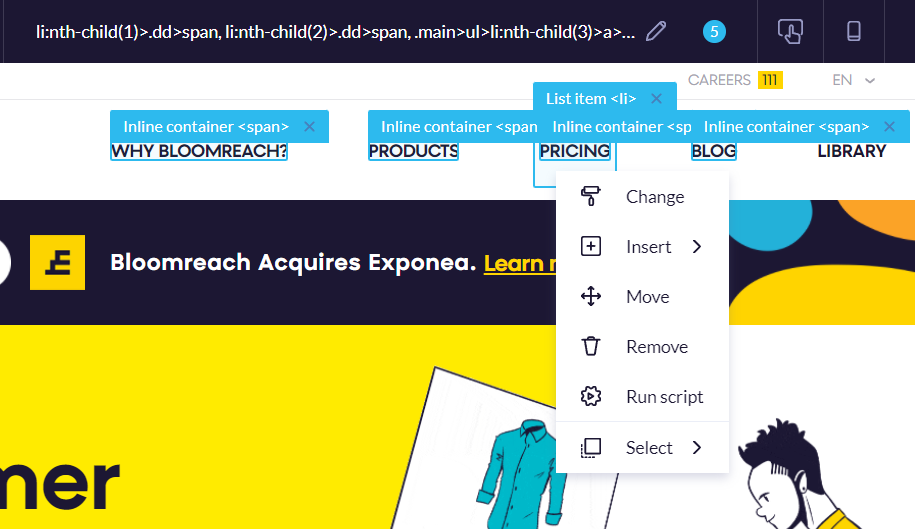
Whenever you're hovering over an element or selecting an element on the webpage, the editor generates a unique selector for that element. If you hold the SHIFT key, you can select multiple elements by clicking, as you can see in the picture above. The editor then generates a selector that matches all the selected elements.
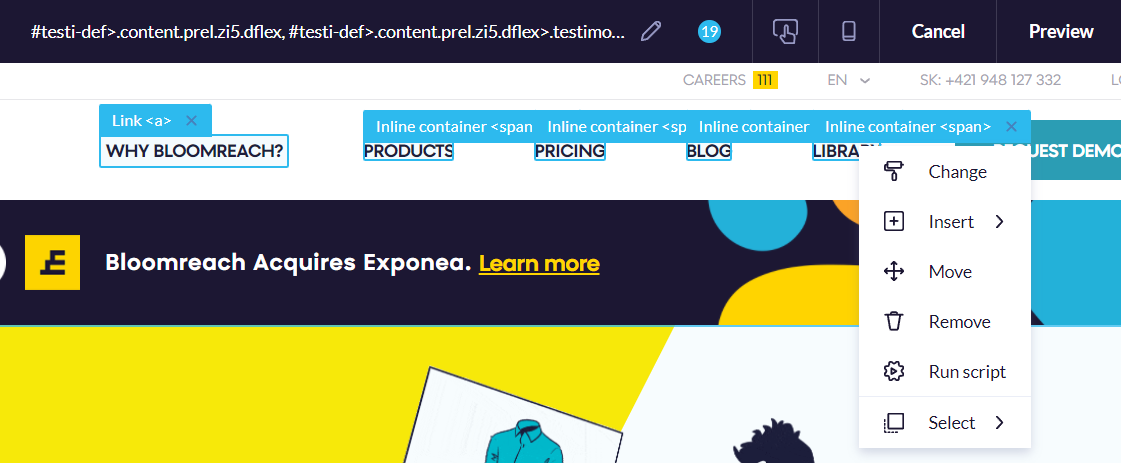
After selecting an elements by clicking on it, you can still edit the auto-generated CSS selector by clicking on the pencil-shaped icon in the top bar. For example, your page may have many different pictures and adjusting all of them would take too much time. Select one picture and rewrite the selector to select more (or all) elements. You can even write a custom CSS selector to apply modifications to, if you know a little CSS.
Important
When you modify an existing selector or write a custom one, you have to confirm it by hitting the ENTER key.
Unique selectors
When you select an element on the webpage, the Experiments editor always tries to generate a unique CSS selector based on the current elements on the current webpage. However, the editor doesn't know about elements on the other pages on your website, so this selector might also match some other elements on other webpages (if you don't set up page filters and other targeting). If you want to be sure, either set up filters for the experiment, or use unique IDs for the elements you want to modify on your website. Read more about this in Experiments for developers.
Save your work
Confirm your changes by clicking the Save button in the top menu. You return to the Bloomreach Engagement app where you can edit additional settings of the experiment and set up A/B testing.
Important
Because of security concerns, it's not possible to save the experiment directly from the Experiment editor. Don't just close the browser tab when you click the Save button. Instead, wait until you're redirected to the Bloomreach Engagement app and it loads. You should see a confirmation message: "Success! Your experiment was saved."
Modify elements
After clicking on any element, a menu pops up presenting you with several options on how to modify that element. Different modification types are described separately in Modification types.
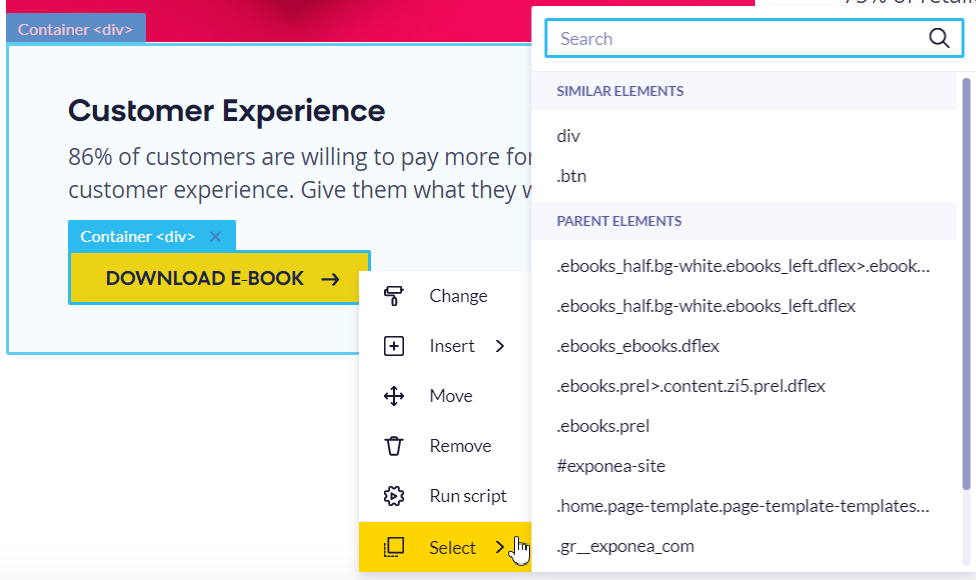
Select parent, child, or similar element
Change your current selection to the parent or a child of the currently selected element. You have to understand a little bit of HTML and its structure to use this. Selecting a parent element means going one level up within the website structure. Each element can also contain multiple children and you can select one of them to move down within the website structure.
Modification types
Change
Use this option to change the element visually. You can edit the dimensions, colors, fonts, spacing of the element, and so on. You can enter the colors manually (using the hex or RGB color format) or use the color picker. When changing the font, make sure it's loaded onto the website. The sizes need a number and a unit (for example, 43px or 12em). The format you should use is indicated in the fields as a placeholder.
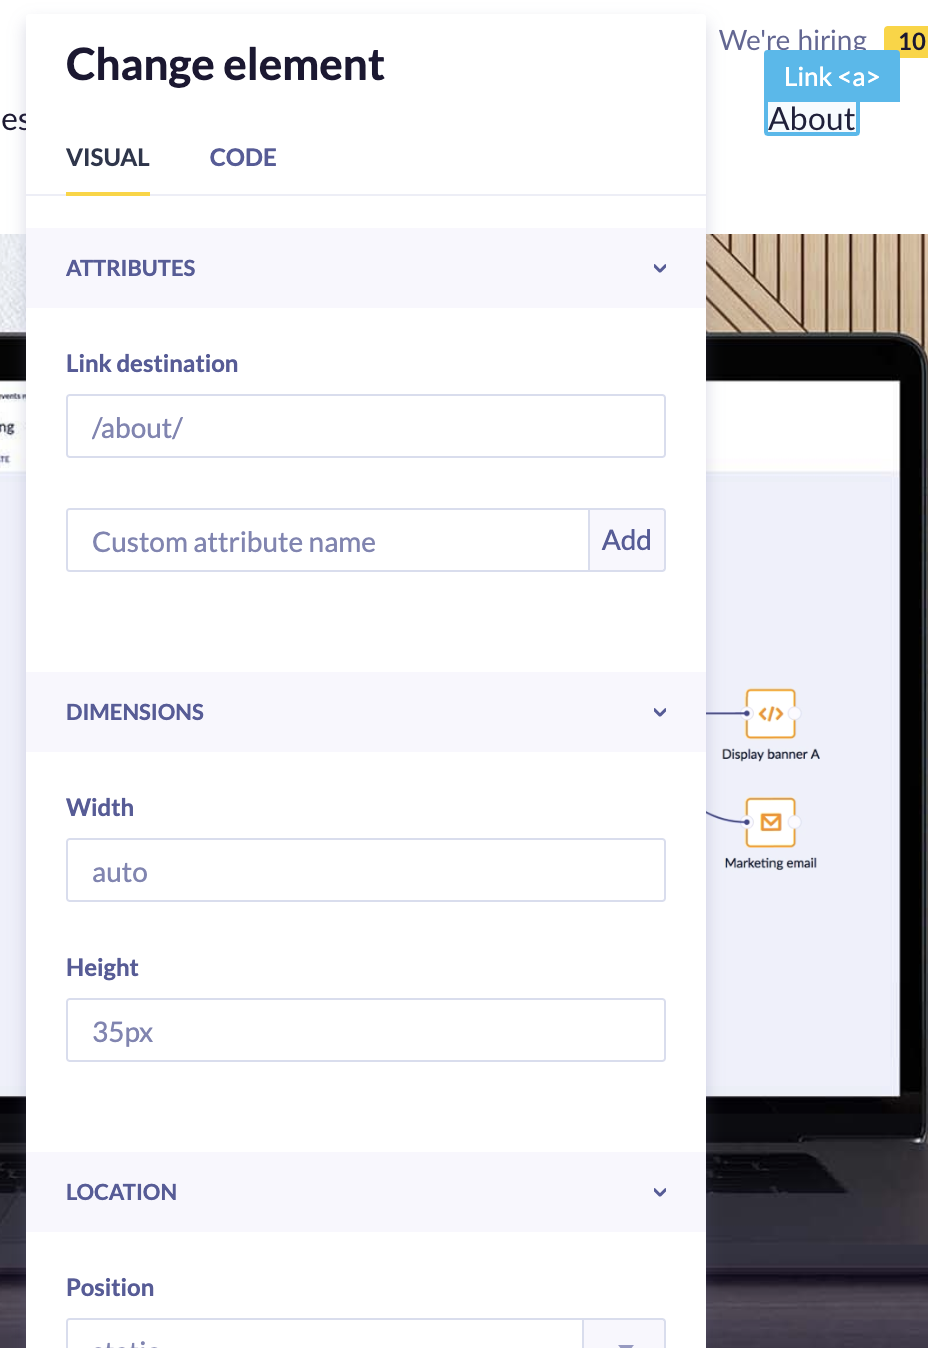
This modification type also lets you change an image on the website and a link's URL address. To do that, you have to first select an image or a link.
If you're advanced, you can switch to the Code tab and modify the HTML of the selected element. You can use Jinja here to personalize the content for the user.
Jinja syntax
The experiments modifications is a Jinja template. Be careful when modifying elements code because in some cases minified CSS and HTML might be interpreted as Jinja.
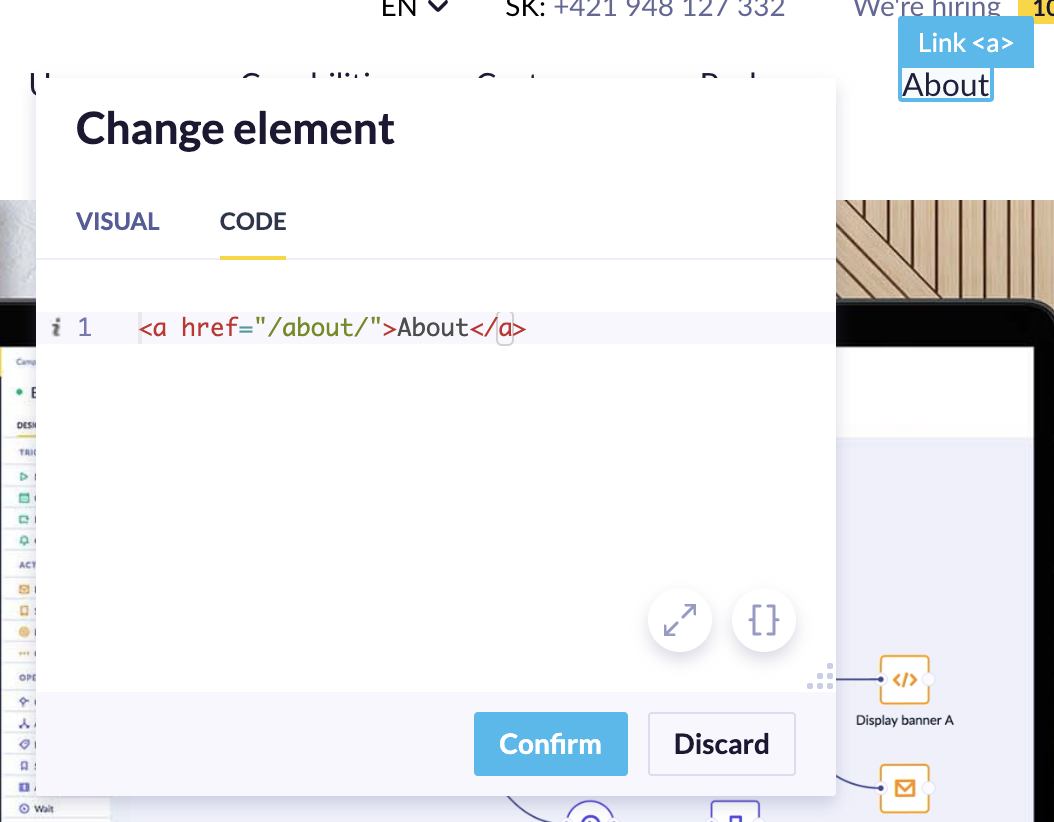
This modification currently only performs basic replacement of text or HTML of the selected element if you modify the HTML in the Code tab. It's not recommended to use it to modify large chunks of the webpage. Always prefer selecting child nodes of the webpage and performing HTML modifications deep in document tree of the webpage. Read more in Experiments for developers.
Insert
This opens a menu with your weblayers and HTML blocks saved in the Asset Manager. In both cases, you can either pick an existing template or create a new one using the code editor.
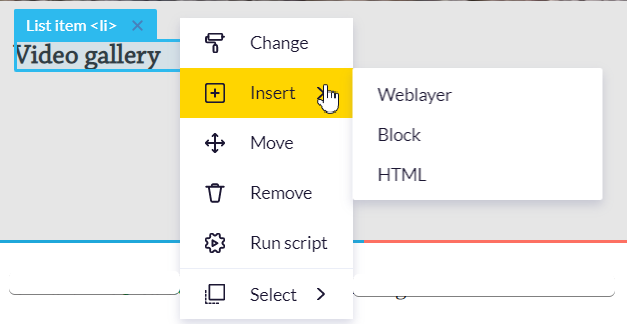
- Weblayer: Weblayers are campaigns that are shown on the specified pages of your website to a specified audience. They're executed using HTML/CSS/JavaScript. You can use them to show a message to the customer or prompt them to action. Use any weblayer from your project and display it using experiments.
- Block: Use any existing HTML Block from your project. HTML blocks in the old form of
[[ paramName ]]can be tweaked by parameters. - HTML: Write your own custom HTML and use Jinja to personalize it.
Move
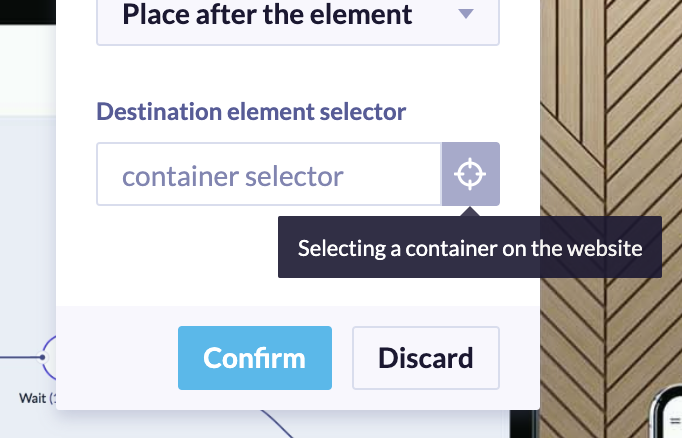
Moving an element has two parts. Before selecting an anchor point on the website, you need to select whether you want to place your currently selected element before or after that anchor point. You can also put it inside that anchor point as the first or last child.
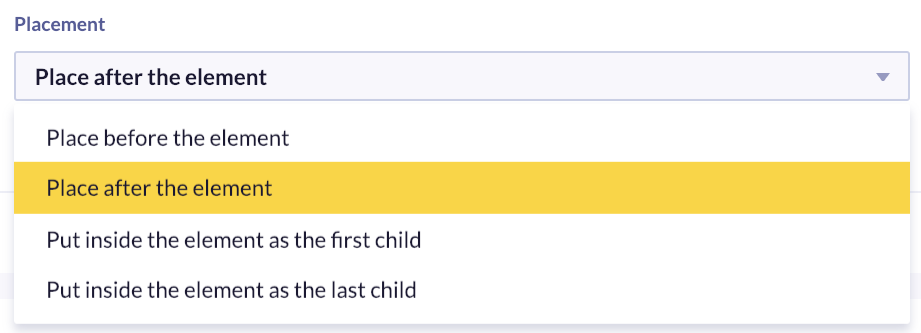
Before and after are self-explanatory and also the most-used options. The new content is placed right before or after the selected element. Using these two options places the new content outside the selected anchor element, which means that the new content doesn't inherit the style of the selected element. If you put the element inside as the first or last child, it inherits the style of the anchor element.
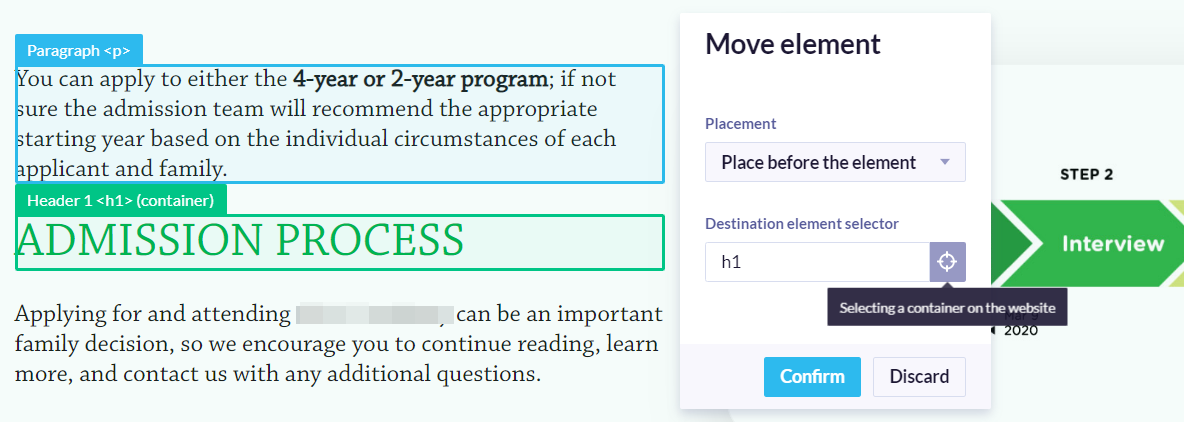
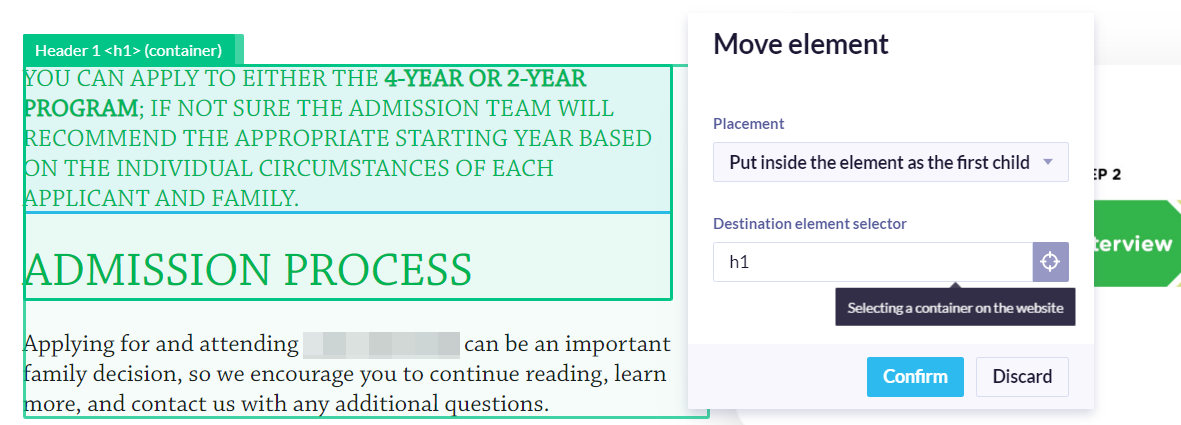
In non-programming vocabulary, the first-child matches the first element of a series of tags. Last-child works the same as first-child, but it selects the last element in the list.
Next, click the target button and then select the element you want to use as the anchor point for these settings.
Remove
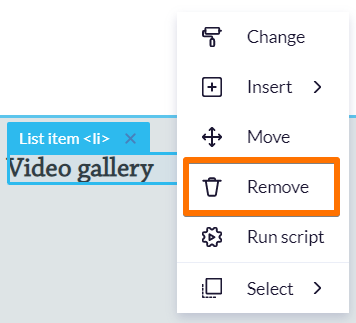
You can delete the selected element. After clicking this button, you can also choose whether you want to leave blank space instead of this element or not.
Set up A/B testing
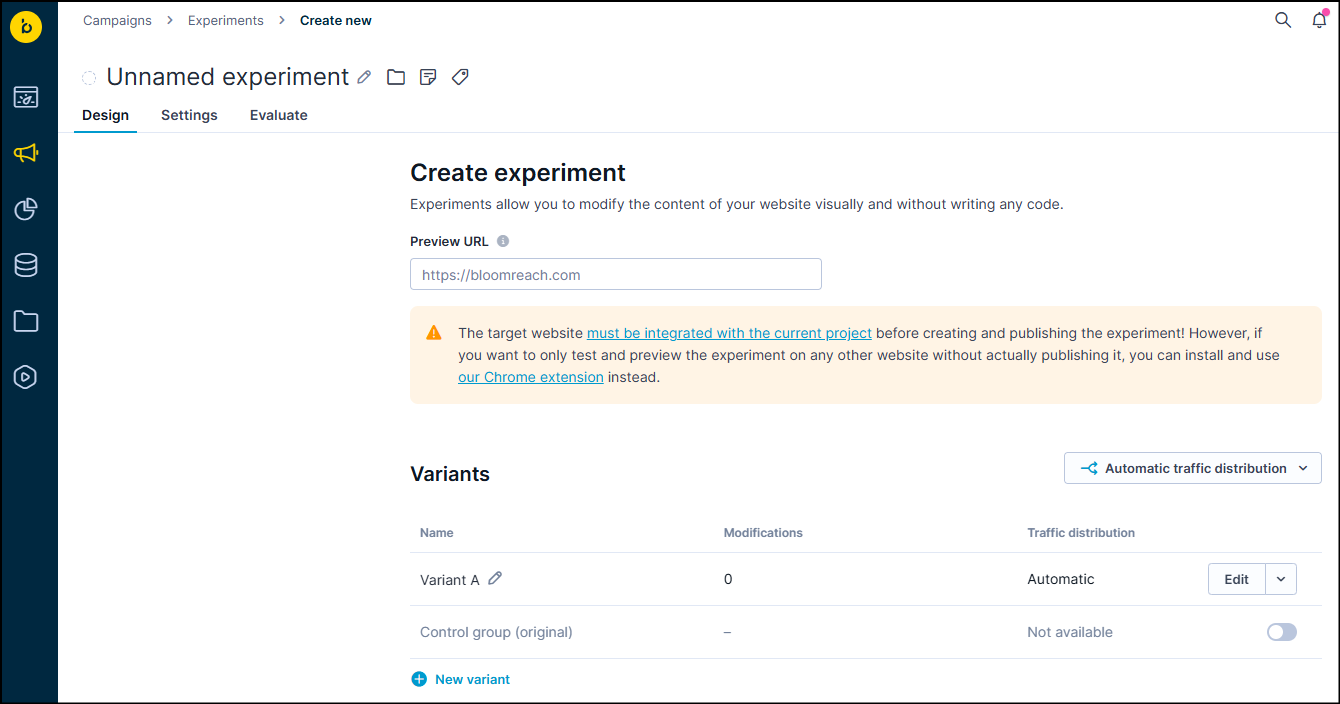
In the Design tab, you can create multiple variants of the experiment and set up A/B testing. You can also change the preview page URL, change the variant names, and duplicate them.
You can choose the traffic distribution of your customers in the right-middle part of the page. If you select Automatic traffic distribution (default setting), Bloomreach Engagement determines the best performing variants of the experiment and then prefers these variants over the less performing ones. Custom traffic distribution lets you select the percentage of your customers to see each of your variants. Both cases let you create a control group, which is a group of people who continue to see your original page for the purpose of a better evaluation.
You can also choose to duplicate your variant.
Settings
Modify the settings of the experiment on the Settings tab.
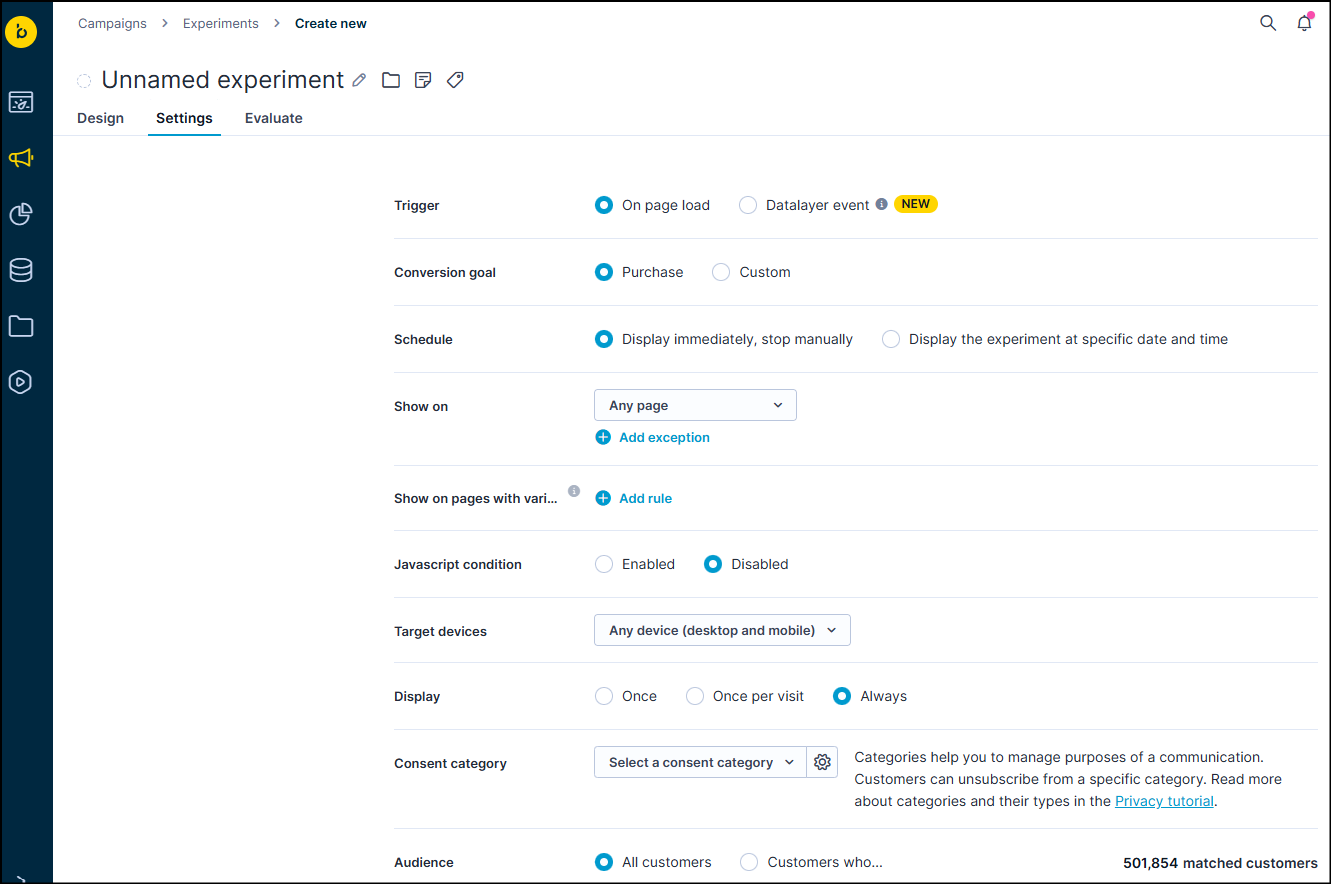
| Trigger | Choose whether to trigger the experiment On page load (default) or on a specific Datalayer event. See Enhanced Web Targeting for details. |
| Conversion goal | The automatic A/B test optimization and the generated evaluation report are based on this setting. |
| Schedule | Choose to display the experiment instantly or set a specific time period in which the experiment is shown. |
| Show on | Choose on which URLs to show the experiment. |
| Show on pages with variables | You can choose to display the experiment only on pages with certain pre-defined variables that you have set up in the project settings. See Enhanced Web Targeting for details. |
| JavaScript condition | You can specify custom JavaScript as a condition for displaying the experiment. This is an advanced feature for developers. Read more in Experiments for developers. |
| Target devices | Show on any device or only desktop or mobile. |
| Display | Set until when you want to keep showing the experiment for each eligible customer. Once: Shown only once for the whole period of running the experiment. This is tracked when the event experiment tracks action=show. Once per visit: Shown only once between a session_start and session_end. Once action=show is tracked, it's shown again only in the next session. Always: Shown all the time for each visit, each day, and after each page refresh even when the user closes the weblayer. This is the default and makes the most sense for experiments. |
| Category | Choose which consent is required for a customer to see this experiment. Read more about Consents. If you don't use consents yet, you will see the campaign groups setting here. |
| Audience | Define your custom audience that will see this experiment. You can use our standard customer and event filters. |
Test your experiment
For testing purposes, we recommend setting the condition "Show on page URL containing" to something like ?test. After you've launched the experiment, you can go to www.yourwebsite.com/?test, and you see it in the real environment. You can even send this link to anyone, and it works until you stop the campaign.
By design, experiments ignore URL fragments. That means that if any # character is contained in the URL filter, it's ignored to retain only the first part of the URL.
Evaluate your experiment
Every experiment has a built-in evaluation dashboard. This dashboard displays common metrics and analyses. If A/B testing is enabled for the experiment, the dashboard also shows you how each variant is performing through funnels and accompanying tables
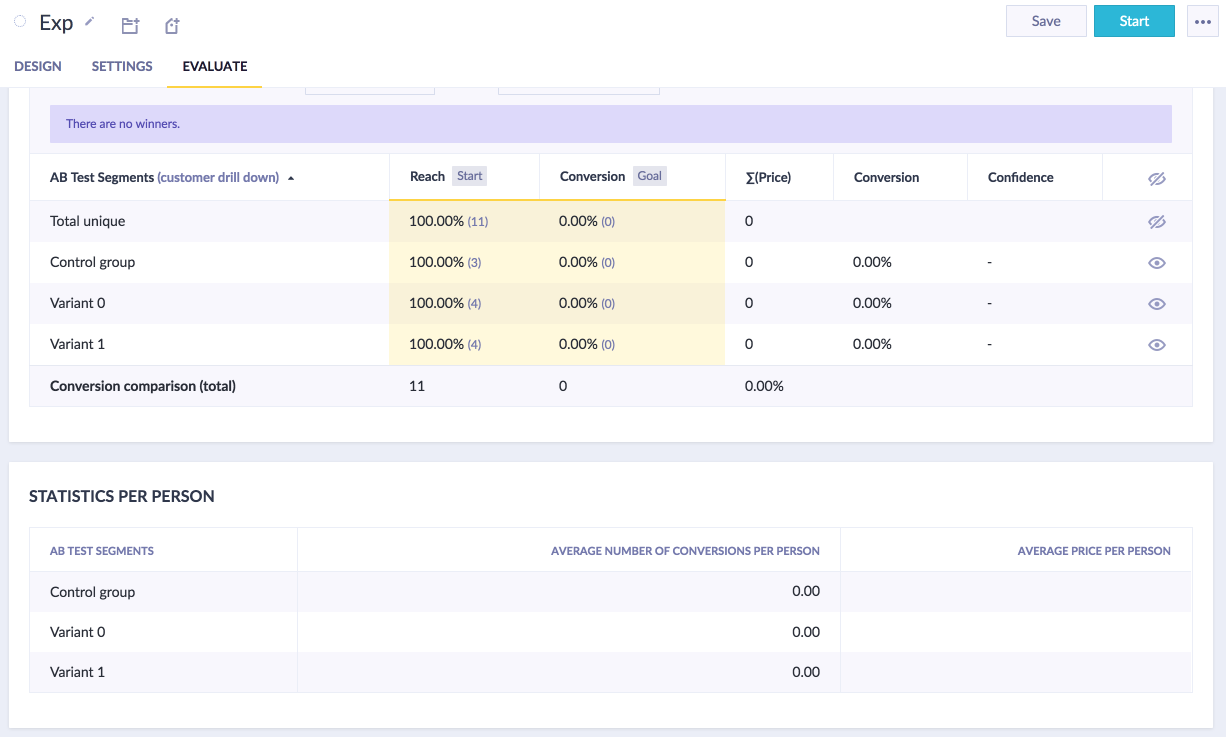
If you want to customize the evaluation dashboard, you can save it as a custom dashboard using the menu in the top right corner next to the Save button.
Integrate experiments on your website
Now that you have your experiments set up and prepared for production, read about how to integrate and use Experiments on your website correctly. This is a necessary step to optimize the experience of your experiments for your users.
Use the Chrome extension
The Bloomreach Experiments Chrome extension lets you preview your experiments on any webpage, even if it's not integrated with your Engagement project (yet).
The extension requires developer mode to be enabled:
-
Open
chrome://extensions/in Chrome (or navigate to Extensions > Manage Extensions). -
Enable the Developer mode switch:

Troubleshoot common issues
Here are some common issues with using experiments.
I launched the experiment but can't see it
There can be several reasons for this.
If you use A/B testing
- You might have been assigned to the control group, which is set to show the original. You can check whether this is the case by going to Customers and checking what events have been tracked to your profile. You can try using our Chrome extension and see what events are being tracked live in the console.
- If this is the case, then either change the A/B testing or try opening the page in an incognito mode until you get assigned to the correct variant (the incognito mode changes your cookie every time you open it).
In settings:
- Check the condition "Show on" and make sure it matches the page you're loading.
- Check "Category": If the campaign is set to show only to customers with specific consent, your profile must also have that consent.
- If you specified any conditions in the "Audience" part, you must match them.
- If you set up a Custom JavaScript Condition for the experiment, make sure that the code behaves as expected and that it returns
true. If your code doesn't return anything, the experiment is never shown.
The experiment showed once but doesn't load again
- If the Display option in Settings is set to Once or Until interaction, then you either need to change it or use the incognito mode to see the campaign again.
- If the experiment is using a specific schedule, the schedule might have ended.
The experiment editor won't start
- Your backend server may be removing some parameters from the URL. The experiments editor relies on a special parameter in the URL called
exponea-editor-paramsto function. Make sure your server isn't removing this parameter from the URL when showing a webpage. - Make sure to disable any ad blocking extension you might be using.
- If nothing helps, contact our Support team.
My visual changes aren't applied to the element
The visual changes in the experiment are applied to your website with CSS. CSS works with priorities, so it's possible that your changes are overwritten by the CSS on your website. A bit of technical knowledge is required here, or you can contact our Support team.
Possible causes:
- If you understand CSS a little, you know that your experiment styles are probably overwritten by your existing website styles. Consider manually writing a longer CSS selector for the element, which would get a higher priority.
- If you're changing the background color or image of an element, it's possible that the element is using the new picture element with a set of source elements. Technical knowledge is required to fix this problem. To fix this problem (and have your new image shown in the webpage), you have to edit the HTML of the element, remove all source elements, and replace them with a single new source (or img) element with the correct src set to your new image.
- The changes might get overwritten by another experiment that's published in your Bloomreach Engagement project.
- The changes might be overwritten by the JavaScript running on your webpage. This tends to be hard to spot and requires some technical knowledge of your website.
Updated 4 months ago
