

Configure and implement widget webhooks
This guide walks you through configuring a widget webhook preset in Bloomreach and implementing the postMessage communication protocol in your iFrame widget.
Before you begin, read Widget webhooks to understand how the communication process works and what prerequisites apply.
Overview
Setting up a widget webhook involves two stages:
- Configure the webhook preset in Bloomreach: Set up the widget URL, icon, description, and tracked parameters.
- Implement the communication protocol: Build the JavaScript
postMessagecommunication between the iFrame widget and Bloomreach to exchange configuration data.
Configure the webhook preset in Bloomreach
Access the webhook preset wizard
-
Go to Data & Assets > Integrations.
-
Click + Add new integration to open the wizard.
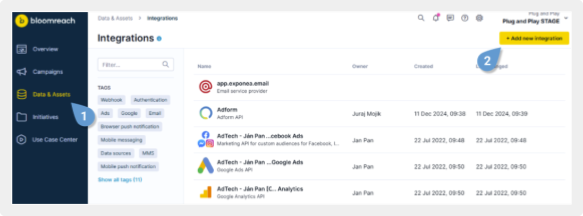
Click Add new integration on the Integrations page to open the webhook preset wizard.
-
Use the Webhooks filter to narrow down the integrations list.
-
Click + Add integration next to Webhook preset.
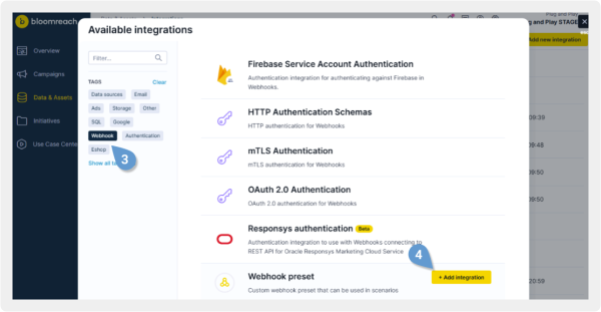
Use the Webhooks filter to locate the Webhook preset, then click Add integration.
Configure the webhook settings
In the webhook preset wizard, fill in the following fields:
- Icon (optional): Upload an icon to help users identify this webhook in scenario action nodes. Maximum dimensions: 72×72px. Supported formats: PNG, JPEG.
- Description: Add a description that explains what this webhook does and when to use it.
- Preset type: Set to Widget Webhook to enable widget-specific configuration fields.
- Widget URL: Enter the URL where your widget interface is hosted. Bloomreach loads this URL into an iFrame when a user opens the webhook in a scenario.
- Tracked parameters (optional): Specify values you want to track, such as
event_timeororder_id. These are added as extra event properties in campaign events.
NoteEnable authentication if your third-party API requires it by selecting a supported method. Bloomreach securely stores your credentials and automatically includes them in webhook requests.
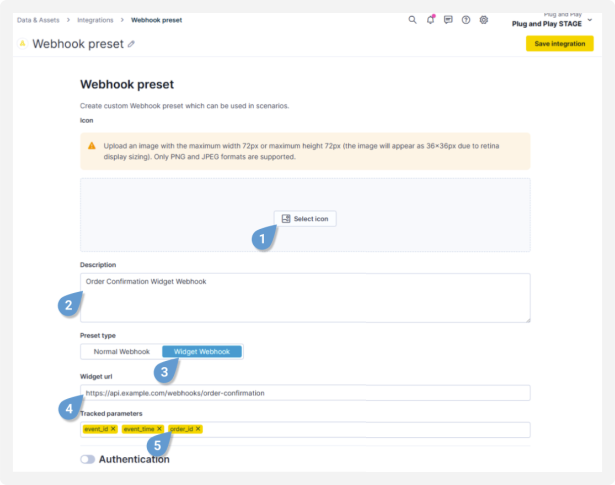
Set the preset type to Widget Webhook to reveal the widget-specific configuration fields.
After saving the preset, connect it to your iFrame widget by implementing the communication protocol.
Implement the widget communication protocol
The iFrame widget and Bloomreach follow a specific protocol to exchange messages.
NoteTo verify the connection during setup, you can load the widget in a scenario while you implement. See Widget webhooks in scenarios for details.
Set up postMessage communication
The widget must listen for messages from Bloomreach and send messages back to the application origin.
Define the application origin in your widget code:
var appOrigin = "https://app.exponea.com"; // the origin where the app runsSet up a message listener to receive messages from the application:
window.addEventListener('message', function(event) {
  if (event.origin !== appOrigin) return;

  // Handle different message types
  var message = event.data;
  switch(message.message_type) {
    case 'app_hello':
      // Handle initialization response
      break;
    case 'app_reject':
      // Handle unsupported version
      break;
    case 'app_request_state':
      // Handle state request
      break;
    case 'errors':
      // Handle validation errors
      break;
  }
});
Initialize the widget
The initialization process verifies that the widget and Bloomreach use the same API version and establishes communication between them.
Send the initialization message
When the iFrame loads, send an initialization message to Bloomreach:
var appOrigin = 'https://app.exponea.com'; // the origin where the app runs
window.parent.postMessage(
    {
        min_supported_version: 1, // will be used in the future for compatibility, but still must be present
        max_supported_version: 1, // will be used in the future for compatibility, but still must be present
        message_type: 'widget_hello'
    },
    appOrigin
);
NoteAlways include both
min_supported_versionandmax_supported_versionin your initialization message. These version numbers enable future compatibility.
Handle the application response
Bloomreach responds with either app_hello or app_reject.
If the API version is supported, Bloomreach sends an app_hello message with the following payload:
{
  message_type: 'app_hello',
  version: 1,
  webhook: null, // null for new webhooks
  webhook: { // object for edited webhooks with previous configuration
    url: 'https://remote-server', // remote url to send the webhook to
    method: 'POST', // HTTP method to use ('GET' or 'POST')
    response_handling: 'discard', // how to make the response available to subsequent campaign nodes
      // 'discard' - ignore the response
      // 'text' - store response as plain text
      // 'json' - parse response as json and store the parsed version
    auth: null, // if no authentication was saved
    auth: { // if authentication was previously saved
      type: 'basic',
      username: 'myuser', // password won't be present here, there is no way to retrieve it after it's saved
    },
    headers: [ // list of HTTP headers to send in the request
      {
        name: 'Content-Type', // name of the HTTP header, case insensitive
        value: 'application/json', // public value of the header, this field isn't present for secret headers
        type: 'public',
      },
      {
        name: 'X-Secret', // name of the HTTP header, case insensitive
        type: 'secret',
      }
    ],
    body: 'jinja2 template', // jinja2 template that renders webhook body
    event_properties: { // extra event properties that are tracked in campaign events
      name1: 'jinja2 template', // the values of the properties are rendered using jinja2, the keys are not
      name2: 'jinja2 template',
    },
    frequency_policy: 'policy_name', // string that matches an existing frequency policy in exponea
    consent_category: 'category', // string that matches an existing category in exponea
    general_consent: true, // in case that consent_category is null or undefined
  },
  widget_state: null, // state of the widget as provided on last save, null for new webhooks
}
Use this payload to initialize the widget instance. For edited webhooks, the webhook object contains the previous configuration.
If the API version isn't supported, Bloomreach sends:
{
  message_type: 'app_reject',
  version: 1,
}
NoteIf you receive
app_reject, display a message indicating the widget isn't supported and stop sending messages.
Send the initialization complete message
After initializing the widget instance, notify Bloomreach that initialization was successful:
window.parent.postMessage(
  {
    message_type: 'widget_initialized'
  },
  appOrigin
);
ImportantBloomreach uses this message to enable UI elements like the Save and Test buttons. Users can't save the webhook configuration until the widget sends this message.
Edit the widget parameters
After connecting successfully and receiving the app_hello response, you can load the widget interface and edit it in Bloomreach. See Widget webhooks in scenarios for details.
NoteUse the widget webhook interface editor in Bloomreach every time you need to edit parameters or messages within the widget application.
Handle state requests
When a user interacts with the webhook configuration window, Bloomreach sends an app_request_state message to retrieve the widget's current settings. This happens during the following actions:
- Test: The user clicks the test button. Bloomreach retrieves the widget's configuration, then the user clicks another button to send the test request.
- Save: The user clicks Done. Bloomreach retrieves the widget's state and validates consents, frequency policies, and Jinja syntax. Bloomreach doesn't validate the correctness of JSON or XML payloads.
- Cancel: The user clicks Cancel to close the webhook configuration. Bloomreach doesn't perform validation or saving.
Receive the state request
When the user clicks Save or Test, Bloomreach sends:
{
  message_type: 'app_request_state',
}
Send the widget state response
Respond with the widget's current configuration:
window.parent.postMessage(
{
    message_type: 'widget_state', // webhook data as specified in initialization, except that authentication password and secret header values must be specified (if applicable)
    webhook: {
      url: 'https://remote-server', // remote url to send webhook to
      method: 'POST', // HTTP method to use ('GET' or 'POST')
      response_handling: 'discard', // how to make the response available to subsequent campaign nodes
          // 'discard' - ignore the response
          // 'text' - store response as plain text
          // 'json' - parse response as json and store the parsed version
      auth: null, // if no authentication was saved
      auth: { // if authentication was saved
          type: 'basic',
          username: 'myuser',
          password: 'I am secret',
      },
      headers: [{ // list of HTTP headers to send in the request
          name: 'Content-Type', // name of the HTTP header, case insensitive
          value: 'application/json', // public value of the header, this field isn't present for secret headers
          type: 'public',
      }, {
          name: 'X-Secret', // name of the HTTP header, case insensitive
          type: 'secret',
          value: 'I am secret',
      }],
      body: 'jinja2 template', // jinja2 template that renders webhook body
      event_properties: { // extra event properties that are tracked in campaign events
          name1: 'jinja2 template', // the values of the properties are rendered using jinja2, the keys aren't
          name2: 'jinja2 template',
      },
      frequency_policy: 'policy_name', // string that matches an existing frequency policy in exponea
      consent_category: 'category', // string that matches an existing category in exponea
      general_consent: true // in case that consent_category is null or undefined
    },
    widget_state: null,
}
);
NoteThe
widget_statefield stores any JSON-serializable JavaScript object that preserves the widget's state for future initialization. Don't include secrets in this data.
Important notes on state responses
- If the webhook uses the old authentication approach — saving credentials directly at the node level — provide authentication passwords and secret header values in the state response. These values are omitted from the initialization payload for security. Use authentication integrations instead, as they let users update credentials across all scenarios at once.
- The
widget_statefield stores any JSON-serializable object up to 4KB. Use this to preserve widget-specific state that doesn't belong in the webhook configuration, such as UI state like filters for dropdowns or flags to collapse panels.
Manage validation errors
If Bloomreach encounters validation errors while processing the widget's state, it displays an error notification to the user and sends error details to the widget.
Bloomreach sends:
{
    message_type: 'errors',
    errors: {
        webhook: {
            // a dictionary of the same structure as the webhook object
            // but containing a list of errors instead of values in the leafs
            // for example it could contain the below data:
            url: ['Use either http or https scheme'],
            // lists use object keys with the index
            headers: {
                0: {type: ['invalid type']} // error for the first header
            }
        }
    }
}
The errors object mirrors the webhook structure, with lists of error messages for each invalid field. Object keys use indices for array elements.
You can use these errors to display detailed validation messages in the widget interface. You can also ignore this message entirely. Users already see the error notification in Bloomreach.
Updated 4 months ago