

Weblayer design
The weblayer editor is where you design and configure your weblayer's appearance. You can work with the visual editor, the code editor, or both. This article covers the editor interface, how to define parameters, adding custom images, and using predefined templates.
Design methods
Design your weblayer using one of the following methods:
- Visual editor: Modify parameters through text inputs and color pickers. This option works well for users with limited coding experience.
- Code editor: Edit HTML, CSS, and JavaScript directly. You can also define new template parameters in the code, enabling the creation of custom, editable templates.
Or use a combination of the two methods. First, define parameters in the code editor, then refine them in the visual editor.
The properties of each weblayer are defined by its parameters, which control aspects such as copywriting, positioning, button visuals, and background color.
NoteThe JavaScript code editor also supports advanced conditions that can't be set through general weblayer settings. For example, reading the contents of a customer's cart.
Editor
Use the visual editor to design and customize your weblayer.
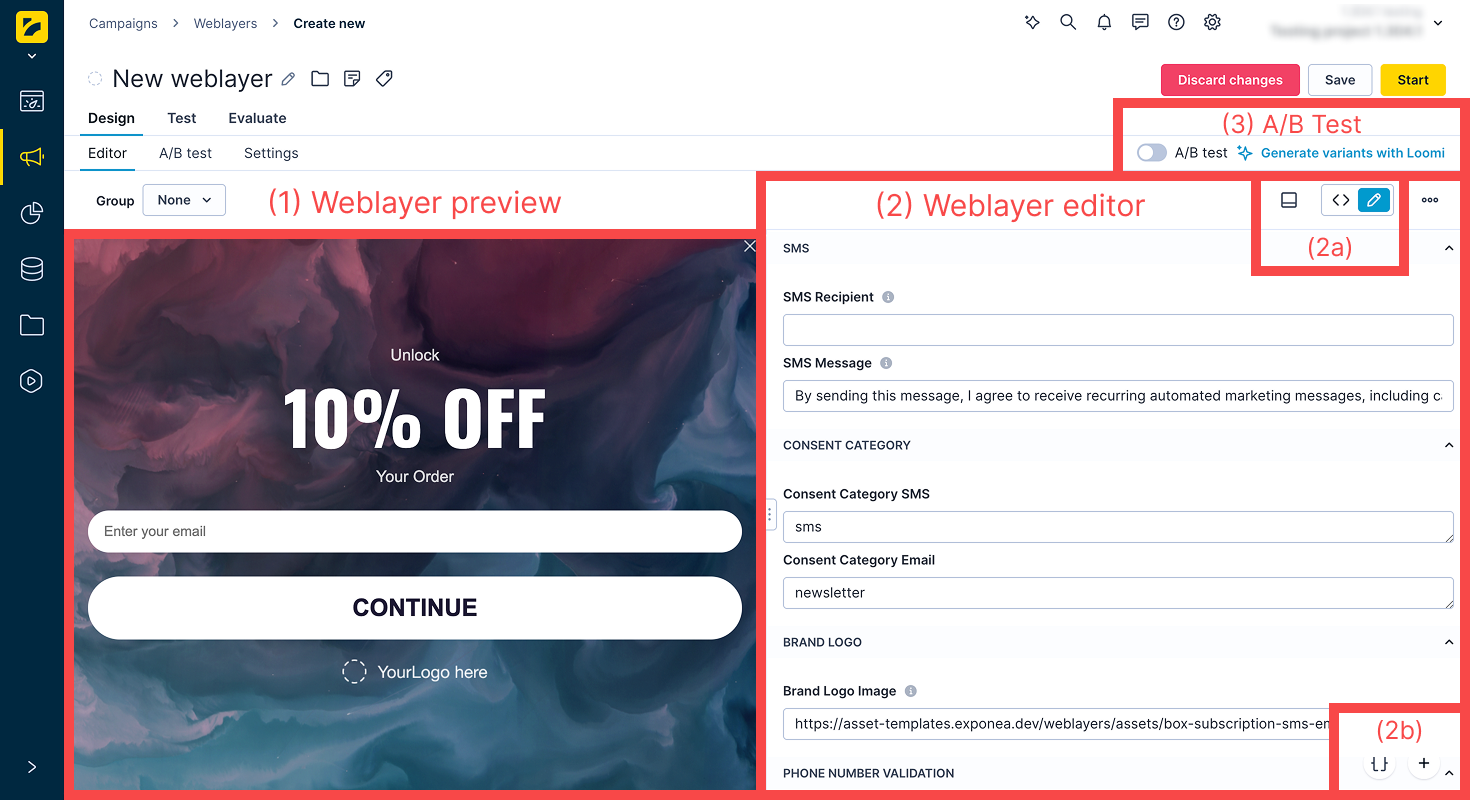
The editor has the following components:
| Component | Description |
|---|---|
| (1) Weblayer preview | Reflects changes made in the editor in real time. You can also preview the weblayer for a specific customer and scenario using the Test tab. |
| (2) Weblayer editor | Lets you design your weblayer using the code or visual editor. Switch between the two using the toggle above the editor. In the code editor, you can define parameters, configure their behavior, tooltips (visible when hovering the i icon), and categories. Categories appear as collapsible Groups in the visual editor, which helps with navigation. Resize the editor region by dragging the 3-dot handle at its edge. |
| (2a) Editor docking style and editor switch | Dock the editor at the bottom (below the preview) or to the right, depending on your workflow. Use the toggle to switch between the code and visual editors. |
| (2b) Jinja personalization and snippets | Use Jinja personalization to pull in customer attributes or metric data. Select an attribute or metric from the dropdown and copy the generated Jinja tag. Use snippets and HTML blocks to reuse saved content and speed up campaign creation. These controls appear in the bottom-right of the editor. |
| (3) A/B test switch | Toggles A/B testing on and off. When enabled, you can work with multiple weblayer variants at once. |
NoteField sizes and dimensions in the visual editor are measured in pixels.
| Component | Description |
|---|---|
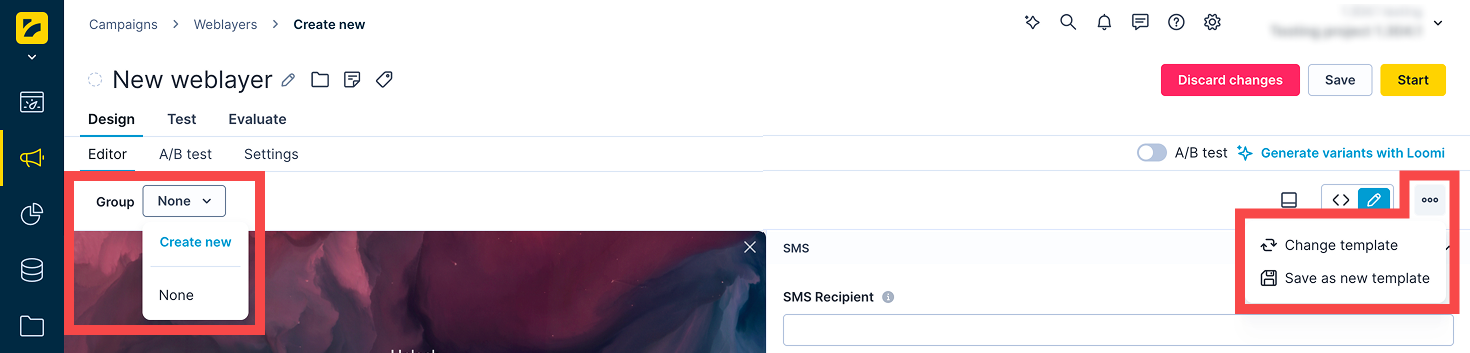
| Group | Sets a priority policy for banners. When multiple live banners belong to the same group, only one appears — prioritized alphabetically. This policy is ignored when using showWebLayer(). For details, see Manage multiple weblayers. |
| Save as new | Saves your weblayer in the Asset manager for later use. |
| Change template | Lets you switch the template for the current weblayer. You can use a different template for each variant. |
Define parameters
Use the HTML code editor to define custom parameters. Once defined, these parameters appear in the visual editor so non-technical users can adjust them too.
Use the toggle above the code editor to switch between the HTML, CSS, and JavaScript views. Newly defined parameters must follow this format to support collapsible categories and tooltips:
Important
isJsonParam: truemust be included for the parser to recognize the notation. Without it, the full content inside{...}appears as the parameter name instead.
[[ { name: 'paramName', tooltip: 'Tooltip text', category: 'Category name', isJsonParam: true }: type | 'default value' ]]"| Component | Description | Required | |
|---|---|---|---|
[[ ]] | Double square brackets wrap the entire parameter definition. The parser uses these delimiters to identify template parameters in the code. | Yes | |
name | The name of the parameter that appears in the visual editor. For example, 'showAfter'. | Yes | |
tooltip | Text displayed when hovering over the ⓘ icon next to the parameter name in the visual editor. Use it to provide guidance on expected values. For example, 'Time in milliseconds'. | No | |
category | The collapsible group the parameter belongs to in the visual editor. Parameters that share the same category are visually grouped together. For example, 'Triggering'. | No | |
isJsonParam | Must be set to true for the parser to recognize the JSON notation. Without it, the full content inside {...} is displayed as the parameter name instead. | Yes | |
type | The input type rendered in the visual editor. Supported types: string, text (multiline), number, color, enum(value1,value2,...), image. | No | |
| ` | ` | Pipe separator between the type and the default value | No. |
default value | The value pre-filled in the visual editor when the parameter is first loaded. For example, '0' or '#00b7db'. | No |
For more information, see Template parameters.
Limitations
Special characters used in weblayer parameters must be escaped based on their context:
- Parameters in JavaScript: Escape
"as\"(for example, in the Prefilled Text Message parameter). - Parameters in HTML: Escape the characters as shown below.
& with &
< with <
> with >
" with "
' with '
(e.g. Heading parameter)Custom images
To add a custom image to your weblayer, insert the following code into the HTML code editor:
<img src="URL LINK OF YOUR IMAGE" />Use this method to add images that are either hosted online via a public URL or uploaded to the Bloomreach CDN via the Asset manager.
Predefined templates
Start faster by choosing a predefined template when creating a weblayer. Save any changes as a new copy — predefined templates can't be edited directly. For more information, see Predefined templates.
WarningTo comply with US wireless carrier policies, your logo must appear in all SMS opt-in weblayer templates. Update your SMS templates to meet compliance standards for US short codes.
Subscription templates
When creating a subscription box using a predefined template, choose from the following template types:
| Weblayer type | Description |
|---|---|
| Includes only an email field. No additional parameters required. | |
| Email and phone | Adds a phone number field alongside the email field. Requires Phone Number Validation configuration. See parameters below. |
| Text (mobile only) | A click-to-text weblayer. When the customer clicks Subscribe, a messaging app opens with a pre-filled message and SMS short code, so they can opt in to your SMS program. Configure the SMS short code and pre-filled message text using parameters. |
To enable the phone number field in the Email and phone template, configure the following parameters in the Phone Number Validation section:
- Initial country: The country code preselected in the dropdown (for example,
us). - Preferred countries: Country codes shown at the top of the dropdown (for example,
us, gb). - Only countries (optional): Restricts which countries are selectable (for example,
us, gb). - Invalid phone number message: Error message shown when an invalid number is entered.
- Required fields: Sets which fields must be completed to submit the weblayer. Options are Both, Email, or Phone number.
WarningSubscription weblayers now display the following consent text: "Insert your consent text/privacy policy/terms and conditions/other mandatory notices as may be required by applicable laws. For information about personal data processing, see Privacy Policy." This replaces the previous text: "By signing up you agree to our Terms and Conditions."
Updated 3 months ago