

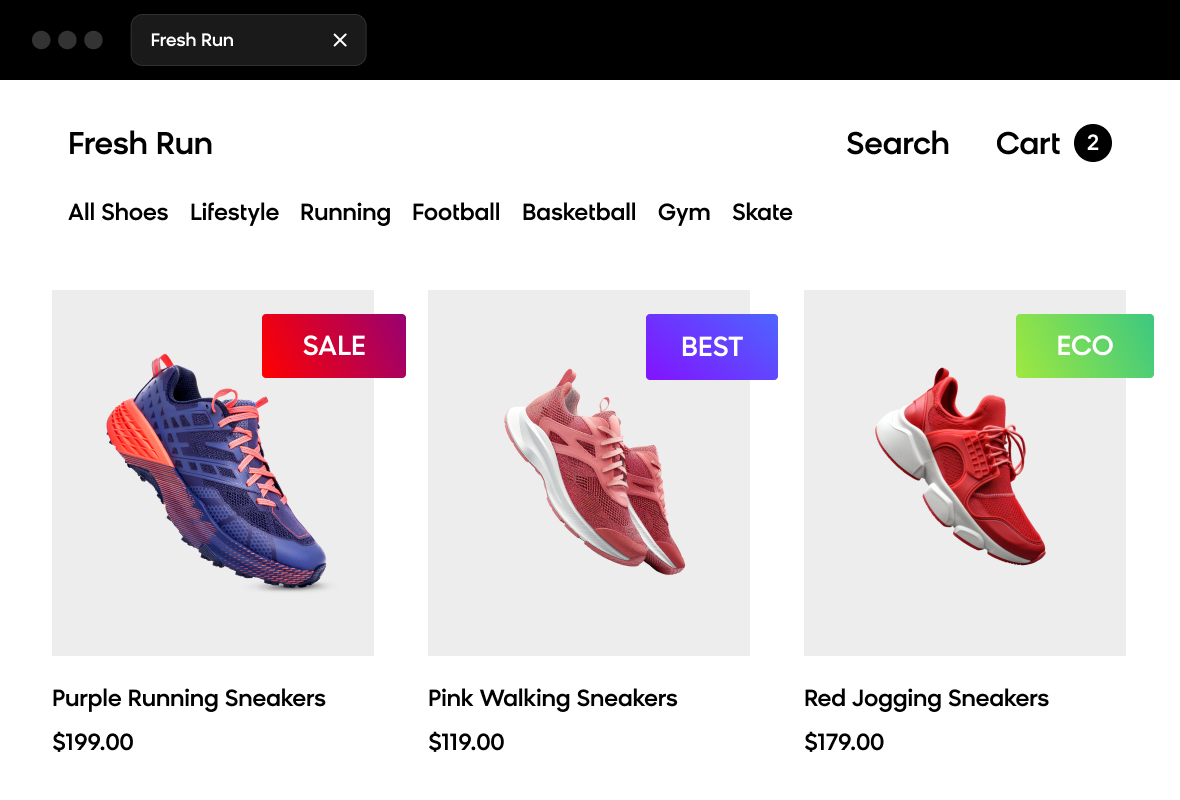
Global and product-specific badges


Use case description
Display badges on product detail pages to communicate company policies and product-specific offers to your customers. These badges serve as a mid-funnel marketing tactic that drives conversion by highlighting key product attributes like "eco-friendly," "sale," or "new-in." You can display multiple badges simultaneously, control their priority order, and customize their appearance to match your brand.
Key features
- Communicate policies and offers effectively: Display company-wide badges (free shipping, sale) or product-specific badges (eco-friendly, vegan, best-seller) to inform purchase decisions.
- Flexible badge management: Choose which badges to display, set their quantity, and define display order based on your marketing priorities.
- Customizable appearance: Adjust badge shapes, shadows, positioning, and styling to align with your brand identity.
- A/B testing built-in: Measure the impact of badges on conversion rates and revenue through integrated testing functionality.
Use case items
With this use case, you'll get a:
- Badge Product Page Container: A weblayer container that manages badge display on product pages, controlling the number of badges shown, their order, animation, and position within product images.
- Global badges: Two pre-configured badges (Free Shipping, Sale) that display across all products when applicable company policies are active.
- Product-specific badges: Ten customizable badges (New-in, Black Friday, Recycled, Christmas, Best Seller, Eco-friendly, Last Chance, Last Minute, Vegan, Cruelty-free) that display on products marked in your catalog.
- Evaluation dashboards: Pre-built dashboards that track badge performance metrics including conversion rates, revenue uplift, and A/B test significance.
How to deploy the use case
After downloading the use case, follow these steps.
Meet the requirements
Check if the data in your project meets the requirements. The Use Case Center lists requirements for each use case during the deployment process.
For global badges:
You need a regularly updated product catalog where:
- Items are identified by product ID that matches the product ID on your website (usually available in the
dataLayer). - The catalog includes the
item_idattribute.
For product-specific badges:
You need a product catalog with:
- Items identified by product ID matching your website (usually available in the
dataLayer). - Boolean attributes for each badge you want to display. You can either:
- Import new columns into your existing product catalog with boolean attributes for badges you'll use.
- Create a separate product catalog specifically for badges.
Required boolean attributes (import only those you'll use):
new_inblack_fridayrecycledsalechristmasbest_sellereco_friendlylast_chancelast_minutevegancruelty_freefair_tradelocally_sourcedorganically_produced
Products marked as true for an attribute will display that badge. Products marked as false won't display the badge.
Understand the use case logic
The badge system displays customizable badges on product detail pages to communicate offers and policies. When a customer visits a product page, the system checks which badges should appear based on badge type (global or product-specific) and displays them according to your configured priority order.
How the system works:
- Customer visits product page: The Badge Product Page Container loads and identifies the product ID from your website's data layer.
- Badge eligibility check:
- Global badges: System checks if badges are active (started) in the platform.
- Product-specific badges: System queries your product catalog to check which boolean attributes are set to
truefor that product.
- Display logic: Eligible badges appear on the product image based on your configured order (priority), with badge 1 displaying at the top.
- A/B test assignment: Visitors are randomly assigned to see badges (Variant A) or no badges (Control Group) based on your traffic distribution settings.
- Tracking: The system tracks banner show/click events for evaluation purposes if tracking is enabled.
Adjustable aspects:
- Badge quantity and priority order for display
- Badge appearance (shape, shadow, image, positioning)
- Product ID source from your website
- CSS selector for badge placement on product images
- Traffic distribution for A/B testing (default: 50/50)
- Tracking settings for individual badges
Adjust the use case
Now that you understand the use case logic, you can set up the use case according to your needs.
Product page container setup
The Badge Product Page Container manages all badge display on product pages. Configure this container before setting up individual badges.
Product ID configuration
Find the product ID from your website's data layer. This typically exists in a productDetail object used for Google Analytics.
To verify your data layer structure:
- Open a product detail page.
- Right-click and select Inspect.
- Open the Console tab.
- Type
dataLayerand press Enter. - Check if the structure matches this pattern:
dataLayer.find(item => item.event === 'productDetail').ecommerce.detail.products[0].idIn the Badge Product Page Container weblayer:
- Open the Settings tab.
- Locate the Product Id JavaScript Expression parameter.
- Paste your product ID code.

If your product detail object has a different name (for example, productDetailImpression) or structure, adjust the code accordingly.
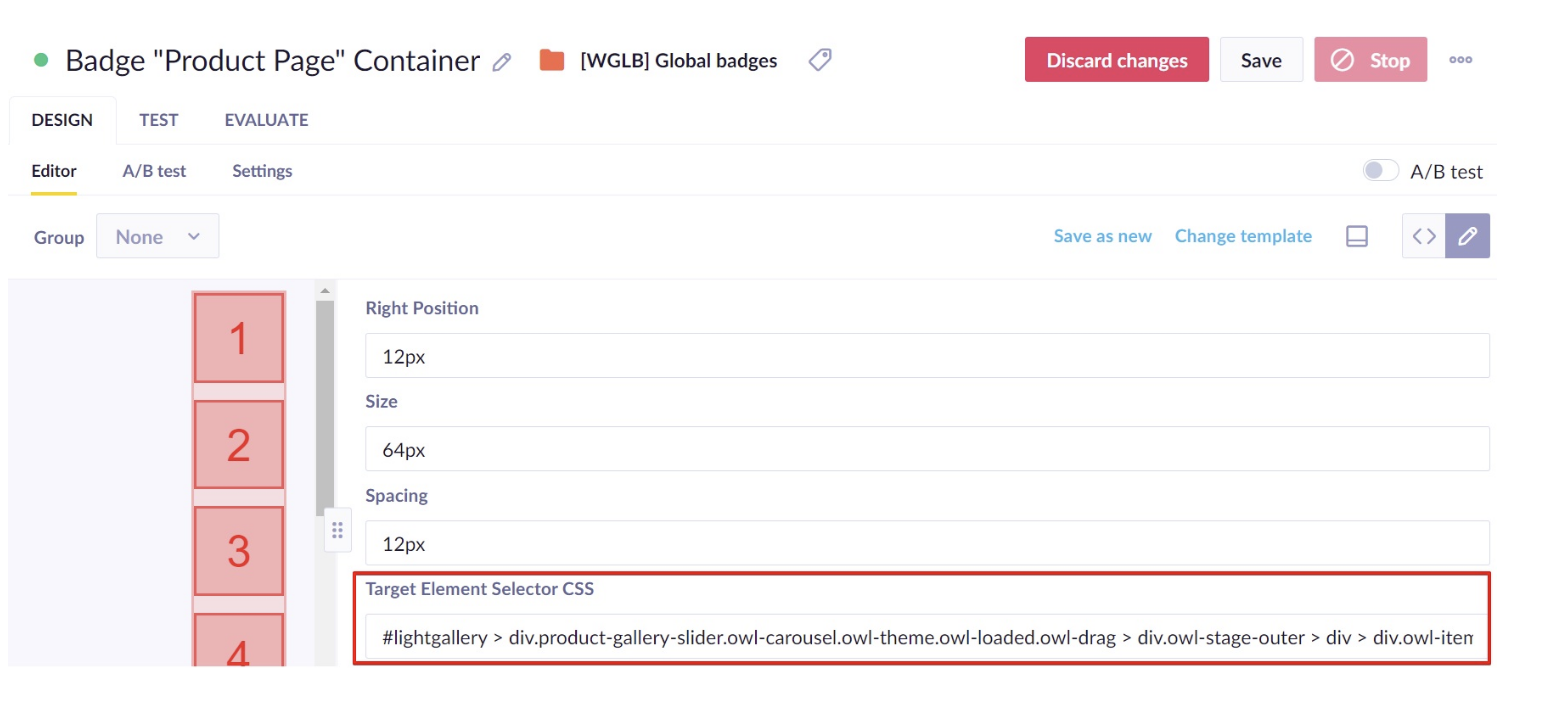
CSS selector for image placement
Find the CSS selector for the element that contains your product image:
- Open a product detail page.
- Right-click and select Inspect.
- Open Elements.
- Click the "Select an element in the page to inspect it" button.
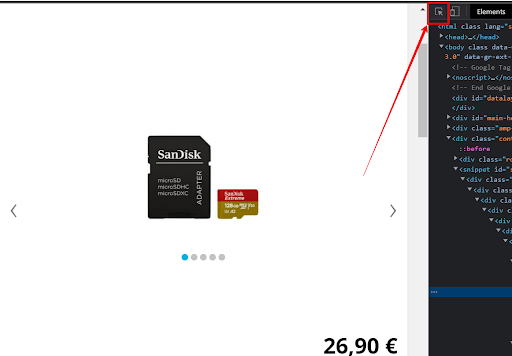
- Click on the product image.
- Select the
<div>element directly above the highlighted<img>element in the code.
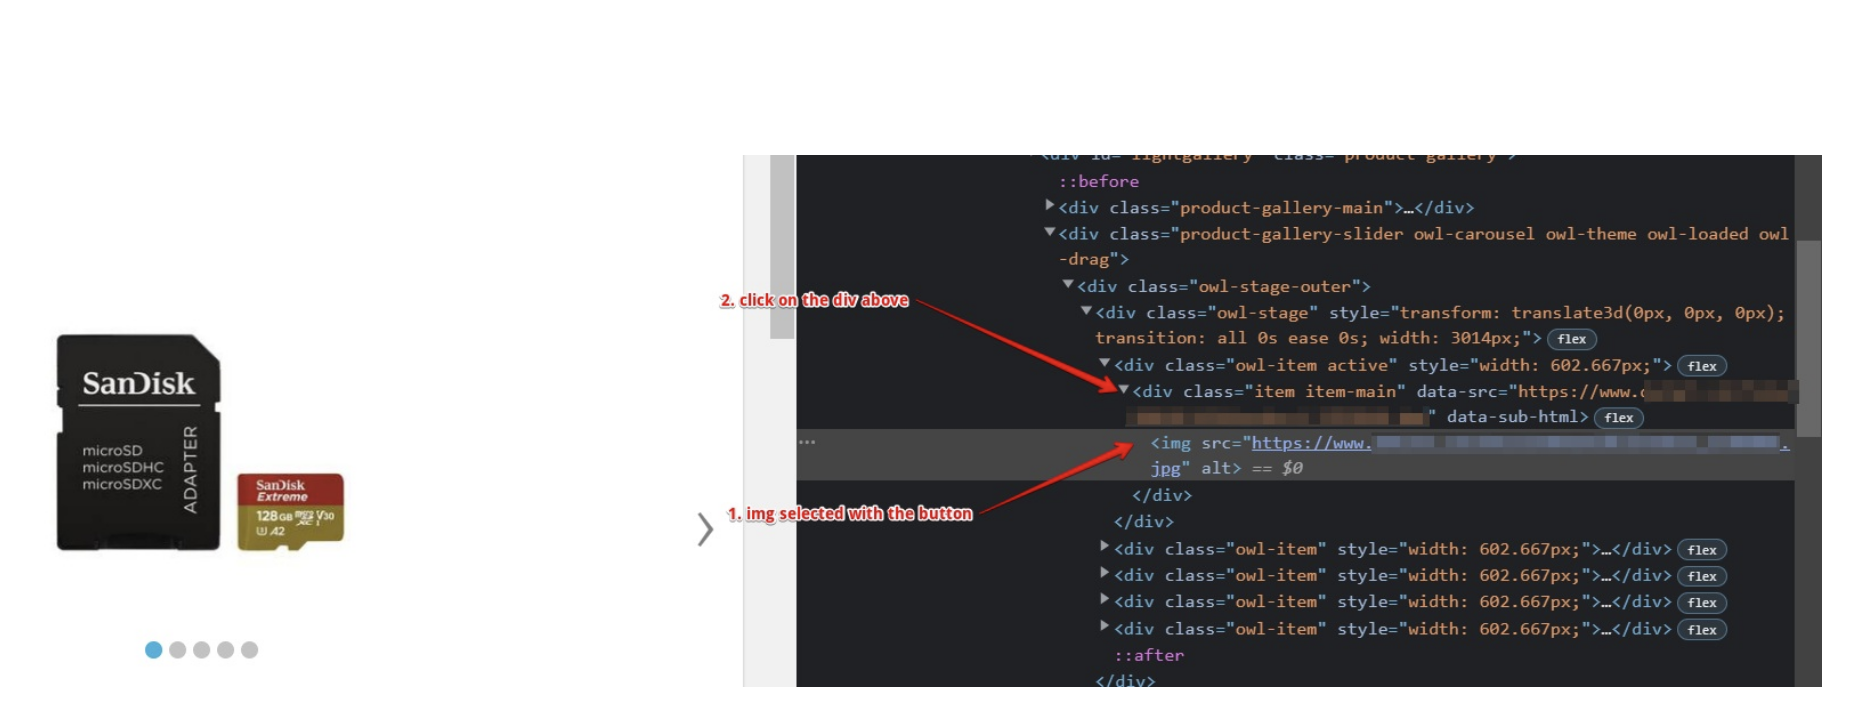
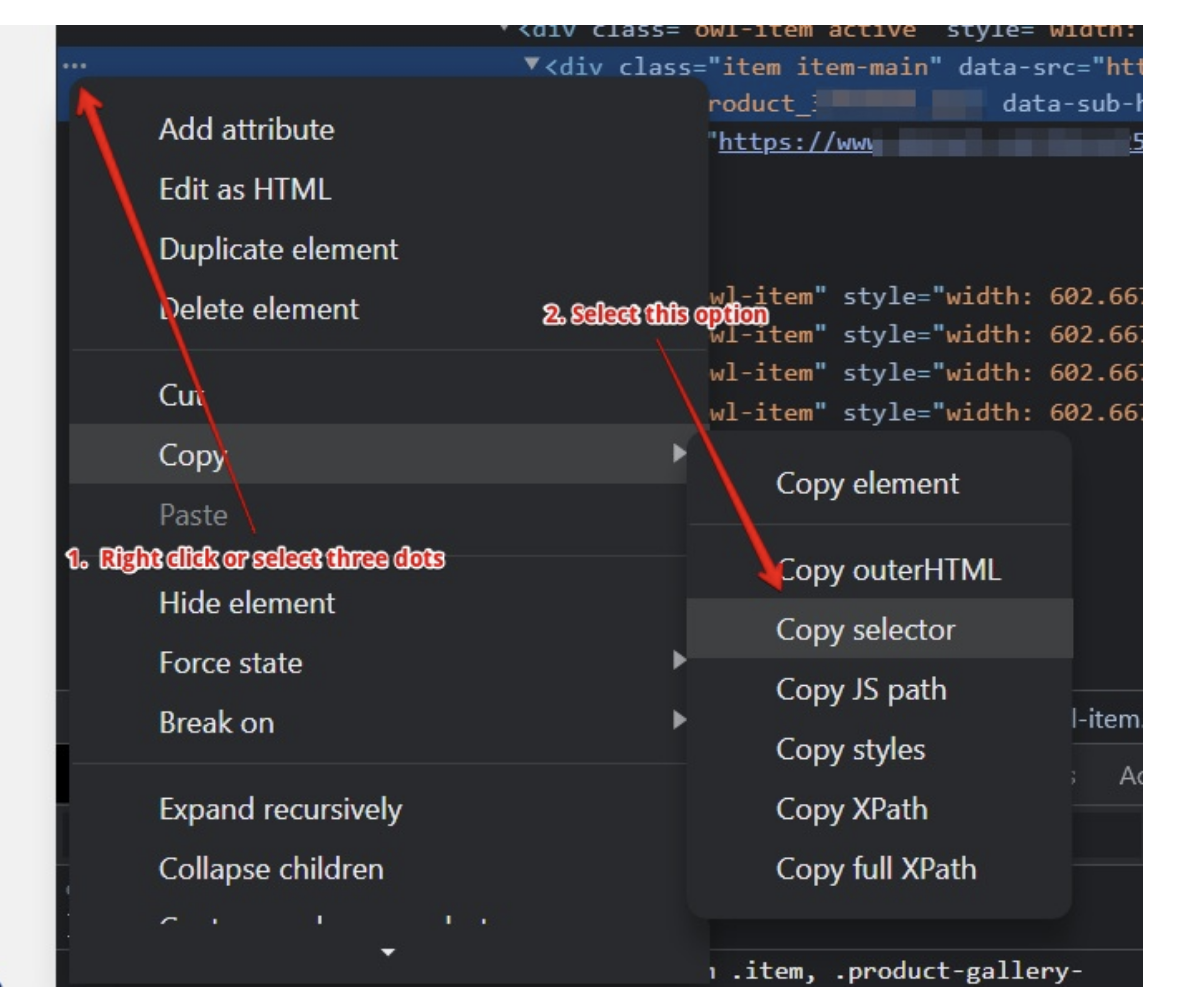
- Right-click the
<div>element and select Copy > Copy selector.
Example selector:
#lightgallery > div.product-gallery-slider.owl-carousel.owl-theme.owl-loaded.owl-drag > div.owl-stage-outer > div > div.owl-item.active > divIn the Badge Product Page Container weblayer:
- Locate the Target Element Selector CSS parameter.
- Paste the CSS selector you copied.
Background worker ID setup
Ensure the background worker ID is correctly configured in the container's JavaScript code:
- Open the Badge Product Page Container weblayer.
- Click <> to access the code editor.
- Open the JS tab.
- Find
WEBLAYER_CONDITIONAL_VIEW. - Verify the value matches the ID from the Aggregated background worker URL.
To find the background worker ID:
- Open the Aggregated background worker (don't touch, don't start) weblayer.
- Copy the ID from the URL (the part matching
banners/[ID]?action=design).
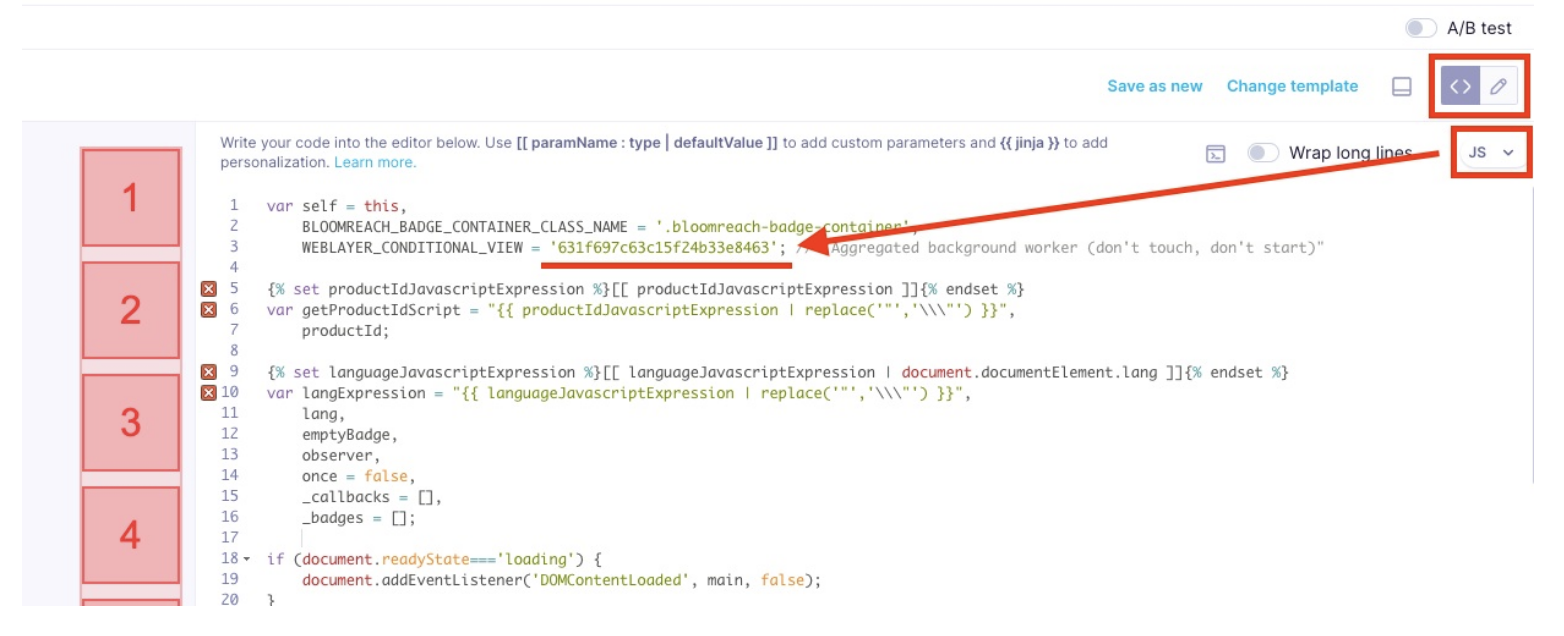
- Replace the value in the container code if different.
Launch the container
After configuration, click Start in the top right corner of the Badge Product Page Container to activate the badge display system.
Product catalog configuration
For product-specific badges only. Global badges don't require catalog configuration.
Set up your product catalog to control which badges appear on which products:
Catalog structure
Your catalog should include:
item_id(primary key matching product IDs on your website)- Boolean columns for each badge type you want to use
Example CSV structure:
item_id,new_in,sale,eco_friendly,best_seller
123,true,false,true,false
456,false,true,false,true
Import process
- Navigate to Data & Assets > Catalogs.
- Select your product catalog or create a new one.
- Import your CSV file with boolean badge attributes.
- Verify the import completed successfully.
The system will display badges on products where the corresponding attribute is set to true.
Badge configuration
Configure each badge you want to display. This applies to both global badges (Free Shipping, Sale) and product-specific badges (New-in, Eco-friendly, etc.).
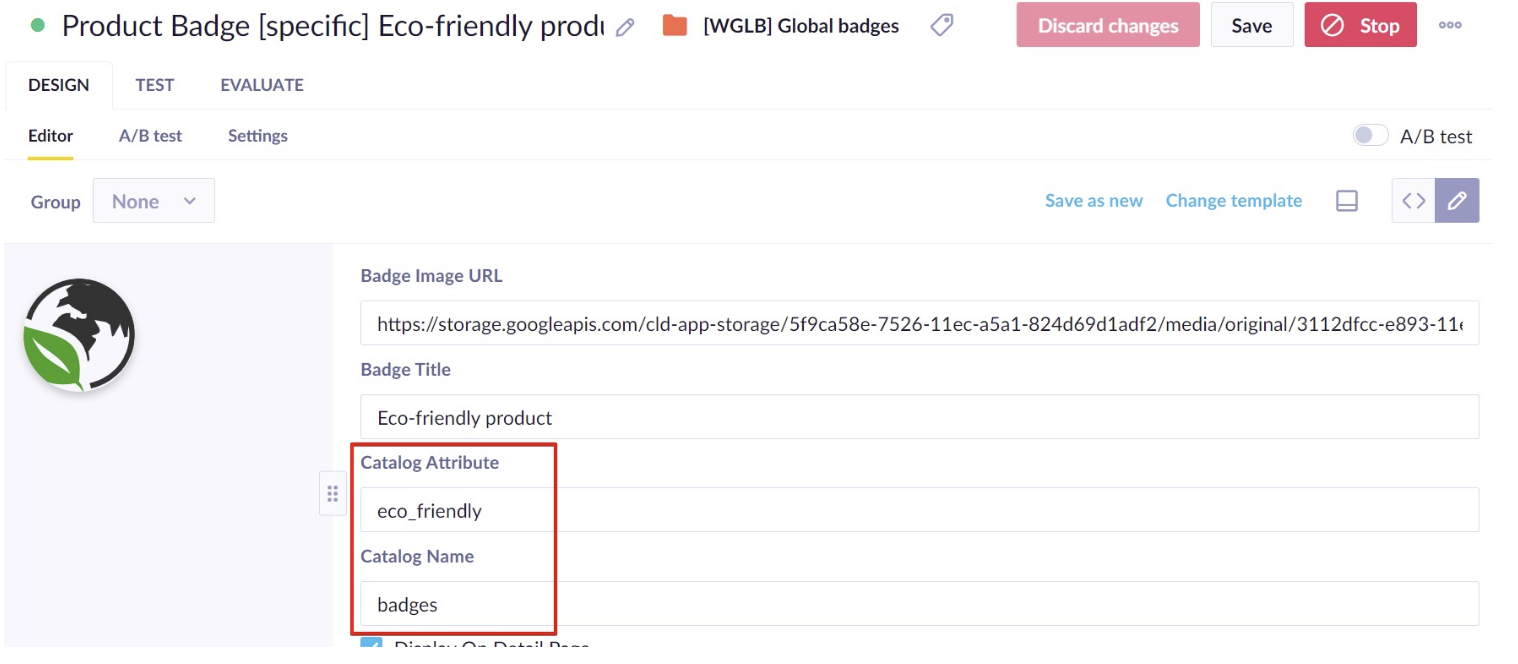
For product-specific badges only:
- Open the badge weblayer (for example, Product Badge [specific] Eco-friendly product).
- Set the Catalog Name parameter to your product catalog name.
- Set the Catalog Attribute parameter to the corresponding column name (for example,
eco_friendly).
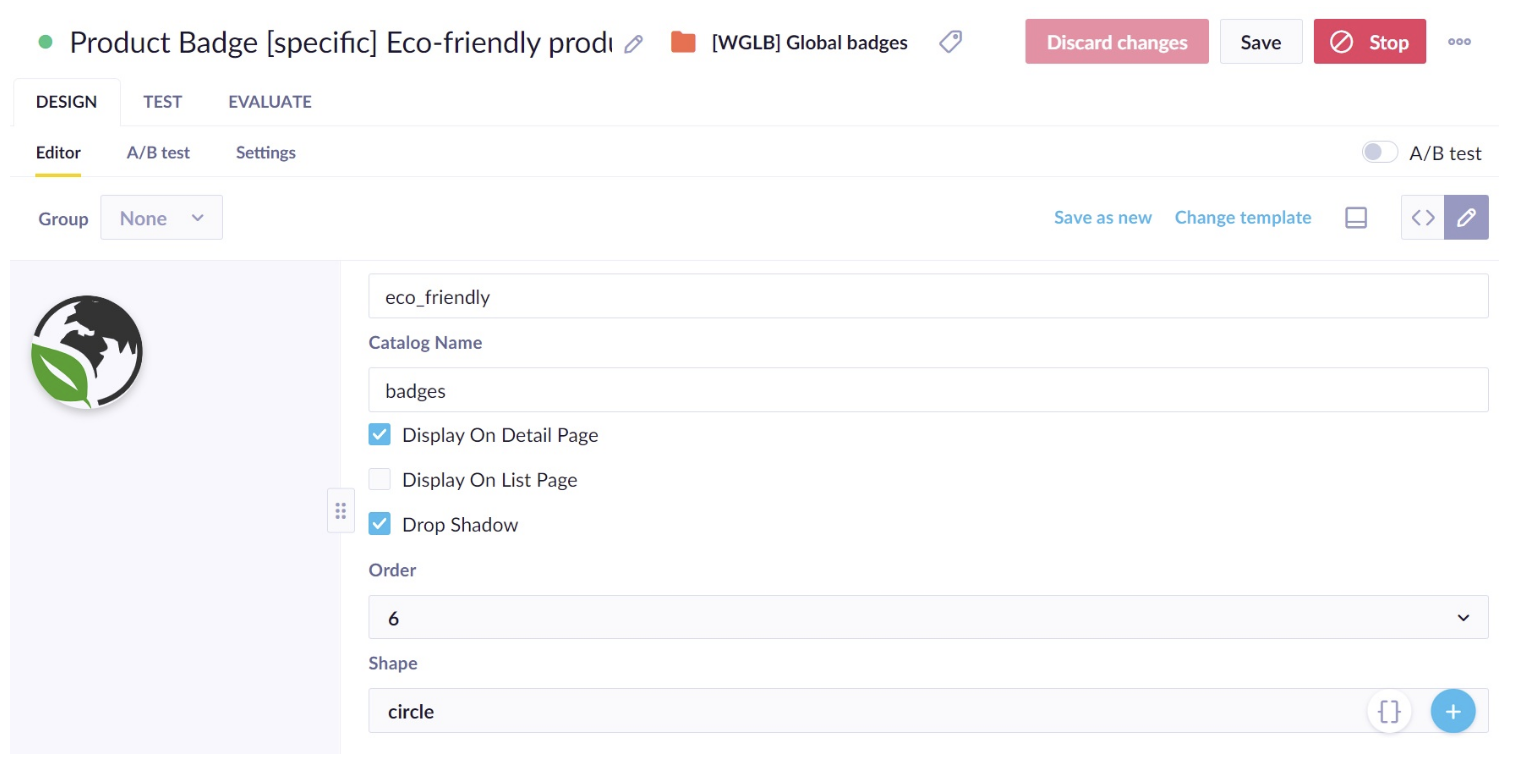
For all badges (global and product-specific):
Configure these parameters:
- Badge Image URL: Enter the URL for your badge image. Change this to use custom badge designs.
- Badge Title: Set the tracking value that appears in banner events under the
badge titleattribute. Used for analytics purposes only. - Display on detail page: Check this option to enable badge display on product pages. The "Display on List page" option is not supported in this version.
- Shape: Select the badge shape (circle, square, etc.).
- Drop Shadow: Check to add a shadow effect to the badge.
- Track banner event for evaluation: Enable tracking to monitor individual badge performance. Recommended during initial evaluation only, as this consumes MPEs during ongoing use.
- Order: Set the display priority (1 = top position). Badges display vertically in order, with number 1 appearing at the top.
Launch individual badges
After configuration, click Start on each badge weblayer you want to display.
A/B test setup
Set up A/B testing at the Badge Product Page Container level to measure whether displaying badges improves conversion and revenue.
Test configuration:
- Variant A: Customers see configured badges on product pages.
- Control Group: Customers see no badges.
- Recommended split: 50/50 for faster significance, or 80/20 once positive results are confirmed.
To configure the test:
- Open the Badge Product Page Container weblayer.
- Go to the A/B test tab.
- Adjust the traffic distribution between Variant A and Control Group.
- Save your changes.
The test tracks whether badge visibility impacts customer purchase behavior and revenue generation.
When to adjust distribution:
- Initial testing: Use 50/50 split to reach statistical significance faster.
- After proving value: Switch to 90/10 or remove Control Group entirely to maximize badge exposure while maintaining ongoing validation.
- Regular check-ups: Periodically re-enable A/B testing (every 3 months) to verify continued positive performance.
Test and run the use case
Test the use case before deploying it. Testing ensures you don't send unfinished or imperfect campaigns to your customer base.
Testing approach 1: Restricted page
- Open each badge weblayer's Settings tab.
- Set Show on to match a testing page URL not accessible to the public (for example,
https://www.yoursite.com/en#test). - Click Start on the badge weblayers and Badge Product Page Container.
- Navigate to the test page URL to verify display.
- Click Stop when testing completes.
Testing approach 2: Audience filtering
- Open each badge weblayer's Settings tab.
- Under Audience, select Customers who....
- Filter by tester identifiers (for example,
hard_idof you and your colleagues). - Click Start on the badge weblayers and Badge Product Page Container.
- Visit product pages as a filtered user to verify display.
- Click Stop when testing completes.
Testing checklist:
- Verify badges display in correct priority order.
- Test on multiple browsers and devices.
- Confirm A/B test assignment works (check if you're in Variant A or Control Group).
- Validate tracking events fire correctly for both groups.
- Check badge positioning and appearance on different product images.
Launch the use case:
- Remove testing restrictions from badge weblayers.
- Configure final settings in each badge's Settings tab.
- Click Start on all badge weblayers you want to display.
- Verify the Badge Product Page Container is running.
Evaluate the results
Remember to run the use case for a few days to see the impact.
After this initial period, use the prebuilt evaluation dashboard to measure and analyze relevant data:
- Open the [WGLB] Product Badges - Use Case Evaluation dashboard.
- Verify the
[WBSB] weblayer targetevent segmentation uses the correctbanner_idfor the Badge Product Page Container. - Check the
[WBSB] purchase_banner targetsegmentation:- Attribution window is set correctly (default: 24 hours).
- Purchase status filter matches your project's successful purchase definition.
- Review these key metrics regularly:
- Revenue Uplift: Extra revenue generated by Variant A compared to Control Group.
- Unique Conversion Rate Uplift: Percentage difference in conversion between groups.
- Statistical significance: Must reach 98%+ before making decisions.
- Check the [WGLB] Product Badges - Use Case Evaluation - Specific Single badge dashboard to evaluate individual badge performance.
For individual badge evaluation:
- Open the [WGLB] Product Badges - Use Case Evaluation - Specific Single badge dashboard.
- Update the
[Banner] Weblayer target - Specific single badge eventsegmentation to match thebanner_idof the badge you want to evaluate. - Monitor badge-specific conversion and revenue metrics.
Important metrics to monitor:
- Impressions: Count of badge displays.
- Visitors: Unique customers who saw badges.
- Revenue: Total purchase value within attribution window.
- Conversion Rate: Percentage of impressions converted to purchases.
- Unique Conversion Rate: Percentage of visitors who made purchases.
- Average Order Value: Revenue per purchase.
- Revenue Per Visitor: Average revenue per customer who saw badges.
Check results regularly to identify optimization opportunities as soon as possible.
Other resources
Learn how to enhance and optimize badge performance with different tips and tricks from Bloomreach experts.
Create custom badges:
You can create your own custom badges beyond the pre-configured options. Design badge images that communicate your unique company policies or seasonal campaigns, then add them as new weblayers following the same configuration pattern as existing badges.
Related documentation:
Updated 4 months ago