

Google Display & Video 360
Integration
This guide shows you how to connect Google Display & Video 360 (DV360) with Bloomreach Engagement. You can send customer segments from Bloomreach Engagement to DV360 and run targeted ad campaigns using your first-party data.
Why use this integration
With this integration, you can:
- Sync customer segments from Bloomreach Engagement to DV360 automatically.
- Keep your DV360 audiences updated with your current customer data without manual work.
- Launch targeted ad campaigns using your first-party data.
When to use this integration
Use this integration when you want to:
- Retarget website visitors who didn't complete a purchase or signup.
- Exclude recent customers from acquisition campaigns to avoid wasted ad spend.
- Create lookalike audiences based on your best customers.
- Personalize ads for different customer segments (VIP customers, first-time buyers, lapsed customers).
- Share customer data with brand partners for targeted ads.
- Handle privacy requests by automatically removing customers from all ad audiences.
Prerequisites
- A Google DV360 account.
- A Bloomreach Engagement account with the Ad optimization package enabled.
- Admin access in Bloomreach Engagement to set up integrations.
- Good DV360 policy compliance and payment history (required for Customer Match).
- Customer segments already created in Bloomreach Engagement.
- Legal consent for all customer data you plan to send to DV360.
ImportantIf you're using legitimate interest instead of explicit consent, check with your Legal team first. Legitimate interest requires valid business grounds to process data without permission (like fraud prevention). Confirm DV360 activation qualifies in your jurisdiction.
Connect your DV360 account
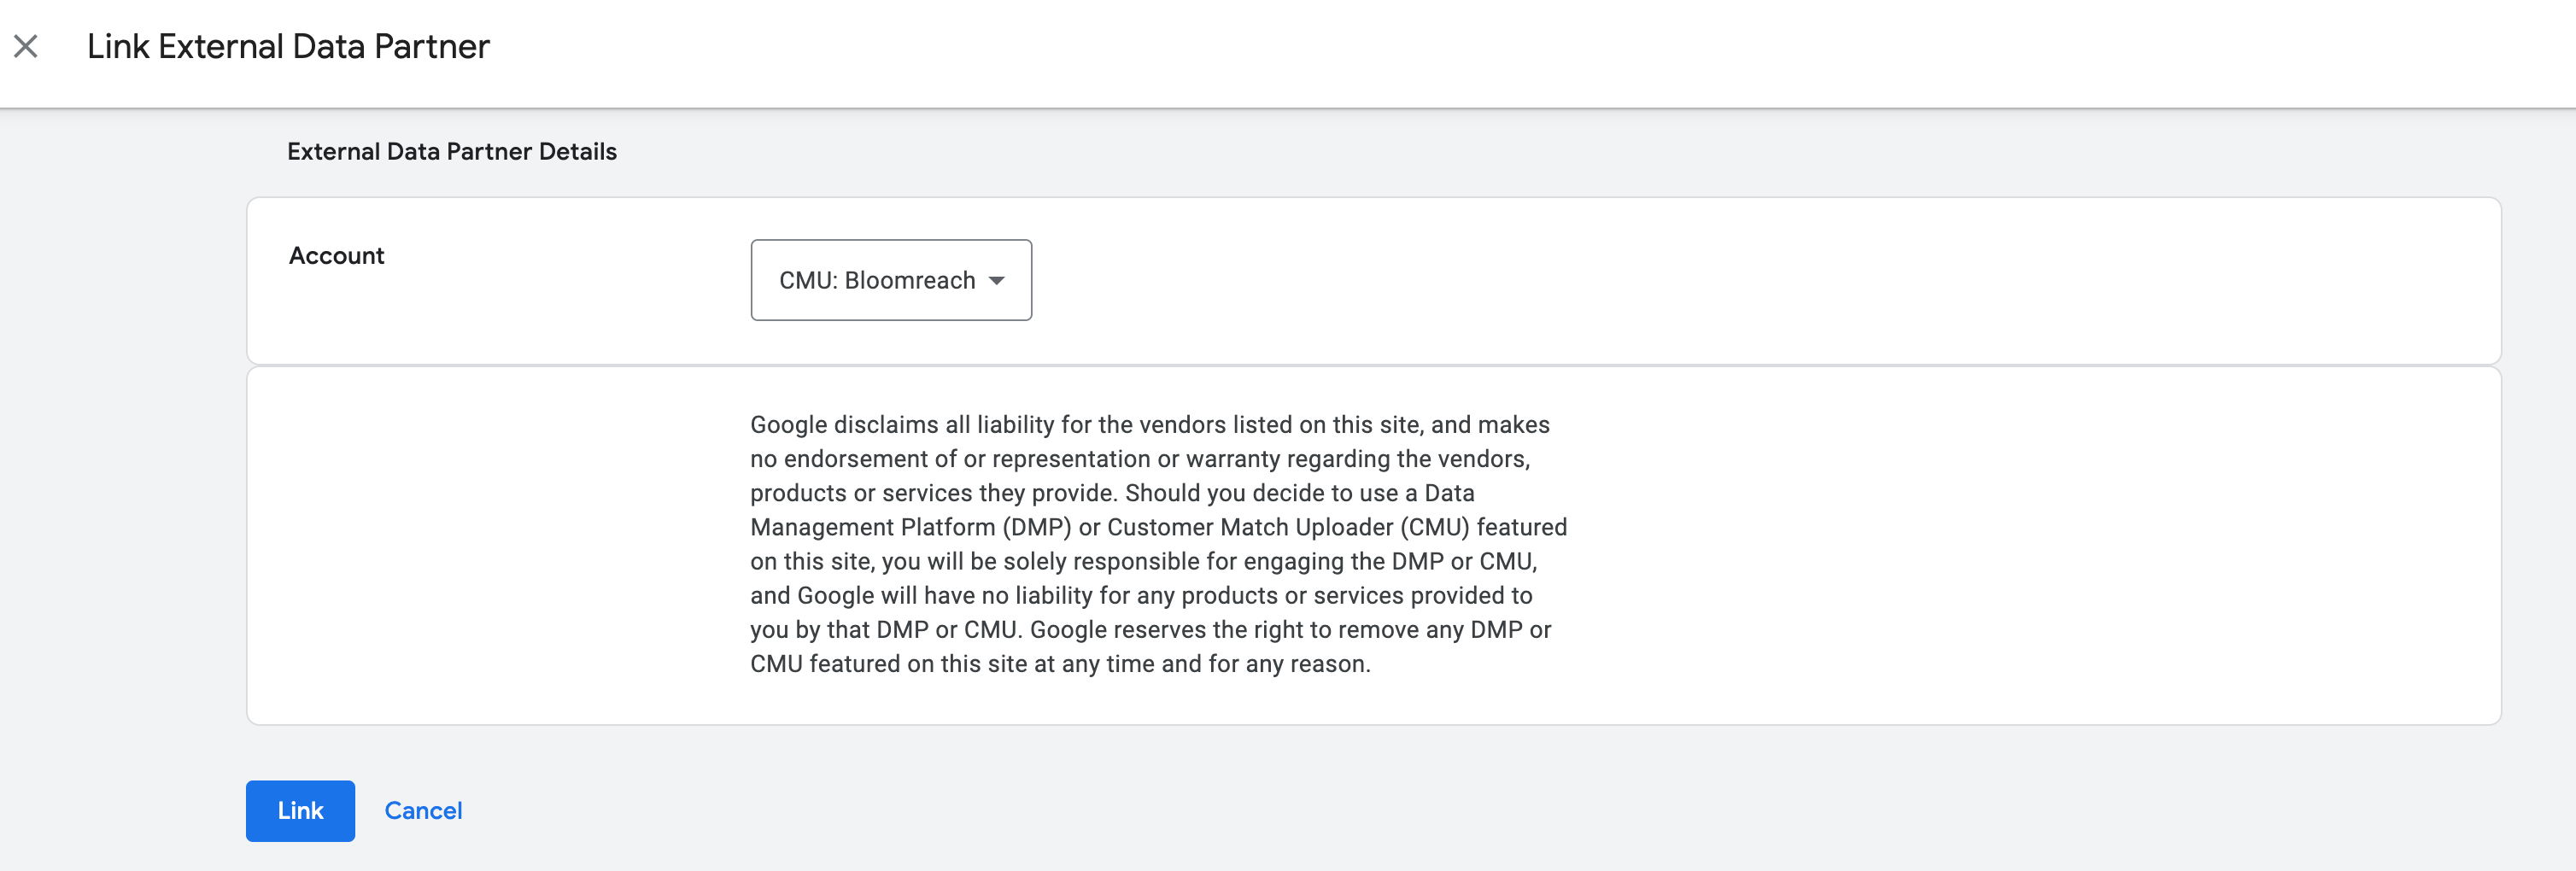
Bloomreach Engagement connects to your DV360 account as a Customer Match Uploader (CMU) partner. To create this integration, link Bloomreach as an external data partner in your DV360 account.
You can connect to either a partner-level account or a subaccount. However, data can only be pushed to the level you’re connected to. Connecting at the partner level doesn't allow you to push data to subaccounts.
Create account link
If your account isn't already linked to Bloomreach, create the account link using one of these methods.
Manual setup
In your DV360 account settings, add a new external data partner link and select "CMU: Bloomreach" from the partners list. Learn how to create the link.
Google sign-in
Use the Sign in with Google option within the integration settings and enter your login credentials. We'll automatically create the product link using your account.
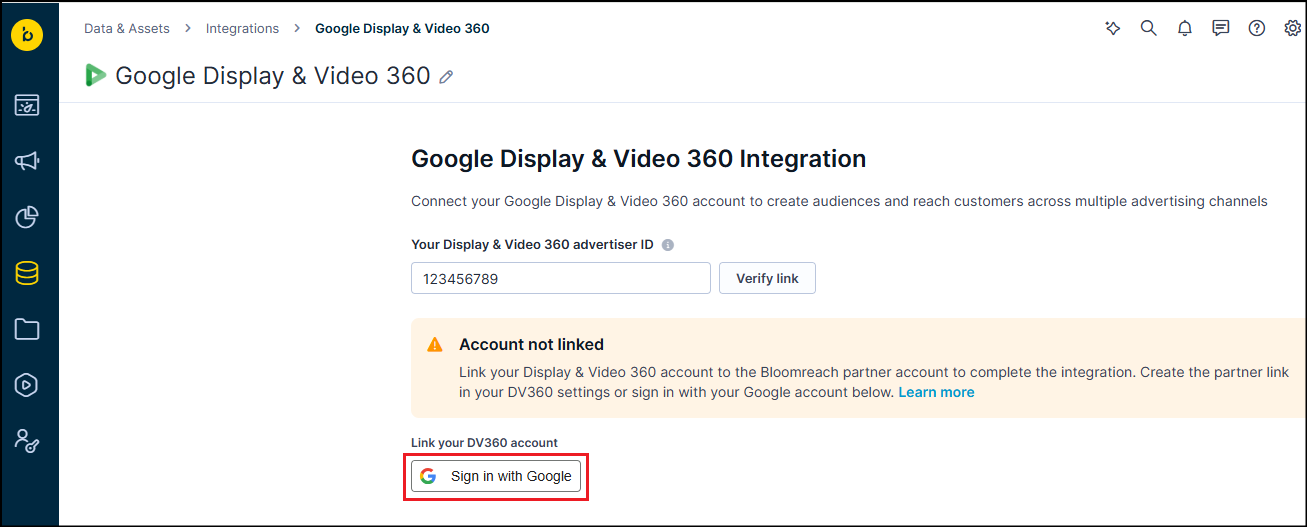
NoteYour Google account needs admin permissions to create a product link. If you don't have admin permissions, ask your account admin to use the manual setup method.
Set up the integration
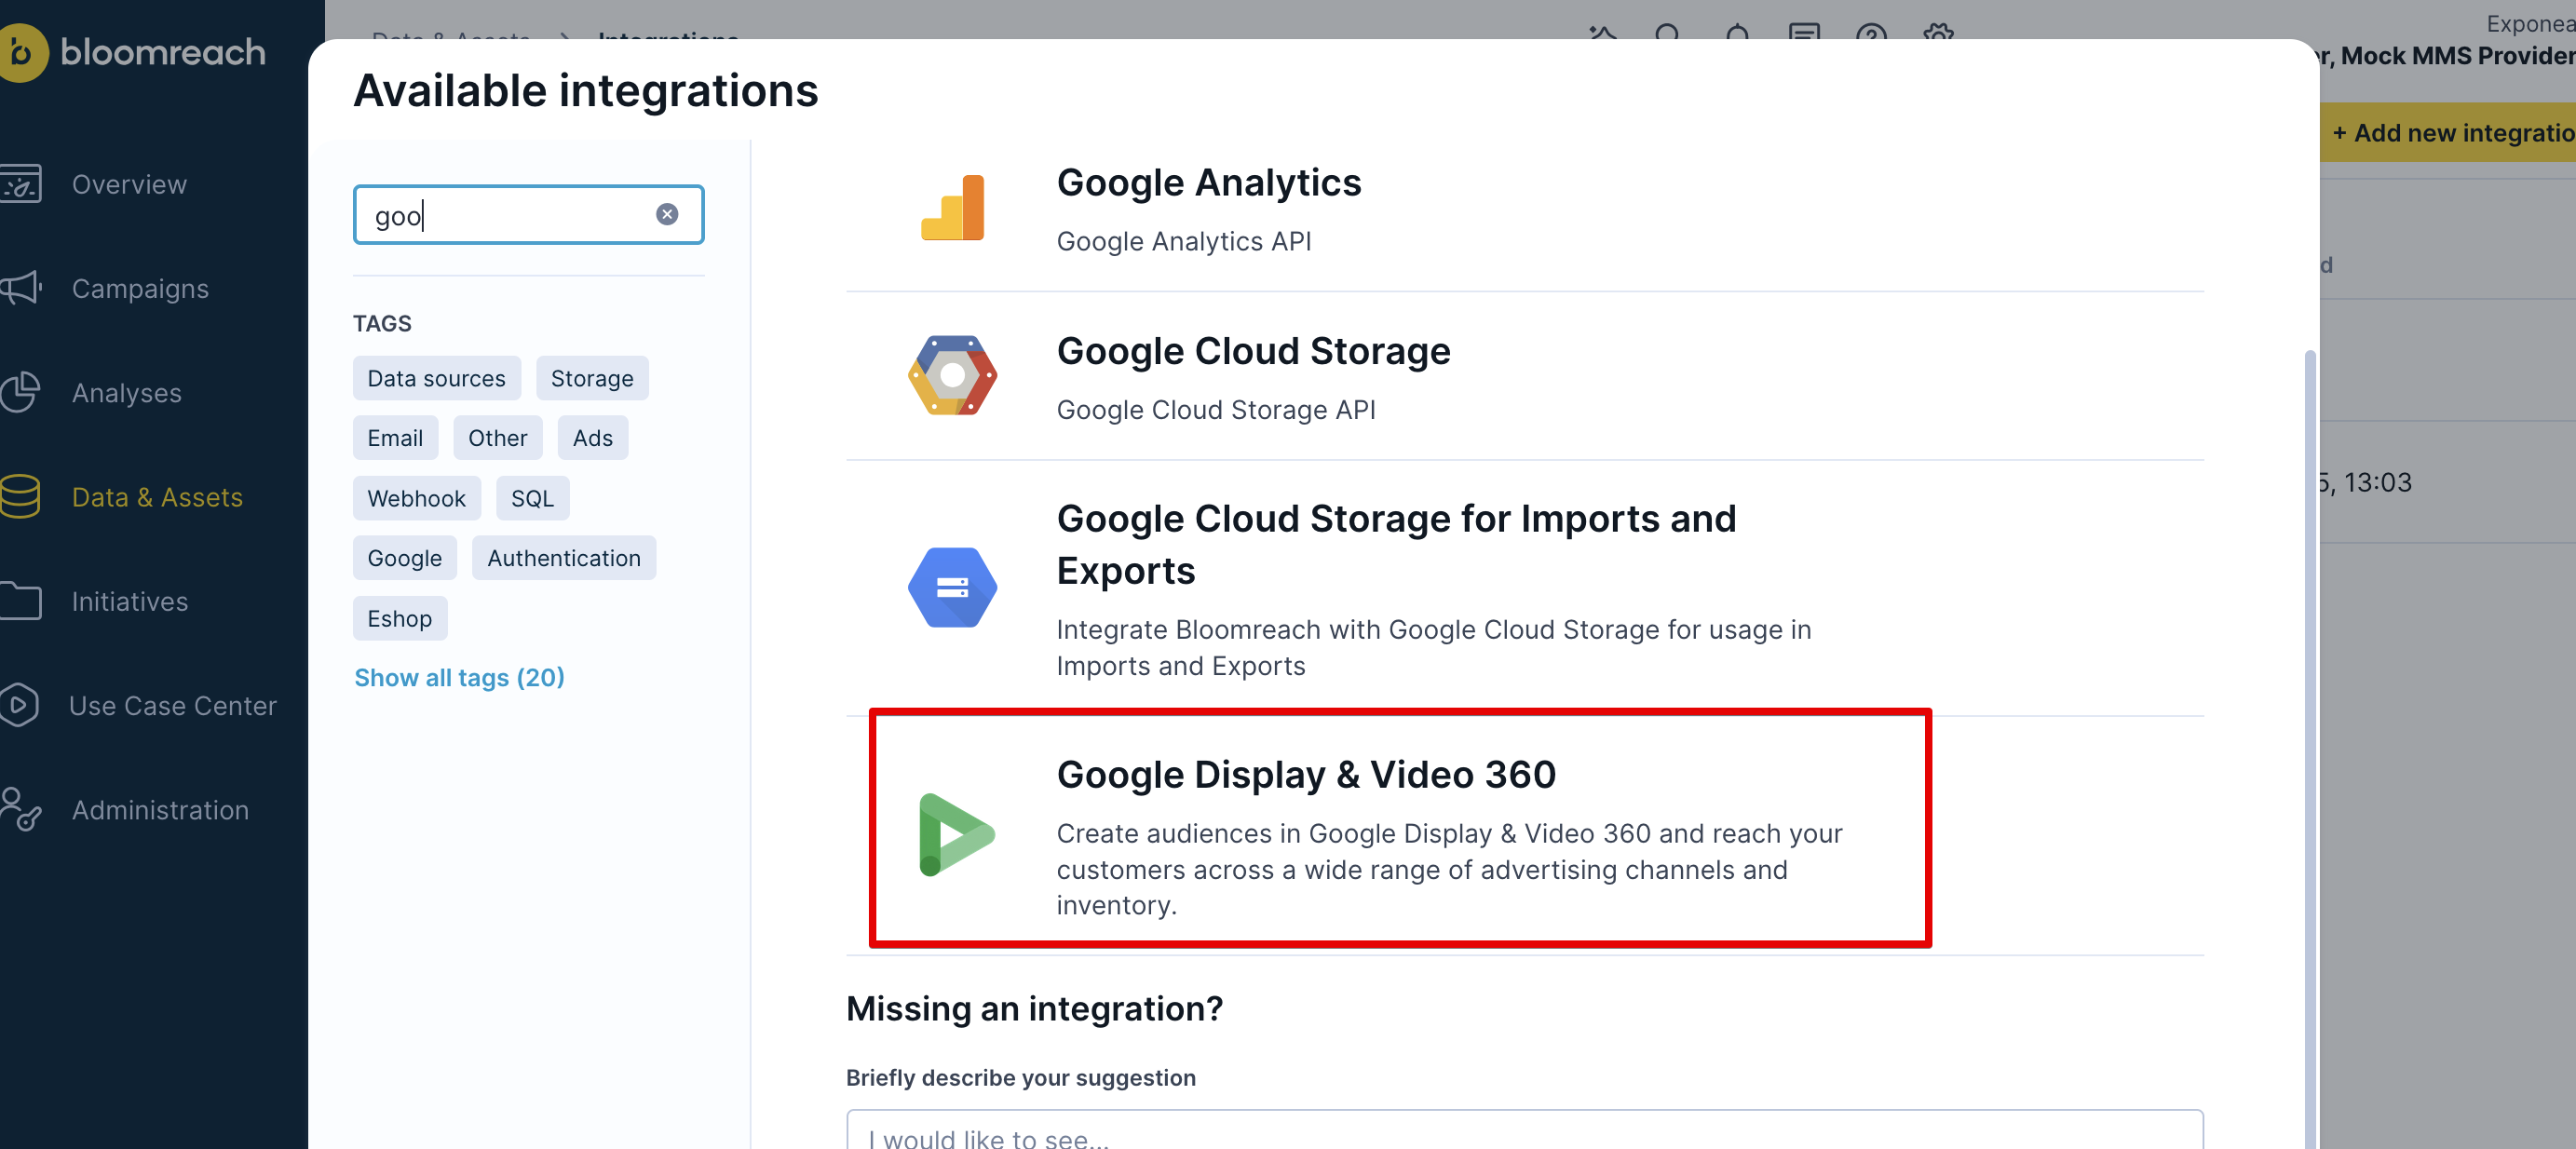
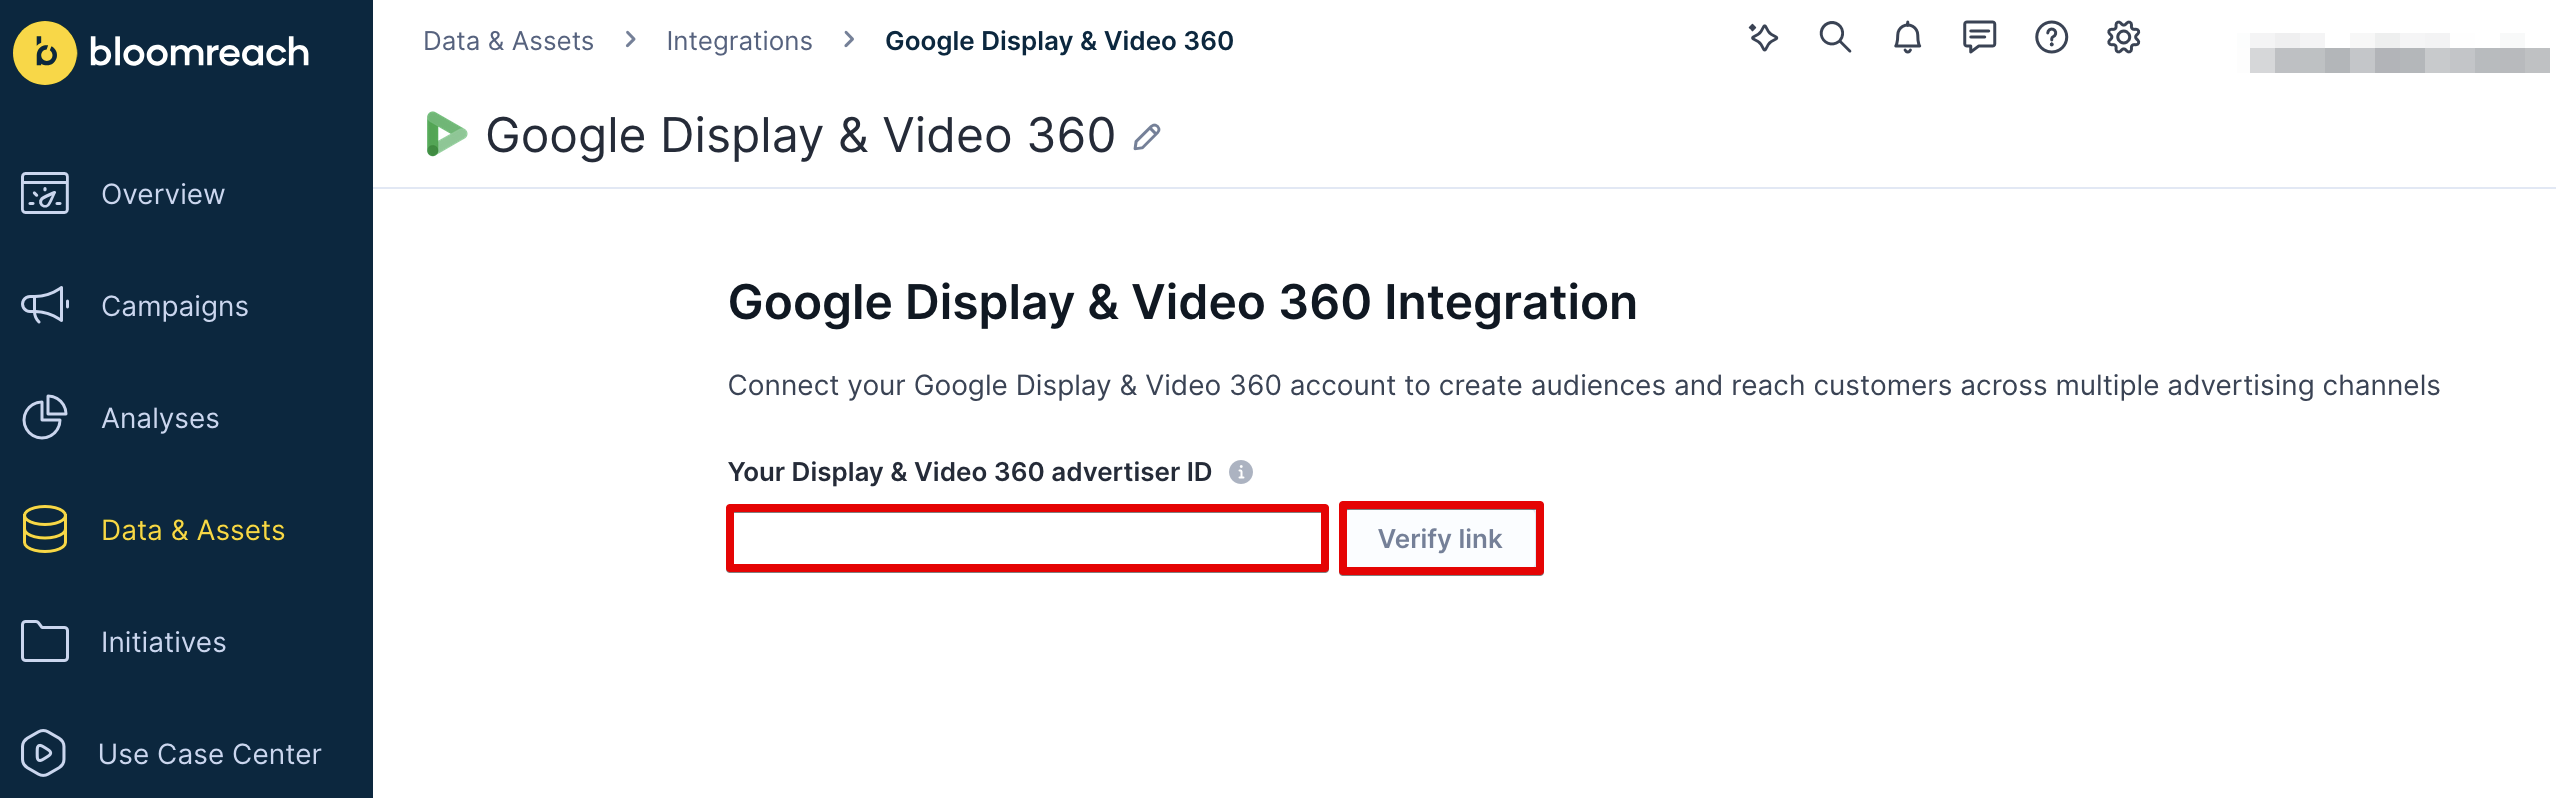
- In Bloomreach Engagement, go to Data & Assets > Integrations.
- Click Add new integration and select Google Display & Video 360 from the list.
- Accept the terms and conditions for both Google and Bloomreach Engagement.
- Enter your Google Display & Video 360 advertiser ID. Learn how to find your advertiser ID.
- Click Verify link to check if your account is linked to the Bloomreach partner account.
- If your account isn't linked yet, create the account link using one of the methods explained above:
- Manual setup of the account link or
- Google sign-in for automatic link creation
- Click Verify link again to confirm the connection.
- Once verification succeeds, click Save to complete the integration.
Disconnect your DV360 account
When you no longer want Bloomreach linked to your DV360 account, remove the external partner link in your DV360 Linked accounts settings. Removing the integration in Bloomreach Engagement won’t remove the link from your account.
Build your audience sync scenario
This is where you build the automated workflow that sends customers to DV360.
- Go to Campaigns > Scenarios in Bloomreach Engagement.
- Click New scenario and give it a descriptive name (or use an existing scenario).
- Add an Ad audiences node to your workflow.
- Double-click the node, select Google Display & Video 360 from the list, and open the audience settings.

Check out our ready-made ad audience scenarios in the Use Case Center to get started faster:
- Target customers based on lifetime value
- Optimize ads for email engagement
- Use audience predictions to optimize ads
Set up audience targeting
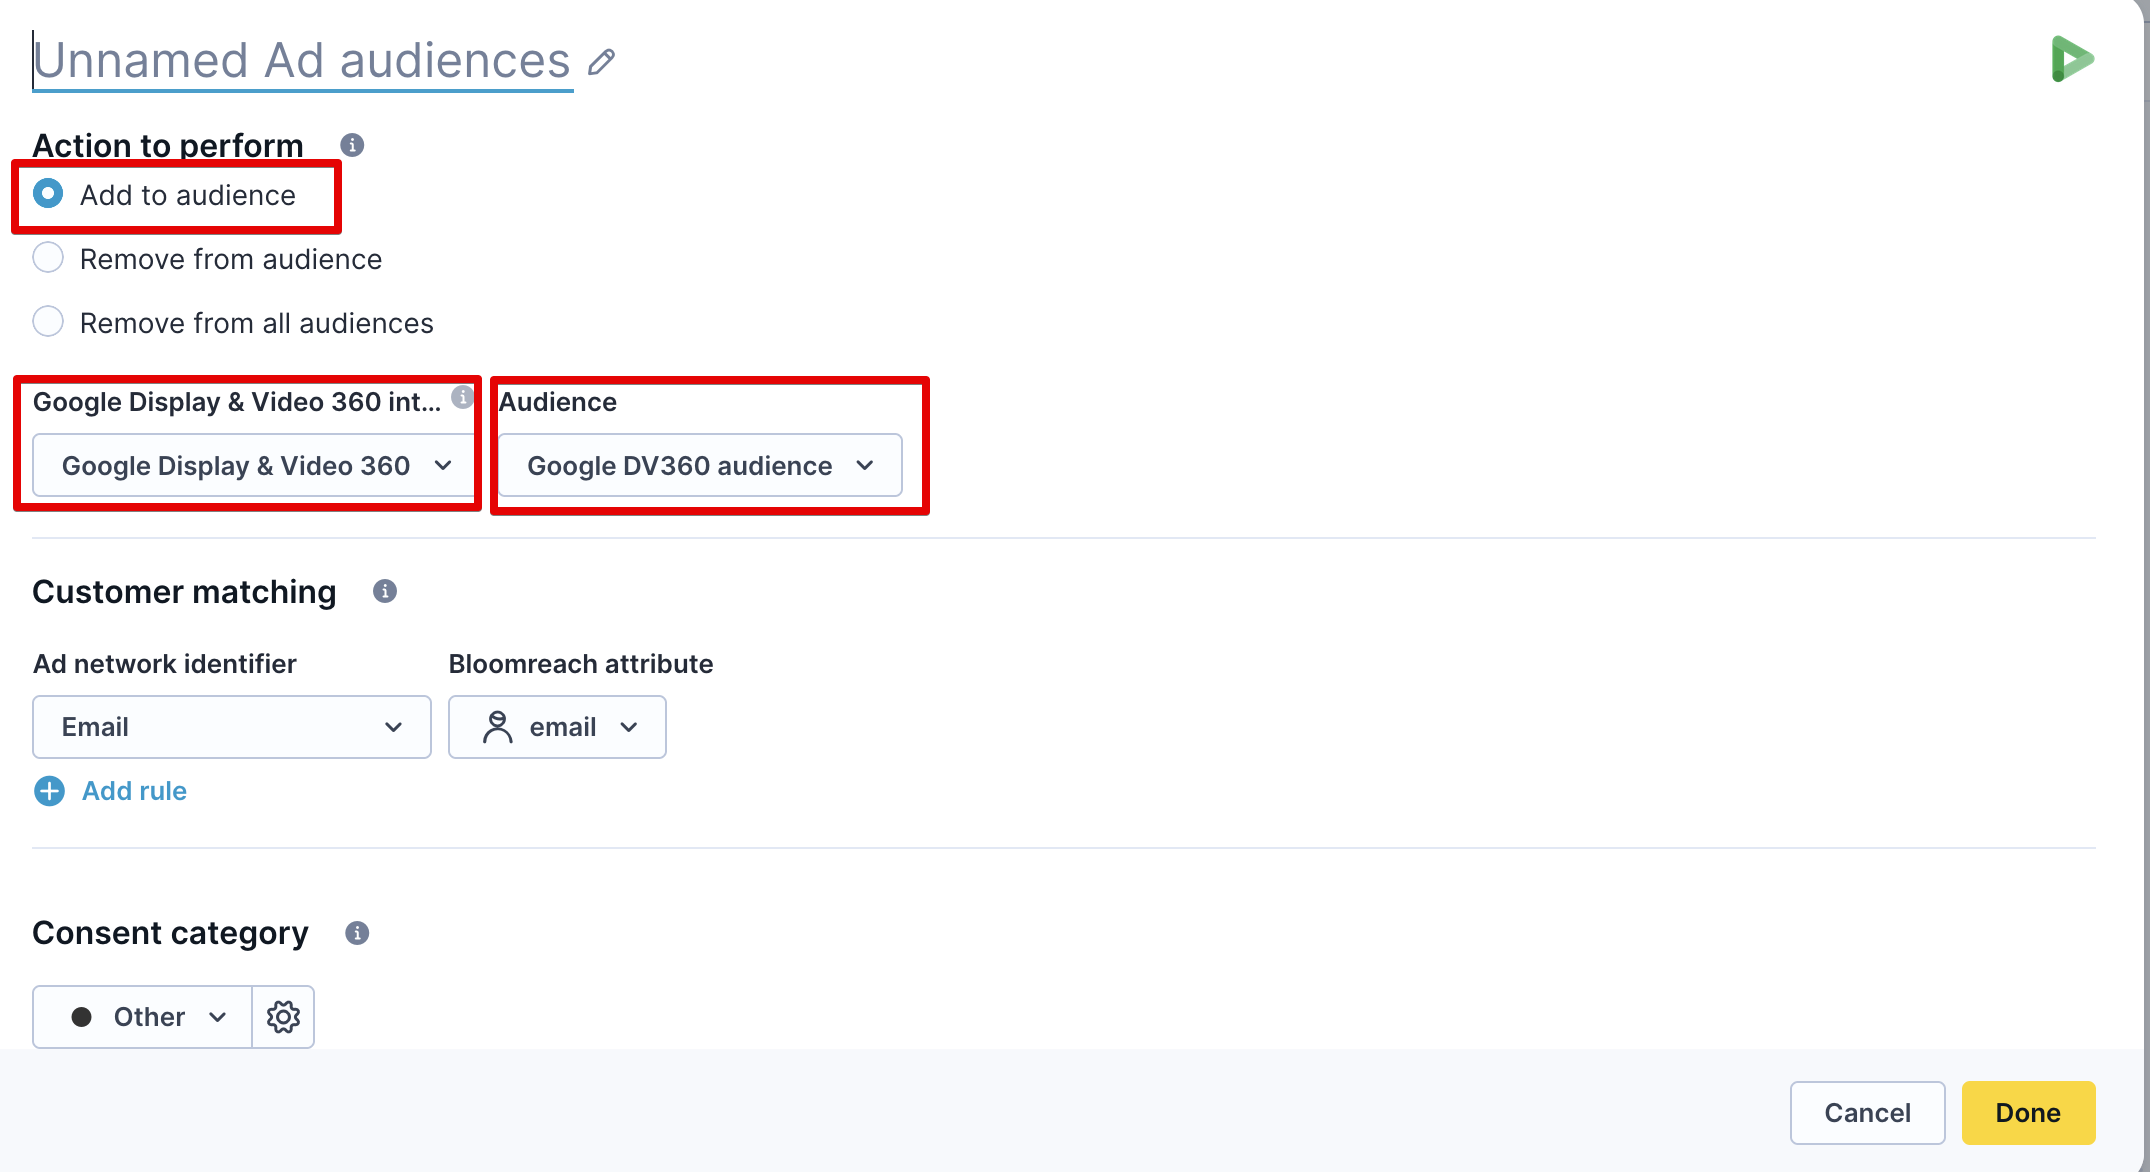
Configure these settings.
Set audience action
Choose what to do with customers:
- Add to audience: Include customers in the selected DV360 audience for targeting.
- Use for: Retargeting campaigns, lookalike building, product recommendations.
- Remove from audience: Remove customers from this specific audience.
- Use for: When customers no longer meet criteria (bought something, changed segment, opted out of category).
- Remove from all audiences: Remove customers from all DV360 audiences created through this Bloomreach Engagement integration.
- Use for: Privacy requests, account deletions, global opt-outs.
Choose the integration
Select your DV360 integration from the available integrations.
Choose the target audience
You have 2 options.
Use an existing audience list
Choose this if you've already set up DV360 audience lists through this integration and want to add more customers.
ImportantYou can only manage audience lists created through this integration. You can't update audience lists created manually in DV360 or through other tools using Bloomreach Engagement.
Create a new audience list
Choose this for your first sync or when you want a fresh audience list for a new campaign.
You need to provide a name, description, and audience type. The integration creates it automatically in DV360. There are 2 audience types available based on the customer match identifiers you’ll use:
- Emails, phone numbers, address (contact info)
- Mobile advertising IDs
You can only select one type per audience. You can't combine the two customer match types.
When using Mobile advertising IDs, you also need to specify the App ID.
- App ID is a string that uniquely identifies a mobile application from which the data was collected.
- For iOS, the ID string is the 9-digit string that appears at the end of an App Store URL. For example, "476943146" for "Flood-It! 2" whose App Store link is
http://itunes.apple.com/us/app/flood-it!-2/id476943146. - For Android, the ID string is the application's package name. For example,
com.labpixies.colordripsfor "Color Drips" given Google Play linkhttps://play.google.com/store/apps/details?id=com.labpixies.colordrips.
If you have both iOS and Android apps, you need to create 2 separate audiences.
Set up customer matching
This section determines how DV360 identifies your customers and handles their data.
Configure customer matching
Bloomreach Engagement supports audience lists that work with contact information (email, phone, physical address) or mobile advertising IDs. You can't combine contact information with mobile advertising IDs. Based on the audience type you selected, only contact info or mobile advertising IDs will be available.
Choose how to identify customers. DV360 matches these against their customer database:
Contact info:
- Email address: Use this first — it gives the highest match rates, typically 60-80%.
- Phone number: Use as backup when email doesn't match.
- Customer's phone number should be in international format E.164 (like
+441234556789with + and country code). - If it’s not in the E.164 format, we'll try to convert it.
- Customer's phone number should be in international format E.164 (like
- Physical address: Use as backup for customers without email/phone matches. The address consists of 4 required fields:
- First name: User’s first (given) name.
- Last name: User's last (family) name.
- Regional code: The 2-letter region code in ISO-3166-1 alpha-2 of the user's address.
- Postal code: The postal code of the user's address.
Mobile advertising ID:
- Use as backup option for mobile app users.
- Use Identifier for Advertising (IDFA) or Google Advertising ID (AAID) for mobile app users.
- Mobile advertising IDs are less reliable because they depend on cookies and device IDs.
- Use contact information when possible instead of mobile IDs.
ImportantContact information must be linked to a Google account to match, and corporate accounts (like Google Workspace) can't be targeted. This applies to all contact information: email, phone, and address.
All customer identifiers are converted into an unreadable format (called SHA-256 hashing) for security and privacy protection.
Pre-hashed identifiers
- Email (sha256): Use when you can only provide pre-hashed email addresses due to legal or compliance reasons.
- Phone (sha256): Use when you can only provide pre-hashed phone numbers due to legal or compliance reasons.
The system checks that pre-hashed values are correctly formatted as SHA256 before sending them to DV360. This prevents double hashing and ensures audience matching works properly.
Set up multiple fields to match more customers. If a customer’s email doesn't match a Google DV360 profile, their phone number might.
Pro tipUpload at least 5,000 members to increase your chances of having enough matched, active users for targeting. Active users are people on your list who use Gmail, Search, YouTube, or Display.
Make sure you have proper consent for each data type you're sending.
Set up privacy permissions
Set consent preferences by choosing the consent category in Bloomreach Engagement that shows your customers agreed to use their data in ad platforms. Choose one consent category that covers both:
- Ad personalization: Whether DV360 can use this data to customize ads for the customer.
- User data collection: Whether DV360 can combine this customer data with other data sources.
Your selected consent category automatically handles both consent requirements in DV360.
Make sure you have legal grounds (consent or legitimate interest) for every identifier before sending to DV360. This is required for GDPR and other privacy regulations.
Test the integration
- Create a test scenario with a small customer segment (100-500 customers).
- Run the scenario and check that the audience appears in your DV360 account. It typically takes 24-48 hours for audiences sent via API to reflect and be visible in the UI.
- Look for any sync errors or warnings in scenario events.
- Check match rates in your DV360 account.
- Launch your full scenario once testing works.
Optimize your integration
Improve match rates
- Always include email addresses as the primary identifier.
- Set up backup identification methods (phone, address) to catch customers who don't match on email.
- Regularly check and clean your customer data for accuracy.
Stay compliant with privacy laws
- Check customer consent regularly to ensure compliance with privacy regulations.
- Use the Remove from all audiences action for customers who opt out of ads.
- Document your legal basis for processing customer data in ad platforms.
Monitor integration health
- Check scenario logs weekly for sync errors or API quota issues.
- Set up alerts for failed syncs or low match rates.
- Review DV360 audience performance to optimize your targeting strategy.
Common issues
- Low match rates: Try using multiple identifier types (email and phone) and verify you have proper consent for the data you're sending. Clean your customer data to remove invalid email addresses or phone numbers.
- Audience not appearing: You can only select audiences created through this integration, not ones created manually in DV360. If you created the audience through Bloomreach Engagement but can't see it, check your DV360 account permissions.
- API quota exceeded: If you're hitting DV360 API limits, sync less frequently or split large audiences into smaller groups. Monitor your usage patterns and adjust accordingly. If you see this error often, contact Support. When you hit limits, you'll get error
RESOURCE_EXHAUSTEDwith HTTP status 429. - Persistent errors: If errors continue after following troubleshooting steps, contact Bloomreach Support with your scenario logs and DV360 account identifier.
Related articles
- Learn more about ad audience management
- Understand ad audiences best practices
- Set up audience segmentation
- Configure consent management
Updated 3 months ago