
Affinity journey brief and generation
After you submit your prompt, Affinity generates a journey brief and builds your complete journey. This guide explains what the journey brief contains, how journey generation works, and what elements make up your generated journey.
Understanding the journey brief
The journey brief translates your prompt into a structured marketing plan. It summarizes what Affinity understood—including objectives, audience, timing, and messaging—so you can review and refine it before journey creation.
Journey brief structure
Each journey brief contains four sections:
Journey objective
Defines the main goal and expected business outcome.
Examples:
- Increase repeat purchases by re-engaging inactive customers.
- Drive first purchases from new subscribers.
Target audience
Describes who will receive the journey:
- Entry criteria: Conditions determining who enters (for example, customers who recently subscribed or customers with items left in the cart).
- Exit criteria: Conditions that remove customers once they no longer qualify (for example, customers who made a purchase).
Key message
Outlines main communication themes and examples of what each message might include. This helps visualize tone and structure, but isn't the final content—actual emails are generated later.
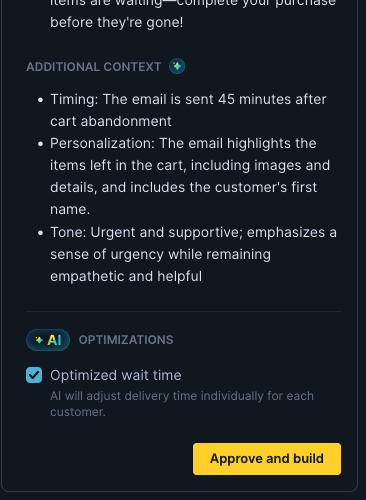
Additional context
Provides details that shape how the journey operates:
- Timing: When and how often messages are sent.
- Personalization: Attributes or data points used to tailor content.
- Tone: Overall communication style.
AI optimization
Displays AI-powered features available for this journey:
- Optimized wait time: AI adjusts delivery time individually for each customer within a defined range. This option appears automatically for Abandoned Cart and Browse Abandonment journeys.
You can enable or disable AI optimizations directly in the journey brief before clicking Approve and build.
Reviewing and refining the brief
After Affinity generates the brief, review it to ensure it matches your marketing intent. Reviewing the brief before approval helps reduce post-generation edits.
If something feels off, adjust it through conversation. You can ask Affinity to:
- Modify the target audience: "Include only customers who purchased from the Reebok brand."
- Adjust timing or frequency: "Send follow-up emails every 5 days instead of 3."
- Change tone or messaging direction: "Make it sound more premium and less promotional."
Affinity updates the journey brief and shows you the revised version. Once you're satisfied, click Approve and build.
Journey generation overview
Once you click Approve and build, Affinity translates your approved brief into a complete journey flow on the Canvas. Generation typically takes 2-10 minutes depending on complexity.
What happens behind the scenes
During generation, Affinity:
- Analyzes your approved brief to identify required triggers, filters, and steps.
- Builds an agentic journey, connecting all components into a working flow.
- Generates email content drafts, timing logic, and decision points.
- Optimizes wait times automatically when applicable.
Elements of the generated journey
Once generation is complete, you'll see your journey represented visually in the Canvas. Each node in the flow corresponds to a functional part of the journey.
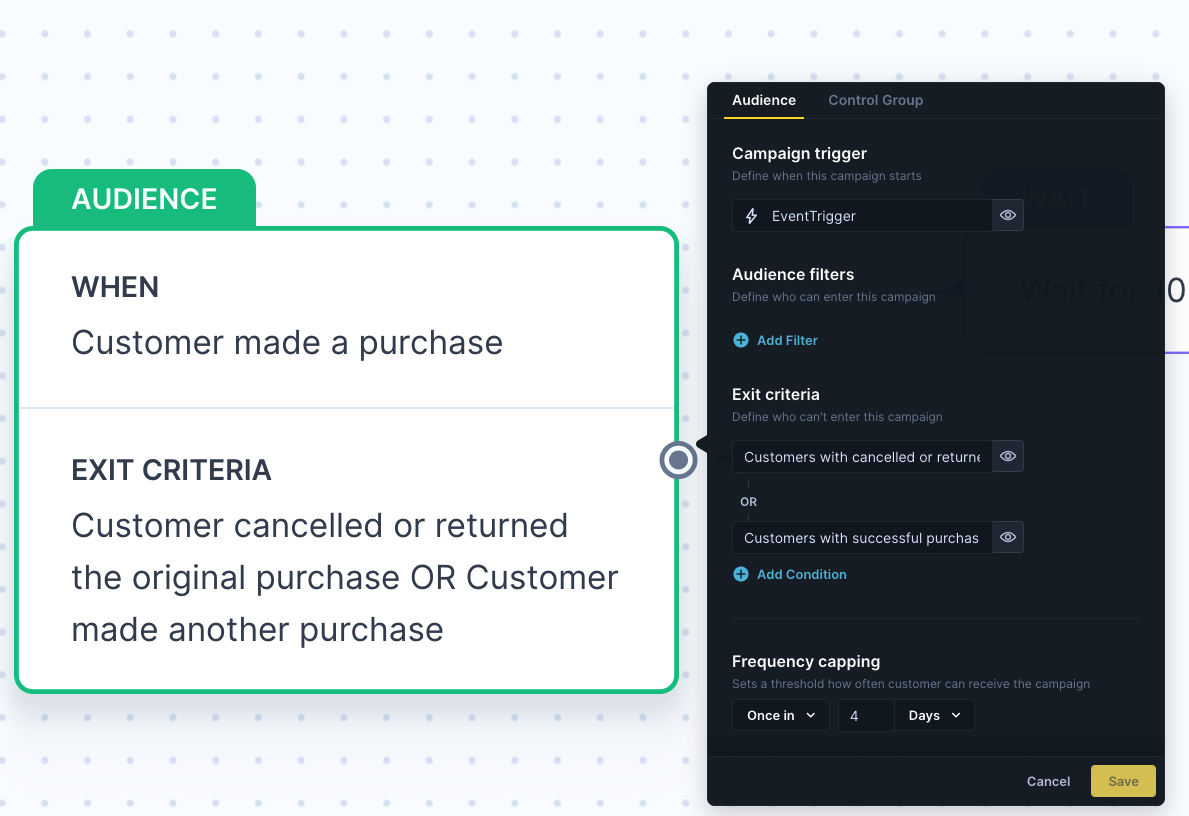
Audience node
The Audience node defines who can enter and who will be excluded from the journey.
Journey trigger
Defines when the journey should start for a customer (for example, when customers modify a cart, visit a website, or on a daily basis). This is the event or condition that activates the journey flow.
Audience filter
Specifies who can enter the journey once the trigger occurs (for example, customers who viewed two or more products and are older than 18 years). Customers who meet both the trigger and audience filter conditions will be included in the journey.
Exit criteria
Defines when customers should leave the journey after entering (for example, when a customer made a purchase). These conditions are continuously monitored. If a customer meets any exit criteria while the journey is running, they drop out of the flow.
Send frequency
Controls how often customers can enter the journey within a specified time period. This helps manage message frequency and prevents over-communication.
Send frequency options:
- Once in [X] [days/weeks/months]: Customer can enter the journey once within the specified time period. For example, set "Once in 7 days" for a weekly newsletter or "Once in 4 days" for a Browse Abandonment journey.
- Only once: Customer can enter the journey only one time, ever. Use this for one-time journeys like welcome flows.
- Every time: Customer can enter the journey every time they meet the trigger and audience filter conditions (no frequency restriction). Use this for transactional journeys like order confirmations.
To adjust the audience node
Click the Audience node to manually modify triggers, audience filters, exit conditions, or send frequency. All changes save automatically when you click Save.
You can also request changes conversationally. For example:
- "Change the trigger to when a customer views a product page"
- "Add a filter to exclude VIP customers"
- "Set send frequency to once per week"
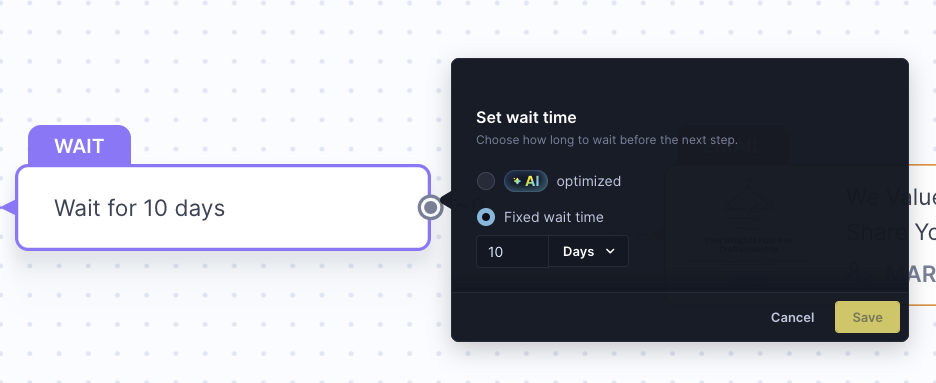
Wait node
The Wait node defines how long Affinity waits before moving customers to the next step in your journey (for example, between two emails). It helps control pacing and ensures messages reach customers at the right moment.
AI-optimized wait time
A dynamic delay that adapts individually to each customer within a defined time range (for example, between 15 minutes and 24 hours). Affinity determines the best time to send the next message based on behavioral signals and engagement likelihood.
This optimization is enabled automatically in the journey brief for Abandoned Cart and Browse Abandonment journeys. Once generated, it can be disabled manually or through conversation, but it can't be newly enabled from the Canvas.
Fixed wait time
A static delay applied equally to all customers (for example, "Wait 24 hours before sending the next email"). Use this when you want consistent timing for every participant, such as scheduled newsletters or post-purchase sequences.
To adjust wait settings
Click the Wait node to manually choose between Fixed or AI-optimized timing (if available), set your desired duration or range, and confirm with Save.
You can also request adjustments conversationally. For example:
- "Change the delay to 2 days"
- "Switch to fixed wait time"
- "Set AI-optimized wait time between 1 hour and 12 hours"
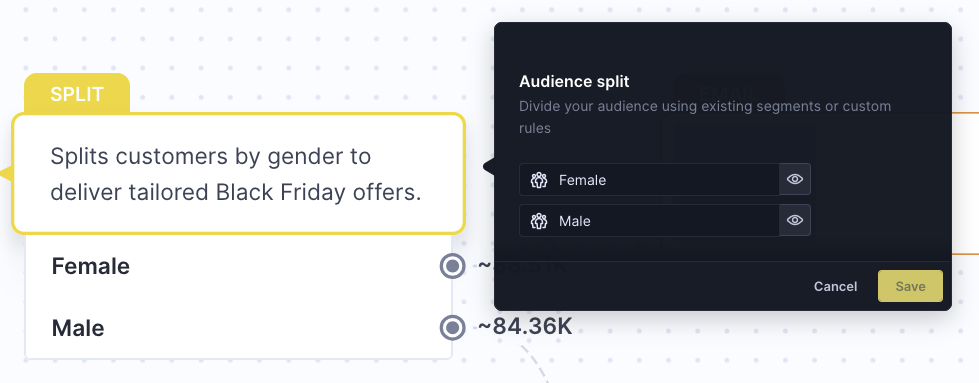
Split node
The Split node divides your audience into multiple paths based on defined conditions (for example, gender, loyalty tier, or past behavior). It allows you to deliver differentiated content or timing to distinct customer segments within a single journey.
Each branch represents a unique segment:
- Segment 1: Men
- Segment 2: Women
Customers meeting the criteria of each segment follow their corresponding path. Affinity determines when to include a split node based on your journey brief (for instance, when your prompt mentions personalization by gender, product category, or engagement level).
Affinity segments: Affinity creates segments internally during journey generation or adjustment. These segments are exclusive to Affinity and can't be reused or accessed in Bloomreach Engagement. They're created from scratch each time Affinity generates a journey and are visible only within the Canvas.
To adjust segments
Click the Split node to manually add, remove, or rename segments, and define new conditions using available attributes. Confirm your updates with Save—changes apply instantly.
You can also request changes conversationally. For example:
- "Split by loyalty tier instead of gender"
- "Add a third segment for VIP customers"
- "Create segments based on product category interest"
Content node
The Content node defines the actual message sent to customers. It includes the message subject line, body, and personalization elements generated directly from your approved journey brief. Affinity currently supports email only.

Consent validation is added automatically to ensure messages are sent only to customers with valid marketing consent.
ImportantAlways review and confirm the message and assigned consent before sending to ensure accuracy, tone, and compliance.
To adjust content
Click the Content node to manually edit message text, subject line, and personalization.
You can also request changes conversationally. For example:
- "Make the tone more playful"
- "Add a recommended products section"
- "Change the subject line to mention the customer's loyalty points"
For a complete overview of what content elements can be edited conversationally, manually, or not at all, see Content editing capabilities.
To learn more about viewing, editing, and testing content, see Working with content.
Review the generated journey
After generation:
- Review the overall structure on Canvas—ensure the flow, timing, and content logic align with your intent.
- Inspect each node by clicking on it to verify filters, delays, and personalization settings.
- Use conversational editing to request high-level changes (for example, "Make the second email more product-focused" or "Add another delay before the final email").
- Make manual edits for fine-tuning (for example, updating timing or adjusting subject lines).
Once the journey structure is finalized, you can preview messages, test the logic, and prepare for launch.
NoteBecause generation takes several minutes, refine and align the journey brief thoroughly before clicking Approve and build. This helps Affinity produce the most accurate version and reduces post-generation adjustments.
Updated about 2 months ago