

Adform integration setup
This document will guide you through setting up the Adform integration with Bloomreach Engagement to synchronize customer data for targeted advertising campaigns. Follow these steps to establish the connection, configure audiences, and verify data flow between platforms.
NoteIf you need to learn more about Adform integration and how to use it, see the Adform integration guide.
Prerequisites
To set up Adform integration, ensure you have:
- Adform account: Active Data Management Platform (DMP) or Demand Side Platform (DSP) account.
- Bloomreach Engagement access: Administrator permissions.
- Tag Manager access: Ability to create and deploy custom JavaScript tags (required for third-party identifiers only).
- Selected Adform identifier: You should know which type of identifier you want to use. Learn more about identifier types in the Adform integration guide.
Adform integration setup
The setup process involves configuring both platforms to establish a data connection. You will then use Bloomreach Engagement scenarios to manage audience assignments.
Step 1: Enable Adform integration support
Contact Adform to activate the Bloomreach Engagement integration on their platform.
- Send an email to
[email protected]. - For DMP account holders: Request: "Please enable the Bloomreach Engagement import integration on my DMP account".
- For DSP account holders: Request: "Please create a DSP audience connector for Bloomreach Engagement data. I would like to start activating data from Bloomreach Engagement".
- Include your Adform DMP/DSP account ID (obtained from your Adform DMP account).
NoteAdform typically responds within 1-2 business days. Wait for confirmation before proceeding to the next step.
Step 2: Configure integration in Bloomreach Engagement
Create the integration connection that links your Bloomreach Engagement project to your Adform account.
-
Navigate to Data & Assets > Integrations.
-
Click + Add new integration. The integration wizard will open.
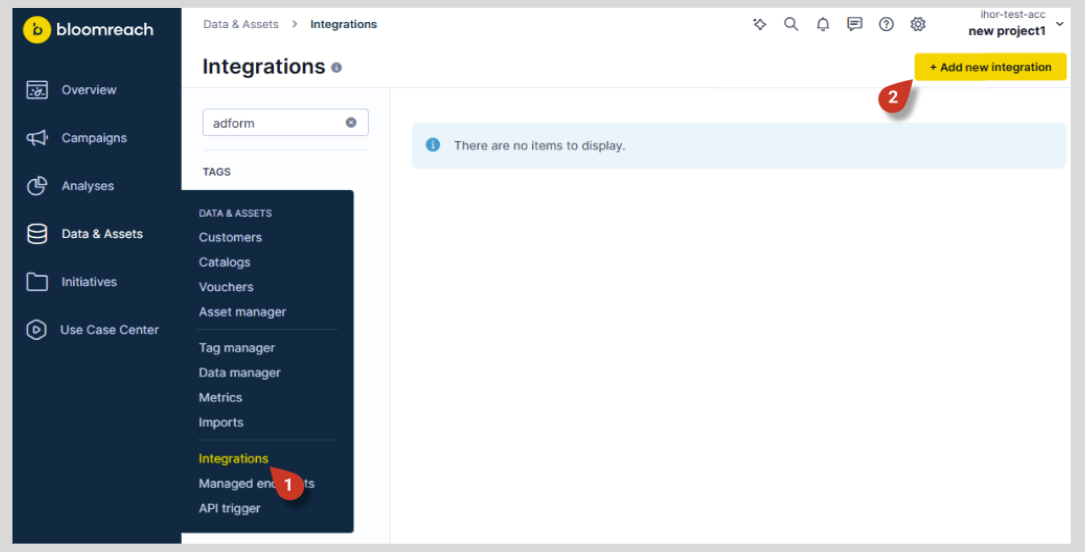
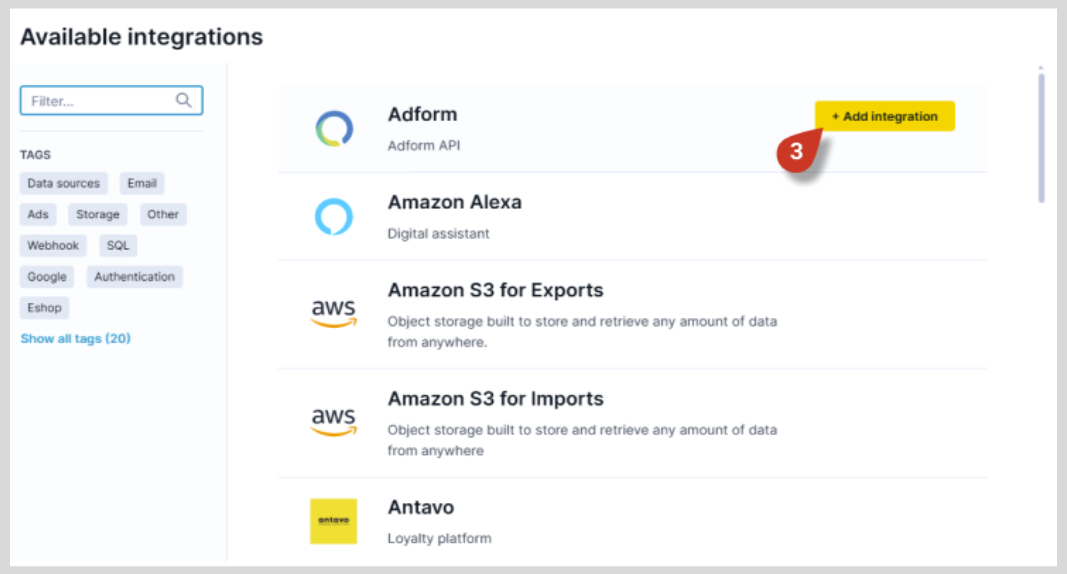
-
Search for Adform in the integration list and click +Add integration.
-
Enter your DMP account ID (the
xxxportion of your Audience Owner ID format). -
Click Save integration.
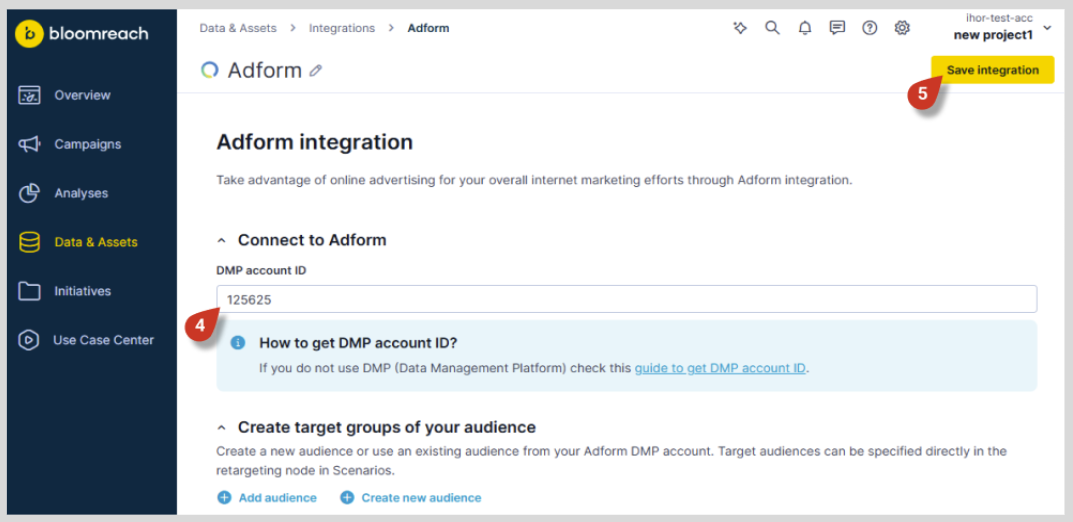
Set up your audience
After saving the integration, choose one of the following options:
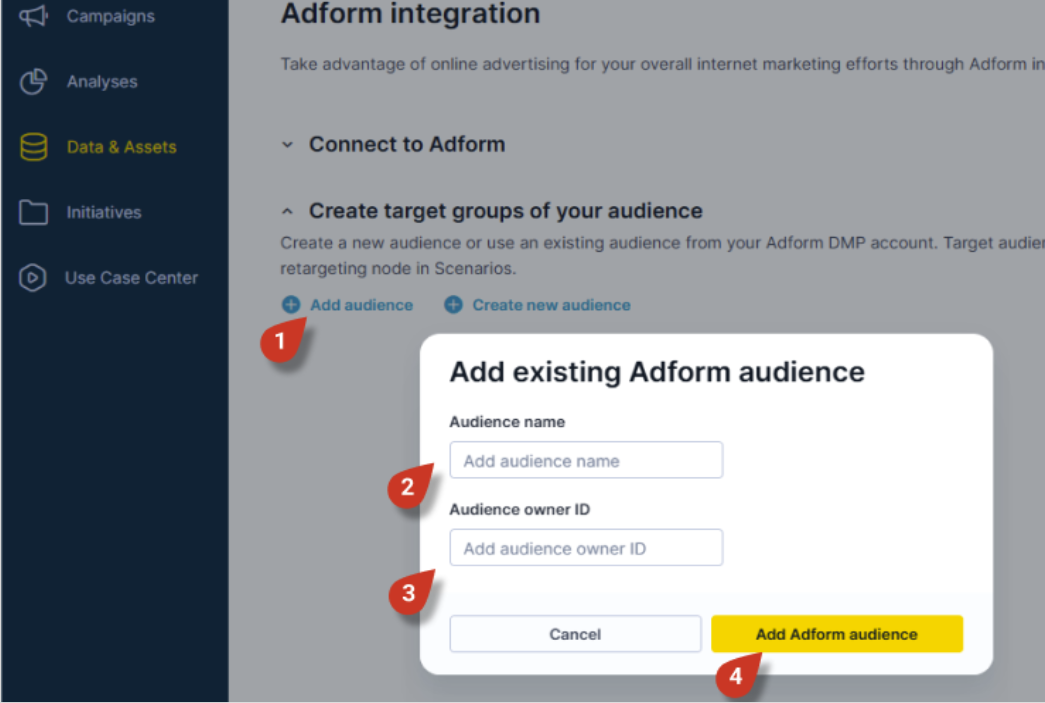
Option A: Add an existing audience
Use this when you've previously created an audience in Adform and want to populate it from Bloomreach Engagement.
-
Click Add audience.
-
Add the Audience name for future identification.
-
Enter the Audience owner ID (see Adform integration for details). This connects to an audience you've already created manually in Adform. No taxonomy file is uploaded with this option.
-
Click Add Adform audience to finish.
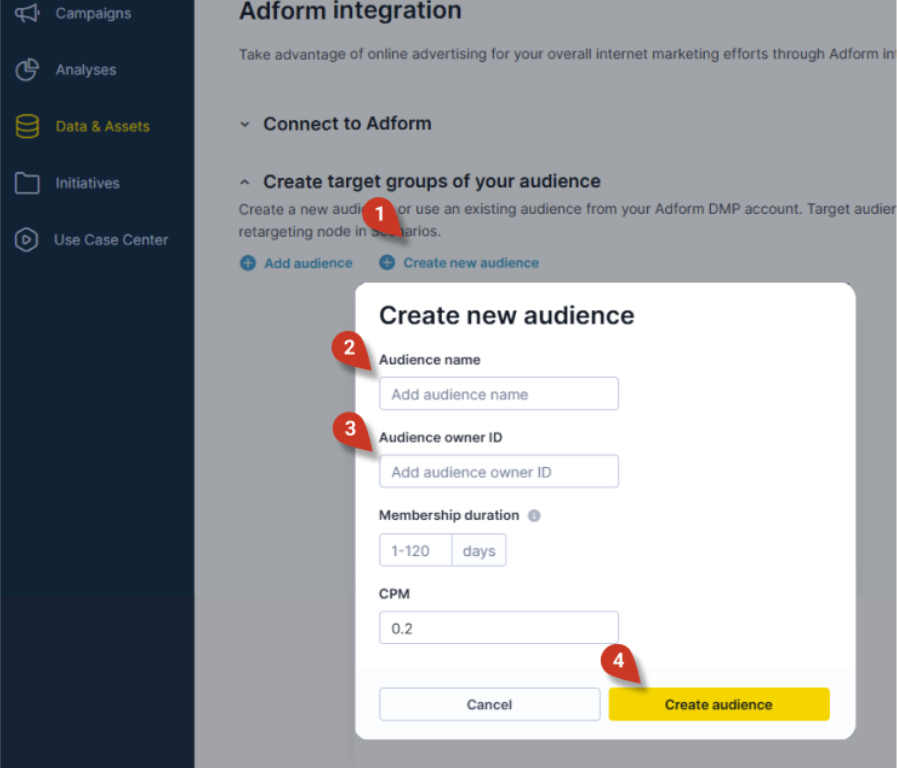
Option B: Create a new audience
Use this when building a new audience from scratch.
- Click Create new audience.
- Define the Audience name.
- Add audience Owner ID (see Adform integration for details), Membership duration, and CPM parameters.
- Click Create audience. This uploads a taxonomy file to Adform and creates a new segment.
NoteAllow 30 minutes for Adform to upload a taxonomy file to Adform and create a new segment.
Step 3: Deploy Adform matching pixel
Install the cookie-matching mechanism that synchronizes customer identifiers between platforms. The matching pixel enables Adform to recognize Bloomreach Engagement customers by synchronizing cookie IDs. Without this pixel, Adform cannot match your customer data to its advertising profiles.
Note: This step is relevant to third-party identifiers only. For first-party or MAID identifiers, skip to the integration verification (step 4).
Deploy the Pixel
-
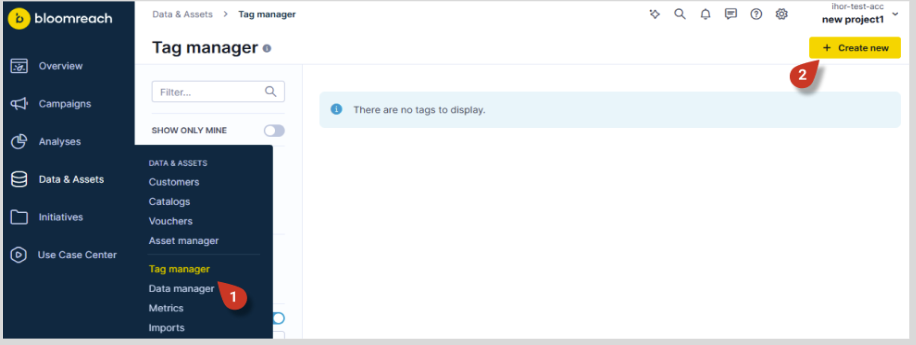
In Bloomreach Engagement, navigate to Data & Assets > Tag Manager.
-
Click + Create new at the top-right of your screen.
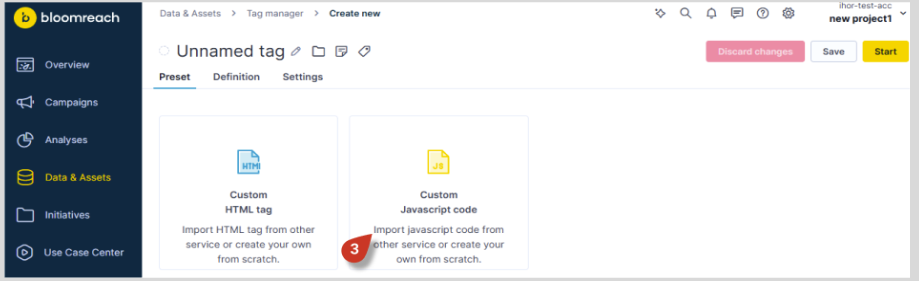
-
Select New Custom Javascript tag.
-
Copy and paste the appropriate code snippet below into the code field (multiple tenant or single tenant instance).
-
Save the changes.
NoteYou might get prompted to select a consent category first. Go to Settings tab and select the correct consent category.
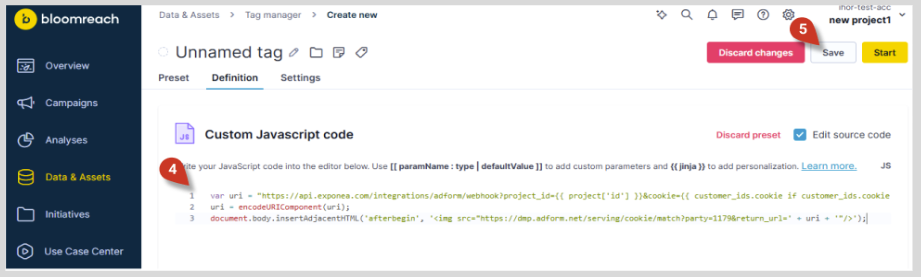
For multi-tenant instances (standard):
var uri = "https://api.exponea.com/integrations/adform/webhook?project_id={{ project['id'] }}&cookie={{ customer_ids.cookie if customer_ids.cookie is string else customer_ids.cookie | last }}&adform_uuid=__ADFUID__";
uri = encodeURIComponent(uri);
document.body.insertAdjacentHTML('afterbegin', '<img src="https://dmp.adform.net/serving/cookie/match?party=1179&return_url=' + uri + '"/>');
For single-tenant instances:
Replace https://api.exponea.com in the code above with your specific instance API endpoint (e.g., https://api-yourinstance.exponea.com) and paste it into the code field.
Verify Tag Deployment
After publishing, check your website's browser console to confirm the matching pixel fires on page load. You should see a network request to dmp.adform.net.
Step 4: Verify integration setup
Confirm the integration work correctly before operational use.
For DMP account holders:
- Log in to your Adform DMP account.
- Navigate to Audiences.
- Locate the segment you created in Bloomreach Engagement.
- Check the UIDs S2S column.
For DSP account holders:
- Log in to your Adform DSP account.
- Navigate to Audience Marketplace > Data Providers.
- Locate your DSP audience connector (named for Bloomreach Engagement integration).
- Check the UIDs Total column in the Audiences section.
What to expect:
- Initially: 0 UIDs (normal—identifier collection needs time to populate)
- After 24-48 hours: Increasing UID count as customers visit your website or app
- When you add customers via retargeting: 30-minute delay before counts update
If UIDs begin populating within 24-48 hours, your setup is complete. Proceed to the next section to begin using the integration.
NotePopulation speed varies by identifier type. Third-party identifiers populate as customers visit your website. First-party and MAID identifiers populate as you send customer data to Bloomreach.
Additional resources
Bloomreach Engagement documentation
- Scenario Building Guide — Comprehensive guide to creating scenario logic
- Tag Manager Guide — Managing custom tags and tracking pixels