

Location-based social proof banner


Use case description
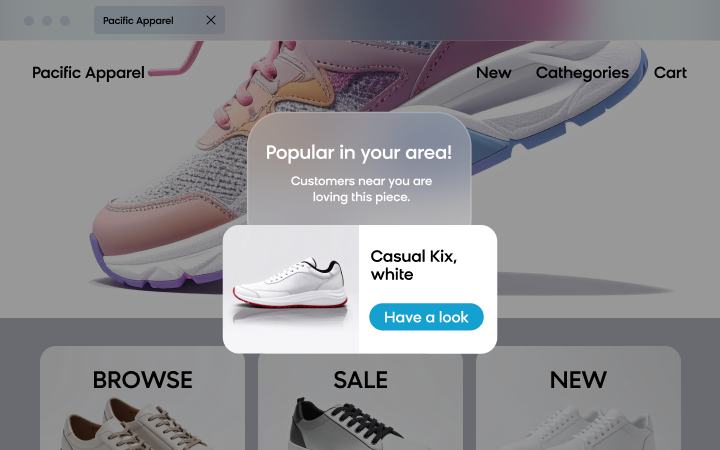
This use case displays a social proof banner showing "Someone in [City] just bought this item" on product detail pages when another customer from a similar location recently purchased the same product. This solution leverages the psychological principle of social proof to increase conversion rates by showing customers that others in their area are buying the product.
Key features
- Displays location-based purchase activity: Shows real-time data when customers from similar locations purchase products
- Increases urgency and trust: Creates psychological validation through local social proof
- Helps recover potential lost sales: Converts hesitant shoppers by demonstrating local demand
- Promotes a personalized shopping experience: Adapts to your product page layout and branding with customizable display settings
Use case items
With this use case, you'll get:
- Location Social Proof Banner: A banner appears on product detail pages if another customer from the same location has purchased the product recently, driving urgency and increasing conversion rates
- Banner trigger: Custom JavaScript code to trigger the banner on product pages
- Definitions and report: Required data structures for weblayer functionality
- Custom evaluation dashboard: Tools to measure banner performance
How to deploy the use case
After downloading the use case, follow these steps.
Meet the requirements
Check if the data in your project meets the requirements. The Use Case Center lists requirements for each use case during the deployment process.
Understand the use case logic
The system displays a weblayer banner when customers visit product detail pages and another customer from a similar location recently purchased the same product. The banner uses real-time location and purchase data to create localized social proof.
Step-by-step scenario setup:
- Customer visits product page: Triggers the location-based social proof banner system
- Location and purchase check: Queries the Just Bought Location Report for matching product ID and customer location
- Location matching: Compares current customer's city (from session_start) with cities where the product was recently purchased
- A/B test execution: Randomly assigns visitors to see banner (Variant A - 80%) or not (Control Group - 20%)
- Banner display: Shows overlay banner with "Someone in [City] just bought this item"
- Conversion tracking: Tracks whether banner influences purchase behavior
Only products in the Just Bought Location Report will display the banner, and only when location criteria are met.
Adjust the use case
Now that you understand the use case logic, you can set up the use case according to your needs.
Banner settings
Access the banner Settings tab to adjust banner settings.
Configuration notes:
- Design > Settings: Not relevant since banner runs on the tag. Set audience settings on the tag instead.
- Design > A/B test: Update the default 80:20 split. Goal is to compare conversion rates between Variant A and Control Group.
ImportantWhen a weblayer runs via a tag in Bloomreach, audience settings must be configured in the tag, not in the banner itself. The tag controls which customers see the weblayer.
Design and copy
Customize banner visuals and copy to reflect your brand identity. Open the banner use case and find the panel with adjustable parameters.
Design > Editor > Visual (parameters) editor
Depending on your preferences, you might want to change:
- Background Color: The color of the banner background
- Banner Hide Delay in Milliseconds: Time in milliseconds after which the banner disappears
- Banner Show Delay in Milliseconds: Time in milliseconds that the customer must stay on page before the banner is shown
- Close Button Color: Color of the close button 'x' in the top right corner
- Notification Text Before: The displayed text before the automatically pulled-in city name (example: "Someone in London just bought this item")
- Notification Text After: The displayed text after the automatically pulled-in city name (example: "Someone in London just bought this item")
- Notification Text Color: The text color of the notification message
- Class Name: Name of the class of the element that holds the product image
- Product View Report ID: This parameter should contain the report ID of report '[WJBL] Just bought Location Report [data for weblayer]'
- Position: Top Offset/Left Offset: Set where the weblayer should be displayed on the page
ImportantDo not change the JavaScript code of the weblayer. It is currently set up to display the weblayer if the
cityvalue from the customer's lastsession_startmatches thecitytracked in the lastsession_startbefore thepurchase_itemwith the sameproduct_idas the product displayed on the website.
To adjust basic CSS styling (colors, padding, background), use parameters or click <> to access HTML/CSS/JS code directly.
Product image container configuration
Product Image Container Class Name: Identify the class name of the element holding the product image. The weblayer will be added on top of your product image.
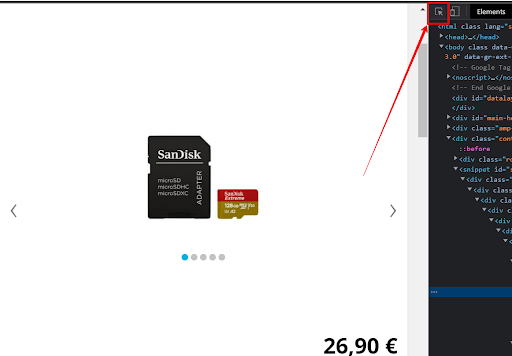
To find the class name:
- Open your product detail page
- Right-click and select Inspect
- Open Elements and find the button for "Select an element in the page to inspect it"
- Click the button, then click on the product image on your site
- This highlights the element in the code
- Select the element directly above the highlighted piece of code
- Identify the class of that element in the row above the highlighted code
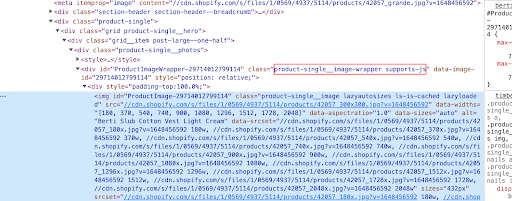
Example: If you find product-single__image-wrapper supports-js, set this as your Class Name parameter.
To adjust basic CSS styling: Use parameters or click <> to access HTML/CSS/JS code directly.
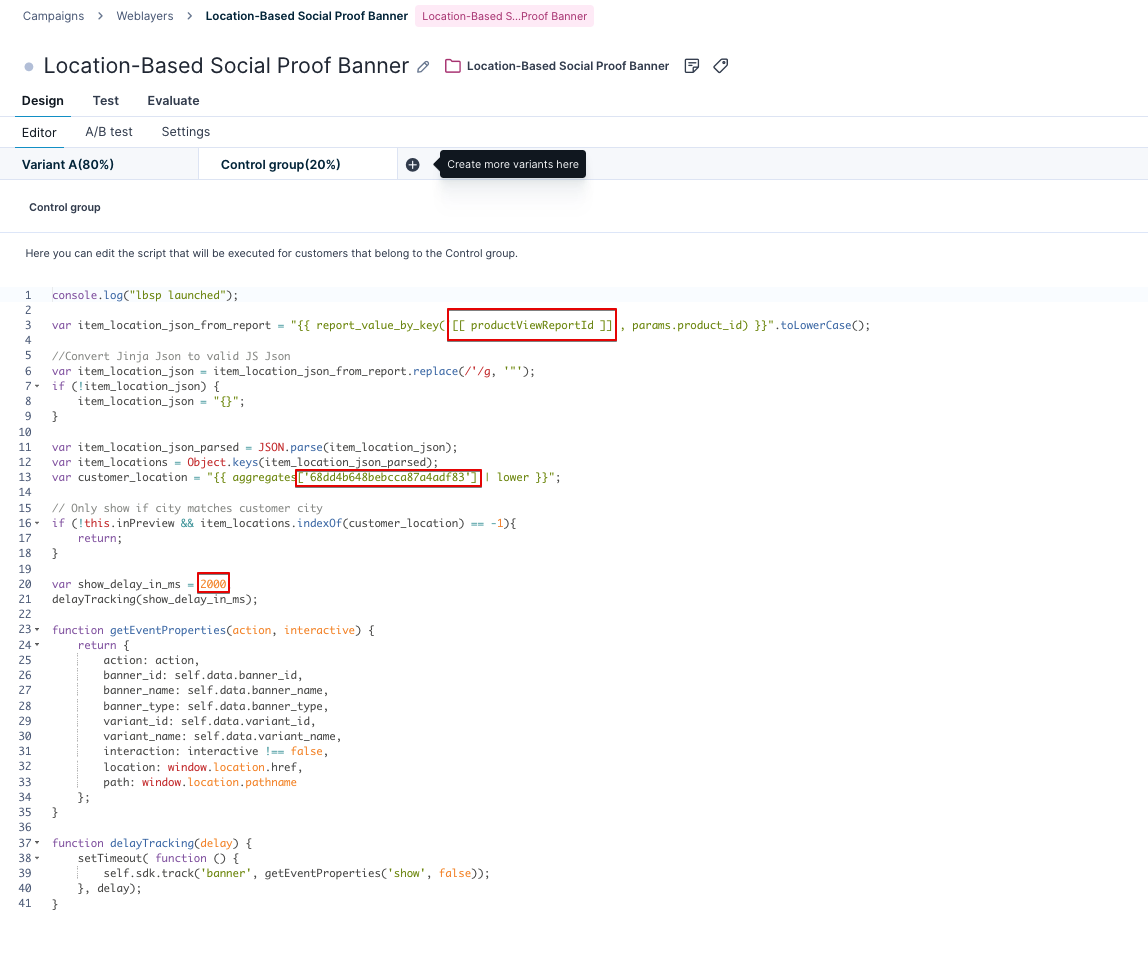
Control group weblayer customization
Design > Control Group
When using A/B testing, you must adjust the highlighted values in the Control Group code:
- report_value_by_key (line 3): Set to the same ID as your 'Product View Report ID' parameter used in Variant A
- aggregates (line 13): Must reflect the aggregate '[WJBL] Last session_start city'
- show_delay_in_milliseconds (line 20): Set to the same value as Variant A
Make sure these values match your Variant A configuration to ensure proper A/B test evaluation.
Just Bought Location Report configuration
Check the Just bought Location Report [data for weblayer]' report:
This report returns the product IDs of recently purchased items and the city tracked in the session_start preceding each purchase.
Configuration steps:
- Timeframe adjustment: By default, it's set to 24 hours. You can adjust this to your needs
- Time frame setting: Make sure you set it to 'relative' time frame
- Data validation: Verify that your data is populated correctly, especially check the data schema for "rows" to confirm the product_id is correctly identified
The report serves as the data source for determining which products show the location-based banner and for which cities.
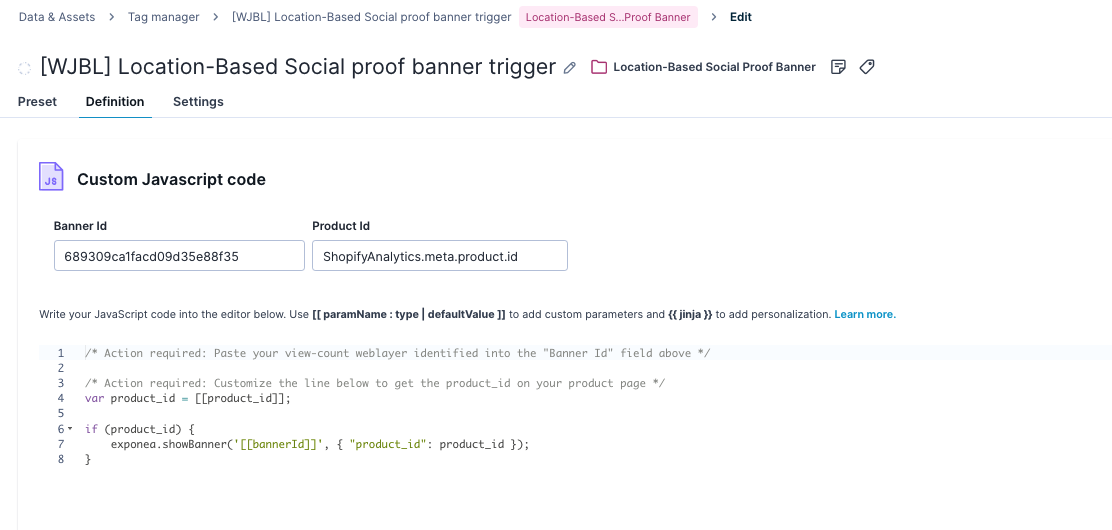
Location-Based Social proof banner trigger setup
Open the tag '[WJBL] Just Bought Location-Based Social proof banner trigger' and adjust these parameters:
Banner ID: Enter the correct Banner ID for the weblayer "[WJBL] Just Bought Location-Based Social proof banner" in this initiative. Find the ID in the URL of the weblayer after opening it.
Product ID From Product Page: Add the code piece that identifies the product ID on your website's product page. You can get (or "parse") the product_id either from the URL or as a JavaScript variable.
Typically, the product ID is found in dataLayer, in the "productDetail" object. This is often used for Google Analytics and follows a pre-defined structure. In that case, you can use this code:
dataLayer.find(item => item.event === 'productDetail').ecommerce.detail.products[0].id
To check the dataLayer structure:
- Open the product detail page
- Right-click and select Inspect
- Open Console
- Type
dataLayerand press Enter - This lists objects in the dataLayer where you can manually verify the structure
Note: If your product detail object is named differently (for example, "productDetailImpression" instead of "productDetail"), or has different contents (for example, no ecommerce object, different name), you will need to rename these values in the code.
Settings configuration:
- Fire on: Make sure this only contains product page URLs (for example, Page URL containing
/products/) - Audience filter: Set up here, not in the banner, as these settings will be applied. Don't delete the current condition in the filter. However you can add more filters to narrow down the audience.
Test and run the use case
Test a use case before deploying it. Testing ensures you don't send unfinished or imperfect campaigns to your customer base.
Testing steps:
-
Start the trigger: Launch the trigger code in Tag Manager. Don't start the weblayer separately, as it's already invoked from the trigger code in the tag.
-
Set up test conditions: Go to Tag Manager Settings and in 'Audience' select 'Customers who...'. Filter only the testers (for example, by filtering by cookie).
-
Test in real conditions: Verify the weblayer displays correctly on product pages meeting your location and purchase criteria.
-
Configure the banner: Once you're satisfied with testing results, configure the weblayer to match desired display settings in the Settings tab and click Save.
-
Launch: Open the Trigger and if everything is set correctly, click Start to launch the weblayer.
ImportantDon't click Start on the banner itself, since it's triggered via 'Location Based Social proof banner trigger'.
Other resources
Learn how to enhance and optimize the banner performance with different tips and tricks from Bloomreach experts.
Additional documentation:
- View count banner - public documentation
Updated 3 months ago