

Optimal send time in scenarios and campaigns
When you run a campaign or scenario, every customer receives the message at the same scheduled time — regardless of when they're most likely to engage. Optimal send time changes that: the platform delays each customer's message until their personal peak engagement hour, calculated from their own campaign history. Delivery timing runs automatically, with no extra segmentation or manual scheduling required.
Built-in vs. standalone optimal send time predictions
Bloomreach has 2 separate optimal send time features that serve different purposes:
- Built-in optimal send time (available in the scenarios Wait node and campaigns Schedule setting) uses self-contained logic to calculate and apply optimal timing automatically. It can't reference or select saved prediction templates from Analyses > Predictions. See
- Standalone optimal send time predictions (Analyses > Predictions) calculate optimal send time and store the result as an attribute on each customer's profile. Use this attribute for segmentation, filtering, reporting, and dynamic wait times in scenarios via Jinja.
If you use custom events or webhooks (for example, custom SMS or custom push), built-in optimal send time can't analyze those events. Create a standalone optimal send time prediction using the Other channel option, map your custom events manually, then use the resulting profile attribute to drive timing in your scenario.
Optimal send time objective and packaging
Optimal send time optimizes for clicks by default. The previous "optimize for open vs. click" selector has been removed because open event data can be unreliable. When click data is insufficient, optimal send time falls back to opens.
In scenarios, optimal send time can be calculated per messaging channel (email, SMS, MMS, RCS, push, or all channels). The channel selector in the wait node requires the Loomi Journey Orchestration package. Without it, the Wait node defaults to all-channel behavior—using engagement data across all channels.
Send strategy
The send strategy controls how the system handles timing when a customer's optimal send time falls outside your campaign window. Choose based on whether you need a hard delivery deadline or a flexible window.
| Use | When |
|---|---|
| Send within a time window | You want to limit how long a customer waits, but don't need delivery by a specific clock time. |
| Send before a specific local time | You need a hard deadline — each customer must receive the message before a set time, in their own time zone by default. |
Send within a time window
Use this when you want to set a maximum wait time rather than a specific delivery deadline. For example, a daily newsletter scheduled for 10 AM with a 12-hour maximum wait reaches each customer at their preferred time, but no later than 10 PM.
The message is sent:
- At the customer's best time within that window.
- Immediately, if no better time exists within the window.
- Immediately, if the best time has already passed.
Send before a specific local time
Use this to guarantee delivery before a fixed local time — for example, a daily promotion that must arrive before 20:00.
To configure:
- Set a "send before" time, for example,
20:00. - Configure a default time zone.
Use customer profile time zone when available is enabled by default to respect each customer's own time zone. Disable it to apply a single time zone across all customers instead.
The message is sent:
- At the customer's best time before the deadline.
- Immediately, if the best time has passed.
- At the deadline, if no earlier time is available.
Configure optimal send time for scenarios
NotePrefer a video walkthrough? Watch How to configure optimal send time in scenarios.
- Go to Campaigns > Scenarios, click + New scenario, and continue with + Create scenario.
- Configure your scenario.
- In the Nodes list, scroll down to Operator and add the Wait node.
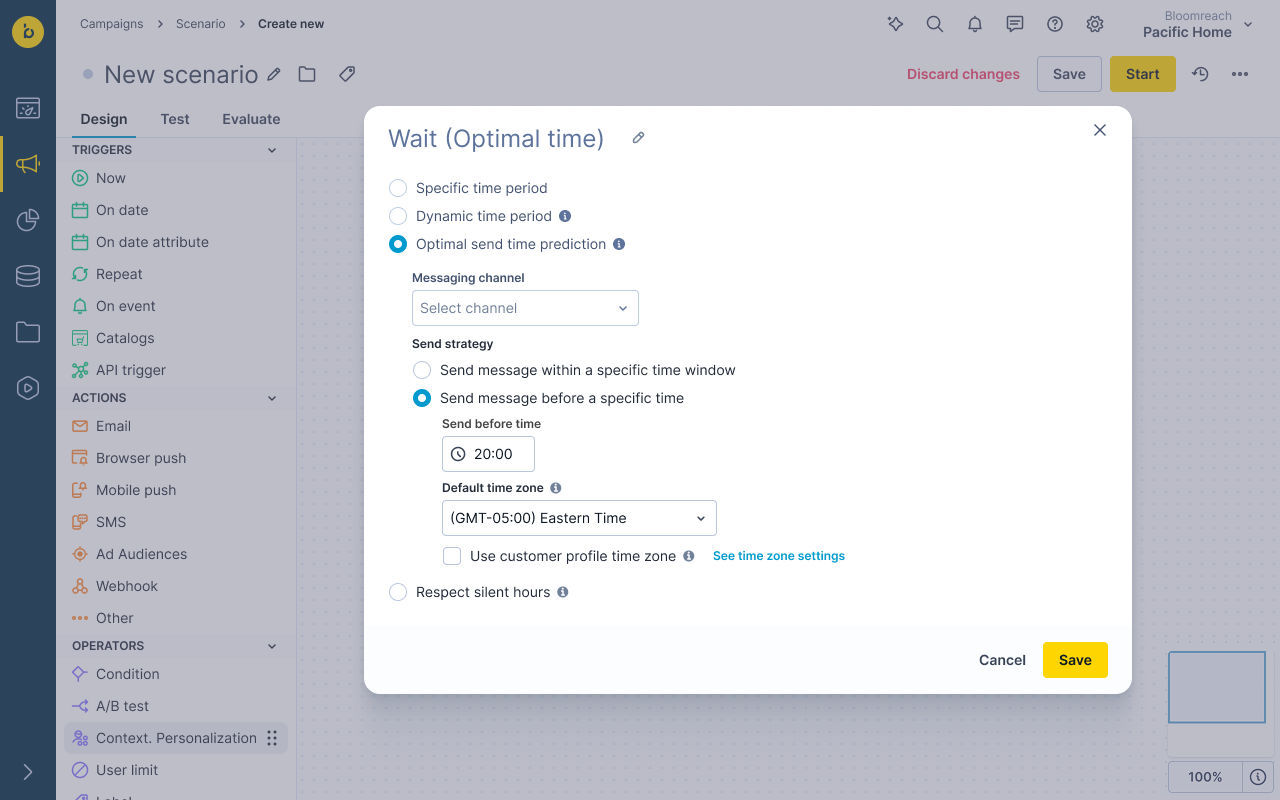
- Double-click the Wait node, select Optimal send time prediction. This uses built-in optimal send time logic — it doesn't reference saved prediction templates from Analyses > Predictions. Select the messaging channel to determine which campaign data is used to calculate optimal send time. The messaging channel selector requires the Loomi Journey Orchestration package — without it, optimal send time uses all-channel data by default.
- SMS / MMS / RCS
- Push / mobile channels
- All channels — uses engagement data across all campaign channels
- Select the send strategy from the following:
- Send within a specific time window: Sets the maximum wait time.
- Send before a specific time: Sets a "send before" time and a default time zone. You can also enable Use customer profile time zone.
- Save and Start your scenario.
How to configure optimal send time in scenarios
Configure optimal send time for campaigns
- Go to Campaigns > Email or SMS Campaigns, click + New Email/SMS Campaign.
- Select a template or continue with a blank one.
- Configure your campaign.
- Go to the Settings tab.
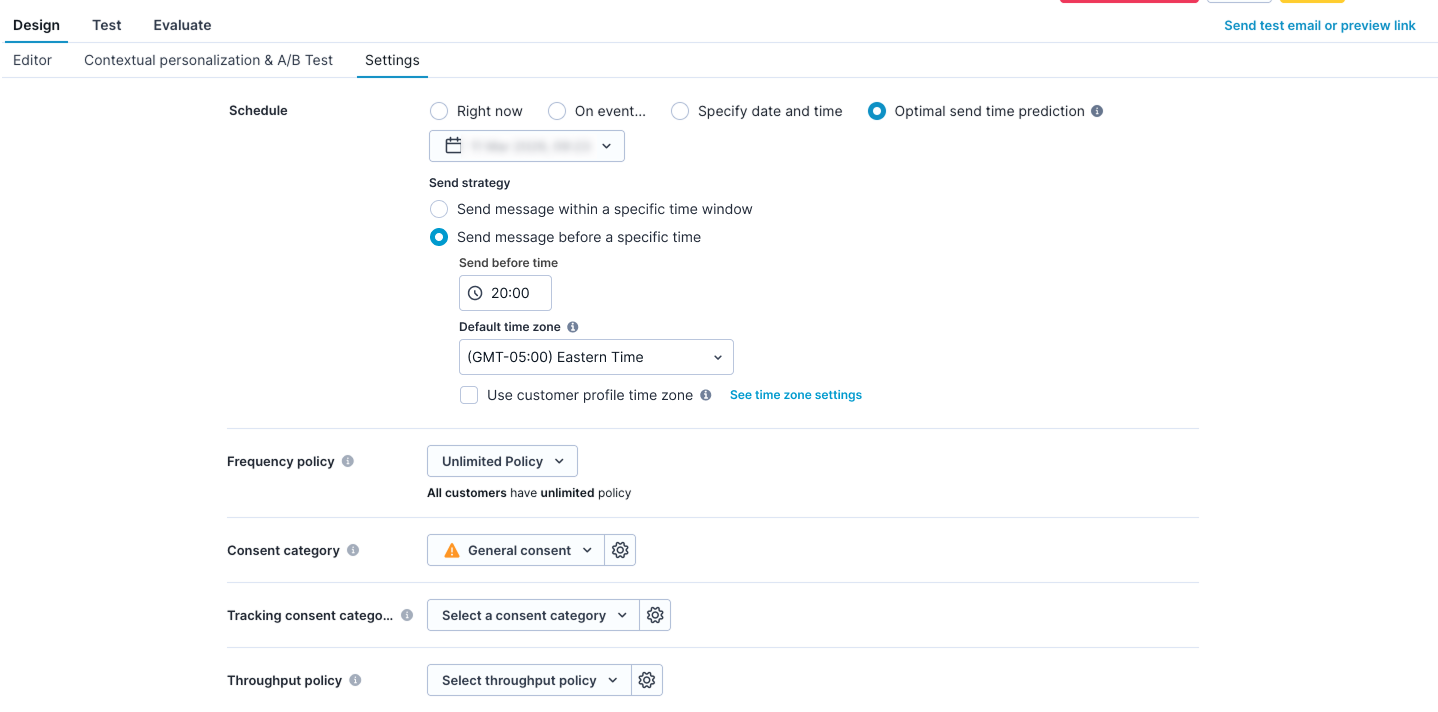
- For the Schedule setting, select Optimal send time prediction.
- Select your send strategy. Enable Use customer profile time zone to send at the right local time for each customer. If a customer's time zone isn't set in their profile, the default time zone applies
- Save and Start your campaign.
Evaluate optimal send time A/B testing
To see how optimal send time performs against a fixed send time, build a two-step funnel that compares click-through rate between your control and optimal send time variants.
- Create a funnel with two steps. For the first step, select the campaign event that records the split, filter to the same campaign used in your scenario, and set the action type to
split. This identifies everyone who entered one of the test variants. - Add a second step for the same campaign. Keep the campaign name the same and set the status to
clicked. This measures how many people progressed from the split to a click. - Save the funnel, then break down the results by the
variantevent property from step one. This splits the data into the control group and the optimal send time group. - Compare conversion from step one to step two, setting step one as the start and step two as the goal. The table shows the click-through rate for each variant along with the confidence level.
As with any A/B test, ensure you have a large enough audience and give the test enough time for the goal event to happen before drawing conclusions.
Related articles
Prediction use cases: Explore real-world examples of how predictions can personalize customer experiences and drive engagement.
Updated about 2 months ago